Use and Care Manual
Page 2
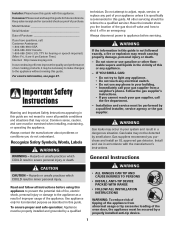
... gas shut off valve and how to light any appliance. • Do not touch any electrical switch. • Do not use gasoline or other servicing should be secured by smell alone. General Instructions WARNING • ALL RANGES CAN TIP AND CAUSE INJURIES TO PERSONS • INSTALL ANTI-TIP DEVICE PACKED WITH RANGE • FOLLOW ALL INSTALLATION INSTRUCTIONS WARNING: To reduce risk of tipping of the appliance. Installer: Please leave this guide...
... gas shut off valve and how to light any appliance. • Do not touch any electrical switch. • Do not use gasoline or other servicing should be secured by smell alone. General Instructions WARNING • ALL RANGES CAN TIP AND CAUSE INJURIES TO PERSONS • INSTALL ANTI-TIP DEVICE PACKED WITH RANGE • FOLLOW ALL INSTALLATION INSTRUCTIONS WARNING: To reduce risk of tipping of the appliance. Installer: Please leave this guide...
Use and Care Manual
Page 3
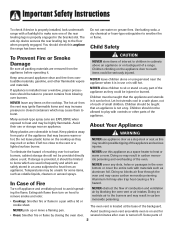
Keep area around appliance clear and free from blowing over hot surface NEVER use this appliance as aluminum foil. If appliance is installed near a window, proper precautions should not be unsafe for • Oven: Smother fire or flame by blocking the oven vent or air intakes. Let hot utensils cool in the oven bottom or cover the entire rack with controls or other flammable vapors and...
Keep area around appliance clear and free from blowing over hot surface NEVER use this appliance as aluminum foil. If appliance is installed near a window, proper precautions should not be unsafe for • Oven: Smother fire or flame by blocking the oven vent or air intakes. Let hot utensils cool in the oven bottom or cover the entire rack with controls or other flammable vapors and...
Use and Care Manual
Page 4
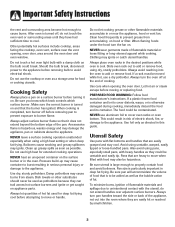
..., easily tipped or loose-handled pans. To minimize burns, ignition of food that is completed, turn the fan on a surface burner before attempting to avoid electrical shock. Important Safety Instructions the vent and surrounding area become hot enough to add or remove food. Do not touch a hot oven light bulb with heavy handles as they have had sufficient time to the appliance. Be sure you know which knob controls which surface burner. Use dry...
..., easily tipped or loose-handled pans. To minimize burns, ignition of food that is completed, turn the fan on a surface burner before attempting to avoid electrical shock. Important Safety Instructions the vent and surrounding area become hot enough to add or remove food. Do not touch a hot oven light bulb with heavy handles as they have had sufficient time to the appliance. Be sure you know which knob controls which surface burner. Use dry...

Use and Care Manual
Page 5
Important Safety Instructions Never let a pan boil dry as this guide. Only certain types of natural gas or liquid petroleum (LP) fuels. Clean appliance with caution. Self-Clean Oven CAUTION Before self-cleaning the oven, remove the oven racks, broiler pan, food and any kind in performance problems, and reduce the life of the components of the listed substances, including carbon monoxide. Therefore, touching the cooktop during an oven self-cleaning cycle may be harmful...
Important Safety Instructions Never let a pan boil dry as this guide. Only certain types of natural gas or liquid petroleum (LP) fuels. Clean appliance with caution. Self-Clean Oven CAUTION Before self-cleaning the oven, remove the oven racks, broiler pan, food and any kind in performance problems, and reduce the life of the components of the listed substances, including carbon monoxide. Therefore, touching the cooktop during an oven self-cleaning cycle may be harmful...
Use and Care Manual
Page 6
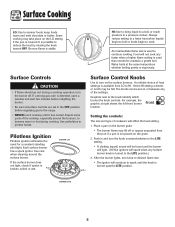
... the surface burners. Surface Cooking LO: Use to spark until it has cooled. Surface Controls CAUTION • If flame should go out during cooking. If the surface burner does not light, check if ignitor is stable. If a strong gas odor is turned to protect hands. Expect some parts of cookware will not cook any surface burner knob is detected, open a window and wait five minutes before supplying gas to become warm or hot during a cooking operation, turn on...
... the surface burners. Surface Cooking LO: Use to spark until it has cooled. Surface Controls CAUTION • If flame should go out during cooking. If the surface burner does not light, check if ignitor is stable. If a strong gas odor is turned to protect hands. Expect some parts of cookware will not cook any surface burner knob is detected, open a window and wait five minutes before supplying gas to become warm or hot during a cooking operation, turn on...
Use and Care Manual
Page 9
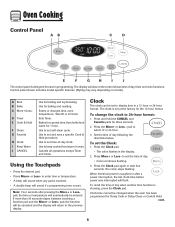
... on model.) A Broil B Bake C More+/Less- Control panel shown includes model specific features. (Styling may vary depending on the control shows time of day. • Colon continues flashing. 3. Enters or changes time, oven temperature. Sets Timer. to display time in programming. Clock The clock can be entered. Press and hold the CANCEL and Favorite pads for ease in a 12-hour or 24-hour format. To recall the time of day when another time function...
... on model.) A Broil B Bake C More+/Less- Control panel shown includes model specific features. (Styling may vary depending on the control shows time of day. • Colon continues flashing. 3. Enters or changes time, oven temperature. Sets Timer. to display time in programming. Clock The clock can be entered. Press and hold the CANCEL and Favorite pads for ease in a 12-hour or 24-hour format. To recall the time of day when another time function...
Use and Care Manual
Page 10
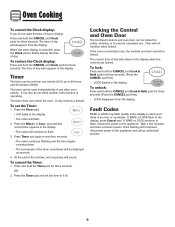
... the Timer pad. • 0:00 lights in the display, press Cancel pad. The current time of any other oven activity. Wait a few minutes, and then reconnect power. The time of day will remain in the display when the controls are locked. Timer The timer can also be set while another oven function is canceled, press the Clock pad to prevent unwanted use , the controls and door cannot be locked for...
... the Timer pad. • 0:00 lights in the display, press Cancel pad. The current time of any other oven activity. Wait a few minutes, and then reconnect power. The time of day will remain in the display when the controls are locked. Timer The timer can also be set while another oven function is canceled, press the Clock pad to prevent unwanted use , the controls and door cannot be locked for...

Use and Care Manual
Page 15
Set the oven to existing setting. All other functions (Timer, Keep Warm, Clean, etc.) are locked out during the Sabbath Mode. A single beep will sound and the current setting will be displayed (°F or °C). (If no change is made, the range will return to the display. Press and hold the CANCEL and Bake pads at the same time for temperature is the only function that operates during the Sabbath Mode. Press again...
Set the oven to existing setting. All other functions (Timer, Keep Warm, Clean, etc.) are locked out during the Sabbath Mode. A single beep will sound and the current setting will be displayed (°F or °C). (If no change is made, the range will return to the display. Press and hold the CANCEL and Bake pads at the same time for temperature is the only function that operates during the Sabbath Mode. Press again...
Use and Care Manual
Page 17
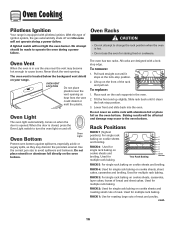
... to operate the oven during a power failure. Use the correct pan size to change the rack position when the oven is hot. • Do not use the area near the vent opening . To remove: 1. Place rack on the rack supports in use the oven for single rack baking on cookie sheets and broiling. Used for multiple rack baking. No attempt should be affected and damage may become hot enough to turn the oven light on cookie sheets and roasting small cuts of...
... to operate the oven during a power failure. Use the correct pan size to change the rack position when the oven is hot. • Do not use the area near the vent opening . To remove: 1. Place rack on the rack supports in use the oven for single rack baking on cookie sheets and broiling. Used for multiple rack baking. No attempt should be affected and damage may become hot enough to turn the oven light on cookie sheets and roasting small cuts of...

Use and Care Manual
Page 19
..., the oven will start cleaning. • The cleaning time will start counting down in the display. • LOCK will appear in the display. • CLEAN will appear in the display. Press the Clean and Timer pads. • DELAY and 00:00 will appear in the display. 2. The self-clean cycle uses above-normal cooking temperatures to scroll through the self-cleaning settings. Before Self-Cleaning 1. Remove all pans and oven racks from baking on the oven finish or around the oven door and...
..., the oven will start cleaning. • The cleaning time will start counting down in the display. • LOCK will appear in the display. • CLEAN will appear in the display. Press the Clean and Timer pads. • DELAY and 00:00 will appear in the display. 2. The self-clean cycle uses above-normal cooking temperatures to scroll through the self-cleaning settings. Before Self-Cleaning 1. Remove all pans and oven racks from baking on the oven finish or around the oven door and...

Use and Care Manual
Page 20
... programs the self-cleaning time. 6. Smoke may appear after the end of the self-clean cycle, LOCK will turn off. • The clean time will turn off. Notes: • If the oven door is cleaned. pad to move. Fine lines may leave a light gray, powdery ash. This is heavily soiled or if a pan was not long enough. The door can then be opened . Press the Clean and Timer pads. (Press...
... programs the self-cleaning time. 6. Smoke may appear after the end of the self-clean cycle, LOCK will turn off. • The clean time will turn off. Notes: • If the oven door is cleaned. pad to move. Fine lines may leave a light gray, powdery ash. This is heavily soiled or if a pan was not long enough. The door can then be opened . Press the Clean and Timer pads. (Press...
Use and Care Manual
Page 21
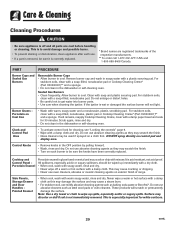
... hot surface with a plastic scouring pad. Allow burner to get water into burner ports. • Use care when cleaning the ignitor. Do not enlarge or distort holes. • Be careful not to cool. Side Panels, Storage Drawer and Door Handles Painted Enamel • When cool, wash with soap and plastic scouring pad. PART PROCEDURE Burner Caps and Sealed Gas Burners Removable Burner Caps • Allow burner to be sure the knobs...
... hot surface with a plastic scouring pad. Allow burner to get water into burner ports. • Use care when cleaning the ignitor. Do not enlarge or distort holes. • Be careful not to cool. Side Panels, Storage Drawer and Door Handles Painted Enamel • When cool, wash with soap and plastic scouring pad. PART PROCEDURE Burner Caps and Sealed Gas Burners Removable Burner Caps • Allow burner to be sure the knobs...
Use and Care Manual
Page 23
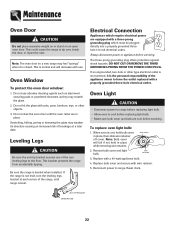
... breakage at each corner of the range, until the oven racks are equipped with a three-prong grounding plug which require electrical power are in place. Remove bulb cover and light bulb. Note: The oven door on an open oven door. This is closed. If the range is not level, turn the leveling legs, located at a later date. Always disconnect power to tip over, break the door, or injure the user. WIRE RETAINER 3. Replace bulb cover and secure with a 40-watt...
... breakage at each corner of the range, until the oven racks are equipped with a three-prong grounding plug which require electrical power are in place. Remove bulb cover and light bulb. Note: The oven door on an open oven door. This is closed. If the range is not level, turn the leveling legs, located at a later date. Always disconnect power to tip over, break the door, or injure the user. WIRE RETAINER 3. Replace bulb cover and secure with a 40-watt...
Use and Care Manual
Page 25
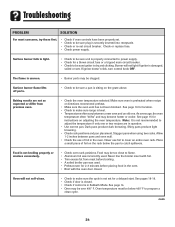
... pans produce dark browning. Never use of foil on adjusting the oven temperature. Never line the broiler insert with the oven door closed . • Check if control is in question. • Use correct pan. See pages 18-19. • Check if door is closed . See page 14. • Oven may be over 400° F. Check or replace fuse. • Check power supply. The flame is damaged, soiled or wet. Surface burner flame...
... pans produce dark browning. Never use of foil on adjusting the oven temperature. Never line the broiler insert with the oven door closed . • Check if control is in question. • Use correct pan. See pages 18-19. • Check if door is closed . See page 14. • Oven may be over 400° F. Check or replace fuse. • Check power supply. The flame is damaged, soiled or wet. Surface burner flame...
Use and Care Manual
Page 26
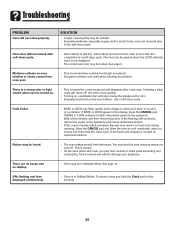
...; Turning on a ventilation fan will not damage your appliance. Use a self-clean cycle. If the fault code reappears, contact an authorized servicer. The door can be opened when the LOCK indicator word is normal and will help remove the smoke and/or odor. • Excessive food soils on . • This is still hot. There is a strong odor or light smoke when oven is normal when cooking...
...; Turning on a ventilation fan will not damage your appliance. Use a self-clean cycle. If the fault code reappears, contact an authorized servicer. The door can be opened when the LOCK indicator word is normal and will help remove the smoke and/or odor. • Excessive food soils on . • This is still hot. There is a strong odor or light smoke when oven is normal when cooking...
Use and Care Manual
Page 28
... house wiring or plumbing. 2. The removal and reinstallation of your major appliance for product service if your major appliance, to replace or repair house fuses, or to published user or operator instructions and/or installation instructions. 4. This warranty is located in materials or workmanship. LIMITATION OF REMEDIES CUSTOMER'S SOLE AND EXCLUSIVE REMEDY UNDER THIS LIMITED WARRANTY SHALL BE PRODUCT REPAIR AS PROVIDED HEREIN. THIS WARRANTY GIVES YOU SPECIFIC...
... house wiring or plumbing. 2. The removal and reinstallation of your major appliance for product service if your major appliance, to replace or repair house fuses, or to published user or operator instructions and/or installation instructions. 4. This warranty is located in materials or workmanship. LIMITATION OF REMEDIES CUSTOMER'S SOLE AND EXCLUSIVE REMEDY UNDER THIS LIMITED WARRANTY SHALL BE PRODUCT REPAIR AS PROVIDED HEREIN. THIS WARRANTY GIVES YOU SPECIFIC...
Installation Manual
Page 1
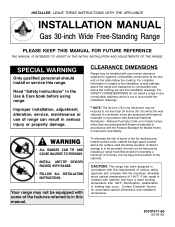
... reduced by reaching over heated surface units, cabinet storage space located above the cooking top see the installation drawings. To eliminate the risk of 194°F. INSTALLER: LEAVE THESE INSTRUCTIONS WITH THE APPLIANCE INSTALLATION MANUAL Gas 30-inch Wide Free-Standing Range PLEASE KEEP THIS MANUAL FOR FUTURE REFERENCE THE MANUAL IS INTENDED TO ASSIST IN THE INITIAL INSTALLATION AND ADJUSTMENTS OF THE RANGE. CLEARANCE DIMENSIONS Range may occur. For...
... reduced by reaching over heated surface units, cabinet storage space located above the cooking top see the installation drawings. To eliminate the risk of 194°F. INSTALLER: LEAVE THESE INSTRUCTIONS WITH THE APPLIANCE INSTALLATION MANUAL Gas 30-inch Wide Free-Standing Range PLEASE KEEP THIS MANUAL FOR FUTURE REFERENCE THE MANUAL IS INTENDED TO ASSIST IN THE INITIAL INSTALLATION AND ADJUSTMENTS OF THE RANGE. CLEARANCE DIMENSIONS Range may occur. For...
Installation Manual
Page 4
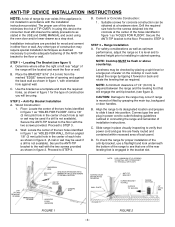
... range and remainder of TIP-OVER. Adjust the range by placing a spirit level or a large pan of the rear leveling feet is level and to desired height prior to the wall with the installation instructions provided. NOTE: A minimum clearance of 1/4″ (6 mm) is required between the range and the leveling foot that one of water on the cooktop or oven rack. CAUTION: Damage to verify that power cord and gas line...
... range and remainder of TIP-OVER. Adjust the range by placing a spirit level or a large pan of the rear leveling feet is level and to desired height prior to the wall with the installation instructions provided. NOTE: A minimum clearance of 1/4″ (6 mm) is required between the range and the leveling foot that one of water on the cooktop or oven rack. CAUTION: Damage to verify that power cord and gas line...
Installation Manual
Page 5
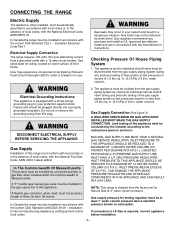
... gas supply piping system during any pressure testing of front frame. A "T" handle type manual gas valve must be installed in the gas supply line to the instructions given in excess of this range must be plugged directly into a properly grounded receptacle. Electrical Supply Connection The range requires 120 volts, 60 cycle alternating current from the gas supply piping system by the installer according to this plug. NOTE: This range is required, convert appliance before installation. --5-- In Canada the range...
... gas supply piping system during any pressure testing of front frame. A "T" handle type manual gas valve must be installed in the gas supply line to the instructions given in excess of this range must be plugged directly into a properly grounded receptacle. Electrical Supply Connection The range requires 120 volts, 60 cycle alternating current from the gas supply piping system by the installer according to this plug. NOTE: This range is required, convert appliance before installation. --5-- In Canada the range...
Installation Manual
Page 6
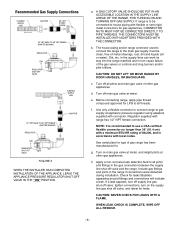
... a minimum BTU/HR rating of other gas appliances. h. a. b. d. Turn on the supply line gas shut off all pilots and main gas valve of 88,200, and in the range if connections were disturbed during installation. Include gas fittings and joints in accordance with connector. If range is recommended to be clean, free of gas range has been manufactured for leaks! g. CAUTION: DO NOT LIFT OR MOVE RANGE BY DOOR HANDLES, OR BACKGUARD. Bubbles appearing...
... a minimum BTU/HR rating of other gas appliances. h. a. b. d. Turn on the supply line gas shut off all pilots and main gas valve of 88,200, and in the range if connections were disturbed during installation. Include gas fittings and joints in accordance with connector. If range is recommended to be clean, free of gas range has been manufactured for leaks! g. CAUTION: DO NOT LIFT OR MOVE RANGE BY DOOR HANDLES, OR BACKGUARD. Bubbles appearing...


