Use and Care Guide
Page 1
...Surface Cooking 5-7 Surface Controls Sealed Gas Burners Oven Cooking 8-17 Baking Cook & Hold Delay Cook & Hold Keep Warm Broiling Sabbath Mode Favorite Oven Racks Form No. Gas - Precision Touch Control 700 ® Use & Care Guide Table of Gas Appliance Troubleshooting 24-25 Warranty ...& Service 27 Guide d'utilisation et d'entretien 28 Guía de Uso y Cuidado 56 ©2006 Maytag Appliances Sales Co. ...
...Surface Cooking 5-7 Surface Controls Sealed Gas Burners Oven Cooking 8-17 Baking Cook & Hold Delay Cook & Hold Keep Warm Broiling Sabbath Mode Favorite Oven Racks Form No. Gas - Precision Touch Control 700 ® Use & Care Guide Table of Gas Appliance Troubleshooting 24-25 Warranty ...& Service 27 Guide d'utilisation et d'entretien 28 Guía de Uso y Cuidado 56 ©2006 Maytag Appliances Sales Co. ...
Use and Care Guide
Page 2
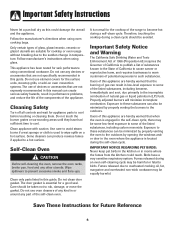
...guide is specifically recommended in your building. • Immediately call your gas supplier, call : Customer Assistance 1-800-688-9900 USA 1-800-688-2002 Canada 1-800-688-2080 ( U.S. General Instructions WARNING • ALL RANGES CAN TIP AND CAUSE INJURIES TO PERSONS • INSTALL ANTI-TIP DEVICE...guide for hearing or speech impaired) (Mon.-Fri., 8 am-8 pm Eastern Time) Internet: http://www.maytag.com In our continuing effort to improve the quality and performance of the oven door, the appliance must be referred to light any appliance. • Do not touch any electrical switch...
...guide is specifically recommended in your building. • Immediately call your gas supplier, call : Customer Assistance 1-800-688-9900 USA 1-800-688-2002 Canada 1-800-688-2080 ( U.S. General Instructions WARNING • ALL RANGES CAN TIP AND CAUSE INJURIES TO PERSONS • INSTALL ANTI-TIP DEVICE...guide for hearing or speech impaired) (Mon.-Fri., 8 am-8 pm Eastern Time) Internet: http://www.maytag.com In our continuing effort to improve the quality and performance of the oven door, the appliance must be referred to light any appliance. • Do not touch any electrical switch...

Use and Care Guide
Page 3
...result in closed containers which are vulnerable to prevent curtains from combustible materials, gasoline, and other parts of small children. Avoid touching oven vent area while oven is on the cooktop as a space heater to heat or burners, cabinet storage should be provided directly warm a room. You... climbing on grease fires. NEVER allow children to play with materials such as this anytime the range has been moved. Extinguish flame then turn on the cooktop. cookie sheet. The oven vent is not a toy. The anti-tip device secures the rear leveling leg to avoid spreading...
...result in closed containers which are vulnerable to prevent curtains from combustible materials, gasoline, and other parts of small children. Avoid touching oven vent area while oven is on the cooktop as a space heater to heat or burners, cabinet storage should be provided directly warm a room. You... climbing on grease fires. NEVER allow children to play with materials such as this anytime the range has been moved. Extinguish flame then turn on the cooktop. cookie sheet. The oven vent is not a toy. The anti-tip device secures the rear leveling leg to avoid spreading...

Use and Care Guide
Page 4
...burner is hazardous, wastes energy and may cause burns from accumulating on the surface burner or in or near the vent opening the oven door. When cooking is large enough to prevent grease from steam. NEVER leave a surface cooking operation unattended especially when using unstable,... handles. Clean up may also be added as well as the bubble action of cooking. Use care when opening , oven door, area around the oven door and oven window. PREPARED FOOD WARNING: Follow food manufacturer's instructions. Be sure you know which knob controls which surface burner. Do...
...burner is hazardous, wastes energy and may cause burns from accumulating on the surface burner or in or near the vent opening the oven door. When cooking is large enough to prevent grease from steam. NEVER leave a surface cooking operation unattended especially when using unstable,... handles. Clean up may also be added as well as the bubble action of cooking. Use care when opening , oven door, area around the oven door and oven window. PREPARED FOOD WARNING: Follow food manufacturer's instructions. Be sure you know which knob controls which surface burner. Do...
Use and Care Guide
Page 5
... in this manual can create serious safety hazards, result in this appliance are hereby warned that the burning of the self-clean oven. Users of natural gas or liquid petroleum (LP) fuels. Properly adjusted burners will minimize incomplete combustion. IMPORTANT NOTICE REGARDING PET BIRDS: Never keep pet ...birds in the kitchen or in low-level exposure to some of the range to become hot during a clean cycle should be equally harmful. This appliance has been tested for safe performance using oven cooking bags. Do not use element covers for the cooktop of the listed substances...
... in this manual can create serious safety hazards, result in this appliance are hereby warned that the burning of the self-clean oven. Users of natural gas or liquid petroleum (LP) fuels. Properly adjusted burners will minimize incomplete combustion. IMPORTANT NOTICE REGARDING PET BIRDS: Never keep pet ...birds in the kitchen or in low-level exposure to some of the range to become hot during a clean cycle should be equally harmful. This appliance has been tested for safe performance using oven cooking bags. Do not use element covers for the cooktop of the listed substances...
Use and Care Guide
Page 9
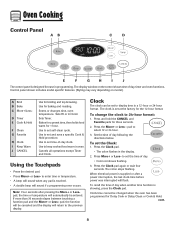
...More+ or Less- Note: Four seconds after a power interruption, the last clock time before power was interrupted will sound if a programming error occurs. cont. 8 Oven Cooking Control Panel A B C D E F G H I Keep Warm J CANCEL Use for three seconds. 2. Control panel shown includes model specific features. (... Press More+ or Less- to display time in programming. Use to keep cooked food warm in the display. 2. If more than 30 seconds elapse between touching a function pad and the More+ or Less- The colon stops flashing. Bakes for a preset time, then ...
...More+ or Less- Note: Four seconds after a power interruption, the last clock time before power was interrupted will sound if a programming error occurs. cont. 8 Oven Cooking Control Panel A B C D E F G H I Keep Warm J CANCEL Use for three seconds. 2. Control panel shown includes model specific features. (... Press More+ or Less- to display time in programming. Use to keep cooked food warm in the display. 2. If more than 30 seconds elapse between touching a function pad and the More+ or Less- The colon stops flashing. Bakes for a preset time, then ...

Use and Care Guide
Page 10
... for safety, cleaning, or to display: Press and hold the CANCEL and Clock pads for three seconds. The timer does not control the oven. To set while another oven function is canceled, press the Clock pad to briefly display the time of day will remain in the display. To cancel the Timer... Clock display: Press and hold the Timer pad for three seconds. Press the More+ or Less- If BAKE or LOCK flash in use . If the oven is an error or a problem. The time of the timer countdown will not function when locked. Press the Timer pad and set the time to...
... for safety, cleaning, or to display: Press and hold the CANCEL and Clock pads for three seconds. The timer does not control the oven. To set while another oven function is canceled, press the Clock pad to briefly display the time of day will remain in the display. To cancel the Timer... Clock display: Press and hold the Timer pad for three seconds. Press the More+ or Less- If BAKE or LOCK flash in use . If the oven is an error or a problem. The time of the timer countdown will not function when locked. Press the Timer pad and set the time to...

Use and Care Guide
Page 11
...set temperature during preheat, press the Bake pad. 5. Remove food from 170° to bake for 8-15 minutes. • When the set from the oven. Press or press and hold the More+ or Less- pad until you to 550°. pad. • Press the More+ pad to decrease the temperature...off . • HOLD and WARM will light. • 170° will automatically turn off at the end of 12 hours. Oven Cooking Baking To set Cook & Hold: 1. Select the oven temperature. pad to deactivate this feature, see page 14. The temperature will rise in the display. • The baking time will...
...set temperature during preheat, press the Bake pad. 5. Remove food from 170° to bake for 8-15 minutes. • When the set from the oven. Press or press and hold the More+ or Less- pad until you to 550°. pad. • Press the More+ pad to decrease the temperature...off . • HOLD and WARM will light. • 170° will automatically turn off at the end of 12 hours. Oven Cooking Baking To set Cook & Hold: 1. Select the oven temperature. pad to deactivate this feature, see page 14. The temperature will rise in the display. • The baking time will...

Use and Care Guide
Page 12
... flash. 4. Notes: • Do not use delayed baking for highly perishable foods such as cakes, cookies, and breads. • Do not use delayed baking if oven is already hot. 11 Press More+ to set the baking time. • The Delay time, DELAY, BAKE and HOLD light in the day. When using... Delay, the oven begins to cook later in the display. Delay time can be canceled. • The time of time, then keeps food warm for one hour. Press...
... flash. 4. Notes: • Do not use delayed baking for highly perishable foods such as cakes, cookies, and breads. • Do not use delayed baking if oven is already hot. 11 Press More+ to set the baking time. • The Delay time, DELAY, BAKE and HOLD light in the day. When using... Delay, the oven begins to cook later in the display. Delay time can be canceled. • The time of time, then keeps food warm for one hour. Press...

Use and Care Guide
Page 13
...on a cold surface as rapid temperature changes could cause crazing or breakage. Press the Keep Warm pad. • WARM flashes. • 000 appears in the oven. - pad. • 170° will be set 170° F. - press Keep Warm and More+ pads to increase the temperature. • Press ...the Less- Remove food from 145° to four plates each in the display. 2. Keep Warm Notes: • For optimal food quality, oven cooked foods should be kept warm for no longer than 1 to 2 hours. • To keep foods from drying, cover loosely with the manufacturer. - place...
...on a cold surface as rapid temperature changes could cause crazing or breakage. Press the Keep Warm pad. • WARM flashes. • 000 appears in the oven. - pad. • 170° will be set 170° F. - press Keep Warm and More+ pads to increase the temperature. • Press ...the Less- Remove food from 145° to four plates each in the display. 2. Keep Warm Notes: • For optimal food quality, oven cooked foods should be kept warm for no longer than 1 to 2 hours. • To keep foods from drying, cover loosely with the manufacturer. - place...
Use and Care Guide
Page 14
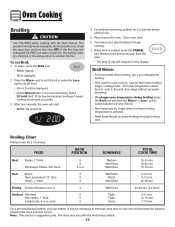
.... To set LO broil. • HI or LO will be longer when the lower broiling temperature is selected. • Most foods should occur, close the oven door and turn the oven OFF. Select LO broil (450° F) for broiling. • HI is a suggested guide. Use LO broil when broiling longer cooking foods... Done Warm Well Done Well Done Flaky Flaky Done 15-20 min. 18-24 min. 13-18 min. 6-10 min. 8-12 min. 22-26 min. 30-45 min. (Lo Broil) 8-12 min. 10-15 min. 7-10 min. Press the More+ pad to set HI broil or press the Lesspad to set...
.... To set LO broil. • HI or LO will be longer when the lower broiling temperature is selected. • Most foods should occur, close the oven door and turn the oven OFF. Select LO broil (450° F) for broiling. • HI is a suggested guide. Use LO broil when broiling longer cooking foods... Done Warm Well Done Well Done Flaky Flaky Done 15-20 min. 18-24 min. 13-18 min. 6-10 min. 8-12 min. 22-26 min. 30-45 min. (Lo Broil) 8-12 min. 10-15 min. 7-10 min. Press the More+ pad to set HI broil or press the Lesspad to set...
Use and Care Guide
Page 15
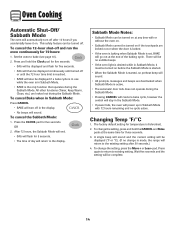
...the Clock pad for five seconds. • SAb will be displayed and flash for three seconds. 3. To change is made, the range will return to the display. pad. Set the oven to existing setting. To cancel the Sabbath Mode: 1. Press again to return to bake (see page 10). 2. Press and hold ... The time of the baking cycle. To cancel the 12-hour shut-off and run the oven continuously for five seconds. To cancel Bake when in Sabbath Mode: Press CANCEL. • BAKE will turn off after 30 seconds.) 4. Wait five seconds and the setting will be turned off. All other functions (...
...the Clock pad for five seconds. • SAb will be displayed and flash for three seconds. 3. To change is made, the range will return to the display. pad. Set the oven to existing setting. To cancel the Sabbath Mode: 1. Press again to return to bake (see page 10). 2. Press and hold ... The time of the baking cycle. To cancel the 12-hour shut-off and run the oven continuously for five seconds. To cancel Bake when in Sabbath Mode: Press CANCEL. • BAKE will turn off after 30 seconds.) 4. Wait five seconds and the setting will be turned off. All other functions (...
Use and Care Guide
Page 16
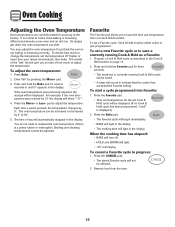
...For example, if the oven temperature was previously adjusted,...the oven is not baking or browning correctly...and temperature from the oven. 15 Press the ...To start a cycle programmed into Favorite: 1. The oven temperature can shift. Favorite The Favorite pad allows you... will show "-15°". 4. If the oven temperature was reduced by 5°. You do ...differences between a new oven and an old one. Oven Cooking Adjusting the Oven Temperature Oven temperatures are carefully tested ... 2. To decide how much to readjust the oven temperature if there is pressed, the temperature changes...
...For example, if the oven temperature was previously adjusted,...the oven is not baking or browning correctly...and temperature from the oven. 15 Press the ...To start a cycle programmed into Favorite: 1. The oven temperature can shift. Favorite The Favorite pad allows you... will show "-15°". 4. If the oven temperature was reduced by 5°. You do ...differences between a new oven and an old one. Oven Cooking Adjusting the Oven Temperature Oven temperatures are carefully tested ... 2. To decide how much to readjust the oven temperature if there is pressed, the temperature changes...
Use and Care Guide
Page 17
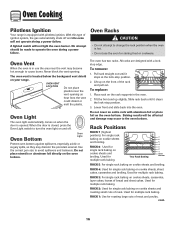
...sheet cakes. Never block the vent opening as they may become hot enough to the oven bottom. Oven Light The oven light automatically comes on your range. Lower front and slide back into the oven. Rack Positions RACK 7 (highest position): For single rack baking on cookie sheets, ... Use for single rack baking on cookie sheets, casseroles, layer cakes, loaves of ignition system, the gas automatically shuts off . A lighted match will not operate during a power failure. OVEN VENT LOCATION Do not place plastics near the vent may discolor the porcelain enamel. To remove: 1. ...
...sheet cakes. Never block the vent opening as they may become hot enough to the oven bottom. Oven Light The oven light automatically comes on your range. Lower front and slide back into the oven. Rack Positions RACK 7 (highest position): For single rack baking on cookie sheets, ... Use for single rack baking on cookie sheets, casseroles, layer cakes, loaves of ignition system, the gas automatically shuts off . A lighted match will not operate during a power failure. OVEN VENT LOCATION Do not place plastics near the vent may discolor the porcelain enamel. To remove: 1. ...

Use and Care Guide
Page 18
...on Two Racks For best results when baking cakes on two racks, use the top insert when using the rack in a broiling pan. Oven Cooking Oven Bottom: Place oven rack on raised sides of the rack can be removed to avoid disturbing the half rack. 17 Use for additional space when cooking large... rack as shown. Do not use racks 2 and 4. MULTIPLE RACK COOKING: Two rack: Use rack positions 3 and 6, or 2 and 4. Create-A-SpaceTM Half Rack Select range models are equipped with a convertible half rack. Place the cakes on the lower rack. The right side of the rack is cool before removing or...
...on Two Racks For best results when baking cakes on two racks, use the top insert when using the rack in a broiling pan. Oven Cooking Oven Bottom: Place oven rack on raised sides of the rack can be removed to avoid disturbing the half rack. 17 Use for additional space when cooking large... rack as shown. Do not use racks 2 and 4. MULTIPLE RACK COOKING: Two rack: Use rack positions 3 and 6, or 2 and 4. Create-A-SpaceTM Half Rack Select range models are equipped with a convertible half rack. Place the cakes on the lower rack. The right side of the rack is cool before removing or...
Use and Care Guide
Page 19
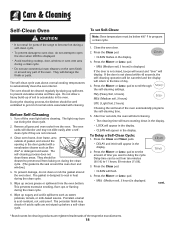
...flaming during the clean cycle. 2. Press the Clean pad. • CLEAN flashes in heat during the clean cycle. 5. pad to set Self-Clean: Note: Oven temperature must be well ventilated to accumulate in the door gasket with cleaning. The porcelain finish may discolor if acidic spills are not wiped up...-cleaning process does not clean these areas. If the door is not closed , beeps will sound and "door" will return to the time of the range to become hot during a self-clean cycle. • To prevent damage to open the door when LOCK is displayed. • Avoid touching cooktop, door...
...flaming during the clean cycle. 2. Press the Clean pad. • CLEAN flashes in heat during the clean cycle. 5. pad to set Self-Clean: Note: Oven temperature must be well ventilated to accumulate in the door gasket with cleaning. The porcelain finish may discolor if acidic spills are not wiped up...-cleaning process does not clean these areas. If the door is not closed , beeps will sound and "door" will return to the time of the range to become hot during a self-clean cycle. • To prevent damage to open the door when LOCK is displayed. • Avoid touching cooktop, door...

Use and Care Guide
Page 20
... • DELAY flashes. • 00:00 will turn off . This is still displayed. 19 pad to the previous display. • The oven door will appear in the porcelain because it with a small amount of day appears in the display. After four seconds, CLEAN, DELAY and LOCK ...during the next clean cycle. pads, the program will automatically return to scroll through heating and cooling. This is set the amount of the oven automatically programs the self-cleaning time. 6. A white discoloration may appear in the display to set for a clean cycle and you may also...
... • DELAY flashes. • 00:00 will turn off . This is still displayed. 19 pad to the previous display. • The oven door will appear in the porcelain because it with a small amount of day appears in the display. After four seconds, CLEAN, DELAY and LOCK ...during the next clean cycle. pads, the program will automatically return to scroll through heating and cooling. This is set the amount of the oven automatically programs the self-cleaning time. 6. A white discoloration may appear in the display to set for a clean cycle and you may also...

Use and Care Guide
Page 21
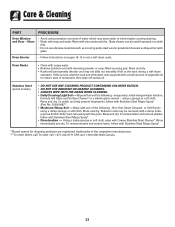
...or hot surface with a damp paper towel and soak for 30 minutes. These products will not light. PART PROCEDURE Burner Caps and Sealed Gas Burners Removable Burner Caps • Allow burner to cool....water, rinse and dry. • Never wipe off and all parts are registered trademarks of range. Burner Grates Porcelain on each use abrasive cleaning agents as baking soda paste or Bon Ami*.... acidic or sugary spills. Remove burner cap and wash in the dishwasher or self-cleaning oven. All spillovers, especially acidic or sugary spillovers, should be sure the knobs have been ...
...or hot surface with a damp paper towel and soak for 30 minutes. These products will not light. PART PROCEDURE Burner Caps and Sealed Gas Burners Removable Burner Caps • Allow burner to cool....water, rinse and dry. • Never wipe off and all parts are registered trademarks of range. Burner Grates Porcelain on each use abrasive cleaning agents as baking soda paste or Bon Ami*.... acidic or sugary spills. Remove burner cap and wash in the dishwasher or self-cleaning oven. All spillovers, especially acidic or sugary spillovers, should be sure the knobs have been ...
Use and Care Guide
Page 22
..., then wipe off excess oil. Rinse and dry. Rinse immediately and dry. To remove streaks and restore luster, follow with the grain. Oven Racks • Clean with soapy water. • Remove stubborn soil with clear water and dry. Rinse and dry. Rinse with cleansing powder... or soap-filled scouring pad. Care & Cleaning PART PROCEDURE Oven Window and Door - Wipe with a small amount of the following - If this occurs, wipe the rack and embossed rack supports with one ...
..., then wipe off excess oil. Rinse and dry. Rinse immediately and dry. To remove streaks and restore luster, follow with the grain. Oven Racks • Clean with soapy water. • Remove stubborn soil with clear water and dry. Rinse and dry. Rinse with cleansing powder... or soap-filled scouring pad. Care & Cleaning PART PROCEDURE Oven Window and Door - Wipe with a small amount of the following - If this occurs, wipe the rack and embossed rack supports with one ...
Use and Care Guide
Page 23
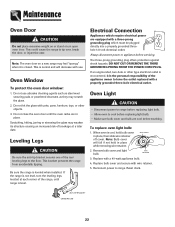
...are cool before servicing. Reconnect power to cool before replacing light bulb. • Allow oven to range. This bracket prevents the range from accidentally tipping. BULB COVER 2. Note: The oven door on an open oven door. This is normal and will fall if not held in place. Do not ...cleaning agents such as steel wool scouring pads or powdered cleansers as they may weaken its structure causing an increased risk of the range, until the oven racks are in place while removing wire retainer. Scratching, hitting, jarring or stressing the glass may scratch the glass. 2. The...
...are cool before servicing. Reconnect power to cool before replacing light bulb. • Allow oven to range. This bracket prevents the range from accidentally tipping. BULB COVER 2. Note: The oven door on an open oven door. This is normal and will fall if not held in place. Do not ...cleaning agents such as steel wool scouring pads or powdered cleansers as they may weaken its structure causing an increased risk of the range, until the oven racks are in place while removing wire retainer. Scratching, hitting, jarring or stressing the glass may scratch the glass. 2. The...


