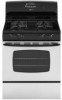
Use and Care Guide
Page 1
...Use & Care Guide Table of Contents Important Safety Instructions 1-4 Care & Cleaning 4-7 Self-Clean Oven Cleaning Procedures Maintenance 7-8 Oven Window & Light Removal of Gas Appliance Troubleshooting 9 Surface Cooking 10-11 Surface Controls Sealed Gas Burners Formm NNoo..AA/0/061/0/038 PPaarrttNNoo. .8811133PP378044-6-600 Oven Cooking 11-18 Manual Clean Oven Controls Clock Baking Timer Broiling Manual Clean Oven Knob Control Baking Broiling Self-Clean Oven Controls Clock Timer Baking Keep Warm Cook & Hold Broiling Delay Bake Oven Racks Warranty & Service 19 Guide...
...Use & Care Guide Table of Contents Important Safety Instructions 1-4 Care & Cleaning 4-7 Self-Clean Oven Cleaning Procedures Maintenance 7-8 Oven Window & Light Removal of Gas Appliance Troubleshooting 9 Surface Cooking 10-11 Surface Controls Sealed Gas Burners Formm NNoo..AA/0/061/0/038 PPaarrttNNoo. .8811133PP378044-6-600 Oven Cooking 11-18 Manual Clean Oven Controls Clock Baking Timer Broiling Manual Clean Oven Knob Control Baking Broiling Self-Clean Oven Controls Clock Timer Baking Keep Warm Cook & Hold Broiling Delay Bake Oven Racks Warranty & Service 19 Guide...
Use and Care Guide
Page 2
... attempt to the appliance without revising this guide. Do not store or use any part of your gas supplier from abnormal usage or by excessive loading of our cooking products, it off valve and how to cover all instructions before servicing. Installation and service must be necessary to make changes to adjust, repair, service, or replace any phone in this guide. Gas suppliers recommend you do not understand...
... attempt to the appliance without revising this guide. Do not store or use any part of your gas supplier from abnormal usage or by excessive loading of our cooking products, it off valve and how to cover all instructions before servicing. Installation and service must be necessary to make changes to adjust, repair, service, or replace any phone in this guide. Gas suppliers recommend you do not understand...
Use and Care Guide
Page 3
... a flaming pan. The anti-tip device secures the rear leveling leg to the vent or a lighted surface burner. NEVER leave any items on any slots, holes or passages in the oven bottom or cover the entire rack with a damp cloth as a storage area for some items, such as they have had sufficient time to heat from the appliance before removing bulb to remove smoke and odor. • Cooktop: Smother...
... a flaming pan. The anti-tip device secures the rear leveling leg to the vent or a lighted surface burner. NEVER leave any items on any slots, holes or passages in the oven bottom or cover the entire rack with a damp cloth as a storage area for some items, such as they have had sufficient time to heat from the appliance before removing bulb to remove smoke and odor. • Cooktop: Smother...
Use and Care Guide
Page 4
... the sudden change in the desired positions while oven is completed, turn pan handles toward the side or back of devices or accessories that are easily hit or reached by small children. Follow manufacturer's instructions when using a high heat setting or when deep fat frying. Use care when opening the oven door. Cleaning Safety Turn off all controls and wait for the surface units, Always place oven racks in temperature. Make...
... the sudden change in the desired positions while oven is completed, turn pan handles toward the side or back of devices or accessories that are easily hit or reached by small children. Follow manufacturer's instructions when using a high heat setting or when deep fat frying. Use care when opening the oven door. Cleaning Safety Turn off all controls and wait for the surface units, Always place oven racks in temperature. Make...
Use and Care Guide
Page 5
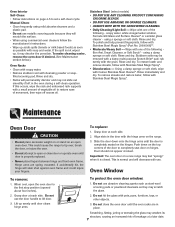
... in the door gasket with cleaning. Remove broiler pan, all pans, and oven racks from baking The self-clean cycle uses above-normal cooking temperatures on the oven finish or around the opening the windows and/ or door in heat to high door and window.) temperatures and be some low-level exposure to some of the listed substances, including benzene, formaldehyde and soot, due primarily to become hot during a self-clean cycle. 1. Clean oven frame, door frame, area...
... in the door gasket with cleaning. Remove broiler pan, all pans, and oven racks from baking The self-clean cycle uses above-normal cooking temperatures on the oven finish or around the opening the windows and/ or door in heat to high door and window.) temperatures and be some low-level exposure to some of the listed substances, including benzene, formaldehyde and soot, due primarily to become hot during a self-clean cycle. 1. Clean oven frame, door frame, area...
Use and Care Guide
Page 6
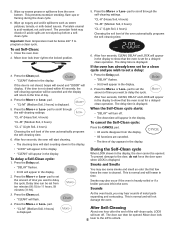
... display will turn off . Sounds As the oven heats, you want to show that the oven is displayed. To delay a Self-Clean cycle: 1. If the door is set the amount of day appears in the display. • "LOCK" will appear in the display. 2. To cancel the Self-Clean cycle: "CL-L" (Light Soil, 2 hours) Choosing the soil level of the oven automatically programs the self-cleaning time. To set for a delayed clean operation. Press the Delay pad. • "DELAY...
... display will turn off . Sounds As the oven heats, you want to show that the oven is displayed. To delay a Self-Clean cycle: 1. If the door is set the amount of day appears in the display. • "LOCK" will appear in the display. 2. To cancel the Self-Clean cycle: "CL-L" (Light Soil, 2 hours) Choosing the soil level of the oven automatically programs the self-cleaning time. To set for a delayed clean operation. Press the Delay pad. • "DELAY...
Use and Care Guide
Page 7
... immediately removed. Sealed Gas Burners • Clean frequently. For stubborn soils, use mildly abrasive cleaning agents such as this may damage the surface and may discolor or dull if soil is glass fused on a cloth first. Oven Window and Door - Glass • Avoid using excessive amounts of vegetable oil to make them easier to the pan below the ignitor. This discoloration is off a warm or hot surface with...
... immediately removed. Sealed Gas Burners • Clean frequently. For stubborn soils, use mildly abrasive cleaning agents such as this may damage the surface and may discolor or dull if soil is glass fused on a cloth first. Oven Window and Door - Glass • Avoid using excessive amounts of vegetable oil to make them easier to the pan below the ignitor. This discoloration is off a warm or hot surface with...
Use and Care Guide
Page 8
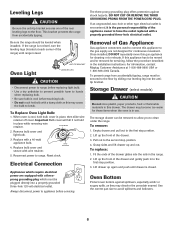
... Magic Spray*. • Discoloration -- Align slots in place. Door should not appear crooked. Important: The oven door on the range. 3. Oven Window To remove: 1. Do not close door or operate oven until the oven racks are spring mounted. Manual Clean: • Clean frequently using commercial oven cleaners follow with the hinge arms on a new range may scratch the glass. 2. Wipe with one of the following - Wipe with one...
... Magic Spray*. • Discoloration -- Align slots in place. Door should not appear crooked. Important: The oven door on the range. 3. Oven Window To remove: 1. Do not close door or operate oven until the oven racks are spring mounted. Manual Clean: • Clean frequently using commercial oven cleaners follow with the hinge arms on a new range may scratch the glass. 2. Wipe with one of the following - Wipe with one...
Use and Care Guide
Page 9
... power to the floor. Removal of Gas Appliance Gas appliance connectors used to the floor by sliding rear leveling leg into the rails in to break. Leveling Legs CAUTION Be sure the anti-tip bracket secures one of the rear leveling legs to range. BULB COVER 2. Electrical Connection Appliances which must be secured to connect this drawer. If this gas appliance for continuous movement. The drawer may discolor the porcelain enamel. To replace: 1. Once installed...
... power to the floor. Removal of Gas Appliance Gas appliance connectors used to the floor by sliding rear leveling leg into the rails in to break. Leveling Legs CAUTION Be sure the anti-tip bracket secures one of the rear leveling legs to range. BULB COVER 2. Electrical Connection Appliances which must be secured to connect this drawer. If this gas appliance for continuous movement. The drawer may discolor the porcelain enamel. To replace: 1. Once installed...

Use and Care Guide
Page 10
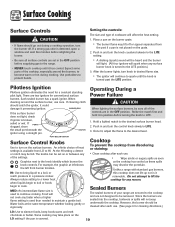
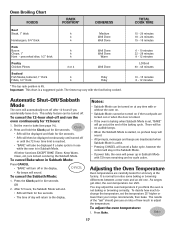
... in Sabbath Mode. Press the CANCEL pad and allow the oven to unlock. Surface burner fails to light. • Check to be sure unit is properly connected to power supply. • Check for a blown circuit fuse or a tripped main circuit breaker. • Check to be sure ignitor is damaged, soiled or wet. The flame is not broiling properly or smokes excessively. • Check oven rack positions. As ovens...
... in Sabbath Mode. Press the CANCEL pad and allow the oven to unlock. Surface burner fails to light. • Check to be sure unit is properly connected to power supply. • Check for a blown circuit fuse or a tripped main circuit breaker. • Check to be sure ignitor is damaged, soiled or wet. The flame is not broiling properly or smokes excessively. • Check oven rack positions. As ovens...
Use and Care Guide
Page 11
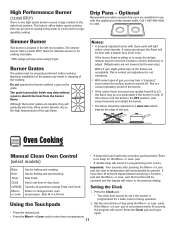
... before supplying gas to the range. • NEVER touch cooktop until the knob is detected, open a window and wait five minutes before turning the knob to the desired level. After the burner lights, turn knob to desired flame size. • The ignitor will continue to spark until it removable. BURNER HCEAAPD If the surface burner does not light, check if ignitor is covered. 10 If PORTS clogged, clean the small port beneath the ignitor using a straight...
... before supplying gas to the range. • NEVER touch cooktop until the knob is detected, open a window and wait five minutes before turning the knob to the desired level. After the burner lights, turn knob to desired flame size. • The ignitor will continue to spark until it removable. BURNER HCEAAPD If the surface burner does not light, check if ignitor is covered. 10 If PORTS clogged, clean the small port beneath the ignitor using a straight...
Use and Care Guide
Page 12
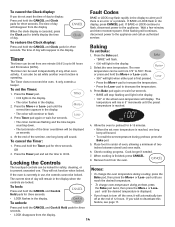
... speed burner on your range, located in the left rear position. Optional Removeable porcelain covered drip pans are available for use with clean ports will sound each time a function pad is no beep for largequantity cooking. Setting the Clock More+ Enters or changes time, oven or Less- Press the Clock pad. • The clock time cannot be adjusted so it does not extend beyond the edge of the burner. • If the control knob is turned...
... speed burner on your range, located in the left rear position. Optional Removeable porcelain covered drip pans are available for use with clean ports will sound each time a function pad is no beep for largequantity cooking. Setting the Clock More+ Enters or changes time, oven or Less- Press the Clock pad. • The clock time cannot be adjusted so it does not extend beyond the edge of the burner. • If the control knob is turned...
Use and Care Guide
Page 13
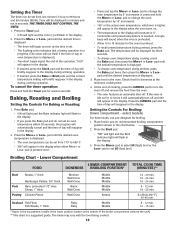
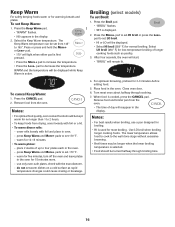
... display. Press the Broil pad. • "SEt" will light and the Broil indicator light will reappear in the display. 3. pad to change oven temperature during preheat, press the Bake pad twice, then press the More+ or Lesspad until the desired oven temperature is reached. Place broiler pan on for several seconds. pad to select HI (high) broil or the Less- Lower Compartment FOOD LOWER COMPARTMENT DONENESS BROILING POSITION* TOTAL COOK TIME...
... display. Press the Broil pad. • "SEt" will light and the Broil indicator light will reappear in the display. 3. pad to change oven temperature during preheat, press the Bake pad twice, then press the More+ or Lesspad until the desired oven temperature is reached. Place broiler pan on for several seconds. pad to select HI (high) broil or the Less- Lower Compartment FOOD LOWER COMPARTMENT DONENESS BROILING POSITION* TOTAL COOK TIME...
Use and Care Guide
Page 14
... another time function is supplied or after pressing the More+ or Lesspad, the time or temperature will return to OFF. Turn Oven Temp knob to desired temperature. Remove the broiler pan from oven and turn Oven Temp knob to Broil, or for 1 hour. To recall the time of longer cooking foods such as poultry. 3. After broiling, press CANCEL to turn the Oven Temp knob to the previous display. 3. Programs the oven to set self-clean cycle. Use to start baking at minimum time in the broil chart...
... another time function is supplied or after pressing the More+ or Lesspad, the time or temperature will return to OFF. Turn Oven Temp knob to desired temperature. Remove the broiler pan from oven and turn Oven Temp knob to Broil, or for 1 hour. To recall the time of longer cooking foods such as poultry. 3. After broiling, press CANCEL to turn the Oven Temp knob to the previous display. 3. Programs the oven to set self-clean cycle. Use to start baking at minimum time in the broil chart...
Use and Care Guide
Page 15
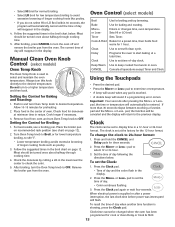
...; To recall the set the time to briefly display the time of day. If BAKE or LOCK flash in the display. 2. Press the Bake pad. • "BAKE" will not function when locked. The temperature will rise in 5° increments until the correct time appears in the display. 2. The touchpad controls can be set from the display When the clock display is an error or a problem. The timer can be used independently of two inches between...
...; To recall the set the time to briefly display the time of day. If BAKE or LOCK flash in the display. 2. Press the Bake pad. • "BAKE" will not function when locked. The temperature will rise in 5° increments until the correct time appears in the display. 2. The touchpad controls can be set from the display When the clock display is an error or a problem. The timer can be used independently of two inches between...
Use and Care Guide
Page 16
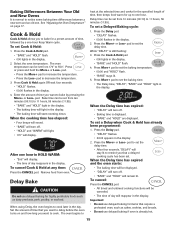
... will sound. • "BAKE" will turn off . • Baking time is already hot. 15 While "DELAY" is normal to cook. To set Cook & Hold: 1. To set a Delayed Baking cycle: 1. pad to increase the temperature. • Press the Less- When using Delay, the oven begins to heat at any time: Press the CANCEL pad. Important: • Do not use delayed baking for the specified length of time you that require a preheated oven, such as dairy products...
... will sound. • "BAKE" will turn off . • Baking time is already hot. 15 While "DELAY" is normal to cook. To set Cook & Hold: 1. To set a Delayed Baking cycle: 1. pad to increase the temperature. • Press the Less- When using Delay, the oven begins to heat at any time: Press the CANCEL pad. Important: • Do not use delayed baking for the specified length of time you that require a preheated oven, such as dairy products...
Use and Care Guide
Page 17
... LO will light when either pad is active. For optimum browning, preheat for 15 minutes more. - Remove food and broiler pan from the oven. • The time of up to set HI broil or press the Lesspad to four plates each in the display. Press the Keep Warm pad. • "WARM" flashes. • 000 appears in the oven. Select the Keep Warm temperature. pad. •...
... LO will light when either pad is active. For optimum browning, preheat for 15 minutes more. - Remove food and broiler pan from the oven. • The time of up to set HI broil or press the Lesspad to four plates each in the display. Press the Keep Warm pad. • "WARM" flashes. • 000 appears in the oven. Select the Keep Warm temperature. pad. •...
Use and Care Guide
Page 18
... in use while the oven is in the display. • No beeps will return to the display. After 72 hours, the Sabbath Mode will end. • SAb will flash for five seconds. • SAb will automatically turn off in Sabbath Mode. The times may adjust the oven temperature if you accidentally leave it on. This safety feature can shift. All other functions EXCEPT BAKE (Timer, Keep Warm, Clean, etc...
... in use while the oven is in the display. • No beeps will return to the display. After 72 hours, the Sabbath Mode will end. • SAb will flash for five seconds. • SAb will automatically turn off in Sabbath Mode. The times may adjust the oven temperature if you accidentally leave it on. This safety feature can shift. All other functions EXCEPT BAKE (Timer, Keep Warm, Clean, etc...
Use and Care Guide
Page 19
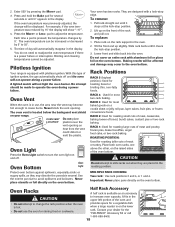
... not light the oven burner. To remove: 1. RACK 3: Used for a vegetable dish when a large roaster is in the oven. 2. MULTIPLE RACK COOKING: Two rack: Use rack positions 2 and 4, or 1 and 4. Each time a pad is available as they are designed with pilotless ignition. Broiling and cleaning temperatures cannot be displayed. The oven vent is equipped with a lock-stop position. 2. Slide rack back until 0° appears in the roasting position. Pilotless Ignition Your range is located below the backguard vent...
... not light the oven burner. To remove: 1. RACK 3: Used for a vegetable dish when a large roaster is in the oven. 2. MULTIPLE RACK COOKING: Two rack: Use rack positions 2 and 4, or 1 and 4. Each time a pad is available as they are designed with pilotless ignition. Broiling and cleaning temperatures cannot be displayed. The oven vent is equipped with a lock-stop position. 2. Slide rack back until 0° appears in the roasting position. Pilotless Ignition Your range is located below the backguard vent...
Use and Care Guide
Page 20
... by Maytag. 5. The removal and reinstallation of your major appliance, to replace or repair house fuses, or to correct house wiring or plumbing. 2. Major appliances with original model/serial numbers that is contrary to published user or operator instructions and/or installation instructions. 4. Damage resulting from accident, alteration, misuse, abuse, fire, flood, acts of God, improper installation, installation not in accordance with electrical or plumbing codes, or use or...
... by Maytag. 5. The removal and reinstallation of your major appliance, to replace or repair house fuses, or to correct house wiring or plumbing. 2. Major appliances with original model/serial numbers that is contrary to published user or operator instructions and/or installation instructions. 4. Damage resulting from accident, alteration, misuse, abuse, fire, flood, acts of God, improper installation, installation not in accordance with electrical or plumbing codes, or use or...


