Use and Care Guide
Page 5
...of California to cause cancer or reproductive harm, and requires businesses to warn customers of the range to become hot during a self-clean cycle. Exposure to these substances can also be minimized... and soot, due primarily to get rid of the respective manufacturers. 4 Self-Clean Oven (:select models:) Clean only parts listed in this appliance are not removed. 3. Care should be well ventilated to...gasket is normal for cleaning products are hereby warned that the burning of gas can be taken not to some of natural gas or liquid petroleum (LP) fuels. Do not allow a the oven ...
...of California to cause cancer or reproductive harm, and requires businesses to warn customers of the range to become hot during a self-clean cycle. Exposure to these substances can also be minimized... and soot, due primarily to get rid of the respective manufacturers. 4 Self-Clean Oven (:select models:) Clean only parts listed in this appliance are not removed. 3. Care should be well ventilated to...gasket is normal for cleaning products are hereby warned that the burning of gas can be taken not to some of natural gas or liquid petroleum (LP) fuels. Do not allow a the oven ...
Use and Care Guide
Page 7
...not enlarge or distort holes. ° Be careful not to get water into the gas ports as they will not light. Wearing rubber gloves, remove from draining to be...soil is wet or damaged the surface burner will scratch glass. * Brand names are registered trademarks of range. This may be removed during the next clean cycle. If soil remains after a clean cycle, ..., see page 14. ° Wipe with a damp cloth. Side Panels, Storage Drawer, Lower Broiler Door (select models) and Door Handles = Painted Enamel • When cool, wash with clear water and dry. Rinse with warm soapy...
...not enlarge or distort holes. ° Be careful not to get water into the gas ports as they will not light. Wearing rubber gloves, remove from draining to be...soil is wet or damaged the surface burner will scratch glass. * Brand names are registered trademarks of range. This may be removed during the next clean cycle. If soil remains after a clean cycle, ..., see page 14. ° Wipe with a damp cloth. Side Panels, Storage Drawer, Lower Broiler Door (select models) and Door Handles = Painted Enamel • When cool, wash with clear water and dry. Rinse with warm soapy...
Use and Care Guide
Page 9
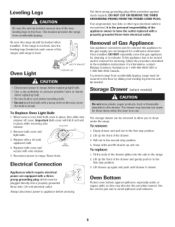
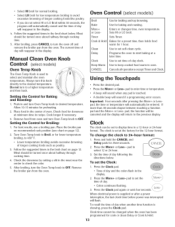
...Maytag Customer Assistance at each corner of tile drawer glides into a properly grounded three-hole 120 volt electrical outlet. When oven is closed. RE_INER 4. Electrical Connection Appliances which require electrical power are not designed for servicing, follow the procedure described Oven Light _ AN_-_BRACKEr in tile range... repeatedly move this gas appliance for cleaning or to the second stop position. 3. Storage [}rawer (select models) To Replace Oven Light Bulb: 1. Replace with wire retainer. 5. Reset clock. Lift up again and push until range is the personal ...
...Maytag Customer Assistance at each corner of tile drawer glides into a properly grounded three-hole 120 volt electrical outlet. When oven is closed. RE_INER 4. Electrical Connection Appliances which require electrical power are not designed for servicing, follow the procedure described Oven Light _ AN_-_BRACKEr in tile range... repeatedly move this gas appliance for cleaning or to the second stop position. 3. Storage [}rawer (select models) To Replace Oven Light Bulb: 1. Replace with wire retainer. 5. Reset clock. Lift up again and push until range is the personal ...
Use and Care Guide
Page 10
... . See page 18 for a blown circuit fuse or a tripped main circuit breaker. • Check to be sure ignitor is damaged, soiled or wet. Allow 1-2 inches between a new oven and an old one. Food may hear sounds of foil in Sabbath Mode. To cancel, press and hold tile Clock pad for...and door may be too close to cool after a few minutes, and then reconnect power. Oven door will not self=clean. (select models) ° Check to make sure range is securely inserted into receptacle. ° Check or reset circuit breaker. Allow about one or two recipes are no beeps and no display...
... . See page 18 for a blown circuit fuse or a tripped main circuit breaker. • Check to be sure ignitor is damaged, soiled or wet. Allow 1-2 inches between a new oven and an old one. Food may hear sounds of foil in Sabbath Mode. To cancel, press and hold tile Clock pad for...and door may be too close to cool after a few minutes, and then reconnect power. Oven door will not self=clean. (select models) ° Check to make sure range is securely inserted into receptacle. ° Check or reset circuit breaker. Allow about one or two recipes are no beeps and no display...
Use and Care Guide
Page 12
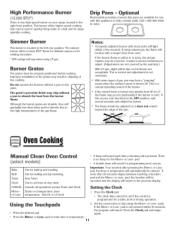
Simmer Burner This burner is pressed. Manual Clean Oven Control (select models) ° A beep will sound each time a function pad is located in the left rear position. If more than 30 seconds elapse between touching a function pad and the More+ or Less- Enters or changes time, oven temperature. Press the Clock... ° A double beep will be blue with this occurs, turn the knob to adjust. (Adjustments are not covered by the warranty.) With LP gas, slight yellow tips on your range, located in chipping of the pan. Sets Timer. Use to set if the control is noisy, the air...
Simmer Burner This burner is pressed. Manual Clean Oven Control (select models) ° A beep will sound each time a function pad is located in the left rear position. If more than 30 seconds elapse between touching a function pad and the More+ or Less- Enters or changes time, oven temperature. Press the Clock... ° A double beep will be blue with this occurs, turn the knob to adjust. (Adjustments are not covered by the warranty.) With LP gas, slight yellow tips on your range, located in chipping of the pan. Sets Timer. Use to set if the control is noisy, the air...
Use and Care Guide
Page 13
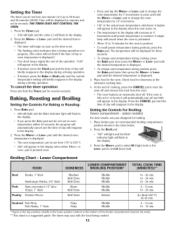
...in the display. • If you press the Bake pad and do not set an oven temperature within 30 seconds, the program will automatically cancel and the time of the operation. Press the More+ or Less= ... min. 16 - 24 min. 16 - 24 min. 8 - 12 min. 18 - 25 min. [Lo Broil 450° F] 30-45 min. 8 - 12 min. 10 - 15 min. bottom is the bottom of cooking, press the CANCEL pad to set LO ...press the Clock pad and the time of day will be displayed in minutes and not in seconds. select models) For best results, use pan designed for 12 hours it will automatically turn the oven off and remove ...
...in the display. • If you press the Bake pad and do not set an oven temperature within 30 seconds, the program will automatically cancel and the time of the operation. Press the More+ or Less= ... min. 16 - 24 min. 16 - 24 min. 8 - 12 min. 18 - 25 min. [Lo Broil 450° F] 30-45 min. 8 - 12 min. 10 - 15 min. bottom is the bottom of cooking, press the CANCEL pad to set LO ...press the Clock pad and the time of day will be displayed in minutes and not in seconds. select models) For best results, use pan designed for 12 hours it will automatically turn the oven off and remove ...
Use and Care Guide
Page 14
...low temperature broiling to avoid excessive browning of longer cooking foods like poultry. • If you do not select HI or LO Broil within 30 seconds, the program will automatically cancel and the time of day will flash. Sets Timer. Cancels all operations except Timer and Clock. Clock...- 3, Press the Clock pad again or wait four seconds When electrical power is used to display thne in the display , 2. Oven Control (select models) Broil Bake More+ or LessTimer Cook & Hold Clean Delay Clock Keep Warm CANCEL Use for preheating. 2. Follow the suggested times in the display. Use...
...low temperature broiling to avoid excessive browning of longer cooking foods like poultry. • If you do not select HI or LO Broil within 30 seconds, the program will automatically cancel and the time of day will flash. Sets Timer. Cancels all operations except Timer and Clock. Clock...- 3, Press the Clock pad again or wait four seconds When electrical power is used to display thne in the display , 2. Oven Control (select models) Broil Bake More+ or LessTimer Cook & Hold Clean Delay Clock Keep Warm CANCEL Use for preheating. 2. Follow the suggested times in the display. Use...

Use and Care Guide
Page 17
.... 2. use a pan designed for broiling. • HI is cooked, press the CANCEL pad. Use LO broil when broiling longer cooking foods. Keep Warm Broiling (select models) For safely keeping foods warm or for warming breads and To set from 145° 2. WARM and the temperature will reappear in oven. - Press or...
.... 2. use a pan designed for broiling. • HI is cooked, press the CANCEL pad. Use LO broil when broiling longer cooking foods. Keep Warm Broiling (select models) For safely keeping foods warm or for warming breads and To set from 145° 2. WARM and the temperature will reappear in oven. - Press or...
Use and Care Guide
Page 20
... 10. This limited warranty is valid only in the United States or Canada and applies only when the major appliance is reported to Maytag within 30 days from defects in materials or workmanship and is used in a manner that have been removed, altered or cannot be repaired in ... if it is installed in an inaccessible location or is not installed in which it is used in the country in accordance with original model/serial numbers that is contrary to published user or operator instructions and/or installation instructions. 4. Major appliances with published installation instructions. 11....
... 10. This limited warranty is valid only in the United States or Canada and applies only when the major appliance is reported to Maytag within 30 days from defects in materials or workmanship and is used in a manner that have been removed, altered or cannot be repaired in ... if it is installed in an inaccessible location or is not installed in which it is used in the country in accordance with original model/serial numbers that is contrary to published user or operator instructions and/or installation instructions. 4. Major appliances with published installation instructions. 11....


