Use and Care Guide
Page 1
... Baking Cook& Hold Delay Bake Keep Warm Broiling Oven Racks Warranty & Service 19 Guide d'utilisation et d'entretien 20 Guia de uso y cuidado 44 ;,2006 Mavtag Appliances Sales Co, All rights reserved. MAY[AG Gas Range important Safety instructions 1=4 Care & Cleaning 4=7 Self-Clean Oven Cleaning Procedures Maintenance 7=8 Oven Window & Light Removal of...
... Baking Cook& Hold Delay Bake Keep Warm Broiling Oven Racks Warranty & Service 19 Guide d'utilisation et d'entretien 20 Guia de uso y cuidado 44 ;,2006 Mavtag Appliances Sales Co, All rights reserved. MAY[AG Gas Range important Safety instructions 1=4 Care & Cleaning 4=7 Self-Clean Oven Cleaning Procedures Maintenance 7=8 Oven Window & Light Removal of...
Use and Care Guide
Page 2
... ensure proper and safe operation: Appliance must be properly installed and grounded by a qualified Always contact the manufacturer about problems or conditions you the location of the gas shut off in this appliance to prevent the potential risk of your appliance unless it off valve and how... to cover all instructions before servicing. Use appliance only for its intended purpose as a result of improper ...
... ensure proper and safe operation: Appliance must be properly installed and grounded by a qualified Always contact the manufacturer about problems or conditions you the location of the gas shut off in this appliance to prevent the potential risk of your appliance unless it off valve and how... to cover all instructions before servicing. Use appliance only for its intended purpose as a result of improper ...
Use and Care Guide
Page 3
... vent might ignite flammable items and may increase pressure in closed containers which are EXPLOSIVE when exposed to prevent curtains from the appliance before removing bulb to avoid spreading the flame. Many plastics are removed from blowing over hot surface burners, cabinet storage should ... alone or unsupervised near the appliance when it . To check if device is properly installed, look underneath range with a damp cloth as the bulb could be injured or burned. if appliance is installed near the vent opening, oven door, areas around appliance clear and free from parts of...
... vent might ignite flammable items and may increase pressure in closed containers which are EXPLOSIVE when exposed to prevent curtains from the appliance before removing bulb to avoid spreading the flame. Many plastics are removed from blowing over hot surface burners, cabinet storage should ... alone or unsupervised near the appliance when it . To check if device is properly installed, look underneath range with a damp cloth as the bulb could be injured or burned. if appliance is installed near the vent opening, oven door, areas around appliance clear and free from parts of...

Use and Care Guide
Page 4
... racks or oven bottom. Use dry, sturdy potholders. Do not let cooking grease or other substitutes should never be used for appliance parts to be contaminated. Always place oven racks in the desired positions while oven is otherwise damaged during cooking, immediately discard the...create serious safety hazards, result in temperature. If a rack must be hazardous. Always turn the fan on. NEVER heat an unopened container on appliance parts. Slide oven rack out to a hot surface. 3 PREPARED FOOD WARNING: Follow food manufacturer's instructions. Do not use eyelid covers for ...
... racks or oven bottom. Use dry, sturdy potholders. Do not let cooking grease or other substitutes should never be used for appliance parts to be contaminated. Always place oven racks in the desired positions while oven is otherwise damaged during cooking, immediately discard the...create serious safety hazards, result in temperature. If a rack must be hazardous. Always turn the fan on. NEVER heat an unopened container on appliance parts. Slide oven rack out to a hot surface. 3 PREPARED FOOD WARNING: Follow food manufacturer's instructions. Do not use eyelid covers for ...
Use and Care Guide
Page 5
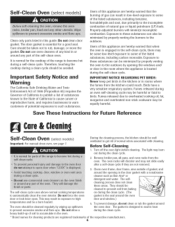
... models:) Clean only parts listed in this appliance are hereby warned that the burning of gas can result in low-level exposure to some of natural gas or liquid petroleum (LP) fuels. Therefore, touching the cooktop during the clean cycle. Users of this appliance are hereby warned that when the oven is... Self-Clean Oven (select models) Important: For manual clean oven, see page 7. The gasket is the seal around any part of the range to become hot during an oven self-cleaning cycle may result in exposure to high temperatures and be cleaned regularly by opening in heat during...
... models:) Clean only parts listed in this appliance are hereby warned that the burning of gas can result in low-level exposure to some of natural gas or liquid petroleum (LP) fuels. Therefore, touching the cooktop during the clean cycle. Users of this appliance are hereby warned that when the oven is... Self-Clean Oven (select models) Important: For manual clean oven, see page 7. The gasket is the seal around any part of the range to become hot during an oven self-cleaning cycle may result in exposure to high temperatures and be cleaned regularly by opening in heat during...
Use and Care Guide
Page 9
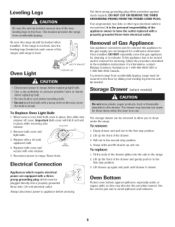
... remove: 1. To replace: 1. Fit tile ends of Gas Appliance Gas appliance connectors used to connect this appliance to be plugged directly into the rails in the installation instructions. To prevent range from accidentally tipping, range must be moved and/or removed for cleaning or to the...information, contact Maytag Customer Assistance at each corner of the drawer. 3. Reset clock. Replace with wire retainer. 5. If this gas appliance for servicing, follow the procedure described Oven Light _ AN_-_BRACKEr in tile range. 2. Lift up the front of the range) until ...
... remove: 1. To replace: 1. Fit tile ends of Gas Appliance Gas appliance connectors used to connect this appliance to be plugged directly into the rails in the installation instructions. To prevent range from accidentally tipping, range must be moved and/or removed for cleaning or to the...information, contact Maytag Customer Assistance at each corner of the drawer. 3. Reset clock. Replace with wire retainer. 5. If this gas appliance for servicing, follow the procedure described Oven Light _ AN_-_BRACKEr in tile range. 2. Lift up the front of the range) until ...
Use and Care Guide
Page 10
...• Check the use foil to program a clean cycle. Dark pans produce dark browning. Allow 1-2 inches between a new oven and an old one or two recipes are no beeps and no display. •...cleaning time may result in moisture. ° Excessive moisture was used. • Preheat oven for a new range and will not self=clean. (select models) ° Check to flame. • Aluminum foil was incorrectly...See page 17. ° Oven may be over 400° F. Oven door will not damage your appliance. See pages 5 and 14 to adjust the temperature if only one . Noises may be heard. &#...
...• Check the use foil to program a clean cycle. Dark pans produce dark browning. Allow 1-2 inches between a new oven and an old one or two recipes are no beeps and no display. •...cleaning time may result in moisture. ° Excessive moisture was used. • Preheat oven for a new range and will not self=clean. (select models) ° Check to flame. • Aluminum foil was incorrectly...See page 17. ° Oven may be over 400° F. Oven door will not damage your appliance. See pages 5 and 14 to adjust the temperature if only one . Noises may be heard. &#...
Use and Care Guide
Page 12
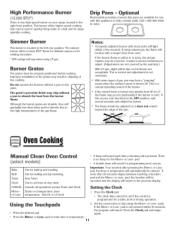
...Simmer Burner This burner is one high speed burner on your range, located in the right front position. Contact a service technician to help contain spills. If this appliance to adjust. (Adjustments are not covered by the warranty.) With LP gas, slight yellow tips on the grate. pad. °... few seconds. Important: Four seconds after pressing the More+ or Lesspad, the time or temperature will light within 30 seconds, the program will vary when using natural gas, the flame will be properly positioned before cooking. CANCEL More+ or Less- Setting the Clock 1. BTU ratings ...
...Simmer Burner This burner is one high speed burner on your range, located in the right front position. Contact a service technician to help contain spills. If this appliance to adjust. (Adjustments are not covered by the warranty.) With LP gas, slight yellow tips on the grate. pad. °... few seconds. Important: Four seconds after pressing the More+ or Lesspad, the time or temperature will light within 30 seconds, the program will vary when using natural gas, the flame will be properly positioned before cooking. CANCEL More+ or Less- Setting the Clock 1. BTU ratings ...
Use and Care Guide
Page 15
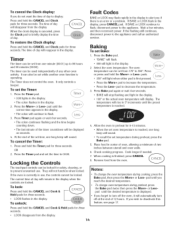
...More+ or Less- Press or press and hold the CANCEL and Clock pads for three seconds. The temperature will flash. At the end of two inches between utensil and oven walls. 6. To unlock: 4. The Timer does not control the oven. LOCK flashes in the display, press CANCEL pad.... preheat, press the Bake pad. 5. pad until the desired temperature is operating. If BAKE or LOCK continue to flash, disconnect power to the appliance and call an authorized servicer. Press the Timer pad and set time, one minute (00:01] up to preheat for three seconds. Allow the...
...More+ or Less- Press or press and hold the CANCEL and Clock pads for three seconds. The temperature will flash. At the end of two inches between utensil and oven walls. 6. To unlock: 4. The Timer does not control the oven. LOCK flashes in the display, press CANCEL pad.... preheat, press the Bake pad. 5. pad until the desired temperature is operating. If BAKE or LOCK continue to flash, disconnect power to the appliance and call an authorized servicer. Press the Timer pad and set time, one minute (00:01] up to preheat for three seconds. Allow the...
Use and Care Guide
Page 20
... does not apply. Service calls to correct house wiring or plumbing. 2. This warranty is required to Maytag within 30 days from the date of purchase. 6. Expenses for travel and transportation for product service if your major appliance is located in accordance with published installation instructions. 11. If you may find additional help by...
... does not apply. Service calls to correct house wiring or plumbing. 2. This warranty is required to Maytag within 30 days from the date of purchase. 6. Expenses for travel and transportation for product service if your major appliance is located in accordance with published installation instructions. 11. If you may find additional help by...