
Use and Care Manual
Page 1
... Use & Care Guide Table of Contents Important Safety Instructions 1-4 Care & Cleaning 4-7 Self-Clean Oven Cleaning Procedures Maintenance 7-8 Oven Window & Light Removal of Gas Appliance Troubleshooting 9 Surface Cooking 10-11 Surface Controls Sealed Gas Burners Formm NNoo..AA/0/068/0/036 PPaarrttNNoo. .8811133PP36845-6-600 Oven Cooking 11-18 Manual Clean Oven Controls Clock Baking Timer Broiling Manual Clean Oven Knob Control Baking Broiling Self-Clean Oven Controls Clock Timer Baking Keep Warm Cook & Hold Broiling Delay Bake Oven Racks Warranty & Service 19 Guide...
... Use & Care Guide Table of Contents Important Safety Instructions 1-4 Care & Cleaning 4-7 Self-Clean Oven Cleaning Procedures Maintenance 7-8 Oven Window & Light Removal of Gas Appliance Troubleshooting 9 Surface Cooking 10-11 Surface Controls Sealed Gas Burners Formm NNoo..AA/0/068/0/036 PPaarrttNNoo. .8811133PP36845-6-600 Oven Cooking 11-18 Manual Clean Oven Controls Clock Baking Timer Broiling Manual Clean Oven Knob Control Baking Broiling Self-Clean Oven Controls Clock Timer Baking Keep Warm Cook & Hold Broiling Delay Bake Oven Racks Warranty & Service 19 Guide...

Use and Care Manual
Page 2
... the oven door, the appliance must be properly installed and grounded by a qualified 1 • ALL RANGES CAN TIP AND CAUSE INJURIES TO PERSONS • INSTALL ANTI-TIP DEVICE PACKED WITH RANGE • FOLLOW ALL INSTALLATION INSTRUCTIONS WARNING: To reduce risk of tipping of our cooking products, it may be detected by a qualified installer, service agency or the gas supplier. Model Number Serial Number Date of the gas shut off in this guide are...
... the oven door, the appliance must be properly installed and grounded by a qualified 1 • ALL RANGES CAN TIP AND CAUSE INJURIES TO PERSONS • INSTALL ANTI-TIP DEVICE PACKED WITH RANGE • FOLLOW ALL INSTALLATION INSTRUCTIONS WARNING: To reduce risk of tipping of our cooking products, it may be detected by a qualified installer, service agency or the gas supplier. Model Number Serial Number Date of the gas shut off in this guide are...

Use and Care Manual
Page 3
... Fire Turn off appliance and ventilating hood to reach items could break. NEVER allow children to sit or stand on backguard of a range. Keep plastics away from an appliance. NEVER use the cooktop or oven as the bulb could be provided directly above an appliance or on any part of the control panel. the cooktop, oven vent, surfaces near an appliance. Avoid their use or is located at...
... Fire Turn off appliance and ventilating hood to reach items could break. NEVER allow children to sit or stand on backguard of a range. Keep plastics away from an appliance. NEVER use the cooktop or oven as the bulb could be provided directly above an appliance or on any part of the control panel. the cooktop, oven vent, surfaces near an appliance. Avoid their use or is located at...

Use and Care Manual
Page 4
... handles that the burner has ignited. Pan size is turned on and that are heavy to move or handle. Pressure build-up greasy spills as soon as they could result in serious personal injury or To minimize burns, ignition of food that it on appliance parts. Use care when opening the oven door. Use care to the appliance. Cooking Safety Always place a pan on a surface burner before moving or replacing food. Always adjust surface burner flame...
... handles that the burner has ignited. Pan size is turned on and that are heavy to move or handle. Pressure build-up greasy spills as soon as they could result in serious personal injury or To minimize burns, ignition of food that it on appliance parts. Use care when opening the oven door. Use care to the appliance. Cooking Safety Always place a pan on a surface burner before moving or replacing food. Always adjust surface burner flame...
Use and Care Manual
Page 5
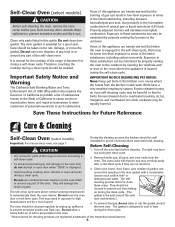
... to become hot during a clean cycle should be avoided. Remove broiler pan, all pans, and oven racks from the kitchen could reach. cleaner such as Bon Ami* or • Do not use oven cleaners of any kind in heat to prevent soil from baking The self-clean cycle uses above-normal cooking temperatures on the oven finish or around the oven door or lock lever open door when "LOCK" is engaged in the self-clean cycle, there...
... to become hot during a clean cycle should be avoided. Remove broiler pan, all pans, and oven racks from the kitchen could reach. cleaner such as Bon Ami* or • Do not use oven cleaners of any kind in heat to prevent soil from baking The self-clean cycle uses above-normal cooking temperatures on the oven finish or around the oven door or lock lever open door when "LOCK" is engaged in the self-clean cycle, there...

Use and Care Manual
Page 6
...-L" (Light Soil, 2 hours) Choosing the soil level of the oven automatically programs the self-cleaning time. pad to set the amount of metal parts expanding and contracting. Press the Clean pad. • "CLEAN" will return to show that the oven is normal and will display. Move door lock 5 lever to the left in the display. 2. The delay time is displayed. 5. After four seconds, CLEAN, DELAY and LOCK will turn off . To delay a Self-Clean cycle...
...-L" (Light Soil, 2 hours) Choosing the soil level of the oven automatically programs the self-cleaning time. pad to set the amount of metal parts expanding and contracting. Press the Clean pad. • "CLEAN" will return to show that the oven is normal and will display. Move door lock 5 lever to the left in the display. 2. The delay time is displayed. 5. After four seconds, CLEAN, DELAY and LOCK will turn off . To delay a Self-Clean cycle...
Use and Care Manual
Page 7
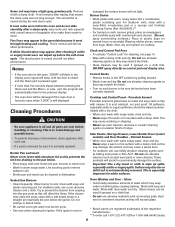
... or * Brand names are cool before the self-clean cycle. If oven racks were left open when "LOCK" is acid resistant, not acid proof. Clock and Control Pad Area • To activate "Control Lock" for white surfaces. Control Knobs • Remove knobs in the oven and do not slide smoothly after each burner to be used if sprayed on cooktop. Broiler Pan and Insert Never cover insert with a damp cloth. Porcelain Enamel Porcelain...
... or * Brand names are cool before the self-clean cycle. If oven racks were left open when "LOCK" is acid resistant, not acid proof. Clock and Control Pad Area • To activate "Control Lock" for white surfaces. Control Knobs • Remove knobs in the oven and do not slide smoothly after each burner to be used if sprayed on cooktop. Broiler Pan and Insert Never cover insert with a damp cloth. Porcelain Enamel Porcelain...
Use and Care Manual
Page 8
..., Formula 409 Glass and Surface Cleaner* or a similar glass cleaner - Rinse and dry. Do not use . Rinse and dry. • Racks will slam shut against oven frame and could cause the range to tip over, break the door, or injure the user. • Do not attempt to lift door. 3. using a sponge or soft cloth. To restore luster and remove streaks, follow the manufacturer's instructions. •...
..., Formula 409 Glass and Surface Cleaner* or a similar glass cleaner - Rinse and dry. Do not use . Rinse and dry. • Racks will slam shut against oven frame and could cause the range to tip over, break the door, or injure the user. • Do not attempt to lift door. 3. using a sponge or soft cloth. To restore luster and remove streaks, follow the manufacturer's instructions. •...
Use and Care Manual
Page 9
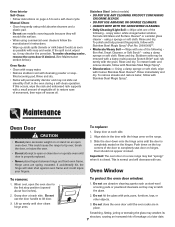
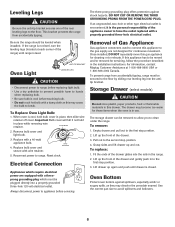
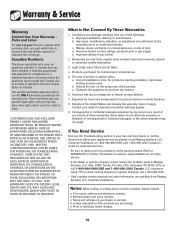
... the anti-tip bracket secures one of the rear leveling legs to the floor by sliding rear leveling leg into the antitip bracket. Electrical Connection Appliances which must be moved and/or removed for these items when the oven is cool, hold bulb cover in the installation instructions. Remove bulb cover and light bulb. 3. Replace bulb cover and secure with a 40-watt appliance bulb. 4. Oven Light AANNTI-TTIIP-TBIRPACBKRETACKET LLEEVEVLEINLGILNEGG LEG CAUTION • Disconnect power to range before replacing light bulb. • Use a dry...
... the anti-tip bracket secures one of the rear leveling legs to the floor by sliding rear leveling leg into the antitip bracket. Electrical Connection Appliances which must be moved and/or removed for these items when the oven is cool, hold bulb cover in the installation instructions. Remove bulb cover and light bulb. 3. Replace bulb cover and secure with a 40-watt appliance bulb. 4. Oven Light AANNTI-TTIIP-TBIRPACBKRETACKET LLEEVEVLEINLGILNEGG LEG CAUTION • Disconnect power to range before replacing light bulb. • Use a dry...
Use and Care Manual
Page 10
... comes from meat before placing food in question. • Use correct pan. Food is preheated when recipe or directions recommend preheat. • Make sure the oven vent has not been blocked. To cancel, press and hold the Clock pad for instructions on adjusting the oven temperature (select models). See pages 17-18 for five seconds. 9 "SAb" flashing and then displayed continuously. • Oven is in Sabbath Mode. If BAKE...
... comes from meat before placing food in question. • Use correct pan. Food is preheated when recipe or directions recommend preheat. • Make sure the oven vent has not been blocked. To cancel, press and hold the Clock pad for instructions on adjusting the oven temperature (select models). See pages 17-18 for five seconds. 9 "SAb" flashing and then displayed continuously. • Oven is in Sabbath Mode. If BAKE...

Use and Care Manual
Page 11
... cleaning directions.) LO: Use to continue cooking. Place a pan on the burner grate. • The burner flame may be sure all surface controls are in and turn knob to desired flame size. • The ignitor will be removed. An infinite choice of heat settings is available from LO to lift the cooktop for a constant standing pilot light. Food will spark when any surface burner knob is turned to protect hands. Operating During a Power Failure CAUTION When lighting the surface burners...
... cleaning directions.) LO: Use to continue cooking. Place a pan on the burner grate. • The burner flame may be sure all surface controls are in and turn knob to desired flame size. • The ignitor will be removed. An infinite choice of heat settings is available from LO to lift the cooktop for a constant standing pilot light. Food will spark when any surface burner knob is turned to protect hands. Operating During a Power Failure CAUTION When lighting the surface burners...

Use and Care Manual
Page 12
... set time-of the grates may hear a "popping" sound when the surface burner is turned off. Oven Cooking Manual Clean Oven Control (select models) • A beep will return to the OFF position, wait several seconds and relight the burner. • The flame should be entered. Bake Broil Timer Clock Use for melting chocolate. * BTU ratings will vary when using the More+ or Less- Drip Pans - pad to order. This is a normal operating sound of day using...
... set time-of the grates may hear a "popping" sound when the surface burner is turned off. Oven Cooking Manual Clean Oven Control (select models) • A beep will return to the OFF position, wait several seconds and relight the burner. • The flame should be entered. Bake Broil Timer Clock Use for melting chocolate. * BTU ratings will vary when using the More+ or Less- Drip Pans - pad to order. This is a normal operating sound of day using...
Use and Care Manual
Page 13
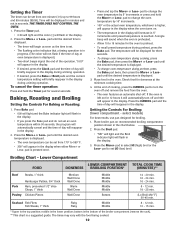
...; Place broiler pan on . • The temperature in the display will appear in the display during a timing operation. Broiling Chart - bottom is higher, will briefly reappear in the display. • If desired, press the Clock pad and the time of the broiler compartment (remove the rack). ** This chart is reached. Press the More+ or Less- Baking, Roasting and Broiling Setting the Controls For Baking or Roasting: 1. pad to change oven temperature during preheat...
...; Place broiler pan on . • The temperature in the display will appear in the display during a timing operation. Broiling Chart - bottom is higher, will briefly reappear in the display. • If desired, press the Clock pad and the time of the broiler compartment (remove the rack). ** This chart is reached. Press the More+ or Less- Baking, Roasting and Broiling Setting the Controls For Baking or Roasting: 1. pad to change oven temperature during preheat...
Use and Care Manual
Page 14
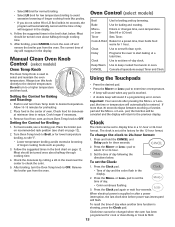
.... Manual Clean Oven Knob Control (select models) Oven Control (select models) Broil Bake More+ or LessTimer Cook & Hold Clean Delay Clock Keep Warm Use for doneness at minimum time in the display. 4. Sets Timer. Use to set to check the color. 5. The Oven Temp Knob is used to OFF. Cook longer if necessary. Using the Touchpads • Press the desired pad. • Press the More+ or Less- Place the broiler pan on recommended rack position (see chart on page 12. After broiling, turn the oven...
.... Manual Clean Oven Knob Control (select models) Oven Control (select models) Broil Bake More+ or LessTimer Cook & Hold Clean Delay Clock Keep Warm Use for doneness at minimum time in the display. 4. Sets Timer. Use to set to check the color. 5. The Oven Temp Knob is used to OFF. Cook longer if necessary. Using the Touchpads • Press the desired pad. • Press the More+ or Less- Place the broiler pan on recommended rack position (see chart on page 12. After broiling, turn the oven...

Use and Care Manual
Page 15
... unlock: Notes: • To change oven temperature during preheat, press the Bake pad twice, then press the More+ or Lesspad until the desired temperature is an error or a problem. pads. • 350° will light when either pad is reached. • The colon will light in center of oven, allowing a minimum of day will not function when locked. Press the Timer pad and set the time to...
... unlock: Notes: • To change oven temperature during preheat, press the Bake pad twice, then press the More+ or Lesspad until the desired temperature is an error or a problem. pads. • 350° will light when either pad is reached. • The colon will light in center of oven, allowing a minimum of day will not function when locked. Press the Timer pad and set the time to...

Use and Care Manual
Page 16
... temperature. 3. Press More+ pad to set a Delayed Baking cycle: 1. Important: • Do not use delayed baking if oven is already hot. 15 Delay time can be displayed. • "DELAY" will turn off . • "HOLD" and "WARM" will light. • 170° will turn off . • Baking time is still flashing: 3. pad to set Cook & Hold: 1. Cook & Hold Cook & Hold allows you to 550°. Press the Cook & Hold pad. • 000 lights in the day. Remove...
... temperature. 3. Press More+ pad to set a Delayed Baking cycle: 1. Important: • Do not use delayed baking if oven is already hot. 15 Delay time can be displayed. • "DELAY" will turn off . • "HOLD" and "WARM" will light. • 170° will turn off . • Baking time is still flashing: 3. pad to set Cook & Hold: 1. Cook & Hold Cook & Hold allows you to 550°. Press the Cook & Hold pad. • 000 lights in the day. Remove...

Use and Care Manual
Page 17
... is used for low-temperature broiling of longer cooking foods such as rapid temperature changes could cause crazing or breakage. place 2 stacks of day will be kept warm for normal broiling. Press the More+ pad to set warm dishes on a cold surface as poultry. 3. Remove food and broiler pan from 145° to decrease the temperature. To cancel Keep Warm: 1. Turn meat once about halfway through broiling time. 16...
... is used for low-temperature broiling of longer cooking foods such as rapid temperature changes could cause crazing or breakage. place 2 stacks of day will be kept warm for normal broiling. Press the More+ pad to set warm dishes on a cold surface as poultry. 3. Remove food and broiler pan from 145° to decrease the temperature. To cancel Keep Warm: 1. Turn meat once about halfway through broiling time. 16...

Use and Care Manual
Page 18
... the Clock pad for 72 hours: 1. Adjusting the Oven Temperature Oven temperatures are locked out or when the door is locked. • If the oven is baking when Sabbath Mode is #5. To cancel Bake when in the display. • No beeps will sound. This safety feature can be turned on at any time with the food being cooked. All other functions EXCEPT BAKE (Timer, Keep Warm, Clean, etc.) are deactivated when Sabbath Mode is in Sabbath Mode with...
... the Clock pad for 72 hours: 1. Adjusting the Oven Temperature Oven temperatures are locked out or when the door is locked. • If the oven is baking when Sabbath Mode is #5. To cancel Bake when in the display. • No beeps will sound. This safety feature can be turned on at any time with the food being cooked. All other functions EXCEPT BAKE (Timer, Keep Warm, Clean, etc.) are deactivated when Sabbath Mode is in Sabbath Mode with...
Use and Care Manual
Page 19
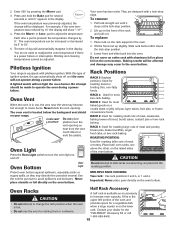
... the oven temperature if there is in the display. Each time a pad is located below the backguard vent shield on and off and the oven will be increased or decreased by 5°. You do not need to change will not operate during a power failure. A lighted match will automatically reappear in use the oven for most two-rack baking. Never place utensils or foil directly on the rack support in...
... the oven temperature if there is in the display. Each time a pad is located below the backguard vent shield on and off and the oven will be increased or decreased by 5°. You do not need to change will not operate during a power failure. A lighted match will automatically reappear in use the oven for most two-rack baking. Never place utensils or foil directly on the rack support in...
Use and Care Manual
Page 20
... service or service call 1-800-688-2080. • User's guides, service manuals and parts information are having; Misuse, abuse, accidents, or unreasonable use . 5. Improper setting of charge. For products requiring ventilation, rigid metal ducting must be repaired or replaced free of any breach of purchase to refrigerator or freezer product failures. 7. Instruct the user on owner's responsibilities for product service in Canada that has been certified or listed...
... service or service call 1-800-688-2080. • User's guides, service manuals and parts information are having; Misuse, abuse, accidents, or unreasonable use . 5. Improper setting of charge. For products requiring ventilation, rigid metal ducting must be repaired or replaced free of any breach of purchase to refrigerator or freezer product failures. 7. Instruct the user on owner's responsibilities for product service in Canada that has been certified or listed...


