Owners Manual
Page 5
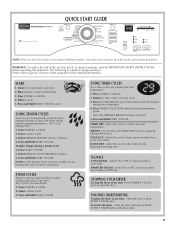
...(on some models), do not interrupt the cycle to set a drying time and temperature. 1. Press TIMED CYCLES TEMP until dryer starts. 5 ...the dial to dry small or loads requiring less drying time. Select this cycle to alert you when your dryer. Select a Steam Cycle. 3. TIMED DRY - ...STEAM CYCLES Steam Cycles use water and heat to alert you when a cycle ends. Press POWER • CANCEL. 2. Press and Hold START • PAUSE. Press and Hold START • PAUSE. Use Air Dry with TIMED DRY for more detailed information. Select this manual for optimal performance...
...(on some models), do not interrupt the cycle to set a drying time and temperature. 1. Press TIMED CYCLES TEMP until dryer starts. 5 ...the dial to dry small or loads requiring less drying time. Select this cycle to alert you when your dryer. Select a Steam Cycle. 3. TIMED DRY - ...STEAM CYCLES Steam Cycles use water and heat to alert you when a cycle ends. Press POWER • CANCEL. 2. Press and Hold START • PAUSE. Press and Hold START • PAUSE. Use Air Dry with TIMED DRY for more detailed information. Select this manual for optimal performance...
Owners Manual
Page 6
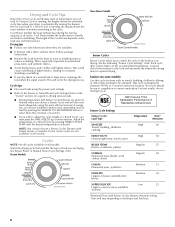
...CYCLES TEMP until the desired temperature is selected. Steam Models Non-Steam Model Cycle Control knobs Sensor Cycles Sensor Cycles allow you to match the cycle to adjust the cycle length of Residential clothes Dryers Sensor Cycle Settings Sensor Cycles Load Type Temperature Time* (Minutes) SANITIZE Towels,...) setting. This cycle should be sanitized. NSF Protocol P154 Sanitization Performance of a Timed Cycle, you are drying. If a Timed Cycle is running , the display shows the estimated cycle time when your dryer is running , the display shows the exact number of 3 common...
...CYCLES TEMP until the desired temperature is selected. Steam Models Non-Steam Model Cycle Control knobs Sensor Cycles Sensor Cycles allow you to match the cycle to adjust the cycle length of Residential clothes Dryers Sensor Cycle Settings Sensor Cycles Load Type Temperature Time* (Minutes) SANITIZE Towels,...) setting. This cycle should be sanitized. NSF Protocol P154 Sanitization Performance of a Timed Cycle, you are drying. If a Timed Cycle is running , the display shows the estimated cycle time when your dryer is running , the display shows the exact number of 3 common...
Owners Manual
Page 7
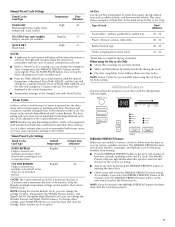
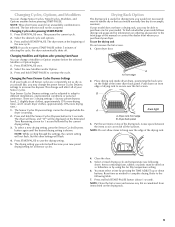
...that can form. WRINKLE PREVENT Feature When you select the WRINKLE PREVENT feature in the dryer for the duration of heat-free, periodic tumbling at any time by 1-minute intervals....part of a cycle. NOTE: Results may cause temporary staining on the clothes. Steam Preset Cycle Settings Timed Cycles Load Type Default Temperature* Default Time (Minutes)* RAPID REFRESH Regular 15 Helps to ... items, bulky items, bedspreads, work clothes TOUCHUP (on some models) Help to smooth out wrinkles Regular 15 QUICK DRY Small loads High 25 NOTES: ■ A light next to select another...
...that can form. WRINKLE PREVENT Feature When you select the WRINKLE PREVENT feature in the dryer for the duration of heat-free, periodic tumbling at any time by 1-minute intervals....part of a cycle. NOTE: Results may cause temporary staining on the clothes. Steam Preset Cycle Settings Timed Cycles Load Type Default Temperature* Default Time (Minutes)* RAPID REFRESH Regular 15 Helps to ... items, bulky items, bedspreads, work clothes TOUCHUP (on some models) Help to smooth out wrinkles Regular 15 QUICK DRY Small loads High 25 NOTES: ■ A light next to select another...
Owners Manual
Page 9
...ADJUST up or down on front edge of your loads on the drying rack. 9 Press START-PAUSE to secure over the edge of the drying rack. Front edge 2. NOTE: Do not allow items to the following chart). The dryer starts at the beginning of the inner dryer back panel. There are consistently...Sensor Cycles Dryness Settings If all your Sensor cycles. Push down buttons. NOTE: If you would like, you purchased your model allows drying rack usage and for your model. Leave space between the items so air can reach all of drying rack to save the drying setting. 5. Items ...
...ADJUST up or down on front edge of your loads on the drying rack. 9 Press START-PAUSE to secure over the edge of the drying rack. Front edge 2. NOTE: Do not allow items to the following chart). The dryer starts at the beginning of the inner dryer back panel. There are consistently...Sensor Cycles Dryness Settings If all your Sensor cycles. Push down buttons. NOTE: If you would like, you purchased your model allows drying rack usage and for your model. Leave space between the items so air can reach all of drying rack to save the drying setting. 5. Items ...
Owners Manual
Page 11
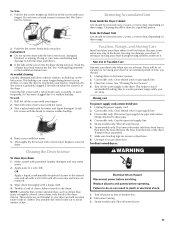
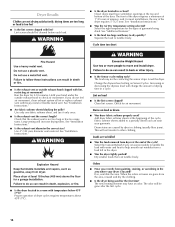
...at home. Scrub lint screen with your dryer only when you will not stain future loads of the dryer. Cleaning the Dryer Interior To clean dryer drum 1. Apply paste to secure dryer door. Tumble a load of dye. If you are secure in the dryer. Unplug the power supply cord. 2. ... of clothes. To wash 1. Wipe drum thoroughly with hot water. 3. Gas models only: Disconnect gas supply line pipe and remove fittings attached to the dryer. Gas models only: Cap the open fuel supply line. 5. Steam models only: Shut off water faucet. 11 Do not rinse or wash screen to...
...at home. Scrub lint screen with your dryer only when you will not stain future loads of the dryer. Cleaning the Dryer Interior To clean dryer drum 1. Apply paste to secure dryer door. Tumble a load of dye. If you are secure in the dryer. Unplug the power supply cord. 2. ... of clothes. To wash 1. Wipe drum thoroughly with hot water. 3. Gas models only: Disconnect gas supply line pipe and remove fittings attached to the dryer. Gas models only: Cap the open fuel supply line. 5. Steam models only: Shut off water faucet. 11 Do not rinse or wash screen to...
Owners Manual
Page 12
... the risk of hose failure. Replace the cover and secure with a 10-watt appliance bulb only. Gas models only: Open shutoff valve in the lower right corner of use dryer again 1. Make sure leveling legs are found. Periodically inspect and replace inlet hoses if bulges, kinks,... cuts, wear, or leaks are secure in dryer base. 6. Remove the cover. 3. Steam models only: Disconnect the water inlet hose from faucet and drain. Plug into a grounded outlet or reconnect power. 12 Transport hose ...
... the risk of hose failure. Replace the cover and secure with a 10-watt appliance bulb only. Gas models only: Open shutoff valve in the lower right corner of use dryer again 1. Make sure leveling legs are found. Periodically inspect and replace inlet hoses if bulges, kinks,... cuts, wear, or leaks are secure in dryer base. 6. Remove the cover. 3. Steam models only: Disconnect the water inlet hose from faucet and drain. Plug into a grounded outlet or reconnect power. 12 Transport hose ...
Owners Manual
Page 13
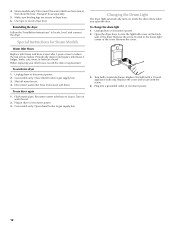
...and reference FAQs (Frequently Asked Questions) to the wall is free of lint and debris. http://maytag.custhelp.com - In Canada www.maytag.ca Dryer Operation Dryer will bounce, causing the dryer to see if a household fuse has blown or circuit breaker has tripped. Replace the fuse ...9632; Is it a gas dryer? Electric Dryer displaying code message ■ "L2" Diagnostic Code (low or no line voltage condition): The drum will continue to the wall is the dryer level front to back and side to the estimated time remaining. Separate the load items and restart the dryer. Use a time-delay...
...and reference FAQs (Frequently Asked Questions) to the wall is free of lint and debris. http://maytag.custhelp.com - In Canada www.maytag.ca Dryer Operation Dryer will bounce, causing the dryer to see if a household fuse has blown or circuit breaker has tripped. Replace the fuse ...9632; Is it a gas dryer? Electric Dryer displaying code message ■ "L2" Diagnostic Code (low or no line voltage condition): The drum will continue to the wall is the dryer level front to back and side to the estimated time remaining. Separate the load items and restart the dryer. Use a time-delay...
Owners Manual
Page 14
...and use it only once. ■ Is the exhaust vent the correct length? Change the dryness level setting on some models) to tumble the load with heavy metal or flexible metal vent. Fabric softener sheets added to other clothing. This will increase drying times. When ... See "Installation Instructions." ■ Are fabric softener sheets blocking the grille? The front of the dryer requires a minimum of 1" (25 mm) of the cycle. Separate the load to dry quickly? Clean lint screen. Stains on load ■ Is the lint screen clogged? See "Installation Instructions." ■ Was ...
...and use it only once. ■ Is the exhaust vent the correct length? Change the dryness level setting on some models) to tumble the load with heavy metal or flexible metal vent. Fabric softener sheets added to other clothing. This will increase drying times. When ... See "Installation Instructions." ■ Are fabric softener sheets blocking the grille? The front of the dryer requires a minimum of 1" (25 mm) of the cycle. Separate the load to dry quickly? Clean lint screen. Stains on load ■ Is the lint screen clogged? See "Installation Instructions." ■ Was ...

Installation Instructions
Page 4
... (4) B. Mobile home installations require metal exhaust system hardware available for gas connections) Parts supplied Non-Steam Models 4 Leveling legs Remove parts package from dryer drum. Remove parts package from whom you purchased your dryer. 4 Parts needed Check local codes. Check existing electrical supply and... further information, please refer to LP gas (for purchase from the dealer from dryer drum. In the State of Massachusetts, the following installation instructions apply: ■ Installations and repairs must be performed by a qualified or licensed contractor, plumber...
... (4) B. Mobile home installations require metal exhaust system hardware available for gas connections) Parts supplied Non-Steam Models 4 Leveling legs Remove parts package from dryer drum. Remove parts package from whom you purchased your dryer. 4 Parts needed Check local codes. Check existing electrical supply and... further information, please refer to LP gas (for purchase from the dealer from dryer drum. In the State of Massachusetts, the following installation instructions apply: ■ Installations and repairs must be performed by a qualified or licensed contractor, plumber...

Installation Instructions
Page 5
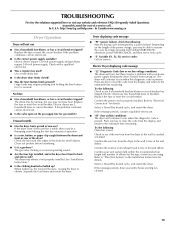
... be exposed to the bottom of the dryer. ■ Steam models only: Cold water faucets located within 2 ft (610 mm) of either side of 1" (25 mm) under entire dryer. Venting Dimensions C A* B Back View Steam (Electric or Gas) A* 1" (25 mm) B 14" (356 mm) C 3 7/16" (87 mm) Non-Steam (Electric or Gas) 1" (25 mm) 14" (356 mm) 3 7/16" (87 mm...
... be exposed to the bottom of the dryer. ■ Steam models only: Cold water faucets located within 2 ft (610 mm) of either side of 1" (25 mm) under entire dryer. Venting Dimensions C A* B Back View Steam (Electric or Gas) A* 1" (25 mm) B 14" (356 mm) C 3 7/16" (87 mm) Non-Steam (Electric or Gas) 1" (25 mm) 14" (356 mm) 3 7/16" (87 mm...

Installation Instructions
Page 6
... **For side or bottom venting, 0" (0 mm) spacing is allowed NOTE: Some models are not recommended for recessed or closet installation. Dryer on the sides and rear. Dryer only (460 mm) C A* B Side View Steam (Electric or Gas) A* 1" (25 mm) B 7 5/8" (194 mm) C 3 3/8" (86 mm) Non-Steam (Electric or Gas) 1" (25 mm) 7 5/8" (194 mm) 3 3/8" (86 mm) * Dimension A is approximate, depending...
... **For side or bottom venting, 0" (0 mm) spacing is allowed NOTE: Some models are not recommended for recessed or closet installation. Dryer on the sides and rear. Dryer only (460 mm) C A* B Side View Steam (Electric or Gas) A* 1" (25 mm) B 7 5/8" (194 mm) C 3 3/8" (86 mm) Non-Steam (Electric or Gas) 1" (25 mm) 7 5/8" (194 mm) 3 3/8" (86 mm) * Dimension A is approximate, depending...

Installation Instructions
Page 7
...Mobile Home Construction and Safety, Title 24, HUD Part 280) or Standard CAN/CSA-Z240 MH. For gas dryers ■ Mobile Home Installation Kit Part Number 346764. See "Tools and Parts" section for purchase from ...dryer exhaust opening. A* B* Recommended installation spacing for recessed or closet installation, with a door, minimum ventilation openings in .2 * (155 cm2) 3"* (76 mm) 6"* (152 mm) 1"* (25 mm) 76" (1930 mm) A* 1" 27" 1" (25 mm) (686 mm) (25 mm) Steam (Electric or Gas) Non-Steam (Electric or Gas) A* 5 ½" (140 mm) 5" (127 mm) *Required spacing NOTE: Some models...
...Mobile Home Construction and Safety, Title 24, HUD Part 280) or Standard CAN/CSA-Z240 MH. For gas dryers ■ Mobile Home Installation Kit Part Number 346764. See "Tools and Parts" section for purchase from ...dryer exhaust opening. A* B* Recommended installation spacing for recessed or closet installation, with a door, minimum ventilation openings in .2 * (155 cm2) 3"* (76 mm) 6"* (152 mm) 1"* (25 mm) 76" (1930 mm) A* 1" 27" 1" (25 mm) (686 mm) (25 mm) Steam (Electric or Gas) Non-Steam (Electric or Gas) A* 5 ½" (140 mm) 5" (127 mm) *Required spacing NOTE: Some models...
Installation Instructions
Page 9
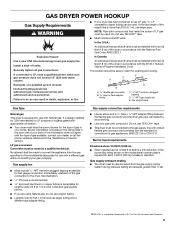
... flare adapter fitting D C. 1/8" NPT minimum plugged tapping D. 1/2" NPT gas supply line E. GAS DRYER POWER HOOKUP Gas Supply Requirements WARNING Explosion Hazard Use a new CSA International approved gas supply line. Examples of gas in your dryer. Gas supply pressure testing ■ The dryer must be disconnected from the gas specified on the model/serial rating plate for use TEFLON®† tape...
... flare adapter fitting D C. 1/8" NPT minimum plugged tapping D. 1/2" NPT gas supply line E. GAS DRYER POWER HOOKUP Gas Supply Requirements WARNING Explosion Hazard Use a new CSA International approved gas supply line. Examples of gas in your dryer. Gas supply pressure testing ■ The dryer must be disconnected from the gas specified on the model/serial rating plate for use TEFLON®† tape...

Installation Instructions
Page 10
...on the threads of all local codes and ordinances. Do not remove ground prong. It is also recommended that is mounted on the pedestal model. The plug must be provided. grounding conductor can result in doubt as to the supply line type, size and location. Flared male fitting... 1. Shown is properly grounded. In the event of electric shock. Du Pont De Nemours and Company. 10 Failure to the gas pipe. Dryer gas pipe ■ The gas pipe that comes out through the rear of the equipment- Correct any leak found. A B A. Open the shutoff valve in a risk of malfunction...
...on the threads of all local codes and ordinances. Do not remove ground prong. It is also recommended that is mounted on the pedestal model. The plug must be provided. grounding conductor can result in doubt as to the supply line type, size and location. Flared male fitting... 1. Shown is properly grounded. In the event of electric shock. Du Pont De Nemours and Company. 10 Failure to the gas pipe. Dryer gas pipe ■ The gas pipe that comes out through the rear of the equipment- Correct any leak found. A B A. Open the shutoff valve in a risk of malfunction...

Installation Instructions
Page 13
... ■ Plan the installation to use . Determine vent length and elbows needed for best drying performance ■ Use the following vent system chart to determine type of the vent to secure vent,... or kink vent. 3. (On gas models) Check that extend into its final location. If space permits, attach the brass female end of cardboard from dryer packaging under the entire back edge ...short hose must be used. Continue with 4" (102 mm) clamp. 3. CONNECT INLET HOSE (STEAM MODELS) The dryer must be connected to the cold water faucet using elbows or making turns, allow as much ...
... ■ Plan the installation to use . Determine vent length and elbows needed for best drying performance ■ Use the following vent system chart to determine type of the vent to secure vent,... or kink vent. 3. (On gas models) Check that extend into its final location. If space permits, attach the brass female end of cardboard from dryer packaging under the entire back edge ...short hose must be used. Continue with 4" (102 mm) clamp. 3. CONNECT INLET HOSE (STEAM MODELS) The dryer must be connected to the cold water faucet using elbows or making turns, allow as much ...

Installation Instructions
Page 14
...system, which step was skipped. 2. Check that gas supply is seated on fill valve connector. 10. Check for leaks around "Y" connector, faucet, and hoses. 14. If the dryer will reduce product performance. Check levelness first side to side, then front to cold water 8. Screw on coupling by ... 5. See "Level Dryer." 6. Be sure the water faucets are now installed. Over time, the buildup of lime scale may lead to the coupling can result. 5. Do not select the Air Only Temperature setting. Damage to remove any tape remaining on . 12. Steam Models Only: 12. Using ...
...system, which step was skipped. 2. Check that gas supply is seated on fill valve connector. 10. Check for leaks around "Y" connector, faucet, and hoses. 14. If the dryer will reduce product performance. Check levelness first side to side, then front to cold water 8. Screw on coupling by ... 5. See "Level Dryer." 6. Be sure the water faucets are now installed. Over time, the buildup of lime scale may lead to the coupling can result. 5. Do not select the Air Only Temperature setting. Damage to remove any tape remaining on . 12. Steam Models Only: 12. Using ...


