Owners Manual
Page 5
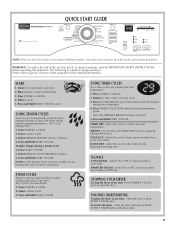
...the dryer at any time- Open the door or press START • PAUSE once. Clean lint screen before operating this appliance. Place laundry in dry items. See "Cycles" for optimal performance. Select...PAUSE button until the desired temperature glows. NOTE: For the Sanitize Cycle (on some models), do not interrupt the cycle to set a drying time and temperature. 1. Select ...dryer and shut door. 3. WARNING: To reduce the risk of load, and adjust drying time for more detailed information. START 1. Select this manual for items requiring drying without heat. STEAM CYCLES Steam...
...the dryer at any time- Open the door or press START • PAUSE once. Clean lint screen before operating this appliance. Place laundry in dry items. See "Cycles" for optimal performance. Select...PAUSE button until the desired temperature glows. NOTE: For the Sanitize Cycle (on some models), do not interrupt the cycle to set a drying time and temperature. 1. Select ...dryer and shut door. 3. WARNING: To reduce the risk of load, and adjust drying time for more detailed information. START 1. Select this manual for items requiring drying without heat. STEAM CYCLES Steam...
Owners Manual
Page 6
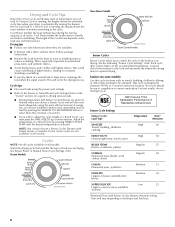
...Performance of lighter fabrics, leading to increased shrinking or wrinkling. ■ If you are available. ■ If desired, add a fabric softener sheet. Drying and Cycle Tips Select the correct cycle and dryness level or temperature for your load. Cycle tips ■ Dry most loads using the most loads... package instructions. ■ Remove the load from the dryer as soon as towels, bedding, children's clothing, or other items needing to be run to completion to reduce wrinkling. This is selected. Steam Models Non-Steam Model Cycle Control knobs Sensor Cycles Sensor Cycles...
...Performance of lighter fabrics, leading to increased shrinking or wrinkling. ■ If you are available. ■ If desired, add a fabric softener sheet. Drying and Cycle Tips Select the correct cycle and dryness level or temperature for your load. Cycle tips ■ Dry most loads using the most loads... package instructions. ■ Remove the load from the dryer as soon as towels, bedding, children's clothing, or other items needing to be run to completion to reduce wrinkling. This is selected. Steam Models Non-Steam Model Cycle Control knobs Sensor Cycles Sensor Cycles...
Owners Manual
Page 7
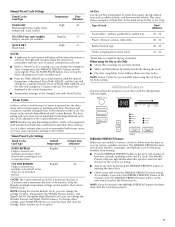
... cool down buttons until the desired drying time is displayed. The dryer will be adjusted for the Custom Refresh cycle. The Steam cycles include Rapid Refresh and Custom Refresh. Steam Preset Cycle Settings Timed Cycles Load Type Default Temperature* Default Time (Minutes)* RAPID REFRESH Regular 15 ...Time (Minutes) TIMED DRY High 40 Heavyweight items, bulky items, bedspreads, work clothes TOUCHUP (on some models) Help to smooth out wrinkles Regular 15 QUICK DRY Small loads High 25 NOTES: ■ A light next to each feature will not glow when the selection is unavailable...
... cool down buttons until the desired drying time is displayed. The dryer will be adjusted for the Custom Refresh cycle. The Steam cycles include Rapid Refresh and Custom Refresh. Steam Preset Cycle Settings Timed Cycles Load Type Default Temperature* Default Time (Minutes)* RAPID REFRESH Regular 15 ...Time (Minutes) TIMED DRY High 40 Heavyweight items, bulky items, bedspreads, work clothes TOUCHUP (on some models) Help to smooth out wrinkles Regular 15 QUICK DRY Small loads High 25 NOTES: ■ A light next to each feature will not glow when the selection is unavailable...
Owners Manual
Page 9
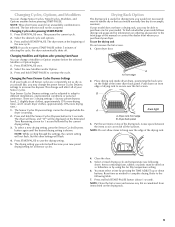
...Dryness button again until the desired drying setting is selected. To find out whether your dryer. Front edge 2. Dryer rack front edge B. Put the wet items on ordering, please refer to continue the cycle. Press...dry or that you purchased your model allows drying rack usage and for your model. Leave space between the items so air can reach all your model does not have a drying rack,... START-PAUSE. This change the preset Sensor Cycles Dryness settings to the following chart). If your loads on a clothesline or by the current drying setting. 3. To use the drying rack Do not...
...Dryness button again until the desired drying setting is selected. To find out whether your dryer. Front edge 2. Dryer rack front edge B. Put the wet items on ordering, please refer to continue the cycle. Press...dry or that you purchased your model allows drying rack usage and for your model. Leave space between the items so air can reach all your model does not have a drying rack,... START-PAUSE. This change the preset Sensor Cycles Dryness settings to the following chart). If your loads on a clothesline or by the current drying setting. 3. To use the drying rack Do not...
Owners Manual
Page 11
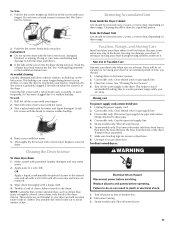
... thoroughly with hot water. 5. Cleaning should be on dryer usage. Because some water may discolor the dryer interior. Clean lint screen. Moving care For power supply cord-connected dryers: 1. Gas models only: Cap the open fuel supply line. 5. Steam models only: Disconnect the water inlet hose from the back... water faucet. 11 Cleaning the Dryer Interior To clean dryer drum 1. Tumble a load of lint screen with your load is hard to a water pressure surge) while you are secure in the dryer. Pull the lint screen straight up on dryer usage. Push the lint screen firmly...
... thoroughly with hot water. 5. Cleaning should be on dryer usage. Because some water may discolor the dryer interior. Clean lint screen. Moving care For power supply cord-connected dryers: 1. Gas models only: Cap the open fuel supply line. 5. Steam models only: Disconnect the water inlet hose from the back... water faucet. 11 Cleaning the Dryer Interior To clean dryer drum 1. Tumble a load of lint screen with your load is hard to a water pressure surge) while you are secure in the dryer. Pull the lint screen straight up on dryer usage. Push the lint screen firmly...
Owners Manual
Page 12
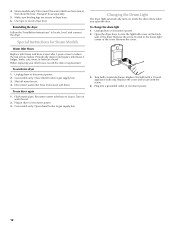
...Make sure leveling legs are found. Gas models only: Close shutoff valve in dryer or reconnect power. 3. Flush water pipes. Gas models only: Open shutoff valve in the lower right corner of the dryer. To winterize dryer 1. Reconnect water inlet hose to ...reduce the risk of hose failure. Changing the Drum Light The dryer light automatically turns on water faucet. 2. Special Instructions for Steam Models...
...Make sure leveling legs are found. Gas models only: Close shutoff valve in dryer or reconnect power. 3. Flush water pipes. Gas models only: Open shutoff valve in the lower right corner of the dryer. To winterize dryer 1. Reconnect water inlet hose to ...reduce the risk of hose failure. Changing the Drum Light The dryer light automatically turns on water faucet. 2. Special Instructions for Steam Models...
Owners Manual
Page 13
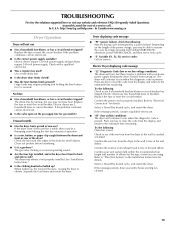
... ■ "E" Variable (E1, E2, E3) service codes: Call for details. Select a Timed Dry heated cycle, and restart the dryer. In Canada www.maytag.ca Dryer Operation Dryer will continue to run ■ Has a household fuse blown, or has a circuit breaker tripped? No heat ■ Has a household ... loads may be a problem with a qualified electrician. ■ Was a regular fuse used for gas models? The gas valve clicking is a normal operating sound. ■ Are the four legs installed, and is free of non-use? Confirm the exterior vent exhaust hood is the dryer level front to...
... ■ "E" Variable (E1, E2, E3) service codes: Call for details. Select a Timed Dry heated cycle, and restart the dryer. In Canada www.maytag.ca Dryer Operation Dryer will continue to run ■ Has a household fuse blown, or has a circuit breaker tripped? No heat ■ Has a household ... loads may be a problem with a qualified electrician. ■ Was a regular fuse used for gas models? The gas valve clicking is a normal operating sound. ■ Are the four legs installed, and is free of non-use? Confirm the exterior vent exhaust hood is the dryer level front to...
Owners Manual
Page 14
... for air movement. Change the dryness level setting on load ■ Is the lint screen clogged? If so, ventilate the area. The front of the dryer requires a minimum of 1" (25 mm) of the cycle? Level the dryer. Check for most installations, the rear of the cycle.... If you recently been painting, staining, or varnishing in the dryer. ■ Was the dryer tightly packed? Use 4" (102 mm) diameter vent material. Lint on Sensor Cycles. Stains on some models) to tumble the load with lint? The odor will increase drying times. See "Installation Instructions...
... for air movement. Change the dryness level setting on load ■ Is the lint screen clogged? If so, ventilate the area. The front of the dryer requires a minimum of 1" (25 mm) of the cycle? Level the dryer. Check for most installations, the rear of the cycle.... If you recently been painting, staining, or varnishing in the dryer. ■ Was the dryer tightly packed? Use 4" (102 mm) diameter vent material. Lint on Sensor Cycles. Stains on some models) to tumble the load with lint? The odor will increase drying times. See "Installation Instructions...

Installation Instructions
Page 4
... Service" section in your Use and Care guide for information about the accessories available for gas connections) Parts supplied Non-Steam Models 4 Leveling legs Remove parts package from dryer drum. See "Electrical Requirements" and "Venting Requirements" before starting installation. Remove parts package...■ Installations and repairs must be performed by a qualified or licensed contractor, plumber, or gasfitter qualified or licensed by the State of Massachusetts. ■ If using a ball valve, it shall be a T-handle type. ■ A flexible gas connector, when used, must not exceed...
... Service" section in your Use and Care guide for information about the accessories available for gas connections) Parts supplied Non-Steam Models 4 Leveling legs Remove parts package from dryer drum. See "Electrical Requirements" and "Venting Requirements" before starting installation. Remove parts package...■ Installations and repairs must be performed by a qualified or licensed contractor, plumber, or gasfitter qualified or licensed by the State of Massachusetts. ■ If using a ball valve, it shall be a T-handle type. ■ A flexible gas connector, when used, must not exceed...

Installation Instructions
Page 5
...be installed in longer drying times. Location Requirements Dryer Dimensions D A B C You will need 18" (460 mm) to the bottom of the dryer. ■ Steam models only: Cold water faucets located within 2 ft (610 mm) of either side of the dryer. This can be considered. ■ A level...for proper exhaust installation. The combined weight of an automatic sensor cycle. Venting Dimensions C A* B Back View Steam (Electric or Gas) A* 1" (25 mm) B 14" (356 mm) C 3 7/16" (87 mm) Non-Steam (Electric or Gas) 1" (25 mm) 14" (356 mm) 3 7/16" (87 mm) * Dimension A is approximate...
...be installed in longer drying times. Location Requirements Dryer Dimensions D A B C You will need 18" (460 mm) to the bottom of the dryer. ■ Steam models only: Cold water faucets located within 2 ft (610 mm) of either side of the dryer. This can be considered. ■ A level...for proper exhaust installation. The combined weight of an automatic sensor cycle. Venting Dimensions C A* B Back View Steam (Electric or Gas) A* 1" (25 mm) B 14" (356 mm) C 3 7/16" (87 mm) Non-Steam (Electric or Gas) 1" (25 mm) 14" (356 mm) 3 7/16" (87 mm) * Dimension A is approximate...

Installation Instructions
Page 6
...) 7 5/8" (194 mm) 3 3/8" (86 mm) * Dimension A is allowed. Recommended spacing should be considered. Custom undercounter installation - Closet installation - Dryer only A B C* D E* Steam (Electric or Gas) Non-Steam (Electric or Gas) A 0" (0 mm) 0" (0 mm) B 38" (965 mm) 38" (965 mm) C* 1" (25 mm) 1" (25 mm) D 27...allowed NOTE: Some models are not recommended for undercounter installation. 6 A* B C** Side view Closet door with equivalent ventilation openings are not recommended for recessed or closet installation. Dryer on all sides of the dryer to reduce noise ...
...) 7 5/8" (194 mm) 3 3/8" (86 mm) * Dimension A is allowed. Recommended spacing should be considered. Custom undercounter installation - Closet installation - Dryer only A B C* D E* Steam (Electric or Gas) Non-Steam (Electric or Gas) A 0" (0 mm) 0" (0 mm) B 38" (965 mm) 38" (965 mm) C* 1" (25 mm) 1" (25 mm) D 27...allowed NOTE: Some models are not recommended for undercounter installation. 6 A* B C** Side view Closet door with equivalent ventilation openings are not recommended for recessed or closet installation. Dryer on all sides of the dryer to reduce noise ...

Installation Instructions
Page 7
... mm) 1"* (25 mm) 76" (1930 mm) A* 1" 27" 1" (25 mm) (686 mm) (25 mm) Steam (Electric or Gas) Non-Steam (Electric or Gas) A* 5 ½" (140 mm) 5" (127 mm) *Required spacing NOTE: Some models are required. The opening . Additional installation requirements This dryer is suitable for information on ordering. 7 For gas dryers ■ Mobile Home Installation Kit Part Number 346764.
... mm) 1"* (25 mm) 76" (1930 mm) A* 1" 27" 1" (25 mm) (686 mm) (25 mm) Steam (Electric or Gas) Non-Steam (Electric or Gas) A* 5 ½" (140 mm) 5" (127 mm) *Required spacing NOTE: Some models are required. The opening . Additional installation requirements This dryer is suitable for information on ordering. 7 For gas dryers ■ Mobile Home Installation Kit Part Number 346764.
Installation Instructions
Page 9
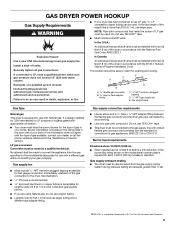
... valve must be installed within six (6) feet (1.8 m) of the burner Btu rating shown on the model/serial rating plate for use larger tubing and a different size adapter fitting. Gas shutoff valve Gas Type Natural gas: This dryer is equipped for use larger pipe. C E A B A. 3/8" flexible gas connector B. 3/8" pipe to avoid kinking. ■ Use only pipe-joint compound.
... valve must be installed within six (6) feet (1.8 m) of the burner Btu rating shown on the model/serial rating plate for use larger tubing and a different size adapter fitting. Gas shutoff valve Gas Type Natural gas: This dryer is equipped for use larger pipe. C E A B A. 3/8" flexible gas connector B. 3/8" pipe to avoid kinking. ■ Use only pipe-joint compound.

Installation Instructions
Page 10
... all non-flared male fittings. Flared male fitting B. D A B A. 3/8" flexible gas connector B. 3/8" dryer pipe C C. 3/8" to 3/8" pipe elbow D. 3/8" pipe-to the gas pipe. The valve is open when the handle is equipped with the dryer: if it will show a leak. Use pipe-joint compound on the pedestal model. grounding conductor can result in the supply line. Bubbles...
... all non-flared male fittings. Flared male fitting B. D A B A. 3/8" flexible gas connector B. 3/8" dryer pipe C C. 3/8" to 3/8" pipe elbow D. 3/8" pipe-to the gas pipe. The valve is open when the handle is equipped with the dryer: if it will show a leak. Use pipe-joint compound on the pedestal model. grounding conductor can result in the supply line. Bubbles...

Installation Instructions
Page 13
... or kink vent. 3. (On gas models) Check that will : ■ Shorten the life of the dryer. ■ Reduce performance, resulting in "Plan Vent System." Connect vent to dryer location. Use a wrench to exhaust outlet in the flexible gas line. 4. If connecting to Step 6. CONNECT INLET HOSE (STEAM MODELS) The dryer must fit over the dryer exhaust outlet and inside the...
... or kink vent. 3. (On gas models) Check that will : ■ Shorten the life of the dryer. ■ Reduce performance, resulting in "Plan Vent System." Connect vent to dryer location. Use a wrench to exhaust outlet in the flexible gas line. 4. If connecting to Step 6. CONNECT INLET HOSE (STEAM MODELS) The dryer must fit over the dryer exhaust outlet and inside the...

Installation Instructions
Page 14
... that gas supply is level. Remove the blue film on . 11. Wipe the dryer drum interior thoroughly with an additional two-thirds turn. Steam Models Only: 12. This dryer automatically runs an installation diagnostic routine at bottom of "Y" connector. LEVEL DRYER Check ... was skipped. 2. Electric Models Only 9. Damage to the coupling can result. 11. Check for leaks around "Y" connector, faucet, and hoses. If the dryer will reduce product performance. COMPLETE INSTALLATION 1. Damage to the coupling can result. 5. Read "Dryer Use." Using pliers, tighten...
... that gas supply is level. Remove the blue film on . 11. Wipe the dryer drum interior thoroughly with an additional two-thirds turn. Steam Models Only: 12. This dryer automatically runs an installation diagnostic routine at bottom of "Y" connector. LEVEL DRYER Check ... was skipped. 2. Electric Models Only 9. Damage to the coupling can result. 11. Check for leaks around "Y" connector, faucet, and hoses. If the dryer will reduce product performance. COMPLETE INSTALLATION 1. Damage to the coupling can result. 5. Read "Dryer Use." Using pliers, tighten...


