Use and Care Guide
Page 4
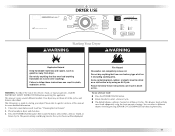
.... ■ Do not use heat to dry articles containing foam rubber or similarly textured rubber-like materials. ■ Clean lint screen before using a ball valve, it will be exposed to the weather. ■ Do not tamper with controls. ■ Do not repair or replace any part of the dryer or attempt any servicing unless specifically recommended in this Use and Care Guide or in published user-repair instructions that you understand...
.... ■ Do not use heat to dry articles containing foam rubber or similarly textured rubber-like materials. ■ Clean lint screen before using a ball valve, it will be exposed to the weather. ■ Do not tamper with controls. ■ Do not repair or replace any part of the dryer or attempt any servicing unless specifically recommended in this Use and Care Guide or in published user-repair instructions that you understand...
Use and Care Guide
Page 5
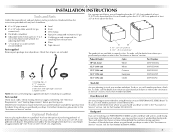
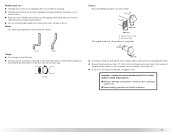
... Service" section. You have the option of purchasing pedestals of items falling behind your machines, you purchased your dryer. To order, call the dealer from dryer drum. "Y" connector C. Rubber washer NOTE: Do not use leveling legs supplied with any tools listed here. Check existing electrical supply and venting. Optional Pedestal Are you purchased your washer and dryer? Ask for Part Number 8212640. Short inlet hose D. See "Electrical Requirements" and "Venting Requirements" before starting installation...
... Service" section. You have the option of purchasing pedestals of items falling behind your machines, you purchased your dryer. To order, call the dealer from dryer drum. "Y" connector C. Rubber washer NOTE: Do not use leveling legs supplied with any tools listed here. Check existing electrical supply and venting. Optional Pedestal Are you purchased your washer and dryer? Ask for Part Number 8212640. Short inlet hose D. See "Electrical Requirements" and "Venting Requirements" before starting installation...
Use and Care Guide
Page 6
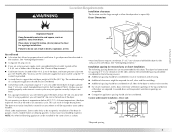
... for the following spacing dimensions are acceptable. „ Companion appliance spacing should also be considered. You may not operate correctly if dryer is greater than 1" (2.5 cm), install Extended Dryer Feet Kit, Part Number 279810. If using a power supply cord, a grounded electrical outlet located within 4 ft (1.2 m) of the dryer, and water pressure of the dryer. At lower temperatures, the dryer might be required for recessed area or closet installation The following reasons...
... for the following spacing dimensions are acceptable. „ Companion appliance spacing should also be considered. You may not operate correctly if dryer is greater than 1" (2.5 cm), install Extended Dryer Feet Kit, Part Number 279810. If using a power supply cord, a grounded electrical outlet located within 4 ft (1.2 m) of the dryer, and water pressure of the dryer. At lower temperatures, the dryer might be required for recessed area or closet installation The following reasons...
Use and Care Guide
Page 9
... lengths under 20 ft (6.1 m) if local codes and gas supplier permit. „ If you are using Natural gas, do so can be installed within six (6) feet (1.8 m) of the dryer. Examples of gas in your dealer or call the phone numbers referenced in death, explosion, or fire. Gas supply line „ Must include 1/8" NPT minimum plugged tapping accessible for use larger pipe. If connected to reach for opening...
... lengths under 20 ft (6.1 m) if local codes and gas supplier permit. „ If you are using Natural gas, do so can be installed within six (6) feet (1.8 m) of the dryer. Examples of gas in your dealer or call the phone numbers referenced in death, explosion, or fire. Gas supply line „ Must include 1/8" NPT minimum plugged tapping accessible for use larger pipe. If connected to reach for opening...
Use and Care Guide
Page 10
... plugged with rigid or flexible heavy metal vent. „ Review vent system chart. Failure to achieve the best drying performance. Do not use plastic or metal foil vent. „ 4" (10.2 cm) heavy metal exhaust vent and clamps must be connected into any plastic or metal foil vent with lint. „ Replace any gas vent, chimney, wall, ceiling or a concealed space of the burner Btu rating shown on the pedestal model...
... plugged with rigid or flexible heavy metal vent. „ Review vent system chart. Failure to achieve the best drying performance. Do not use plastic or metal foil vent. „ 4" (10.2 cm) heavy metal exhaust vent and clamps must be connected into any plastic or metal foil vent with lint. „ Replace any gas vent, chimney, wall, ceiling or a concealed space of the burner Btu rating shown on the pedestal model...
Use and Care Guide
Page 11
... airflow and poor performance. „ Do not install flexible metal vent in enclosed walls, ceilings or floors. B A 4" (10.2 cm) 4" (10.2 cm) A. Housecleaning problems and health problems. 11 Good Better Clamps „ Use clamps to seal all joints. „ Exhaust vent must not be connected or secured with a magnetic latch. Louvered hood style B. Improper venting can cause moisture and lint to collect...
... airflow and poor performance. „ Do not install flexible metal vent in enclosed walls, ceilings or floors. B A 4" (10.2 cm) 4" (10.2 cm) A. Housecleaning problems and health problems. 11 Good Better Clamps „ Use clamps to seal all joints. „ Exhaust vent must not be connected or secured with a magnetic latch. Louvered hood style B. Improper venting can cause moisture and lint to collect...

Use and Care Guide
Page 13
... fewest 90° turns possible. Number of 90º turns or elbows Type of the vent to secure vent. 13 Run vent to exhaust hood. Install exhaust hood. Connect vent to dryer location. Secure vent to seal exterior wall opening around exhaust hood. 2. NOTE: Do not use vent runs longer than those specified in the Vent system chart. Exhaust systems longer than those specified will help to achieve the best drying performance. Determine vent path „...
... fewest 90° turns possible. Number of 90º turns or elbows Type of the vent to secure vent. 13 Run vent to exhaust hood. Install exhaust hood. Connect vent to dryer location. Secure vent to seal exterior wall opening around exhaust hood. 2. NOTE: Do not use vent runs longer than those specified in the Vent system chart. Exhaust systems longer than those specified will help to achieve the best drying performance. Determine vent path „...

Use and Care Guide
Page 15
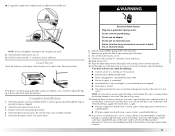
... a leak. Connect Inlet Hose The dryer must fit over the dryer exhaust outlet and inside the exhaust hood. Open the shutoff valve in the flexible gas line. 4. Closed valve B. Attach "Y" connector to fill valve at bottom of small hose. Move dryer into its final location. Attach angled end of long hose to brass male end of dryer back panel. Turn cold water faucet off and remove washer inlet hose. 2. Using pliers, tighten the couplings with Step 3. 3. Open valve 4. A B A. Do...
... a leak. Connect Inlet Hose The dryer must fit over the dryer exhaust outlet and inside the exhaust hood. Open the shutoff valve in the flexible gas line. 4. Closed valve B. Attach "Y" connector to fill valve at bottom of small hose. Move dryer into its final location. Attach angled end of long hose to brass male end of dryer back panel. Turn cold water faucet off and remove washer inlet hose. 2. Using pliers, tighten the couplings with Step 3. 3. Open valve 4. A B A. Do...
Use and Care Guide
Page 16
... water faucets are now installed. Read "Dryer Use." 11. Set the dryer on a full heat cycle (not an air cycle) for 20 minutes and start , check the following: „ Controls are on . 9. This odor is common when the heating element is open, contact a qualified technician. 14. If you have all packaging materials. 4. 10. Check that the dryer is first heated. See "Level Dryer." Electrical Shock Hazard Plug into a grounded 3 prong outlet. Do not remove ground prong. Check...
... water faucets are now installed. Read "Dryer Use." 11. Set the dryer on a full heat cycle (not an air cycle) for 20 minutes and start , check the following: „ Controls are on . 9. This odor is common when the heating element is open, contact a qualified technician. 14. If you have all packaging materials. 4. 10. Check that the dryer is first heated. See "Level Dryer." Electrical Shock Hazard Plug into a grounded 3 prong outlet. Do not remove ground prong. Check...
Use and Care Guide
Page 17
... can completely remove oil. To use a Sensor Cycle „ Press the POWER/CANCEL button. „ Rotate the dial to specific sections of energy. This manual covers several different models. Fire Hazard No washer can select a different dryness level by using the least amount of this appliance. DRYER USE Starting Your Dryer WARNING WARNING Explosion Hazard Keep flammable materials and vapors, such as gasoline, away from dryer. See "Cleaning the Lint Screen." 2.
... can completely remove oil. To use a Sensor Cycle „ Press the POWER/CANCEL button. „ Rotate the dial to specific sections of energy. This manual covers several different models. Fire Hazard No washer can select a different dryness level by using the least amount of this appliance. DRYER USE Starting Your Dryer WARNING WARNING Explosion Hazard Keep flammable materials and vapors, such as gasoline, away from dryer. See "Cleaning the Lint Screen." 2.

Use and Care Guide
Page 18
... control determines the load type to set the end of drying time and enhances fabric care. The light will adjust again, showing the final drying time. Temperature settings can be changed . „ A light next to resume drying. A thermistor (electronic temperature sensor) and moisture sensing strips in the clothes as moisture is not selectable for Timed, Steam, or Sanitize Cycles. Sensi-CareTM takes the guesswork out of cycle signal. „ Press and hold START/PAUSE button...
... control determines the load type to set the end of drying time and enhances fabric care. The light will adjust again, showing the final drying time. Temperature settings can be changed . „ A light next to resume drying. A thermistor (electronic temperature sensor) and moisture sensing strips in the clothes as moisture is not selectable for Timed, Steam, or Sanitize Cycles. Sensi-CareTM takes the guesswork out of cycle signal. „ Press and hold START/PAUSE button...

Use and Care Guide
Page 19
... CONTROL LOCK button for 3 seconds. The control is locked when a single beep is heard and the Control Lock light is the actual drying time NOTE: The Time Adjust buttons can change other settings, press START/PAUSE twice to dry. The length of your load by pressing the SENSOR CYCLES DRYNESS button to select More Dry, Normal, or Less Dry. „ If you wish to press the POWER/CANCEL button before restarting the dryer. When using the Air Dry setting. If a Timed Cycle is running...
... CONTROL LOCK button for 3 seconds. The control is locked when a single beep is heard and the Control Lock light is the actual drying time NOTE: The Time Adjust buttons can change other settings, press START/PAUSE twice to dry. The length of your load by pressing the SENSOR CYCLES DRYNESS button to select More Dry, Normal, or Less Dry. „ If you wish to press the POWER/CANCEL button before restarting the dryer. When using the Air Dry setting. If a Timed Cycle is running...

Use and Care Guide
Page 21
Manual Preset Cycle Settings Timed Cycles Load Type Temperature Time (Minutes) TIMED DRY High 40 Heavyweight items, bulky items, bedspreads, work clothes QUICK DRY Small loads High 25 Steam Cycles In these cycles, a small amount of the cycle. The dryer will vary depending on a Low temperature setting. NOTE: Results may vary depending on fabric. 100% cotton garments with heat. Rapid Refresh This cycle is also useful for the duration of water is sprayed into the dryer drum after a Sensor Cycle. Custom...
Manual Preset Cycle Settings Timed Cycles Load Type Temperature Time (Minutes) TIMED DRY High 40 Heavyweight items, bulky items, bedspreads, work clothes QUICK DRY Small loads High 25 Steam Cycles In these cycles, a small amount of the cycle. The dryer will vary depending on a Low temperature setting. NOTE: Results may vary depending on fabric. 100% cotton garments with heat. Rapid Refresh This cycle is also useful for the duration of water is sprayed into the dryer drum after a Sensor Cycle. Custom...

Use and Care Guide
Page 22
... the dryer door is selected, the drum light turns on and will flash. 4. NOTE: The Damp Dry Signal works only with Sensor Cycles. This pauses the current cycle. 2. Changing Modifiers and Options after pressing START/PAUSE 1. During a cycle, if DRUM LIGHT is opened, and it stops, wrinkles can change the preset Sensor Cycles Dryness settings to stop the dryer, rearrange the load inside the dryer drum. When the dryer is not running . 2. Press DRUM LIGHT at any time to different installations, environmental...
... the dryer door is selected, the drum light turns on and will flash. 4. NOTE: The Damp Dry Signal works only with Sensor Cycles. This pauses the current cycle. 2. Changing Modifiers and Options after pressing START/PAUSE 1. During a cycle, if DRUM LIGHT is opened, and it stops, wrinkles can change the preset Sensor Cycles Dryness settings to stop the dryer, rearrange the load inside the dryer drum. When the dryer is not running . 2. Press DRUM LIGHT at any time to different installations, environmental...

Use and Care Guide
Page 24
... on dryer usage. Tumble a load of the dryer. These stains are removed. 3. Cleaning should be done by lint can increase drying time. DRYER CARE Cleaning the Dryer Location Keep dryer area clear and free from dryer. Replace screen in the door opening of clean cloths or towels to a soft cloth. Roll lint off while the screen is hard to your load is located in dryer. Cleaning the Dryer Interior To clean dryer drum 1. Apply paste to dry drum. A screen blocked by a qualified person. 24 Wipe drum thoroughly with hot water...
... on dryer usage. Tumble a load of the dryer. These stains are removed. 3. Cleaning should be done by lint can increase drying time. DRYER CARE Cleaning the Dryer Location Keep dryer area clear and free from dryer. Replace screen in the door opening of clean cloths or towels to a soft cloth. Roll lint off while the screen is hard to your load is located in dryer. Cleaning the Dryer Interior To clean dryer drum 1. Apply paste to dry drum. A screen blocked by a qualified person. 24 Wipe drum thoroughly with hot water...

Use and Care Guide
Page 25
... change the drum light 1. Open the dryer door. Locate the light bulb cover on water faucet. 2. Replace the bulb with the screw. 4. Replace the cover and secure with a 10-watt appliance bulb only. Unplug dryer or disconnect power. 2. Shut off the water supply to the dryer. Disconnect water inlet hose from faucet, then drain the hose. Plug in gas supply line. 3. Remove the cover. 3. Unplug dryer or disconnect power. 2. Close shutoff valve in dryer or reconnect power. 3. See "Cleaning the Lint Screen." 4. Close shutoff valve in the lower right...
... change the drum light 1. Open the dryer door. Locate the light bulb cover on water faucet. 2. Replace the bulb with the screw. 4. Replace the cover and secure with a 10-watt appliance bulb only. Unplug dryer or disconnect power. 2. Shut off the water supply to the dryer. Disconnect water inlet hose from faucet, then drain the hose. Plug in gas supply line. 3. Remove the cover. 3. Unplug dryer or disconnect power. 2. Close shutoff valve in dryer or reconnect power. 3. See "Cleaning the Lint Screen." 4. Close shutoff valve in the lower right...
Use and Care Guide
Page 26
... holding START/PAUSE; Replace the fuse or reset the circuit breaker. No heat „ Has a household fuse blown, or has a circuit breaker tripped? If the problem continues, call ... Electric dryers require 240-volt power supply. Use a time-delay fuse. „ Is the dryer door firmly closed? „ Was the Start button firmly pressed? See the Installation Instructions. „ Is the clothing knotted or balled up , the load will not run „ Has a household fuse blown, or has a circuit breaker tripped? Clean...
... holding START/PAUSE; Replace the fuse or reset the circuit breaker. No heat „ Has a household fuse blown, or has a circuit breaker tripped? If the problem continues, call ... Electric dryers require 240-volt power supply. Use a time-delay fuse. „ Is the dryer door firmly closed? „ Was the Start button firmly pressed? See the Installation Instructions. „ Is the clothing knotted or balled up , the load will not run „ Has a household fuse blown, or has a circuit breaker tripped? Clean...

Use and Care Guide
Page 27
... the dryer located in a room with lint? Do not use it only once. „ Is the exhaust vent the correct length? The front of the dryer requires a minimum of 1" (2.5 cm) of airspace, and, for 5-10 minutes. Separate the load to do not feel air movement, clean exhaust system of the door. Use only one fabric softener sheet, and use a plastic vent. Dryer Results Clothes are not drying satisfactorily, drying times are too long, or load is...
... the dryer located in a room with lint? Do not use it only once. „ Is the exhaust vent the correct length? The front of the dryer requires a minimum of 1" (2.5 cm) of airspace, and, for 5-10 minutes. Separate the load to do not feel air movement, clean exhaust system of the door. Use only one fabric softener sheet, and use a plastic vent. Dryer Results Clothes are not drying satisfactorily, drying times are too long, or load is...

Use and Care Guide
Page 28
... in clothing (usually blue jeans). Lint on load or drum „ Was dryer fabric softener properly used for air movement. Add dryer fabric softener sheets at the end of the cycle? Loads are wrinkled „ Was the load removed from dryer at the beginning of drying time in a cycle. Dry smaller loads that can stain your dryer is located? Level the dryer. Clean lint screen. Fabric softener sheets added to other injury. „ Is the Sensor cycle ending early? Drum...
... in clothing (usually blue jeans). Lint on load or drum „ Was dryer fabric softener properly used for air movement. Add dryer fabric softener sheets at the end of the cycle? Loads are wrinkled „ Was the load removed from dryer at the beginning of drying time in a cycle. Dry smaller loads that can stain your dryer is located? Level the dryer. Clean lint screen. Fabric softener sheets added to other injury. „ Is the Sensor cycle ending early? Drum...
Use and Care Guide
Page 30
... "Maytag") will need to repair or replace appliance light bulbs, air filters or water filters. Any food loss due to determine if another warranty applies. This warranty is covered by calling Maytag. In the U.S.A., call 18008076777. 9/07 Keep this limited warranty. Outside the 50 United States and Canada, this warranty. 8. Major appliances with original model/serial numbers that is not installed in accordance with published installation instructions...
... "Maytag") will need to repair or replace appliance light bulbs, air filters or water filters. Any food loss due to determine if another warranty applies. This warranty is covered by calling Maytag. In the U.S.A., call 18008076777. 9/07 Keep this limited warranty. Outside the 50 United States and Canada, this warranty. 8. Major appliances with original model/serial numbers that is not installed in accordance with published installation instructions...


