Owners Manual
Page 2
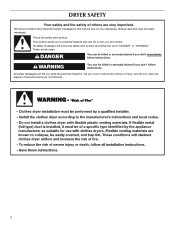
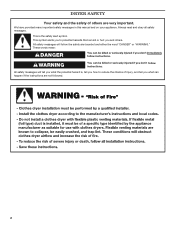
... follow the safety alert symbol and either the word "DANGER" or "WARNING." WARNING You can be killed or seriously injured if you don't follow instructions. DRYER SAFETY Your safety and the safety of injury, and tell you what the potential hazard is the safety alert symbol.
... follow the safety alert symbol and either the word "DANGER" or "WARNING." WARNING You can be killed or seriously injured if you don't follow instructions. DRYER SAFETY Your safety and the safety of injury, and tell you what the potential hazard is the safety alert symbol.
Owners Manual
Page 3
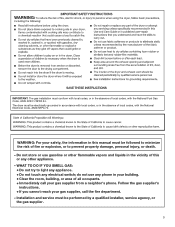
... local codes, with the National Fuel Gas Code, ANSI Z223.1/NFPA 54. WARNING: For your safety, the information in this or any other appliance. - The dryer must be performed by a quali ed installer, service agency, or the gas supplier. 3 Follow the gas supplier's instructions. • If you cannot reach your gas...
... local codes, with the National Fuel Gas Code, ANSI Z223.1/NFPA 54. WARNING: For your safety, the information in this or any other appliance. - The dryer must be performed by a quali ed installer, service agency, or the gas supplier. 3 Follow the gas supplier's instructions. • If you cannot reach your gas...
Owners Manual
Page 4
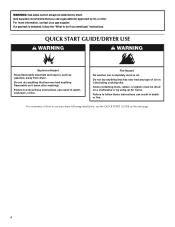
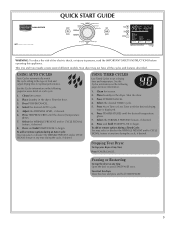
... leak is detected, follow the "What to follow these instructions can completely remove oil. Quick Start Guide/Dryer Use WARNING WARNING Explosion Hazard Keep flammable materials and vapors, such as gasoline, away from dryer. Failure to do if you use your gas supplier. Do not dry anything that has ever had anything... by smell. Gas suppliers recommend that you smell gas" instructions. Failure to use a gas detector approved by UL or CSA. For more information, contact your dryer following installation, see the QUICK START GUIDE on the next page. 4
... leak is detected, follow the "What to follow these instructions can completely remove oil. Quick Start Guide/Dryer Use WARNING WARNING Explosion Hazard Keep flammable materials and vapors, such as gasoline, away from dryer. Failure to do if you use your gas supplier. Do not dry anything that has ever had anything... by smell. Gas suppliers recommend that you smell gas" instructions. Failure to use a gas detector approved by UL or CSA. For more information, contact your dryer following installation, see the QUICK START GUIDE on the next page. 4
Owners Manual
Page 5
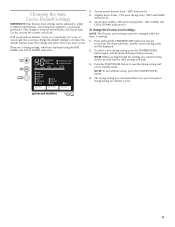
.... Select the desired AUTO cycle. 5. Press TEMPERATURES until the desired temperature glows. 7. Press TEMPERATURES until the desired temperature glows. 7. Your dryer may select or deselect the WRINKLE PREVENT and/or CYCLE SIGNAL feature at any time during the cycle, if desired. To add or remove ... SIGNAL feature at any time during the cycle, if desired. Shut the door. 3. Press and hold START/PAUSE 5 Place laundry in the dryer. Adjust the DRYNESS LEVEL, if desired. 6. Select the WRINKLE PREVENT and/or CYCLE SIGNAL feature, if desired. 8. USING TIMED CYCLES Use...
.... Select the desired AUTO cycle. 5. Press TEMPERATURES until the desired temperature glows. 7. Press TEMPERATURES until the desired temperature glows. 7. Your dryer may select or deselect the WRINKLE PREVENT and/or CYCLE SIGNAL feature at any time during the cycle, if desired. To add or remove ... SIGNAL feature at any time during the cycle, if desired. Shut the door. 3. Press and hold START/PAUSE 5 Place laundry in the dryer. Adjust the DRYNESS LEVEL, if desired. 6. Select the WRINKLE PREVENT and/or CYCLE SIGNAL feature, if desired. 8. USING TIMED CYCLES Use...

Owners Manual
Page 7
...NOTE: When the WRINKLE PREVENT feature is selected and the Cycle Signal is finished. This ends the current cycle and turns the dryer OFF. 2. The dryer starts at the beginning of clothes from forming. ■■ Get up to 60 minutes of heat-free, periodic tumbling at ...Auto Cycle, if a wet item is selected. Wet The Wet light illuminates at the end of a cycle. Changing settings on during dryer operation. The dryer will illuminate. Press the POWER/CANCEL button again to show a more accurate drying time. The WRINKLE PREVENT feature periodically tumbles, rearranges, and...
...NOTE: When the WRINKLE PREVENT feature is selected and the Cycle Signal is finished. This ends the current cycle and turns the dryer OFF. 2. The dryer starts at the beginning of clothes from forming. ■■ Get up to 60 minutes of heat-free, periodic tumbling at ...Auto Cycle, if a wet item is selected. Wet The Wet light illuminates at the end of a cycle. Changing settings on during dryer operation. The dryer will illuminate. Press the POWER/CANCEL button again to show a more accurate drying time. The WRINKLE PREVENT feature periodically tumbles, rearranges, and...
Owners Manual
Page 8
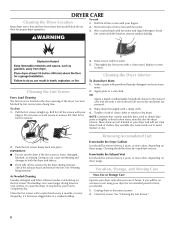
... fabric softener residue can increase drying time. Scrub lint screen with powdered laundry detergent and very warm water. 2. Wet lint is located in dryer. Vacation, Storage, and Moving Care Non-Use or Storage Care Operate your load is loose, damaged, blocked, or missing. IMPORTANT: ■...;■ Do not run the dryer if the lint screen is completely dry. Thoroughly dry lint screen with a damp cloth. 4. Replace screen in the door opening of lint screen...
... fabric softener residue can increase drying time. Scrub lint screen with powdered laundry detergent and very warm water. 2. Wet lint is located in dryer. Vacation, Storage, and Moving Care Non-Use or Storage Care Operate your load is loose, damaged, blocked, or missing. IMPORTANT: ■...;■ Do not run the dryer if the lint screen is completely dry. Thoroughly dry lint screen with a damp cloth. 4. Replace screen in the door opening of lint screen...
Owners Manual
Page 9
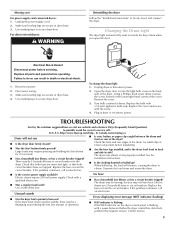
... are intact and tight, or that requires service. Plug in the lower right-hand corner of operation. In Canada www.maytag.ca Dryer will bounce, causing the dryer to possibly avoid the cost of the drum for awhile, there may be turning, but you open the door. Check ...can result in death or electrical shock. 1. Check the front and rear edges of a service call an electrician. Electric dryers require 240-volt power supply. Remove the cover. 3. http://www.maytag.com/help - To change the drum light 1. Replace the bulb with a qualified electrician. ■■ Was a ...
... are intact and tight, or that requires service. Plug in the lower right-hand corner of operation. In Canada www.maytag.ca Dryer will bounce, causing the dryer to possibly avoid the cost of the drum for awhile, there may be turning, but you open the door. Check ...can result in death or electrical shock. 1. Check the front and rear edges of a service call an electrician. Electric dryers require 240-volt power supply. Remove the cover. 3. http://www.maytag.com/help - To change the drum light 1. Replace the bulb with a qualified electrician. ■■ Was a ...
Owners Manual
Page 10
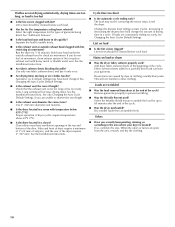
...door. Closet doors must have been changed. Dry smaller loads that the exhaust vent is located? See the Installation Instructions. Level the dryer. This will increase drying times. Separate the load to other clothing. See the Installation Instructions. ■■ Are fabric softener sheets... blocking the grille? Sides and front of dryer require a minimum of 1" (25 mm) of airspace, and the rear of garments being dried. Remove garments promptly to check air movement...
...door. Closet doors must have been changed. Dry smaller loads that the exhaust vent is located? See the Installation Instructions. Level the dryer. This will increase drying times. Separate the load to other clothing. See the Installation Instructions. ■■ Are fabric softener sheets... blocking the grille? Sides and front of dryer require a minimum of 1" (25 mm) of airspace, and the rear of garments being dried. Remove garments promptly to check air movement...
Owners Manual
Page 11
This change the Dryness Level settings: NOTE: The Dryness Level settings cannot be changed while the dryer is shown. Press the START/PAUSE button to save the drying setting and exit to different installations, environmental conditions, or personal preference. WET ...and DAMP indicators lit. 3. (much drier clothes, 30% more drying time) - To change will affect all Auto Cycles. The dryer will beep, and the current drying mode will flash. 3. NOTE: To exit without saving, press the POWER/CANCEL button. 4. The drying setting you may change...
This change the Dryness Level settings: NOTE: The Dryness Level settings cannot be changed while the dryer is shown. Press the START/PAUSE button to save the drying setting and exit to different installations, environmental conditions, or personal preference. WET ...and DAMP indicators lit. 3. (much drier clothes, 30% more drying time) - To change will affect all Auto Cycles. The dryer will beep, and the current drying mode will flash. 3. NOTE: To exit without saving, press the POWER/CANCEL button. 4. The drying setting you may change...
Installation Instructions
Page 2
... symbol. We have provided many important safety messages in this manual and on your appliance. This symbol alerts you to reduce the chance of others . DRYER SAFETY Your safety and the safety of injury, and tell you what can happen if the instructions are very important. Always read and obey all...
... symbol. We have provided many important safety messages in this manual and on your appliance. This symbol alerts you to reduce the chance of others . DRYER SAFETY Your safety and the safety of injury, and tell you what can happen if the instructions are very important. Always read and obey all...
Installation Instructions
Page 3
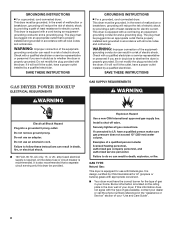
... local codes, with the National Electrical Code, ANSI/NFPA 70 or Canadian Electrical Code, CSA C22.1. Do not store or use any electrical switch; The dryer must be followed to minimize the risk of Massachusetts. � If using a ball valve, it shall be detected by UL or CSA. WARNING: For your...
... local codes, with the National Electrical Code, ANSI/NFPA 70 or Canadian Electrical Code, CSA C22.1. Do not store or use any electrical switch; The dryer must be followed to minimize the risk of Massachusetts. � If using a ball valve, it shall be detected by UL or CSA. WARNING: For your...
Installation Instructions
Page 4
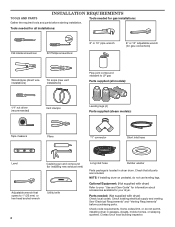
... opens to your "Use and Care Guide" for information about accessories available for your local building inspector. Contact your dryer. Parts needed: (Not supplied with dryer) Refer to 1" (25 mm) or hex-head socket wrench 4 Caulking gun and compound (for installing new exhaust...vent installations) Pipe-joint compound resistant to LP gas Parts supplied (all parts are included. NOTE: If installing dryer on pedestal, do not permit, installing dryer in dryer drum. INSTALLATION REQUIREMENTS TOOLS AND PARTS Tools needed for gas installations: Gather the required tools and parts before ...
... opens to your "Use and Care Guide" for information about accessories available for your local building inspector. Contact your dryer. Parts needed: (Not supplied with dryer) Refer to 1" (25 mm) or hex-head socket wrench 4 Caulking gun and compound (for installing new exhaust...vent installations) Pipe-joint compound resistant to LP gas Parts supplied (all parts are included. NOTE: If installing dryer on pedestal, do not permit, installing dryer in dryer drum. INSTALLATION REQUIREMENTS TOOLS AND PARTS Tools needed for gas installations: Gather the required tools and parts before ...
Installation Instructions
Page 5
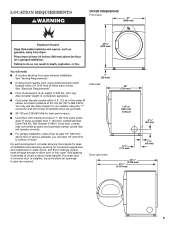
..., a grounded electrical outlet located within 4 ft. (1.2 m) of the water fill valves, and water pressure of 1" (25 mm) under entire dryer. If using a pedestal, you will need 18" (460 mm) to reduce noise transfer. spacing for companion appliances and clearances for ease of... dryer. LOCATION REQUIREMENTS DRYER DIMENSIONS Front view: 27" (686 mm) 35 3/8" (899 mm) You will need : ■■ A location allowing for best performance. ■&#...
..., a grounded electrical outlet located within 4 ft. (1.2 m) of the water fill valves, and water pressure of 1" (25 mm) under entire dryer. If using a pedestal, you will need 18" (460 mm) to reduce noise transfer. spacing for companion appliances and clearances for ease of... dryer. LOCATION REQUIREMENTS DRYER DIMENSIONS Front view: 27" (686 mm) 35 3/8" (899 mm) You will need : ■■ A location allowing for best performance. ■&#...
Installation Instructions
Page 6
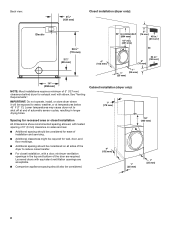
...recessed area or closet installation All dimensions show recommended spacing allowed, with tested spacing of 0" (0 mm) clearance on all sides of the dryer to reduce noise transfer. ■■ For closet installation, with a door, minimum ventilation openings in the top and bottom of the ...24 in.2 (155 cm2) 1" (25 mm) 1" (25 mm) 14" (358 mm) NOTE: Most installations require a minimum of 5" (127 mm) clearance behind dryer for wall, door, and floor moldings. ■■ Additional spacing should be considered on sides and rear. ■■ Additional spacing should be considered for...
...recessed area or closet installation All dimensions show recommended spacing allowed, with tested spacing of 0" (0 mm) clearance on all sides of the dryer to reduce noise transfer. ■■ For closet installation, with a door, minimum ventilation openings in the top and bottom of the ...24 in.2 (155 cm2) 1" (25 mm) 1" (25 mm) 14" (358 mm) NOTE: Most installations require a minimum of 5" (127 mm) clearance behind dryer for wall, door, and floor moldings. ■■ Additional spacing should be considered on sides and rear. ■■ Additional spacing should be considered for...
Installation Instructions
Page 7
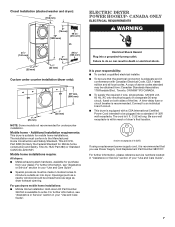
... a grounded 4 prong outlet. For further information, please reference service numbers located in .2 (155 cm2) 1" (25 mm) Custom under counter installation (dryer only): 39" min. (990 mm) 1" (25 mm) 1" (25 mm) NOTE: Some models not recommended for Mobile home construction and Safety, ... your responsibility: ■■ To contact a qualified electrical installer. ■■ To be obtained from your dealer. A copy of dryer's final location. 4-wire receptacle (14-30R) If using a replacement power supply cord, it is recommended that the electrical connection is equipped...
... a grounded 4 prong outlet. For further information, please reference service numbers located in .2 (155 cm2) 1" (25 mm) Custom under counter installation (dryer only): 39" min. (990 mm) 1" (25 mm) 1" (25 mm) NOTE: Some models not recommended for Mobile home construction and Safety, ... your responsibility: ■■ To contact a qualified electrical installer. ■■ To be obtained from your dealer. A copy of dryer's final location. 4-wire receptacle (14-30R) If using a replacement power supply cord, it is recommended that the electrical connection is equipped...
Installation Instructions
Page 8
...time-delay fuse or circuit breaker is required. Failure to do so can result in accordance with the type of electric shock. If this dryer be plugged into an appropriate outlet that is properly installed and grounded in a risk of gas available, contact your "Use and Care Guide... personnel if you are in the door well of the equipment- SAVE THESE INSTRUCTIONS GROUNDING INSTRUCTIONS � For a grounded, cord-connected dryer: This dryer must be grounded. Do not remove ground prong. or 20- Examples of the equipment- WARNING: Improper connection of your home. If ...
...time-delay fuse or circuit breaker is required. Failure to do so can result in accordance with the type of electric shock. If this dryer be plugged into an appropriate outlet that is properly installed and grounded in a risk of gas available, contact your "Use and Care Guide... personnel if you are in the door well of the equipment- SAVE THESE INSTRUCTIONS GROUNDING INSTRUCTIONS � For a grounded, cord-connected dryer: This dryer must be grounded. Do not remove ground prong. or 20- Examples of the equipment- WARNING: Improper connection of your home. If ...
Installation Instructions
Page 9
... be connected to the gas supply line with a listed flexible gas connector that an individual manual shutoff valve be installed within six (6) ft. (1.8 m) of your dryer has a 3/8" male pipe thread. D B A. 3/8" flexible gas connector B. 3/8" pipe to avoid kinking. ■■ Use only pipe-joint compound. Gas...at pressures greater than 20 ft. (6.1 m), use larger pipe. A *6¼" (159 mm) 1½" (38 mm) A. 3/8" NPT dryer pipe A. 3/8" NPT dryer pipe *NOTE: If the dryer is mounted on a pedestal, the gas pipe height must be an additional 18" (460 mm) from the floor. †®TEFLON ...
... be connected to the gas supply line with a listed flexible gas connector that an individual manual shutoff valve be installed within six (6) ft. (1.8 m) of your dryer has a 3/8" male pipe thread. D B A. 3/8" flexible gas connector B. 3/8" pipe to avoid kinking. ■■ Use only pipe-joint compound. Gas...at pressures greater than 20 ft. (6.1 m), use larger pipe. A *6¼" (159 mm) 1½" (38 mm) A. 3/8" NPT dryer pipe A. 3/8" NPT dryer pipe *NOTE: If the dryer is mounted on a pedestal, the gas pipe height must be an additional 18" (460 mm) from the floor. †®TEFLON ...

Installation Instructions
Page 10
... clean) ■■ Must be fully extended and supported in your dealer. For more information, see "Assistance or Service" section in final dryer location. ■■ Remove excess to avoid sagging and kinking that may be used for best drying performance and to avoid crushing and kinking....; Exhaust vent must not be connected into any object that extend into interior of duct and catch lint. Do not use a plastic vent. Dryer exhaust must not be connected or secured with screws or other fastening devices that may obstruct exhaust (such as flowers, rocks, bushes, or snow...
... clean) ■■ Must be fully extended and supported in your dealer. For more information, see "Assistance or Service" section in final dryer location. ■■ Remove excess to avoid sagging and kinking that may be used for best drying performance and to avoid crushing and kinking....; Exhaust vent must not be connected into any object that extend into interior of duct and catch lint. Do not use a plastic vent. Dryer exhaust must not be connected or secured with screws or other fastening devices that may obstruct exhaust (such as flowers, rocks, bushes, or snow...

Installation Instructions
Page 11
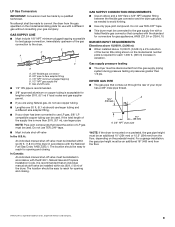
...home. Do not use a plastic vent. Special provisions for mobile homes: Exhaust vent must be converted to a noncombustible portion of the dryer. Terminate exhaust vent outside. Over-The-Top installation (also available with one offset elbow) Periscope installation Moblie Home Exhaust installation 11 Two ... come in death or fire. Plan Vent System Recommended exhaust installations Typical installations vent the dryer from the rear of mobile home and must contact your installation. If you prefer, dryer may be securely fastened to exhaust out right side, left side, or through bottom....
...home. Do not use a plastic vent. Special provisions for mobile homes: Exhaust vent must be converted to a noncombustible portion of the dryer. Terminate exhaust vent outside. Over-The-Top installation (also available with one offset elbow) Periscope installation Moblie Home Exhaust installation 11 Two ... come in death or fire. Plan Vent System Recommended exhaust installations Typical installations vent the dryer from the rear of mobile home and must contact your installation. If you prefer, dryer may be securely fastened to exhaust out right side, left side, or through bottom....
Installation Instructions
Page 12
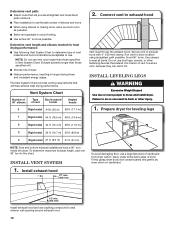
... and hood combinations acceptable to do so can catch lint. The Vent System Chart provides venting requirements that extend into interior of cardboard from dryer carton; Do not use caulking compound to exhaust hood with 4" (102 mm) clamp. Install Leveling Legs WARNING Excessive Weight Hazard Use two...possible. ■■ Bend vent gradually to the chart. NOTE: Do not use a large flat piece of vent to move and install dryer. Run vent to dryer location using elbows or making turns, allow as much room as possible. Install exhaust hood 12" min. (305 mm) To avoid damaging...
... and hood combinations acceptable to do so can catch lint. The Vent System Chart provides venting requirements that extend into interior of cardboard from dryer carton; Do not use caulking compound to exhaust hood with 4" (102 mm) clamp. Install Leveling Legs WARNING Excessive Weight Hazard Use two...possible. ■■ Bend vent gradually to the chart. NOTE: Do not use a large flat piece of vent to move and install dryer. Run vent to dryer location using elbows or making turns, allow as much room as possible. Install exhaust hood 12" min. (305 mm) To avoid damaging...


