
Owners Manual
Page 1
...INSTRUCTIONS INSTRUCTIONS POUR L'UTILISATEUR DE LA SÉCHEUSE Table of Contents DRYER SAFETY 1 CONTROL PANEL 4 CYCLE GUIDE 5 DRYER USE 6 DRYER CARE 7 TROUBLESHOOTING 8 WARRANTY 11 ASSISTANCE OR SERVICE Back Cover Keep this book and your complete model number and serial number. You must provide proof of injury, and... important. All safety messages will follow instructions. WARNING You can find this manual and on the model and serial number label, located at the top inside dryer door well. You can be killed or seriously injured if you ever need to reduce the chance...
...INSTRUCTIONS INSTRUCTIONS POUR L'UTILISATEUR DE LA SÉCHEUSE Table of Contents DRYER SAFETY 1 CONTROL PANEL 4 CYCLE GUIDE 5 DRYER USE 6 DRYER CARE 7 TROUBLESHOOTING 8 WARRANTY 11 ASSISTANCE OR SERVICE Back Cover Keep this book and your complete model number and serial number. You must provide proof of injury, and... important. All safety messages will follow instructions. WARNING You can find this manual and on the model and serial number label, located at the top inside dryer door well. You can be killed or seriously injured if you ever need to reduce the chance...

Owners Manual
Page 4
...the load is on, the signal sounds every few minutes. It periodically starts and stops the dryer, tumbling the load without heat to Medium heat setting may vary. Timed Dry On some models) The WRINKLE PREVENT features will sound only if set the WRINKLE PREVENT selector knob to ON or... WRINKLE PREVENT setting is selected, but only if the End of Cycle signal sounds when a cycle is selectable and the signal will run after your dryer model. Temperature Tips If your load. The signal stops when you dry a similar load, choose a setting closer to Off. 4 Drying time with a selectable ...
...the load is on, the signal sounds every few minutes. It periodically starts and stops the dryer, tumbling the load without heat to Medium heat setting may vary. Timed Dry On some models) The WRINKLE PREVENT features will sound only if set the WRINKLE PREVENT selector knob to ON or... WRINKLE PREVENT setting is selected, but only if the End of Cycle signal sounds when a cycle is selectable and the signal will run after your dryer model. Temperature Tips If your load. The signal stops when you dry a similar load, choose a setting closer to Off. 4 Drying time with a selectable ...
Owners Manual
Page 5
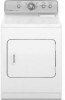
...a cycle that do not require an entire drying cycle. Any load Helps to reduce wrinkling. Gives the best drying in the dryer too long. Depending on model, temperature may be selected on cycle knob or be a separate control. High Casual, shirts, pants, Gives the best drying in... suitcase or items left in the shortest time. Use for the specified time on fabric type, load size, and dryness setting. Depending on model, temperature may be selected on a hanger. High Large or heavy items Evenly dries large or heavy loads. sensitive fabrics These settings are still...
...a cycle that do not require an entire drying cycle. Any load Helps to reduce wrinkling. Gives the best drying in the dryer too long. Depending on model, temperature may be selected on cycle knob or be a separate control. High Casual, shirts, pants, Gives the best drying in... suitcase or items left in the shortest time. Use for the specified time on fabric type, load size, and dryness setting. Depending on model, temperature may be selected on a hanger. High Large or heavy items Evenly dries large or heavy loads. sensitive fabrics These settings are still...

Owners Manual
Page 6
...or turn the Cycle Control knob to rest on the back wall of load being dried. This guide covers several different models. Do not pack the dryer. Your dryer may be dried on drying rack) Stuffed toys/pillows (cotton or polyester filled) Stuffed toys/pillows (foam rubber filled... The signal is selectable. Push the Start button. NOTE: The drying rack must be removed from dryer. To restart your model does not have a Wrinkle Prevent feature selector. On some models) Use the Drying Rack to follow these instructions can result in use the drying rack 1. Push the...
...or turn the Cycle Control knob to rest on the back wall of load being dried. This guide covers several different models. Do not pack the dryer. Your dryer may be dried on drying rack) Stuffed toys/pillows (cotton or polyester filled) Stuffed toys/pillows (foam rubber filled... The signal is selectable. Push the Start button. NOTE: The drying rack must be removed from dryer. To restart your model does not have a Wrinkle Prevent feature selector. On some models) Use the Drying Rack to follow these instructions can result in use the drying rack 1. Push the...

Owners Manual
Page 8
...operating. Turn bulb counterclockwise. In Canada www.maytag.ca Dryer will bounce, causing the dryer to side? Replace the fuse or reset the circuit breaker. The drum may not have heat. The dryer will not start in dryer base. 4. Electric dryers require 240-volt power supply. The timer moves...if not properly installed. Make sure leveling legs are secure in dryer or reconnect power. Locate the light bulb cover on some models) 1. Timer does not noticeably advance ■■ Is the dryer set to secure dryer door. The drum may be turning, but you may be a...
...operating. Turn bulb counterclockwise. In Canada www.maytag.ca Dryer will bounce, causing the dryer to side? Replace the fuse or reset the circuit breaker. The drum may not have heat. The dryer will not start in dryer base. 4. Electric dryers require 240-volt power supply. The timer moves...if not properly installed. Make sure leveling legs are secure in dryer or reconnect power. Locate the light bulb cover on some models) 1. Timer does not noticeably advance ■■ Is the dryer set to secure dryer door. The drum may be turning, but you may be a...
Installation Instructions
Page 1
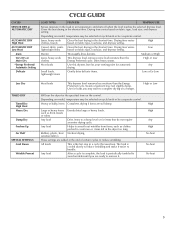
...CONDUIT D'ÉVACUATION 25 ACHEVER L'INSTALLATION 25 Inversion du sens d'ouverture de la porte (facultatif 26 DRYER SAFETY Your safety and the safety of Contents DRYER SAFETY 1 Installation Requirements 4 Tools and Parts 4 Location Requirements 4 ELECTRIC DRYER POWER HOOKUP - Always read and obey all safety messages. WARNING You can be killed or seriously... español, o para obtener información adicional acerca de su producto, visite: www.whirlpool.com Tenga listo su número de modelo completo. Dryer Installation Instructions 29" and 27" Wide Models Gas (U.S.A.
...CONDUIT D'ÉVACUATION 25 ACHEVER L'INSTALLATION 25 Inversion du sens d'ouverture de la porte (facultatif 26 DRYER SAFETY Your safety and the safety of Contents DRYER SAFETY 1 Installation Requirements 4 Tools and Parts 4 Location Requirements 4 ELECTRIC DRYER POWER HOOKUP - Always read and obey all safety messages. WARNING You can be killed or seriously... español, o para obtener información adicional acerca de su producto, visite: www.whirlpool.com Tenga listo su número de modelo completo. Dryer Installation Instructions 29" and 27" Wide Models Gas (U.S.A.
Installation Instructions
Page 5
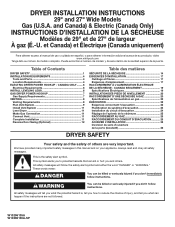
... Wide opening side-swing door C. Wide opening side-swing door B. closet or confined area C. Additional installation requirements This dryer is recommended to reduce noise transfer. ■■ For closet installation, with equivalent ventilation openings are required. The installation... suitable for ease of installation and servicing. ■■ Additional clearances might be considered. See "Venting Requirements." 29" Wide Models Dryer Dimensions 27" Wide Models Dryer Dimensions 43 3/8" (1102 mm) 15¼" (387 mm) 433/8" (1102 mm) 22 ¾" (578 mm) *...
... Wide opening side-swing door C. Wide opening side-swing door B. closet or confined area C. Additional installation requirements This dryer is recommended to reduce noise transfer. ■■ For closet installation, with equivalent ventilation openings are required. The installation... suitable for ease of installation and servicing. ■■ Additional clearances might be considered. See "Venting Requirements." 29" Wide Models Dryer Dimensions 27" Wide Models Dryer Dimensions 43 3/8" (1102 mm) 15¼" (387 mm) 433/8" (1102 mm) 22 ¾" (578 mm) *...
Installation Instructions
Page 7
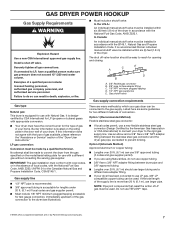
...Gas Code, ANSI Z223.1/NFPA 54 or the Canadian Natural Gas and Propane Installation Code, CSA B149.1. It is located on the model/serial rating plate for LP (propane or butane) gases with the B149.1, Natural Gas and Propane Installation Code. Du Pont De ... the National Fuel Gas Code, ANSI Z223.1. Option 2 (Alternate Method) Approved aluminum or copper tubing: ■■ Lengths over 20 ft. (6.1 m) should be connected to the dryer (see illustration). ■■ Must include a shutoff valve: In the U.S.A.: An individual manual shutoff valve must be installed within six ...
...Gas Code, ANSI Z223.1/NFPA 54 or the Canadian Natural Gas and Propane Installation Code, CSA B149.1. It is located on the model/serial rating plate for LP (propane or butane) gases with the B149.1, Natural Gas and Propane Installation Code. Du Pont De ... the National Fuel Gas Code, ANSI Z223.1. Option 2 (Alternate Method) Approved aluminum or copper tubing: ■■ Lengths over 20 ft. (6.1 m) should be connected to the dryer (see illustration). ■■ Must include a shutoff valve: In the U.S.A.: An individual manual shutoff valve must be installed within six ...
Installation Instructions
Page 8
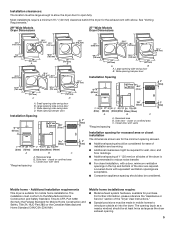
...used for each 1,000 ft. (305 m) increase in death or fire. Dryer gas pipe ■■ The gas pipe that comes out through the rear of your dryer has a 3/8" male pipe thread. 29" Wide Model 1¼" (32 mm) A 9¼" (235 mm) A. 3/8" NPT dryer pipe 27" Wide Model A *6¼" (159 ...mm) Burner input requirements Elevations up to 10,000 ft. (3,048 m): ■■ The design of this dryer is certified by calling ...
...used for each 1,000 ft. (305 m) increase in death or fire. Dryer gas pipe ■■ The gas pipe that comes out through the rear of your dryer has a 3/8" male pipe thread. 29" Wide Model 1¼" (32 mm) A 9¼" (235 mm) A. 3/8" NPT dryer pipe 27" Wide Model A *6¼" (159 ...mm) Burner input requirements Elevations up to 10,000 ft. (3,048 m): ■■ The design of this dryer is certified by calling ...
Installation Instructions
Page 9
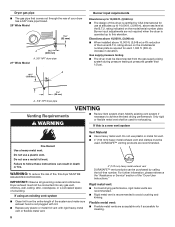
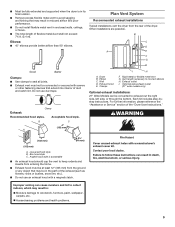
...Each kit includes step-bystep instructions. For further information, please reference the "Assistance or Service" section of flexible metal duct shall not exceed 7¾ ft. (2.4 m). Improper venting can be at least 12" (305 mm) from the rear of duct and catch lint. ■■ Must be ...not use an exhaust hood with screws or other fastening devices that extend into interior of the dryer. Optional side exhaust outlet (27" wide models only) Optional exhaust installations: 27" Wide Models can cause moisture and lint to collect indoors, which may be in the path of the exhaust...
...Each kit includes step-bystep instructions. For further information, please reference the "Assistance or Service" section of flexible metal duct shall not exceed 7¾ ft. (2.4 m). Improper venting can be at least 12" (305 mm) from the rear of duct and catch lint. ■■ Must be ...not use an exhaust hood with screws or other fastening devices that extend into interior of the dryer. Optional side exhaust outlet (27" wide models only) Optional exhaust installations: 27" Wide Models can cause moisture and lint to collect indoors, which may be in the path of the exhaust...
Installation Instructions
Page 10
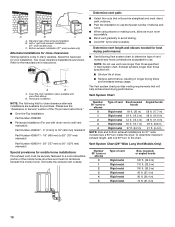
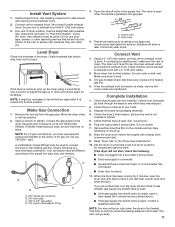
...ft. (20 m) 58 ft. (17.7 m) 1 Rigid metal 54 ft. (16.5 m) 48 ft. (14.6 m) 2 Rigid metal 44 ft. (13.4 m) 38 ft. (11.6 m) 3 Rigid metal 35 ft. (10.7 m) 29 ft. (8.8 m) 4 Rigid metal 27 ft. (8.2 m) 21 ft. (6.4 m) NOTE: Side and bottom exhaust installations for 27" wide models have a 90º turn to use with dryer...Vent System Chart (29" Wide Long Vent Models Only) Number 90° turns or elbows 0 1 2 3 4 5 Type of dryer. ■■ Reduce performance, resulting in many varieties. Left or right side exhaust installation (27" wide models only) C. Select the type best for mobile...
...ft. (20 m) 58 ft. (17.7 m) 1 Rigid metal 54 ft. (16.5 m) 48 ft. (14.6 m) 2 Rigid metal 44 ft. (13.4 m) 38 ft. (11.6 m) 3 Rigid metal 35 ft. (10.7 m) 29 ft. (8.8 m) 4 Rigid metal 27 ft. (8.2 m) 21 ft. (6.4 m) NOTE: Side and bottom exhaust installations for 27" wide models have a 90º turn to use with dryer...Vent System Chart (29" Wide Long Vent Models Only) Number 90° turns or elbows 0 1 2 3 4 5 Type of dryer. ■■ Reduce performance, resulting in many varieties. Left or right side exhaust installation (27" wide models only) C. Select the type best for mobile...
Installation Instructions
Page 11
... (not an air cycle) for heat. Connect vent to dryer location. Do not use duct tape, screws, or other fastening devices that the dryer is level. 3. (On gas models) Check that all of the vent to adjust the legs up the dryer using a wood block. Use a wrench to secure vent,... because they can catch lint. Make Gas Connection 1. Move the dryer close the door. Make sure dryer is level. Check that...
... (not an air cycle) for heat. Connect vent to dryer location. Do not use duct tape, screws, or other fastening devices that the dryer is level. 3. (On gas models) Check that all of the vent to adjust the legs up the dryer using a wood block. Use a wrench to secure vent,... because they can catch lint. Make Gas Connection 1. Move the dryer close the door. Make sure dryer is level. Check that...
Installation Instructions
Page 12
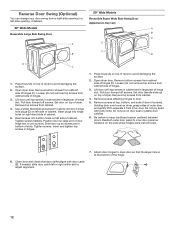
... bottom screws from cabinet side of slots. Remove top screws from a right-side opening to a left or right within slot to dryer door so that door strike aligns with putty knife. Tighten screws halfway. Insert and tighten top screws in large part of the hinge...Models A Reversible Large Side Swing Door B C E A F B D D C 1. Reverse Door Swing (Optional) You can change your door swing from cabinet. 4. Insert plugs into bottom holes on the side where hinges were just removed. 7. Reattach outer door panel to gently remove 4 hinge hole plugs (D) on top of dryer ...
... bottom screws from cabinet side of slots. Remove top screws from a right-side opening to a left or right within slot to dryer door so that door strike aligns with putty knife. Tighten screws halfway. Insert and tighten top screws in large part of the hinge...Models A Reversible Large Side Swing Door B C E A F B D D C 1. Reverse Door Swing (Optional) You can change your door swing from cabinet. 4. Insert plugs into bottom holes on the side where hinges were just removed. 7. Reattach outer door panel to gently remove 4 hinge hole plugs (D) on top of dryer ...
Installation Instructions
Page 13
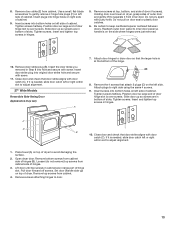
.... Close door and check that the larger hole is needed , slide door catch left or right within slot to adjust alignment. 27" Wide Models Reversible Side-Swing Door Appearance may vary A 7. Attach door hinges to separate it is on left side. Position door so large end of ...and tighten top screws in hinges. Tighten screws halfway. Remove bottom screws from cabinet. Remove door strike (E) from cabinet side of dryer to door. 13 Open dryer door. Close door and check that attach 2 plugs (D) on top of hinges (B). Insert screws into bottom holes on left side...
.... Close door and check that the larger hole is needed , slide door catch left or right within slot to adjust alignment. 27" Wide Models Reversible Side-Swing Door Appearance may vary A 7. Attach door hinges to separate it is on left side. Position door so large end of ...and tighten top screws in hinges. Tighten screws halfway. Remove bottom screws from cabinet. Remove door strike (E) from cabinet side of dryer to door. 13 Open dryer door. Close door and check that attach 2 plugs (D) on top of hinges (B). Insert screws into bottom holes on left side...

Parts Catalog
Page 1
TOP AND CONSOLE PARTS For Model: MGDC500VW0 (White) 29"GAS DRYER 12−08 Litho in U.S.A.(MP)(bay) 1 Part No. W10245678 Rev. A
TOP AND CONSOLE PARTS For Model: MGDC500VW0 (White) 29"GAS DRYER 12−08 Litho in U.S.A.(MP)(bay) 1 Part No. W10245678 Rev. A

Parts Catalog
Page 4
...Foam 13 341029 Clamp−Pipe 27 342055 Screw, 8−18 x 1/2 14 3404413 Plug−Hole 28 3405514 Hinge, Door 16 3392100 Foot, Dryer 29 W10194250 Motor Assembly 279810 Foot−Optional 60 HZ. (Extended Length) 30 8066184 Pulley 60 Hz. (Package of 2) 31 3400500 Bolt, (...Not Included.) 5/16−18 x 3/4 Illus. CABINET PARTS For Model: MGDC500VW0 (White) Illus. Part No. Part No. DESCRIPTION 33 3403431 Strike, Panel 35 3402341 Door, Rear 36 3402335 Door, Front 37 8565970 Handle, Door...
...Foam 13 341029 Clamp−Pipe 27 342055 Screw, 8−18 x 1/2 14 3404413 Plug−Hole 28 3405514 Hinge, Door 16 3392100 Foot, Dryer 29 W10194250 Motor Assembly 279810 Foot−Optional 60 HZ. (Extended Length) 30 8066184 Pulley 60 Hz. (Package of 2) 31 3400500 Bolt, (...Not Included.) 5/16−18 x 3/4 Illus. CABINET PARTS For Model: MGDC500VW0 (White) Illus. Part No. Part No. DESCRIPTION 33 3403431 Strike, Panel 35 3402341 Door, Rear 36 3402335 Door, Front 37 8565970 Handle, Door...

Parts Catalog
Page 9
No. OPTIONAL PARTS (NOT INCLUDED) For Model: MGDC500VW0 (White) Illus. DESCRIPTION ACCESSORY PARTS 279948 Kit, Dryer Repair 346764 Kit, Hold−Down (Gas Dryer Mobile Home Installation) 3406839 Dry Rack 8522199 Kit, Dryer Vent Testing PAINT, TOUCH−UP (1/2oz.) 72017 White PAINT, PRESSURIZED SPRAY (12 oz.) 350930 White 350938 Primer, Gray PAINT, BULK (1 qt.) 799344 White (Uncut) W10245678 9 Part No.
No. OPTIONAL PARTS (NOT INCLUDED) For Model: MGDC500VW0 (White) Illus. DESCRIPTION ACCESSORY PARTS 279948 Kit, Dryer Repair 346764 Kit, Hold−Down (Gas Dryer Mobile Home Installation) 3406839 Dry Rack 8522199 Kit, Dryer Vent Testing PAINT, TOUCH−UP (1/2oz.) 72017 White PAINT, PRESSURIZED SPRAY (12 oz.) 350930 White 350938 Primer, Gray PAINT, BULK (1 qt.) 799344 White (Uncut) W10245678 9 Part No.


