Use and Care Guide
Page 3
...be followed to potential hazards that can be performed by the State of Massachusetts. DRYER SAFETY Your safety and the safety of others . Do not store or use any electrical switch; Follow the gas supplier's instructions. • If you what the potential hazard is the safety alert... In the State of fire or explosion, or to reduce the chance of injury, and tell you cannot reach your appliance. s A flexible gas connector, when used, must be performed by a qualified or licensed contractor, plumber, or gasfitter qualified or licensed by a qualified installer, service agency...
...be followed to potential hazards that can be performed by the State of Massachusetts. DRYER SAFETY Your safety and the safety of others . Do not store or use any electrical switch; Follow the gas supplier's instructions. • If you what the potential hazard is the safety alert... In the State of fire or explosion, or to reduce the chance of injury, and tell you cannot reach your appliance. s A flexible gas connector, when used, must be performed by a qualified or licensed contractor, plumber, or gasfitter qualified or licensed by a qualified installer, service agency...
Use and Care Guide
Page 4
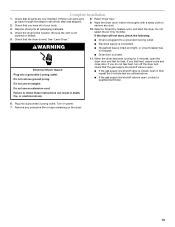
...dry articles containing foam rubber or similarly textured rubber-like materials. SAVE THESE INSTRUCTIONS IMPORTANT: The gas installation must be electrically grounded in accordance with local codes, or in your dryer. s Do not allow children to the weather. s Do not use heat to catch fire....See installation instructions for grounding requirements. The dryer must conform with local codes, or in the absence of lint, dust, and dirt. s Do not tamper with the National Fuel Gas Code, ANSI Z223.1/NFPA 54 or the Canadian Natural Gas and Propane Installation Code, CSA B149.1. ...
...dry articles containing foam rubber or similarly textured rubber-like materials. SAVE THESE INSTRUCTIONS IMPORTANT: The gas installation must be electrically grounded in accordance with local codes, or in your dryer. s Do not allow children to the weather. s Do not use heat to catch fire....See installation instructions for grounding requirements. The dryer must conform with local codes, or in the absence of lint, dust, and dirt. s Do not tamper with the National Fuel Gas Code, ANSI Z223.1/NFPA 54 or the Canadian Natural Gas and Propane Installation Code, CSA B149.1. ...
Use and Care Guide
Page 5
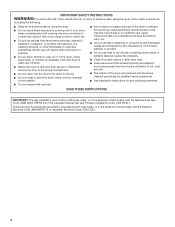
... dealer from whom you will need to purchase a Stack Kit. For a garage installation, you purchased your washer and dryer? s 8" or 10" pipe wrench s 8" or 10" adjustable wrench (for gas connections) s Flat-blade screwdriver s Adjustable wrench that opens to 1" (2.5 cm) or hex-head socket wrench (for...) White WHP1500SQ 15.5" (39.4 cm) Black WHP1500SB Stack Kit Are you placing the dryer on a pedestal. To do so, you purchased your dryer or refer to stack your dryer or refer to LP gas s Caulking gun and compound (for this manual. You may be ordered by calling the...
... dealer from whom you will need to purchase a Stack Kit. For a garage installation, you purchased your washer and dryer? s 8" or 10" pipe wrench s 8" or 10" adjustable wrench (for gas connections) s Flat-blade screwdriver s Adjustable wrench that opens to 1" (2.5 cm) or hex-head socket wrench (for...) White WHP1500SQ 15.5" (39.4 cm) Black WHP1500SB Stack Kit Are you placing the dryer on a pedestal. To do so, you purchased your dryer or refer to stack your dryer or refer to LP gas s Caulking gun and compound (for this manual. You may be ordered by calling the...
Use and Care Guide
Page 6
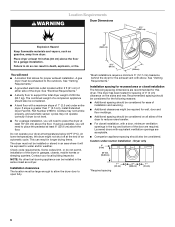
...Required spacing 27" (68.6 cm) 1"* (2.5 cm) 6 You will need to reduce noise transfer. If slope is not level. Do not operate your local building inspector. Some codes limit, or do so can result in death, explosion, or fire. Custom undercounter installation - A gas dryer must be ...considered on the sides and rear. See "Venting Requirements." At lower temperatures, the dryer might be exhausted to water and/or weather. Installation clearances The location must ...
...Required spacing 27" (68.6 cm) 1"* (2.5 cm) 6 You will need to reduce noise transfer. If slope is not level. Do not operate your local building inspector. Some codes limit, or do so can result in death, explosion, or fire. Custom undercounter installation - A gas dryer must be ...considered on the sides and rear. See "Venting Requirements." At lower temperatures, the dryer might be exhausted to water and/or weather. Installation clearances The location must ...
Use and Care Guide
Page 7
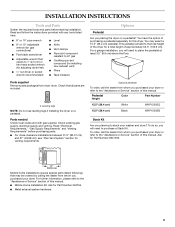
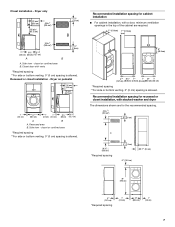
... of the cabinet are for cabinet installation s For cabinet installation, with stacked washer and dryer The dimensions shown are required. 7"* (17.8 cm) 7"* (17.8 cm) 9"* (22.9 cm) 5"** 31¹ ₂" 1"* 1" 27" 1" (12.7 cm) (80.0 cm) (2.5 cm) (2.5 cm)(68.6 cm)... (7.6 cm) 6"* (15.2 cm) 1"* (2.5 cm) 76" (193 cm) 5"* (12.7 cm) *Required spacing 1" (2.5 cm) 27" (68.6 cm) 1" (2.5 cm) 7 Dryer on pedestal 14" max.* (35.6 cm) 18" min.* (45.72 cm) 1" (2.5 cm) 27" (68.6 cm) 1" 1"* (2.5 cm) (2.5 cm) 31½" (80 cm) A B A. Recessed or closet installation - closet...
... of the cabinet are for cabinet installation s For cabinet installation, with stacked washer and dryer The dimensions shown are required. 7"* (17.8 cm) 7"* (17.8 cm) 9"* (22.9 cm) 5"** 31¹ ₂" 1"* 1" 27" 1" (12.7 cm) (80.0 cm) (2.5 cm) (2.5 cm)(68.6 cm)... (7.6 cm) 6"* (15.2 cm) 1"* (2.5 cm) 76" (193 cm) 5"* (12.7 cm) *Required spacing 1" (2.5 cm) 27" (68.6 cm) 1" (2.5 cm) 7 Dryer on pedestal 14" max.* (35.6 cm) 18" min.* (45.72 cm) 1" (2.5 cm) 27" (68.6 cm) 1" 1"* (2.5 cm) (2.5 cm) 31½" (80 cm) A B A. Recessed or closet installation - closet...

Use and Care Guide
Page 8
...fused electrical supply is recommended. GROUNDING INSTRUCTIONS s For a grounded, cord-connected dryer: This dryer must be plugged into a grounded 3 prong outlet. Burner information is properly grounded. Gas supply line s Must include ¹⁄₈" NPT minimum plugged tapping accessible... Installation Kit Part Number 346764. Failure to follow these instructions can result in accordance with Natural gas. SAVE THESE INSTRUCTIONS Gas Type Natural gas: This dryer is suitable for test gauge connection, immediately upstream of your home. If this information does not...
...fused electrical supply is recommended. GROUNDING INSTRUCTIONS s For a grounded, cord-connected dryer: This dryer must be plugged into a grounded 3 prong outlet. Burner information is properly grounded. Gas supply line s Must include ¹⁄₈" NPT minimum plugged tapping accessible... Installation Kit Part Number 346764. Failure to follow these instructions can result in accordance with Natural gas. SAVE THESE INSTRUCTIONS Gas Type Natural gas: This dryer is suitable for test gauge connection, immediately upstream of your home. If this information does not...
Use and Care Guide
Page 9
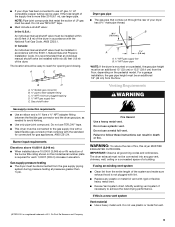
... should be an additional 13" (33 cm) or 15.5" (39.4 cm) from the entire length of your dryer has been converted to the gas supply line with a listed flexible gas connector that comes out through the rear of the system and make sure exhaust hood is required for each 1,000... be installed within six (6) feet (1.8 m) of the burner Btu rating shown on the pedestal model. Gas shutoff valve Dryer gas pipe s The gas pipe that complies with the B149.1, Natural Gas and Propane Installation Code. If using an existing vent system s Clean lint from the floor, depending on the model/...
... should be an additional 13" (33 cm) or 15.5" (39.4 cm) from the entire length of your dryer has been converted to the gas supply line with a listed flexible gas connector that comes out through the rear of the system and make sure exhaust hood is required for each 1,000... be installed within six (6) feet (1.8 m) of the burner Btu rating shown on the pedestal model. Gas shutoff valve Dryer gas pipe s The gas pipe that complies with the B149.1, Natural Gas and Propane Installation Code. If using an existing vent system s Clean lint from the floor, depending on the model/...
Use and Care Guide
Page 10
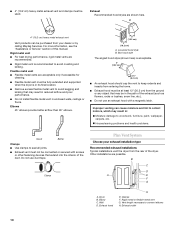
... 4" (10.2 cm) 4" (10.2 cm) A. s Exhaust hood must be purchased from your exhaust installation type Recommended exhaust installations Typical installations vent the dryer from the rear of the dryer. Do not use an exhaust hood with screws or other fastening devices that extend into the interior of the duct...s Use clamps to connect elbows H. s Exhaust vent must not be fully extended and supported when the dryer is in its final location. Clamp Plan Vent System Choose your dealer or by calling Maytag Services. Elbow C. Vent length necessary to seal all joints. s 4" (10.2 cm) heavy metal ...
... 4" (10.2 cm) 4" (10.2 cm) A. s Exhaust hood must be purchased from your exhaust installation type Recommended exhaust installations Typical installations vent the dryer from the rear of the dryer. Do not use an exhaust hood with screws or other fastening devices that extend into the interior of the duct...s Use clamps to connect elbows H. s Exhaust vent must not be fully extended and supported when the dryer is in its final location. Clamp Plan Vent System Choose your dealer or by calling Maytag Services. Elbow C. Vent length necessary to seal all joints. s 4" (10.2 cm) heavy metal ...
Use and Care Guide
Page 11
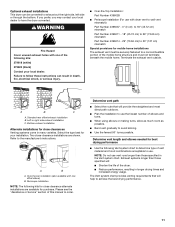
...to 50" (127 cm) mismatch Special provisions for close clearance alternate installations are shown. s Bend vent gradually to have the dryer converted. Periscope installation NOTE: The following kits for mobile home installations The exhaust vent must be converted to follow these instructions can ...and elbows needed for close -clearance installations are available for your local dealer to avoid kinking. Optional exhaust installations This dryer can be securely fastened to use the fewest number of the mobile home structure and must not terminate beneath the ...
...to 50" (127 cm) mismatch Special provisions for close clearance alternate installations are shown. s Bend vent gradually to have the dryer converted. Periscope installation NOTE: The following kits for mobile home installations The exhaust vent must be converted to follow these instructions can ...and elbows needed for close -clearance installations are available for your local dealer to avoid kinking. Optional exhaust installations This dryer can be securely fastened to use the fewest number of the mobile home structure and must not terminate beneath the ...
Use and Care Guide
Page 12
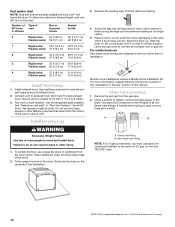
...Use pipe-joint compound on the threads of all joints. Non-flared male fitting NOTE: For LP gas connections, you must be sure there are no longer visible. 5. Do not use Gas dryers must use a large flat piece of this manual. See "Determine vent path" in the "...31 ft (9.4 m) 23 ft (7 m) 2 Rigid metal 44 ft (13.4 m) 38 ft (11.6 m) Flexible metal 27 ft (8.2 m) 19 ft (5.8 m) 3 Rigid metal 35 ft (10.7 m) 29 ft (8.8 m) Flexible metal 25 ft (7.6 m) 17 ft (5.2 m) 4 Rigid metal 27 ft (8.2 m) 21 ft (6.4 m) Flexible metal 23 ft (7 m) 15 ft (4.6 m) Install Vent System 1. Using a...
...Use pipe-joint compound on the threads of all joints. Non-flared male fitting NOTE: For LP gas connections, you must be sure there are no longer visible. 5. Do not use Gas dryers must use a large flat piece of this manual. See "Determine vent path" in the "...31 ft (9.4 m) 23 ft (7 m) 2 Rigid metal 44 ft (13.4 m) 38 ft (11.6 m) Flexible metal 27 ft (8.2 m) 19 ft (5.8 m) 3 Rigid metal 35 ft (10.7 m) 29 ft (8.8 m) Flexible metal 25 ft (7.6 m) 17 ft (5.2 m) 4 Rigid metal 27 ft (8.2 m) 21 ft (6.4 m) Flexible metal 23 ft (7 m) 15 ft (4.6 m) Install Vent System 1. Using a...
Use and Care Guide
Page 13
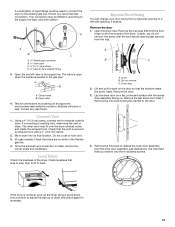
... opening to -flare adapter fitting 3. Open valve 4. Lift and pull forward on the front panel of the dryer. Shown is made, remove the corner posts and cardboard. A B C A. ³⁄₈" flexible gas connector B. ³⁄₈" dryer pipe C. ³⁄₈" to ³⁄₈" pipe elbow D. ³⁄₈" pipe-to a left...
... opening to -flare adapter fitting 3. Open valve 4. Lift and pull forward on the front panel of the dryer. Shown is made, remove the corner posts and cardboard. A B C A. ³⁄₈" flexible gas connector B. ³⁄₈" dryer pipe C. ³⁄₈" to ³⁄₈" pipe elbow D. ³⁄₈" pipe-to a left...
Use and Care Guide
Page 14
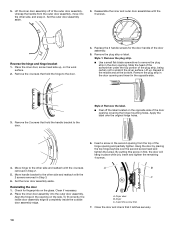
.... Hang the door by placing the top hinge keyhole over the original hinge holes. 6. Place the inner door assembly into the outer door assembly. Dryer door B. Reverse the hinge and hinge bracket 1. Replace the 2 handle screws for fingerprints on the work surface. 2. Style 1: Remove the plug strip...opposite side of the hinge opening covering the hinge mounting holes. Check for the door handle of the door assembly. 5. Clean if necessary. 2. Dryer C. 5. Unsnap the handle from the top of the door opening and partially tighten. Place the inner door, screw head side up . Style ...
.... Hang the door by placing the top hinge keyhole over the original hinge holes. 6. Place the inner door assembly into the outer door assembly. Dryer door B. Reverse the hinge and hinge bracket 1. Replace the 2 handle screws for fingerprints on the work surface. 2. Style 1: Remove the plug strip...opposite side of the hinge opening covering the hinge mounting holes. Check for the door handle of the door assembly. 5. Clean if necessary. 2. Dryer C. 5. Unsnap the handle from the top of the door opening and partially tighten. Place the inner door, screw head side up . Style ...
Use and Care Guide
Page 15
...Do not select the Air Only modifier. Check that the gas supply line shutoff valve is an extra part, go back through the steps to follow these instructions can result in death, fire, or electrical shock. 6. Turn on the dryer. 15 Remove any dust. 3. Do not remove ground ...prong. Complete Installation 1. s If the gas supply line shutoff valve is connected. WARNING s Electrical supply is open the...
...Do not select the Air Only modifier. Check that the gas supply line shutoff valve is an extra part, go back through the steps to follow these instructions can result in death, fire, or electrical shock. 6. Turn on the dryer. 15 Remove any dust. 3. Do not remove ground ...prong. Complete Installation 1. s If the gas supply line shutoff valve is connected. WARNING s Electrical supply is open the...
Use and Care Guide
Page 16
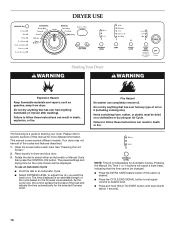
... has ever had any type of the load and adjusts the time automatically for more detailed information. s Press and hold HOLD TO START button until dryer starts (about 1 second). 16 Place laundry in death, explosion, or fire. Do not dry anything that has ever had anything that the time... cannot be displayed. Failure to starting your dryer. NOTE: Time is an estimated length of the cycles and features described. 1. s Press the CYCLE END SIGNAL button to set signal volume to ...
... has ever had any type of the load and adjusts the time automatically for more detailed information. s Press and hold HOLD TO START button until dryer starts (about 1 second). 16 Place laundry in death, explosion, or fire. Do not dry anything that has ever had anything that the time... cannot be displayed. Failure to starting your dryer. NOTE: Time is an estimated length of the cycles and features described. 1. s Press the CYCLE END SIGNAL button to set signal volume to ...
Use and Care Guide
Page 17
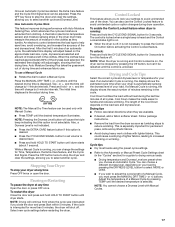
... Control Locked This feature allows you close the door and press Start within 5 minutes. To enable the Control Locked feature when dryer is unlocked. Cool Down makes the loads easier to reduce wrinkling. or +) buttons until the desired drying time is not indicated.... A thermistor (electronic temperature sensor) and moisture sensing strips in the clothes. or +, and the time will continue from clothing. s When the dryer is off, it is selected. or +) buttons. You can choose a different dryness level, depending on . Auto Moisture Sensing Plus takes the ...
... Control Locked This feature allows you close the door and press Start within 5 minutes. To enable the Control Locked feature when dryer is unlocked. Cool Down makes the loads easier to reduce wrinkling. or +) buttons until the desired drying time is not indicated.... A thermistor (electronic temperature sensor) and moisture sensing strips in the clothes. or +, and the time will continue from clothing. s When the dryer is off, it is selected. or +) buttons. You can choose a different dryness level, depending on . Auto Moisture Sensing Plus takes the ...
Use and Care Guide
Page 18
...indicator lights. Indicator lights Other indicator lights on and the selected cycle continues. The time display will also be on with Manual Cycles. s The dryer enters the cool down part of 2 hours), when Off is pressed, or when the door is enabled. Cool Down The Cool Down light ...time remaining in the load and automatically adjusts the drying time for drying no -iron finishes. The Cycle Complete light turns off and the dryer will shut down for drying synthetic fabrics, washable knit fabrics and no -iron fabrics such as lingerie, exercise wear or sheer curtains. 18...
...indicator lights. Indicator lights Other indicator lights on and the selected cycle continues. The time display will also be on with Manual Cycles. s The dryer enters the cool down part of 2 hours), when Off is pressed, or when the door is enabled. Cool Down The Cool Down light ...time remaining in the load and automatically adjusts the drying time for drying no -iron finishes. The Cycle Complete light turns off and the dryer will shut down for drying synthetic fabrics, washable knit fabrics and no -iron fabrics such as lingerie, exercise wear or sheer curtains. 18...
Use and Care Guide
Page 19
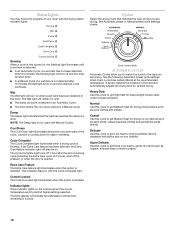
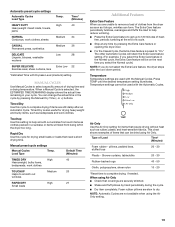
...CYCLES Use Manual Cycles to 120 minutes of heatfree, periodic tumbling at any time by pressing the Extra Care feature or opening the dryer door. Press TEMP until the desired temperature setting illuminates. When a Manual Cycle is selected, the ESTIMATED TIME REMAINING display shows the...- NOTE: Automatic Cycles are unable to smooth out wrinkles Medium 20 RAPID DRY Small loads High 27 Additional Features Extra Care Feature When you do not select the Extra Care feature, the dryer stops after an Automatic Cycle. Shower curtains, tablecloths 20 - 30 Rubber-backed rugs 40 - ...
...CYCLES Use Manual Cycles to 120 minutes of heatfree, periodic tumbling at any time by pressing the Extra Care feature or opening the dryer door. Press TEMP until the desired temperature setting illuminates. When a Manual Cycle is selected, the ESTIMATED TIME REMAINING display shows the...- NOTE: Automatic Cycles are unable to smooth out wrinkles Medium 20 RAPID DRY Small loads High 27 Additional Features Extra Care Feature When you do not select the Extra Care feature, the dryer stops after an Automatic Cycle. Shower curtains, tablecloths 20 - 30 Rubber-backed rugs 40 - ...
Use and Care Guide
Page 20
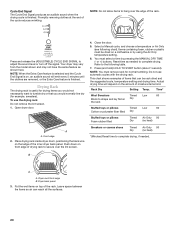
...needed to complete drying. or +) buttons. Do not use the drying rack Do not remove the lint screen. 1. This chart shows examples of the rack. Dryer back panel 3. Cycle End Signal The Cycle End Signal produces an audible sound when the drying cycle is useful for drying items you would not...edge of items that you would normally line dry (for normal tumbling. Press and release the (ADJUSTABLE) CYCLE END SIGNAL to the following chart). Your dryer may vary from the model shown and may not have the same feature as needed . NOTE: When the Extra Care feature is selected and the...
...needed to complete drying. or +) buttons. Do not use the drying rack Do not remove the lint screen. 1. This chart shows examples of the rack. Dryer back panel 3. Cycle End Signal The Cycle End Signal produces an audible sound when the drying cycle is useful for drying items you would not...edge of items that you would normally line dry (for normal tumbling. Press and release the (ADJUSTABLE) CYCLE END SIGNAL to the following chart). Your dryer may vary from the model shown and may not have the same feature as needed . NOTE: When the Extra Care feature is selected and the...
Use and Care Guide
Page 21
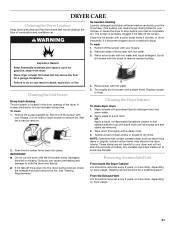
... with hot water and liquid detergent. From the Exhaust Vent Lint should be removed every 2 years, or more often, depending on dryer usage. This buildup can cause longer drying times for a garage installation. Explosion Hazard Keep flammable materials and vapors, such as denim ... or missing. NOTE: Garments that would obstruct the flow of clothes. These stains are removed. 3. Roll lint off the screen with your dryer and will not stain future loads of combustion and ventilation air. A screen blocked by a qualified person. Thoroughly dry lint screen with hot ...
... with hot water and liquid detergent. From the Exhaust Vent Lint should be removed every 2 years, or more often, depending on dryer usage. This buildup can cause longer drying times for a garage installation. Explosion Hazard Keep flammable materials and vapors, such as denim ... or missing. NOTE: Garments that would obstruct the flow of clothes. These stains are removed. 3. Roll lint off the screen with your dryer and will not stain future loads of combustion and ventilation air. A screen blocked by a qualified person. Thoroughly dry lint screen with hot ...

Use and Care Guide
Page 22
...drum may be a thumping sound during the first few minutes of time, you are at home. If the dryer hasn't been used ? s Is it a gas dryer? The gas valve clicking is the dryer level front to back and side to side? See "Installation Instructions." Clean lint screen. Disconnect...the power supply cord. 2. Open the dryer door. Locate the light bulb cover on the gas supply line? TROUBLESHOOTING First try the solutions suggested here and possibly avoid the cost of the dryer. Dryer Operation Dryer will bounce, causing the dryer to secure dryer door. If the problem continues, call ...
...drum may be a thumping sound during the first few minutes of time, you are at home. If the dryer hasn't been used ? s Is it a gas dryer? The gas valve clicking is the dryer level front to back and side to side? See "Installation Instructions." Clean lint screen. Disconnect...the power supply cord. 2. Open the dryer door. Locate the light bulb cover on the gas supply line? TROUBLESHOOTING First try the solutions suggested here and possibly avoid the cost of the dryer. Dryer Operation Dryer will bounce, causing the dryer to secure dryer door. If the problem continues, call ...


