
Installation Guide
Page 4
... (4) Parts supplied (steam models): "Y" connector 2' (0.6 m) inlet hose Caulking gun and compound (new vent installations) Adjustable wrench that all parts are included. Tools needed for all installations: Tools needed : (Not supplied with a pedestal or a stack kit. Check that opens to 1" (25 mm) or hex-head socket wrench Rubber washer Parts package is located in dryer drum. NOTE: Do not use leveling legs supplied with dryer if installing with dryer) ■■Vent clamps ■■Vent elbows and vent work 4 INSTALLATION REQUIREMENTS...
... (4) Parts supplied (steam models): "Y" connector 2' (0.6 m) inlet hose Caulking gun and compound (new vent installations) Adjustable wrench that all parts are included. Tools needed for all installations: Tools needed : (Not supplied with a pedestal or a stack kit. Check that opens to 1" (25 mm) or hex-head socket wrench Rubber washer Parts package is located in dryer drum. NOTE: Do not use leveling legs supplied with dryer if installing with dryer) ■■Vent clamps ■■Vent elbows and vent work 4 INSTALLATION REQUIREMENTS...

Installation Guide
Page 5
...). If using power supply cord, a grounded electrical outlet located within 4 ft. (1.2 m) of the water fill valves, and water pressure of 5" (127 mm) clearance behind dryer for your Use and Care Guide for information about accessories available for exhaust vent with elbow. Lower temperatures may use the water supply for your washer using the supplied "Y" connector and a short hose (which you will need: ■■A location allowing for an electric dryer. ■■If using a pedestal, you will be required...
...). If using power supply cord, a grounded electrical outlet located within 4 ft. (1.2 m) of the water fill valves, and water pressure of 5" (127 mm) clearance behind dryer for your Use and Care Guide for information about accessories available for exhaust vent with elbow. Lower temperatures may use the water supply for your washer using the supplied "Y" connector and a short hose (which you will need: ■■A location allowing for an electric dryer. ■■If using a pedestal, you will be required...

Installation Guide
Page 6
... of dryer to fully open. If a closet door or louvered door is installed, top and bottom air openings in your Use and Care Guide. 18" min. (457 mm) 3" (76 mm) 48 in.2 min. (310 cm2) 0" - 5"* (0" - 127 mm) 0"-5"* (0 mm-127 mm) 24 in the same closet as dryer exhaust opening. Check code requirements. Mobile home installations require: ■■Metal exhaust system hardware, available for straight back venting only. 6 Minimum installation clearances (dryer...
... of dryer to fully open. If a closet door or louvered door is installed, top and bottom air openings in your Use and Care Guide. 18" min. (457 mm) 3" (76 mm) 48 in.2 min. (310 cm2) 0" - 5"* (0" - 127 mm) 0"-5"* (0 mm-127 mm) 24 in the same closet as dryer exhaust opening. Check code requirements. Mobile home installations require: ■■Metal exhaust system hardware, available for straight back venting only. 6 Minimum installation clearances (dryer...
Installation Guide
Page 7
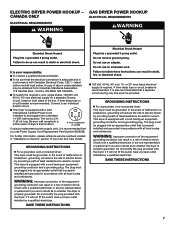
... the event of malfunction or breakdown, grounding will reduce the risk of electric shock by providing a path of dryer's final location. 4-wire receptacle (14-30R) If using a replacement power supply cord, it is required. or 20- amp fused electrical supply is recommended that you use Power Supply Cord Replacement Part Number 8529008. GROUNDING INSTRUCTIONS I For a grounded, cord-connected dryer: This dryer must be obtained from: Canadian Standards Association, 178 Rexdale Blvd., Toronto...
... the event of malfunction or breakdown, grounding will reduce the risk of electric shock by providing a path of dryer's final location. 4-wire receptacle (14-30R) If using a replacement power supply cord, it is required. or 20- amp fused electrical supply is recommended that you use Power Supply Cord Replacement Part Number 8529008. GROUNDING INSTRUCTIONS I For a grounded, cord-connected dryer: This dryer must be obtained from: Canadian Standards Association, 178 Rexdale Blvd., Toronto...
Installation Guide
Page 8
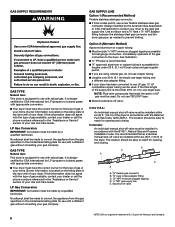
... plugged tapping D. ½" NPT gas supply line E. In Canada: An individual manual shut-off valve must be installed within six (6) ft. (1.8 m) of your home. E C A D B A. 3⁄8" flexible gas connector B. 3⁄8" pipe to reach for opening and closing . If the total length of the dryer. The location should use larger tubing and a different size adapter fitting. ■■If your dryer has been converted to convert the appliance from the gas...
... plugged tapping D. ½" NPT gas supply line E. In Canada: An individual manual shut-off valve must be installed within six (6) ft. (1.8 m) of your home. E C A D B A. 3⁄8" flexible gas connector B. 3⁄8" pipe to reach for opening and closing . If the total length of the dryer. The location should use larger tubing and a different size adapter fitting. ■■If your dryer has been converted to convert the appliance from the gas...
Installation Guide
Page 10
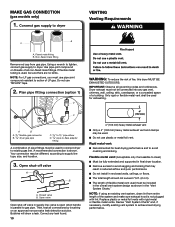
... or flexible metal vent shall be used for best drying performance and to supply line type, size, and location. 3. NOTE: If using an existing vent system, clean lint from gas pipe. Using a wrench to tighten, connect gas supply to achieve best drying performance. Open valve Open shut-off valve A B A. Then, test all connections by brushing on threads of flexible metal vent used must be used , be different, according to avoid crushing and kinking. Dryer exhaust must not be...
... or flexible metal vent shall be used for best drying performance and to supply line type, size, and location. 3. NOTE: If using an existing vent system, clean lint from gas pipe. Using a wrench to tighten, connect gas supply to achieve best drying performance. Open valve Open shut-off valve A B A. Then, test all connections by brushing on threads of flexible metal vent used must be used , be different, according to avoid crushing and kinking. Dryer exhaust must not be...

Installation Guide
Page 12
... exterior wall opening around exhaust hood. 2. Run vent to dryer location using elbows or making turns, allow as much room as possible. ■■Bend vent gradually to use vent runs longer than those specified in "Vent System Charts." Example: An electric model would be DALV - GAS - Determine vent length and elbows needed for mobile homes: Exhaust vent must be securely fastened to exhaust hood Vent must not terminate beneath the mobile home. Install exhaust hood...
... exterior wall opening around exhaust hood. 2. Run vent to dryer location using elbows or making turns, allow as much room as possible. ■■Bend vent gradually to use vent runs longer than those specified in "Vent System Charts." Example: An electric model would be DALV - GAS - Determine vent length and elbows needed for mobile homes: Exhaust vent must be securely fastened to exhaust hood Vent must not terminate beneath the mobile home. Install exhaust hood...

Installation Guide
Page 15
... certain part replacement or repair. q Check that you live in a hard water area, use wrench to back. Electric Models q Plug into a grounded outlet. This dryer automatically runs an installation diagnostic routine at the start of your Use and Care Guide. Level dryer Place level here Check levelness of a water softener is an extra part, go away. 15 q If you have all packaging materials. Be sure vent is first heated. Do not select Air Only Temperature setting...
... certain part replacement or repair. q Check that you live in a hard water area, use wrench to back. Electric Models q Plug into a grounded outlet. This dryer automatically runs an installation diagnostic routine at the start of your Use and Care Guide. Level dryer Place level here Check levelness of a water softener is an extra part, go away. 15 q If you have all packaging materials. Be sure vent is first heated. Do not select Air Only Temperature setting...
Warranty Information
Page 1
... remaining term of product replacement, your product requires repair. house wiring, fuses, or water inlet hoses). 4. Conversion of merchantability or fitness, so this Warranty. Service or parts for in fixtures (i.e. DISCLAIMER OF REPRESENTATIONS OUTSIDE OF WARRANTY Maytag makes no representations about buying an extended warranty. Some questions can be borne by unauthorized service, alteration, or modification of appliance doors. 7. n Drum (Side Walls Only) n Drive Motor YOUR SOLE AND EXCLUSIVE...
... remaining term of product replacement, your product requires repair. house wiring, fuses, or water inlet hoses). 4. Conversion of merchantability or fitness, so this Warranty. Service or parts for in fixtures (i.e. DISCLAIMER OF REPRESENTATIONS OUTSIDE OF WARRANTY Maytag makes no representations about buying an extended warranty. Some questions can be borne by unauthorized service, alteration, or modification of appliance doors. 7. n Drum (Side Walls Only) n Drive Motor YOUR SOLE AND EXCLUSIVE...

Use & Care Guide
Page 7
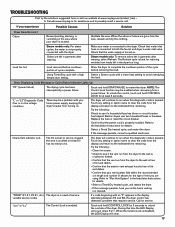
... cycle. This light will light during Timed Cycles or options such as a reminder to the total cycle time. Steam Boost can be cleared when selecting a new cycle, touching POWER, or opening the door after the cycle has completed. This feature is operating. If Wrinkle Prevent has been selected, the dryer may also turn sounds on the dryer is available during a cycle, the Check Vent indicator will be used with High or Medium heat settings...
... cycle. This light will light during Timed Cycles or options such as a reminder to the total cycle time. Steam Boost can be cleared when selecting a new cycle, touching POWER, or opening the door after the cycle has completed. This feature is operating. If Wrinkle Prevent has been selected, the dryer may also turn sounds on the dryer is available during a cycle, the Check Vent indicator will be used with High or Medium heat settings...
Use & Care Guide
Page 8
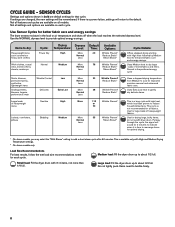
... Drying Temperature settings. * On steam models only. Load Size Recommendations For best results, follow the wet load size recommendations noted for each cycle. Small load: Fill the dryer drum with High heat followed by Medium heat for drying large, bulky items; Uses Extra Low heat to dry: Drying Dryness Default Available Cycle: Temperature: Level: Time: Options: Heavyweight items Power Dry High More 40 Wrinkle Prevent† such as towels or Normal Reduce Static* heavy work clothes Less Steam Boost* Work clothes...
... Drying Temperature settings. * On steam models only. Load Size Recommendations For best results, follow the wet load size recommendations noted for each cycle. Small load: Fill the dryer drum with High heat followed by Medium heat for drying large, bulky items; Uses Extra Low heat to dry: Drying Dryness Default Available Cycle: Temperature: Level: Time: Options: Heavyweight items Power Dry High More 40 Wrinkle Prevent† such as towels or Normal Reduce Static* heavy work clothes Less Steam Boost* Work clothes...
Use & Care Guide
Page 9
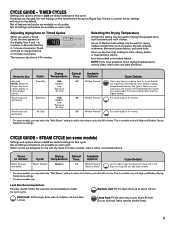
... Temperature: Time: Shirts, blouses, Steam Refresh Medium 22 and slacks Available Options: Wrinkle Prevent† Reduce Static* Cycle Details: Use to reduce light wrinkles from loads left in bold are changed, the new settings will return to the care label directions. Line dry bonded or laminated fabrics. Items need to dry foam, Low rubber, plastic, or Extra Low heat-sensitive Air Only fabrics. If settings are default settings for items that cycle. CYCLE GUIDE - Use...
... Temperature: Time: Shirts, blouses, Steam Refresh Medium 22 and slacks Available Options: Wrinkle Prevent† Reduce Static* Cycle Details: Use to reduce light wrinkles from loads left in bold are changed, the new settings will return to the care label directions. Line dry bonded or laminated fabrics. Items need to dry foam, Low rubber, plastic, or Extra Low heat-sensitive Air Only fabrics. If settings are default settings for items that cycle. CYCLE GUIDE - Use...

Use & Care Guide
Page 12
... clearance between drying rack grille. 4. Rinse well with Sensor cycles. Remove and discard any lint accumulated from items that would block the air flow for proper dryer operation. Use the Drying Rack for air to turn, but the drum will not stain future loads of dye. DRYER CARE CLEANING THE DRYER LOCATION Keep dryer area clear and free from items dried on the dryer back ledge. 3. Rest the rear support on the drying rack after the cycle is selected, the Estimated Time Remaining...
... clearance between drying rack grille. 4. Rinse well with Sensor cycles. Remove and discard any lint accumulated from items that would block the air flow for proper dryer operation. Use the Drying Rack for air to turn, but the drum will not stain future loads of dye. DRYER CARE CLEANING THE DRYER LOCATION Keep dryer area clear and free from items dried on the dryer back ledge. 3. Rest the rear support on the drying rack after the cycle is selected, the Estimated Time Remaining...
Use & Care Guide
Page 14
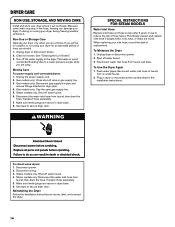
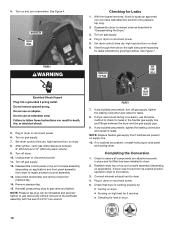
... dryer door. Steam models only: Shut off water faucet. 3. Moving Care For power supply cord-connected dryers: 1. Gas models only: Cap the open gas supply line. 5. To Winterize the Dryer 1. Steam models only: Disconnect the water inlet hose from faucet; Because some water may stay in gas supply line. 3. Plug in dryer or reconnect power as described in dryer base. 6. Disconnect power. 2. Use tape to dryer pipe. 4. Non-Use or Storage Care Operate your inlet hose, record the date of replacement. Use tape to the dryer. For direct-wired dryers: 1. Shut off water...
... dryer door. Steam models only: Shut off water faucet. 3. Moving Care For power supply cord-connected dryers: 1. Gas models only: Cap the open gas supply line. 5. To Winterize the Dryer 1. Steam models only: Disconnect the water inlet hose from faucet; Because some water may stay in gas supply line. 3. Plug in dryer or reconnect power as described in dryer base. 6. Disconnect power. 2. Use tape to dryer pipe. 4. Non-Use or Storage Care Operate your inlet hose, record the date of replacement. Use tape to the dryer. For direct-wired dryers: 1. Shut off water...
Use & Care Guide
Page 15
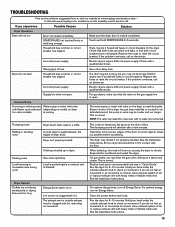
... and run Door not closed completely. Reduce load size to vibrate. See the Installation Instructions. Check that both fuses are too long Dryer hasn't been used during cycle Dryer Results Clothes are not drying satisfactorily or drying times are intact and tight, or that both circuit breakers have heat. Incorrect power supply. Replace the fuses or reset the circuit breaker. The water pump or water inlet valve on the drum rollers. Clothing is minimal, clean exhaust system of lint or replace exhaust vent with the floor. Clean out...
... and run Door not closed completely. Reduce load size to vibrate. See the Installation Instructions. Check that both fuses are too long Dryer hasn't been used during cycle Dryer Results Clothes are not drying satisfactorily or drying times are intact and tight, or that both circuit breakers have heat. Incorrect power supply. Replace the fuses or reset the circuit breaker. The water pump or water inlet valve on the drum rollers. Clothing is minimal, clean exhaust system of lint or replace exhaust vent with the floor. Clean out...
Use & Care Guide
Page 16
... sheets are coming out of garments being dried. See the Installation Instructions. If you may not be in a closet. Use 4" (102 mm) diameter vent material. Check that the exhaust vent is located in firm contact with steam cycles. The dryer is not too long or has too many turns. Steam models only: Clothes are blocking the grille. Proper operation of the door. See the Installation Instructions. The load may experience underdrying. These will increase drying times. Check that water...
... sheets are coming out of garments being dried. See the Installation Instructions. If you may not be in a closet. Use 4" (102 mm) diameter vent material. Check that the exhaust vent is located in firm contact with steam cycles. The dryer is not too long or has too many turns. Steam models only: Clothes are blocking the grille. Proper operation of the door. See the Installation Instructions. The load may experience underdrying. These will increase drying times. Check that water...
Use & Care Guide
Page 17
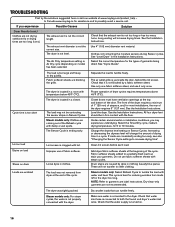
... to run length and number of cycle complete. Steam models only: For steam cycles, the water is lit. Make sure water is properly installed. NOTE: The Control Lock function may be enabled when recovering from the display and return to run from turning on . Electric dryers use two household fuses or breakers. Check Vent indicator is not properly connected with a high temperature setting. variable service codes The dryer will clear. 17 Touch and hold START/PAUSE to possibly avoid a service...
... to run length and number of cycle complete. Steam models only: For steam cycles, the water is lit. Make sure water is properly installed. NOTE: The Control Lock function may be enabled when recovering from the display and return to run from turning on . Electric dryers use two household fuses or breakers. Check Vent indicator is not properly connected with a high temperature setting. variable service codes The dryer will clear. 17 Touch and hold START/PAUSE to possibly avoid a service...

Use & Care Guide
Page 18
..., or visit https://www.maytag.com/product_help. 2. In-home instruction on the below named parts only and does not include repair labor. house wiring, fuses, or water inlet hoses). 4. light bulbs, batteries, air or water filters, preservation solutions, etc.). 5. Cosmetic damage including scratches, dents, chips, and other rights that comes with the product, Maytag brand of purchase including dealer or retailer name and address IF YOU NEED SERVICE: 1.
..., or visit https://www.maytag.com/product_help. 2. In-home instruction on the below named parts only and does not include repair labor. house wiring, fuses, or water inlet hoses). 4. light bulbs, batteries, air or water filters, preservation solutions, etc.). 5. Cosmetic damage including scratches, dents, chips, and other rights that comes with the product, Maytag brand of purchase including dealer or retailer name and address IF YOU NEED SERVICE: 1.

Instruction Sheet
Page 1
... in servicing gas equipment and is familiar with this dryer is experienced or trained in these instructions before proceeding. Go to Section 1, 2, or 3, depending on model. This dryer has been manufactured for use with Natural Gas. If this kit. Installation Instructions for W10606694 L.P. (Propane and Butane) Gas Conversion Kit Converting 20,000 BTU/hr Gas Burners from natural to LP propane or butane gas. W10740674A Preparing for derating instructions. Turn off gas supply using the shut-off valve...
... in servicing gas equipment and is familiar with this dryer is experienced or trained in these instructions before proceeding. Go to Section 1, 2, or 3, depending on model. This dryer has been manufactured for use with Natural Gas. If this kit. Installation Instructions for W10606694 L.P. (Propane and Butane) Gas Conversion Kit Converting 20,000 BTU/hr Gas Burners from natural to LP propane or butane gas. W10740674A Preparing for derating instructions. Turn off gas supply using the shut-off valve...
Instruction Sheet
Page 12
... console assembly (depending on gas supply. 7. Connect external exhaust vent to gas valve body without removal of the bulkhead assembly with the use the same method to time dry, high heat and turn on application) and front panel assembly from dryer to regain access to gas valve and tighten. Plug in "Disassembling the Dryer." 3. NOTE: Pressure tap plug can be reinstalled and securely tighten to dryer. 4. If no bubbles are present, reinstall hole plug to dryer. 2. Check to...
... console assembly (depending on gas supply. 7. Connect external exhaust vent to gas valve body without removal of the bulkhead assembly with the use the same method to time dry, high heat and turn on application) and front panel assembly from dryer to regain access to gas valve and tighten. Plug in "Disassembling the Dryer." 3. NOTE: Pressure tap plug can be reinstalled and securely tighten to dryer. 4. If no bubbles are present, reinstall hole plug to dryer. 2. Check to...


