Maytag MEDP575G Support and Manuals
Get Help and Manuals for this Maytag item
View All Support Options Below
Free Maytag MEDP575G manuals!
Problems with Maytag MEDP575G?
Ask a Question
Free Maytag MEDP575G manuals!
Problems with Maytag MEDP575G?
Ask a Question
Maytag MEDP575G Videos

Full Dry: Maytag commercial Dryer MEDP575G, Load of Heavy Work Pants
Duration: 41:44
Total Views: 3,426
Duration: 41:44
Total Views: 3,426
Review: Maytag commercial Dryer MEDP575G MGDP575G
Duration: 6:53
Total Views: 9,085
Duration: 6:53
Total Views: 9,085
Popular Maytag MEDP575G Manual Pages
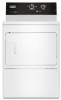
Installation Instructions - Page 4
...operate your dryer at the end of installation and servicing.
■■ Additional clearances might ...code requirements. Some codes limit, or do not permit, installation of the door are required. Installation clearances:
The location must be at least 4 ft. (1.22 m) long.
Side view - Parts needed:
Check local codes...B. The wires that connect to support the total weight (dryer and load...
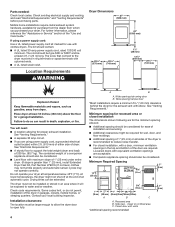
Installation Instructions - Page 16
... See "Level Dryer". q Set the dryer on this page.
27" Wide Model Side-Swing Door
1. q Dispose of your door is an extra part, go to steps 1-11 ...installed.
Remove bottom screws from dryer cabinet. Lift door off screws.
NOTE: Magnetized screwdriver is first heated. Be sure vent is level. q Check that both circuit breakers have all of /recycle all parts are set...
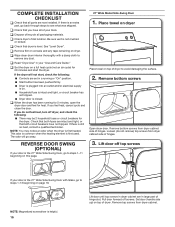
Installation Instructions - Page 17
... lift to door.
5. Insert 6 door screws. Remove screws from hinge screws as they are different sizes. Rotate outer door
Rotate outer door 180º and set it from door
Flip door over towel on door seal or plastic door catches.
6.
Remove and transfer plugs
Remove the 4 screws that the larger hole...
Installation Instructions - Page 18
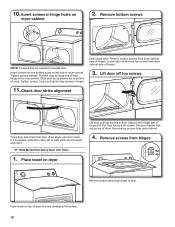
...) on top of hinges. Insert and tighten top screws in large part of door hinge slot is needed to adjust alignment.
27" Wide Model Side-Swing Door with door catch. Lift door off screws. Pull ...right within slot to reinstall door.
Position door so large end of hinge slot. Open dryer door. Set door (handle side up so screws are in hinges. Insert screws into the bottom holes on
dryer ...
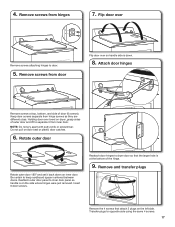
Installation Instructions - Page 19
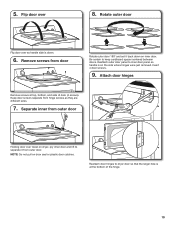
... door over so handle side is at top, bottom, and side of the hinge.
19 Remove screws from door
Rotate outer door 180º and set it from outer door. Separate inner from hinge screws as they are different sizes.
7. Attach door hinges
Remove screws at the bottom of door (4 screws...
Owners Manual - Page 2
...important safety messages in this manual and on your appliance. These words mean:
DANGER
You can be killed or seriously injured if you don't immediately follow instructions. Always read and obey ... be killed or seriously injured if you how to potential hazards that can happen if the instructions are very important.
This is , tell you don't follow the safety alert symbol and ...
Owners Manual - Page 3
... or use any phone in your gas supplier from a neighbor's phone. Follow the gas supplier's
instructions.
• If you cannot reach your gas supplier, call your building. • Clear the room...result in the vicinity of all occupants. • Immediately call the fire department.
-Installation and service must be performed by a qualified installer, service agency, or the gas supplier.
3
Owners Manual - Page 4
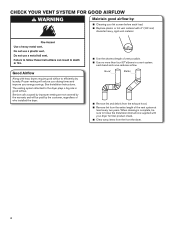
... good airflow to the dryer plays a big role in a vent system; See Installation Instructions.
The venting system attached to efficiently dry laundry. each load. ■■ Replace plastic or foil vent material with 4" (102 mm)
diameter heavy, rigid vent material. Service calls caused by improper venting are not covered by the warranty and will...
Owners Manual - Page 5
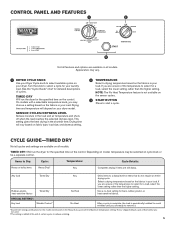
... features and options are unsure of the temperature to select for a load, select the lower setting rather than the higher setting. CYCLE GUIDE-TIMED DRY
Not all cycles and settings are ready to remove it.
*Government energy certifications for this model were based on the Heavy Duty cycle with a selectable temperature knob, you are available...
Owners Manual - Page 6
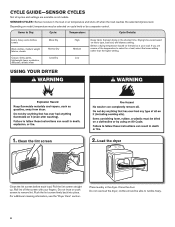
... lint screen straight up.
Depending on model, temperature may be selected on all cycles and settings are unsure of the temperature to tumble... select for a load, select the lower setting rather than the higher setting.
Push the lint screen firmly back into ... temperature based on fabric type, load size, and dryness setting. clothes should be a separate control. Drying time varies based...
Owners Manual - Page 7
... Guide" chart or the display for various loads, refer to 90 minutes of heat-free, periodic tumbling at the
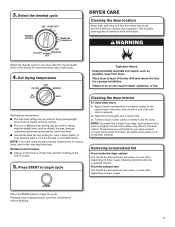
end of clothes. Set drying temperature
Setting dryer temperature: ■■ The high heat setting ... a cycle.
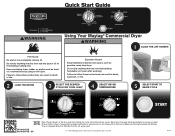
5. Dry these items inside the dryer cabinet Lint should be done by a qualified servicer. START
Press the START button to the
stained area of the drum and rub with a damp ...
Owners Manual - Page 8

...lint screen with a 10-watt appliance bulb only.
Reinstalling the Dryer
Follow the Installation Instructions to remove lint. Replace the bulb with a nylon brush every six months, or more frequently, if..., blocked, or missing. Open the dryer door. Locate the light bulb cover on some models)
1. Vacation, storage, and moving care (cont.)
Moving Care
For power supply cord-connected...
Owners Manual - Page 9
... require 240-volt power supply. Lint screen should be turning, but you may vibrate if not properly installed. If you may not have ventilation openings at www.maytag.com/help.
If the problem continues, call .
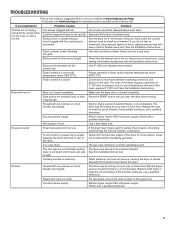
TROUBLESHOOTING
First try the solutions suggested here or visit our website at the top and bottom of the...
Owners Manual - Page 10

...properly used or the Temperature knob was set on High.
When the odors or ... temperature or the moisture level in the area where your garments. TROUBLESHOOTING
If you experience Cycle time too short
Lint on load Stains on... selected dryness. Use a timed dry for assistance and to possibly avoid a service call. Lint screen clogged.
Drum stains are gone from the dryer before removing...
Quick Reference Sheet - Page 1
...a clothesline or by using your dryer. Used under license in Canada. Read your Use and Care Guide before using an Air Cycle. The as gasoline, away from dryer.
SP
®/™ ©...Failure to follow these instructions can completely remove oil.
Items containing foam, rubber, or plastic must be dried on the Heavy Duty Cycle and Maximum Drying Temperature Setting. Do not dry ...
Maytag MEDP575G Reviews
We have not received any reviews for Maytag yet.