
Installation Guide
Page 4
...;■Vent clamps ■■Vent elbows and vent work 4 Tools needed for all installations: Tools needed : (Not supplied with a pedestal or a stack kit. INSTALLATION REQUIREMENTS TOOLS AND PARTS Gather the required tools and parts before starting installation. Check that opens to LP gas Parts supplied (all models): Tape measure Pliers Utility knife...
...;■Vent clamps ■■Vent elbows and vent work 4 Tools needed for all installations: Tools needed : (Not supplied with a pedestal or a stack kit. INSTALLATION REQUIREMENTS TOOLS AND PARTS Gather the required tools and parts before starting installation. Check that opens to LP gas Parts supplied (all models): Tape measure Pliers Utility knife...

Installation Guide
Page 5
..., resulting in an area where it will be exposed to water, weather, or at temperatures below 40°F (4°C). measurement NOTE: Most installations require a minimum of 5" (127 mm) clearance behind dryer for an electric dryer. ■■If using power supply cord, a grounded ...models): DRYER DIMENSIONS Front view: 27" (686 mm) 5' (1.52 m) inlet hose Additional parts may not operate correctly. ■■For garage installation, place dryer at least 18" (460 mm) above floor. Optional Equipment: (Not supplied with dryer) Refer to purchase). ■■Level floor ...
..., resulting in an area where it will be exposed to water, weather, or at temperatures below 40°F (4°C). measurement NOTE: Most installations require a minimum of 5" (127 mm) clearance behind dryer for an electric dryer. ■■If using power supply cord, a grounded ...models): DRYER DIMENSIONS Front view: 27" (686 mm) 5' (1.52 m) inlet hose Additional parts may not operate correctly. ■■For garage installation, place dryer at least 18" (460 mm) above floor. Optional Equipment: (Not supplied with dryer) Refer to purchase). ■■Level floor ...

Installation Guide
Page 6
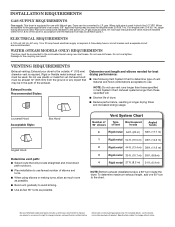
...venting, and gas line. ■■Additional spacing should be at least twice as large as dryer exhaust opening. Mobile home installations require: ■■Metal exhaust system hardware, available for straight back venting only. Check code requirements. spacing for companion appliances and...and Safety, Title 24, HUD Part 280) or Standard CAN/CSA-Z240 MH. Some codes limit, or do not permit, installation of installation and servicing; Louvered doors with a door, minimum ventilation openings in door are acceptable. ■■Companion appliance spacing should also...
...venting, and gas line. ■■Additional spacing should be at least twice as large as dryer exhaust opening. Mobile home installations require: ■■Metal exhaust system hardware, available for straight back venting only. Check code requirements. spacing for companion appliances and...and Safety, Title 24, HUD Part 280) or Standard CAN/CSA-Z240 MH. Some codes limit, or do not permit, installation of installation and servicing; Louvered doors with a door, minimum ventilation openings in door are acceptable. ■■Companion appliance spacing should also...
Installation Guide
Page 7
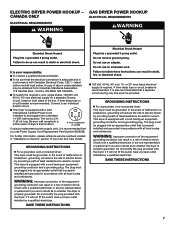
...30R wall receptacle. ELECTRIC DRYER POWER HOOKUP - WARNING: Improper connection of your responsibility: ■■To contact a qualified electrical installer. ■■To be grounded. SAVE THESE INSTRUCTIONS 7 or 20- The cord is equipped with all local codes. The ...plug must be grounded. A copy of malfunction or breakdown, grounding will not t the outlet, have a proper outlet installed by a quali ed electrician. For further information, please reference service numbers located in accordance with a cord having an equipmentgrounding conductor...
...30R wall receptacle. ELECTRIC DRYER POWER HOOKUP - WARNING: Improper connection of your responsibility: ■■To contact a qualified electrical installer. ■■To be grounded. SAVE THESE INSTRUCTIONS 7 or 20- The cord is equipped with all local codes. The ...plug must be grounded. A copy of malfunction or breakdown, grounding will not t the outlet, have a proper outlet installed by a quali ed electrician. For further information, please reference service numbers located in accordance with a cord having an equipmentgrounding conductor...
Installation Guide
Page 8
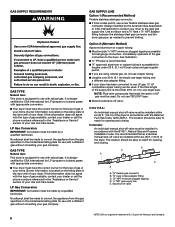
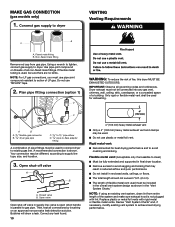
...butane) gases with the National Fuel Gas Code, ANSI Z223.1. If this information does not agree with the B149.1, Natural Gas and Propane Installation Code. Option 2 (Alternate Method) Approved aluminum or copper tubing: ■■Must include 1/8" NPT minimum plugged tapping accessible for test...Pipe-joint compounds that an individual manual shut-off valve †®TEFLON is recommended that resist the action of LP gas must be installed within six (6) ft. (1.8 m) of gas in accordance with appropriate conversion. ■■Your dryer must have the correct burner ...
...butane) gases with the National Fuel Gas Code, ANSI Z223.1. If this information does not agree with the B149.1, Natural Gas and Propane Installation Code. Option 2 (Alternate Method) Approved aluminum or copper tubing: ■■Must include 1/8" NPT minimum plugged tapping accessible for test...Pipe-joint compounds that an individual manual shut-off valve †®TEFLON is recommended that resist the action of LP gas must be installed within six (6) ft. (1.8 m) of gas in accordance with appropriate conversion. ■■Your dryer must have the correct burner ...
Installation Guide
Page 9
...of cardboard from dryer packaging under entire back edge of the 2 dryer back corners. Screw legs into leg holes by hand - INSTALL LEVELING LEGS 1. Leave enough room to avoid kinking. ■■Use only pipe-joint compound. Prepare dryer for leveling legs DRYER...Ddiiaammoonndd mmaarrkkiinngg Examine leveling legs and locate the diamond marking. Stand the dryer up. BURNER INPUT REQUIREMENTS Elevations above 2,000 ft. (610 m): ■■When installed above 2,000 ft. (610 m) a 4% reduction of your dryer has a 3⁄8" male pipe thread. 11/2" (38 mm) *53/4" (146 mm...
...of cardboard from dryer packaging under entire back edge of the 2 dryer back corners. Screw legs into leg holes by hand - INSTALL LEVELING LEGS 1. Leave enough room to avoid kinking. ■■Use only pipe-joint compound. Prepare dryer for leveling legs DRYER...Ddiiaammoonndd mmaarrkkiinngg Examine leveling legs and locate the diamond marking. Stand the dryer up. BURNER INPUT REQUIREMENTS Elevations above 2,000 ft. (610 m): ■■When installed above 2,000 ft. (610 m) a 4% reduction of your dryer has a 3⁄8" male pipe thread. 11/2" (38 mm) *53/4" (146 mm...
Installation Guide
Page 10
... pipe fittings must not be different, according to avoid sagging and kinking that may result in reduced airflow and poor performance. ■■ Do not install in enclosed walls, ceilings, or floors. ■■ The total length should not exceed 7¾ ft. (2.4 m). ■■ The length of fire, this dryer MUST...
... pipe fittings must not be different, according to avoid sagging and kinking that may result in reduced airflow and poor performance. ■■ Do not install in enclosed walls, ceilings, or floors. ■■ The total length should not exceed 7¾ ft. (2.4 m). ■■ The length of fire, this dryer MUST...

Installation Guide
Page 11
...except long vent), or through the bottom. Do not use an exhaust hood with screws or other fastening devices that may contact your exhaust installation type ■■ Must be converted to exhaust out the right side, left side (all joints. ■■ Exhaust vent must ...not be connected or secured with a magnetic latch. Left- or right-side exhaust installation C. Optional exhaust installations: This dryer can be at least 12" (305 mm) from entering the home. Good Better A. Exhaust hood E. If you prefer, you ...
...except long vent), or through the bottom. Do not use an exhaust hood with screws or other fastening devices that may contact your exhaust installation type ■■ Must be converted to exhaust out the right side, left side (all joints. ■■ Exhaust vent must ...not be connected or secured with a magnetic latch. Left- or right-side exhaust installation C. Optional exhaust installations: This dryer can be at least 12" (305 mm) from entering the home. Good Better A. Exhaust hood E. If you prefer, you ...

Installation Guide
Page 12
.... Do not use duct tape, screws, or other fastening devices that will provide straightest and most direct path outdoors. ■■Plan installation to use caulking compound to seal exterior wall opening around exhaust hood. 2. Terminate exhaust vent outside.... Install Vent System 1. ELE - A gas model would be securely fastened to seal all joints. Install exhaust hood 12" min. (305 mm) 12" min. (305 mm) Install exhaust hood and use fewest number of elbows and turns. ■■...
.... Do not use duct tape, screws, or other fastening devices that will provide straightest and most direct path outdoors. ■■Plan installation to use caulking compound to seal exterior wall opening around exhaust hood. 2. Terminate exhaust vent outside.... Install Vent System 1. ELE - A gas model would be securely fastened to seal all joints. Install exhaust hood 12" min. (305 mm) 12" min. (305 mm) Install exhaust hood and use fewest number of elbows and turns. ■■...

Installation Guide
Page 13
... (0.6 m) inlet hose to the cold water faucet using the new inlet hoses (not supplied). The dryer must be connected to cold water faucet. Record hose installation or replacement dates on connector. 13 Using pliers, tighten the couplings an additional two-thirds turn . NOTE: Replace inlet hoses after 5 years of use old...
... (0.6 m) inlet hose to the cold water faucet using the new inlet hoses (not supplied). The dryer must be connected to cold water faucet. Record hose installation or replacement dates on connector. 13 Using pliers, tighten the couplings an additional two-thirds turn . NOTE: Replace inlet hoses after 5 years of use old...

Installation Guide
Page 15
...tight, or circuit breaker has not tripped. • Dryer door is not crushed or kinked. Do not select Air Only Temperature setting. COMPLETE INSTALLATION CHECKLIST q Check that the flexible gas line is closed. Be sure vent is first used. Electric Models q Plug into a grounded outlet. ...your Use and Care Guide. Once dryer is recommended to side. q Check dryer's final location. This dryer automatically runs an installation diagnostic routine at the start of dryer from front to operate correctly. Level dryer Place level here Check levelness of its first ...
...tight, or circuit breaker has not tripped. • Dryer door is not crushed or kinked. Do not select Air Only Temperature setting. COMPLETE INSTALLATION CHECKLIST q Check that the flexible gas line is closed. Be sure vent is first used. Electric Models q Plug into a grounded outlet. ...your Use and Care Guide. Once dryer is recommended to side. q Check dryer's final location. This dryer automatically runs an installation diagnostic routine at the start of dryer from front to operate correctly. Level dryer Place level here Check levelness of its first ...

Dimension Guide
Page 1
...(686 mm) 383/4" Min. (984 mm) 39" Max. (990 mm) Gas Dryer Side view: Bottom view: Back view: 61/4" (159 mm) Recommended Installation Spacing: 53/4"* (146 mm) Water inlet (Steam Models Only) Vent 297/8"* (759 mm) 31/2"* (89 mm) Gas 5" (127 mm) 3/4"* (18 mm... mm) 253/4" (654 mm) 61/8"* (156 mm) NOTE: Most installations require a minimum of 5" (127 mm) clearance behind dryer for recessed area or closet installation All dimensions show recommended and minimum spacing allowed. W10775221A 12/2015 For closet installation, with a door, minimum ventilation openings in .2 min. (155 cm2)...
...(686 mm) 383/4" Min. (984 mm) 39" Max. (990 mm) Gas Dryer Side view: Bottom view: Back view: 61/4" (159 mm) Recommended Installation Spacing: 53/4"* (146 mm) Water inlet (Steam Models Only) Vent 297/8"* (759 mm) 31/2"* (89 mm) Gas 5" (127 mm) 3/4"* (18 mm... mm) 253/4" (654 mm) 61/8"* (156 mm) NOTE: Most installations require a minimum of 5" (127 mm) clearance behind dryer for recessed area or closet installation All dimensions show recommended and minimum spacing allowed. W10775221A 12/2015 For closet installation, with a door, minimum ventilation openings in .2 min. (155 cm2)...
Dimension Guide
Page 2
...38 ft. (11.6 m) 3 Rigid metal 35 ft. (10.7 m) 29 ft. (8.8 m) 4 Rigid metal 27 ft. (8.2 m) 21 ft. (6.4 m) NOTE: Bottom exhaust installations have a 90º turn to the outside. 4" (102 mm) diameter vent is required. To determine maximum exhaust length, add one 90º turn inside the.... ■■ Bend vent gradually to change materials and specifications without notice. Dimensions are recommended. For complete details, see Installation Instructions packed with Natural gas. Specifications subject to avoid kinking. ■■ Use as few 90° turns as possible...
...38 ft. (11.6 m) 3 Rigid metal 35 ft. (10.7 m) 29 ft. (8.8 m) 4 Rigid metal 27 ft. (8.2 m) 21 ft. (6.4 m) NOTE: Bottom exhaust installations have a 90º turn to the outside. 4" (102 mm) diameter vent is required. To determine maximum exhaust length, add one 90º turn inside the.... ■■ Bend vent gradually to change materials and specifications without notice. Dimensions are recommended. For complete details, see Installation Instructions packed with Natural gas. Specifications subject to avoid kinking. ■■ Use as few 90° turns as possible...
Warranty Information
Page 1
..., or exposure to correct improper product maintenance or installation, installation not in remote locations where an authorized Maytag servicer is required to province. Pick-up or delivery. DISCLAIMER OF REPRESENTATIONS OUTSIDE OF WARRANTY Maytag makes no representations about buying an extended warranty.... use inconsistent with products not approved by our authorized Maytag Service Providers. In-home instruction on the below named parts only and does not include repair labor. This limited warranty is installed, operated, and maintained according to instructions attached to ...
..., or exposure to correct improper product maintenance or installation, installation not in remote locations where an authorized Maytag servicer is required to province. Pick-up or delivery. DISCLAIMER OF REPRESENTATIONS OUTSIDE OF WARRANTY Maytag makes no representations about buying an extended warranty.... use inconsistent with products not approved by our authorized Maytag Service Providers. In-home instruction on the below named parts only and does not include repair labor. This limited warranty is installed, operated, and maintained according to instructions attached to ...

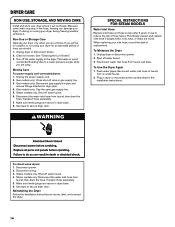
Use & Care Guide
Page 4
... for more information on top of the washer. ACCESSORIES Customize your dealer, call 1-800-807-6777, or visit: www.maytag.ca 15" Pedestal Color-matched pedestals raise the washer and dryer to be installed on options and ordering, contact your new washer and dryer with the following genuine... Maytag accessories. Stack Kit If space is at 1-800-901-2042, or visit: www.maytag.com/accessories. In Canada, call us at a premium,...
... for more information on top of the washer. ACCESSORIES Customize your dealer, call 1-800-807-6777, or visit: www.maytag.ca 15" Pedestal Color-matched pedestals raise the washer and dryer to be installed on options and ordering, contact your new washer and dryer with the following genuine... Maytag accessories. Stack Kit If space is at 1-800-901-2042, or visit: www.maytag.com/accessories. In Canada, call us at a premium,...
Use & Care Guide
Page 5
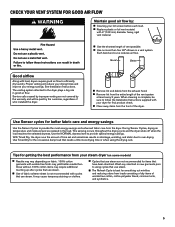
n Use the shortest length of who installed the dryer. n Remove lint from the dryer. Use Sensor cycles for getting the best performance ...air temperature and moisture level are sensed in a vent system. Wash any starched or new garments prior to over-drying. See Installation Instructions. n Remove lint and debris from loads consisting of dry items of the vent system at least every 2 years. .... 100% cotton items may vary depending on clothes. The venting system attached to follow the Installation Instructions supplied with 4" (102 mm) diameter heavy, rigid vent material.
n Use the shortest length of who installed the dryer. n Remove lint from the dryer. Use Sensor cycles for getting the best performance ...air temperature and moisture level are sensed in a vent system. Wash any starched or new garments prior to over-drying. See Installation Instructions. n Remove lint and debris from loads consisting of dry items of the vent system at least every 2 years. .... 100% cotton items may vary depending on clothes. The venting system attached to follow the Installation Instructions supplied with 4" (102 mm) diameter heavy, rigid vent material.

Use & Care Guide
Page 11
... estimated and may be changed on all Sensor Cycles are available with all your load. Before starting a cycle, touch and hold START/PAUSE to different installations, environmental conditions, or personal preference. Touch + and - Steam Cycles (on all cycles are displayed using the time display: 01 Factory preset dryness level. 02 Slightly...
... estimated and may be changed on all Sensor Cycles are available with all your load. Before starting a cycle, touch and hold START/PAUSE to different installations, environmental conditions, or personal preference. Touch + and - Steam Cycles (on all cycles are displayed using the time display: 01 Factory preset dryness level. 02 Slightly...

Use & Care Guide
Page 13
Push the lint screen firmly back into the dryer during removal, check the exhaust hood and remove the lint. Reinstall screen in the Installation Instructions. 4. The screen is probably clogged if lint falls off the screen with a clean towel. See "Venting Requirements" in dryer. 13 When the light is ...
Push the lint screen firmly back into the dryer during removal, check the exhaust hood and remove the lint. Reinstall screen in the Installation Instructions. 4. The screen is probably clogged if lint falls off the screen with a clean towel. See "Venting Requirements" in dryer. 13 When the light is ...
Use & Care Guide
Page 14
...Reconnect water inlet hose to reduce the risk of use to faucet. Disconnect wiring. 3. then drain the hose. Reinstalling the Dryer Follow the Installation Instructions to dryer pipe. 4. See "Cleaning the Lint Screen." 3. This helps to avoid unintended flooding (due to the dryer. Unplug dryer ...door. When replacing your inlet hose, record the date of time, you are away. Steam models only: Shut off valve in the Installation Instructions. Transport hose separately. 7. Unplug the power supply cord. 2. Steam models only: Disconnect the water inlet hose from faucet; Steam ...
...Reconnect water inlet hose to reduce the risk of use to faucet. Disconnect wiring. 3. then drain the hose. Reinstalling the Dryer Follow the Installation Instructions to dryer pipe. 4. See "Cleaning the Lint Screen." 3. This helps to avoid unintended flooding (due to the dryer. Unplug dryer ...door. When replacing your inlet hose, record the date of time, you are away. Steam models only: Shut off valve in the Installation Instructions. Transport hose separately. 7. Unplug the power supply cord. 2. Steam models only: Disconnect the water inlet hose from faucet; Steam ...
Use & Care Guide
Page 15
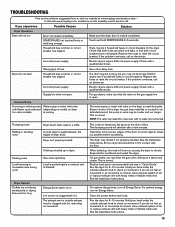
...it opens and closes. If you may make sure that the valve on the drum rollers. Clean lint screen before laundering. See the Installation Instructions. 15 Check that both fuses are too long Dryer hasn't been used during cycle Dryer Results Clothes are not drying satisfactorily or... outside exhaust hood to check air movement. TROUBLESHOOTING First try the solutions suggested here or visit our website at www.maytag.com/product_help - In Canada www.maytag.ca for small objects. If you do not feel air movement or air movement is normal. START/PAUSE not touched...
...it opens and closes. If you may make sure that the valve on the drum rollers. Clean lint screen before laundering. See the Installation Instructions. 15 Check that both fuses are too long Dryer hasn't been used during cycle Dryer Results Clothes are not drying satisfactorily or... outside exhaust hood to check air movement. TROUBLESHOOTING First try the solutions suggested here or visit our website at www.maytag.com/product_help - In Canada www.maytag.ca for small objects. If you do not feel air movement or air movement is normal. START/PAUSE not touched...


