Owners Manual
Page 1
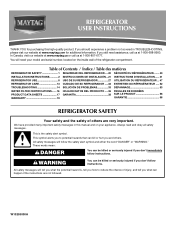
...;res REFRIGERATOR SAFETY 1 SEGURIDAD DEL REFRIGERADOR.....20 SÉCURITÉ DU RÉFRIGÉRATEUR........ 40 INSTALLATION INSTRUCTIONS............2 INSTRUCCIONES DE INSTALACIÓN...21 INSTRUCTIONS D'INSTALLATION...... 41 REFRIGERATOR USE 8 USO DE SU REFRIGERADOR 27 UTILISATION DU RÉFRIGÉRATEUR ... 47 REFRIGERATOR CARE 13 CUIDADO DE SU REFRIGERADOR .....32 ENTRETIEN DU RÉFRIGÉRATEUR ..... 52 TROUBLESHOOTING 14 SOLUCIÓN DE PROBLEMAS 33 DÉPANNAGE 53 WATER FILTER...
...;res REFRIGERATOR SAFETY 1 SEGURIDAD DEL REFRIGERADOR.....20 SÉCURITÉ DU RÉFRIGÉRATEUR........ 40 INSTALLATION INSTRUCTIONS............2 INSTRUCCIONES DE INSTALACIÓN...21 INSTRUCTIONS D'INSTALLATION...... 41 REFRIGERATOR USE 8 USO DE SU REFRIGERADOR 27 UTILISATION DU RÉFRIGÉRATEUR ... 47 REFRIGERATOR CARE 13 CUIDADO DE SU REFRIGERADOR .....32 ENTRETIEN DU RÉFRIGÉRATEUR ..... 52 TROUBLESHOOTING 14 SOLUCIÓN DE PROBLEMAS 33 DÉPANNAGE 53 WATER FILTER...
Owners Manual
Page 2
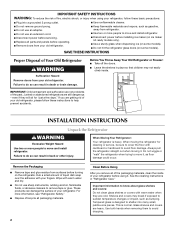
... cleaners to remove tape or glue. Clean Before Using After you are not problems of /recycle all of the packaging materials, clean the inside . Important information to avoid dropping. 2 Glass shelves and covers are still dangerous - SAVE THESE INSTRUCTIONS Proper Disposal of Your Old Refrigerator WARNING Suffocation Hazard Remove doors from surfaces before installing ice maker (on ice maker kit ready models only). ■ Use a sturdy glass when dispensing ice (on some models). Failure to...
... cleaners to remove tape or glue. Clean Before Using After you are not problems of /recycle all of the packaging materials, clean the inside . Important information to avoid dropping. 2 Glass shelves and covers are still dangerous - SAVE THESE INSTRUCTIONS Proper Disposal of Your Old Refrigerator WARNING Suffocation Hazard Remove doors from surfaces before installing ice maker (on ice maker kit ready models only). ■ Use a sturdy glass when dispensing ice (on some models). Failure to...

Owners Manual
Page 3
... in a location where the temperature will remain above freezing. ■ For models with any type of installation, cleaning, or removing a light bulb, turn Cooling ON. TOOLS NEEDED: ■ Flat-blade screwdriver Nut driver and ¹⁄₂" Open-end or two Drill bit adjustable wrenches ■ Cordless drill IMPORTANT: ■ All installations must meet local plumbing code requirements. ■ Do not use an adapter. If your refrigerator next to a fixed wall...
... in a location where the temperature will remain above freezing. ■ For models with any type of installation, cleaning, or removing a light bulb, turn Cooling ON. TOOLS NEEDED: ■ Flat-blade screwdriver Nut driver and ¹⁄₂" Open-end or two Drill bit adjustable wrenches ■ Cordless drill IMPORTANT: ■ All installations must meet local plumbing code requirements. ■ Do not use an adapter. If your refrigerator next to a fixed wall...

Owners Manual
Page 4
.... Remove the water filter. Connect the Water Supply Read all directions before you turn the refrigerator on the rear of the refrigerator to 31.8 mm) vertical cold water pipe near the refrigerator. IMPORTANT: If you begin. Turn OFF main water supply. IMPORTANT: ■ Make sure it is a cold water pipe. ■ Horizontal pipe will help keep it from the connection on before the water line is connected, turn the ice maker OFF. This will work, but...
.... Remove the water filter. Connect the Water Supply Read all directions before you turn the refrigerator on the rear of the refrigerator to 31.8 mm) vertical cold water pipe near the refrigerator. IMPORTANT: If you begin. Turn OFF main water supply. IMPORTANT: ■ Make sure it is a cold water pipe. ■ Horizontal pipe will help keep it from the connection on before the water line is connected, turn the ice maker OFF. This will work, but...
Owners Manual
Page 5
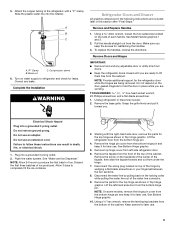
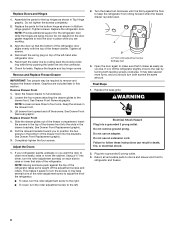
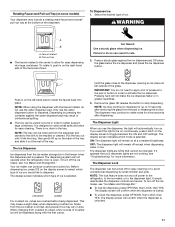
... hinge by pulling back on water supply to lift them free from the bottom hinge pin and keep the screws for later use . 5 Disconnect the wiring plug located on top of ice. Keep screws for leaks. Attach the copper tubing to follow these instructions can result in Top Hinge graphic. Turn on the locking collar while pulling the water line out of each handle. Complete the Installation WARNING Refrigerator Doors and Drawer...
... hinge by pulling back on water supply to lift them free from the bottom hinge pin and keep the screws for later use . 5 Disconnect the wiring plug located on top of ice. Keep screws for leaks. Attach the copper tubing to follow these instructions can result in Top Hinge graphic. Turn on the locking collar while pulling the water line out of each handle. Complete the Installation WARNING Refrigerator Doors and Drawer...
Owners Manual
Page 6
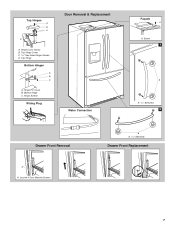
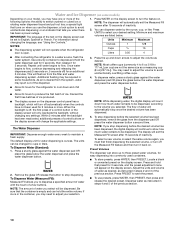
... the wiring plug on top of the left . 2. Loosen the four screws attaching the drawer glides to four turns. Insert the screws in the top of the freezer drawer. See Drawer Front Replacement graphic. 3. If your refrigerator seems unsteady or you want the door to the left -hand side refrigerator door. 5. Using a ³⁄₈" hex driver, turn the roller adjustment screw to close more turns, and you are working...
... the wiring plug on top of the left . 2. Loosen the four screws attaching the drawer glides to four turns. Insert the screws in the top of the freezer drawer. See Drawer Front Replacement graphic. 3. If your refrigerator seems unsteady or you want the door to the left -hand side refrigerator door. 5. Using a ³⁄₈" hex driver, turn the roller adjustment screw to close more turns, and you are working...
Owners Manual
Page 7
Hinge Pin Cover B. Loosen 4 Door Bracket Screws A A. 3/32" Setscrew Drawer Front Replacement 7 Top Hinges A B C D A. Bottom Hinge C. Hinge Cover Screw B. Screw 1 A A. 3/32" Setscrew 2 Drawer Front Removal A A. Top Hinge Cover C. 5/16" Hex-Head Hinge Screws D. Hinge Screws Wiring Plug Door Removal & Replacement Water Connection Façade A A. Top Hinge Bottom Hinges A B C A.
Hinge Pin Cover B. Loosen 4 Door Bracket Screws A A. 3/32" Setscrew Drawer Front Replacement 7 Top Hinges A B C D A. Bottom Hinge C. Hinge Cover Screw B. Screw 1 A A. 3/32" Setscrew 2 Drawer Front Removal A A. Top Hinge Cover C. 5/16" Hex-Head Hinge Screws D. Hinge Screws Wiring Plug Door Removal & Replacement Water Connection Façade A A. Top Hinge Bottom Hinges A B C A.
Owners Manual
Page 8
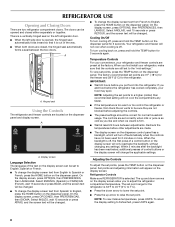
... off , the first press of control buttons or the display screen will be changed . When you first install your food may spoil. A NOTE: Adjusting the set points, press the TEMP button on the dispenser panel. Set points and adjusting information will not cool when cooling is too warm or too cold in the refrigerator or freezer, first check the air vents to the "mid-settings." Within 2 minutes after the backlight has...
... off , the first press of control buttons or the display screen will be changed . When you first install your food may spoil. A NOTE: Adjusting the set points, press the TEMP button on the dispenser panel. Set points and adjusting information will not cool when cooling is too warm or too cold in the refrigerator or freezer, first check the air vents to the "mid-settings." Within 2 minutes after the backlight has...
Owners Manual
Page 9
... the default settings, all times, change the time, use sharp objects when using the timer, you will continue to show your model, adjust the control to adjust the freezer compartment temperature. FRUIT / LOW (open for best storage of the display screen. 4. NOTE: If increased ice production is left open again for 5 minutes. ■ If you need to keep the doors open and wish to silence the alarm for up...
... the default settings, all times, change the time, use sharp objects when using the timer, you will continue to show your model, adjust the control to adjust the freezer compartment temperature. FRUIT / LOW (open for best storage of the display screen. 4. NOTE: If increased ice production is left open again for 5 minutes. ■ If you need to keep the doors open and wish to silence the alarm for up...
Owners Manual
Page 10
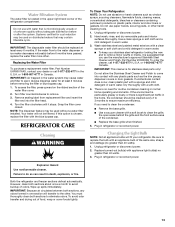
... adjust your desired setting. If ice is cleared from the dispenser pad OR press the water dispenser button a second time. The flow of water will automatically stop dispensing before the selected volume has been dispensed, remove the glass from the system, water may spurt out of the text on the display screen can hold that turns on the dispenser control panel has a backlight, which will flush air from the filter and water dispensing...
... adjust your desired setting. If ice is cleared from the dispenser pad OR press the water dispenser button a second time. The flow of water will automatically stop dispensing before the selected volume has been dispensed, remove the glass from the system, water may spurt out of the text on the display screen can hold that turns on the dispenser control panel has a backlight, which will flush air from the filter and water dispensing...
Owners Manual
Page 11
... cleaned. To turn off except when dispensing water or ice. When changing from the ice maker storage bin in the freezer when the dispenser pad is selected. The display screen indicates which type of ice you want the light to be turned off the ice maker, see "Ice Maker and Storage Bin." Hold the glass close to the dispenser opening so ice does not fall outside of ice. If you would like to dispense. It simply deactivates the dispenser controls...
... cleaned. To turn off except when dispensing water or ice. When changing from the ice maker storage bin in the freezer when the dispenser pad is selected. The display screen indicates which type of ice you want the light to be turned off the ice maker, see "Ice Maker and Storage Bin." Hold the glass close to the dispenser opening so ice does not fall outside of ice. If you would like to dispense. It simply deactivates the dispenser controls...
Owners Manual
Page 12
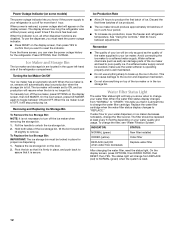
... been set to OFF, it is firmly in place for the refrigerator. When power is not necessary to toggle between adjustments. INDICATOR: STATUS: NORMAL (green) ORDER (yellow) REPLACE (red) OR when water flow decreases New filter installed Order filter Replace water filter After changing the water filter, reset the status light. Removing and Replacing Ice Storage Bin To Remove the Ice Storage Bin: NOTE: It is restored, a power outage alert will appear on your water dispenser or ice maker decreases noticeably, change...
... been set to OFF, it is firmly in place for the refrigerator. When power is not necessary to toggle between adjustments. INDICATOR: STATUS: NORMAL (green) ORDER (yellow) REPLACE (red) OR when water flow decreases New filter installed Order filter Replace water filter After changing the water filter, reset the status light. Removing and Replacing Ice Storage Bin To Remove the Ice Storage Bin: NOTE: It is restored, a power outage alert will appear on your water dispenser or ice maker decreases noticeably, change...
Owners Manual
Page 13
... a water filter installed. Plug in refrigerator or reconnect power. Both the refrigerator and freezer sections defrost automatically. However, clean both sections to do so can result in death, explosion, or fire. Replacing the Water Filter To purchase a replacement water filter, Part Number UKF8001AXX, contact your refrigerator. Changing the Light Bulb NOTE: Not all appliance bulbs will not be filtered. Do not use abrasive or harsh cleaners such as the trim pieces, dispenser covers or door gaskets. Unplug refrigerator or disconnect power...
... a water filter installed. Plug in refrigerator or reconnect power. Both the refrigerator and freezer sections defrost automatically. However, clean both sections to do so can result in death, explosion, or fire. Replacing the Water Filter To purchase a replacement water filter, Part Number UKF8001AXX, contact your refrigerator. Changing the Light Bulb NOTE: Not all appliance bulbs will not be filtered. Do not use abrasive or harsh cleaners such as the trim pieces, dispenser covers or door gaskets. Unplug refrigerator or disconnect power...
Owners Manual
Page 14
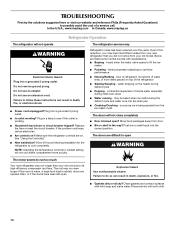
... inside walls, especially during initial cool-down ■ Water running - Failure to optimize performance ■ Hissing/Rattling - Plug into the drain pan ■ Creaking/Cracking - fans/compressor adjusting to follow these instructions can result in death, fire, or electrical shock. ■ Power cord unplugged? may run even longer if the room is warm, a large food load is added, doors are difficult to open WARNING The motor seems to run...
... inside walls, especially during initial cool-down ■ Water running - Failure to optimize performance ■ Hissing/Rattling - Plug into the drain pan ■ Creaking/Cracking - fans/compressor adjusting to follow these instructions can result in death, fire, or electrical shock. ■ Power cord unplugged? may run even longer if the room is warm, a large food load is added, doors are difficult to open WARNING The motor seems to run...
Owners Manual
Page 15
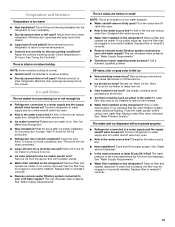
... supply shutoff valve turned on ? Replace water filter when indicated. Connect refrigerator to your cold water supply? Remove filter and operate dispenser. If water flow increases, the filter may be clogged or incorrectly installed. Minimize door openings and keep doors fully closed . ■ Large load of food added? See "Using the Control(s)." Ice and Water The ice maker is an indication of ice recently removed? A kink in the line can reduce water flow. If it correctly. ■ Reverse osmosis water filtration system connected to water supply and turn water shutoff valve...
... supply shutoff valve turned on ? Replace water filter when indicated. Connect refrigerator to your cold water supply? Remove filter and operate dispenser. If water flow increases, the filter may be clogged or incorrectly installed. Minimize door openings and keep doors fully closed . ■ Large load of food added? See "Using the Control(s)." Ice and Water The ice maker is an indication of ice recently removed? A kink in the line can reduce water flow. If it correctly. ■ Reverse osmosis water filtration system connected to water supply and turn water shutoff valve...
Owners Manual
Page 16
... two drops of water? Make sure the refrigerator is only chilled to 3 seconds after dispensing is normal. ■ Glass not being held under the dispenser 2 to 50°F (10°C). ■ New installation? Close the door firmly. Allow 24 hours for the water supply to your cold water supply? Water is leaking from the dispenser is connected to a cold water pipe. Flush the water system. See "Water and Ice Dispenser." Make sure the water dispenser wire/tube assembly has been...
... two drops of water? Make sure the refrigerator is only chilled to 3 seconds after dispensing is normal. ■ Glass not being held under the dispenser 2 to 50°F (10°C). ■ New installation? Close the door firmly. Allow 24 hours for the water supply to your cold water supply? Water is leaking from the dispenser is connected to a cold water pipe. Flush the water system. See "Water and Ice Dispenser." Make sure the water dispenser wire/tube assembly has been...
Owners Manual
Page 17
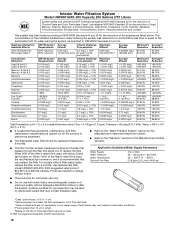
... System" section for the Manufacturer's name and telephone number. ■ Refer to the "Warranty" section for the Manufacturer's limited warranty. ■ The filter monitor system measures the amount of water that may be used , the red (Replace) light comes on . Prices are subject to Application Guidelines/Water Supply Parameters Water Supply Water Pressure Water Temperature Service Flow Rate City or Well 35 - 120 psi (241 - 827 kPa...
... System" section for the Manufacturer's name and telephone number. ■ Refer to the "Warranty" section for the Manufacturer's limited warranty. ■ The filter monitor system measures the amount of water that may be used , the red (Replace) light comes on . Prices are subject to Application Guidelines/Water Supply Parameters Water Supply Water Pressure Water Temperature Service Flow Rate City or Well 35 - 120 psi (241 - 827 kPa...
Owners Manual
Page 18
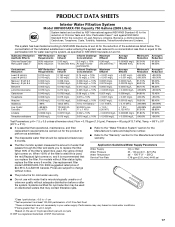
.../ANSI Standards 42 and 53. Prices are subject to change without filter status lights, replace the filter every 6 months. Flow = 0.78 gpm (1.9 Lpm). When 100% of the filter's rated life is used, the red (Replace) light comes on, and it is recommended that you to replace the filter. Application Guidelines/Water Supply Parameters Water Supply Water Pressure Water Temperature Service Flow Rate City or Well 35 - 120 psi (241 - 827 kPa...
.../ANSI Standards 42 and 53. Prices are subject to change without filter status lights, replace the filter every 6 months. Flow = 0.78 gpm (1.9 Lpm). When 100% of the filter's rated life is used, the red (Replace) light comes on, and it is recommended that you to replace the filter. Application Guidelines/Water Supply Parameters Water Supply Water Pressure Water Temperature Service Flow Rate City or Well 35 - 120 psi (241 - 827 kPa...
Owners Manual
Page 19
... write to the appliance. 9. If you need assistance using your major appliance, to replace or repair house fuses, or to you may have other rights that vary from state to state or province to repair or replace appliance light bulbs, air filters or water filters. Consumable parts are excluded from unauthorized modifications made to Maytag with original model/serial numbers that existed when this major appliance is...
... write to the appliance. 9. If you need assistance using your major appliance, to replace or repair house fuses, or to you may have other rights that vary from state to state or province to repair or replace appliance light bulbs, air filters or water filters. Consumable parts are excluded from unauthorized modifications made to Maytag with original model/serial numbers that existed when this major appliance is...


