Service Manual
Page 1
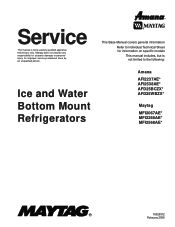
Service This manual is not limited to be used by an unqualified person. Ice and Water Bottom Mount Refrigerators This Base Manual covers general information Refer to individual Technical Sheet for improper service procedures done by qualified appliance technicians only. Maytag does not assume any responsibility for property damage or personal injury for information on specific models This manual includes, but is to the following: Amana AFI2237AE* AFI2538AE* AFD25BCZX* AFD25WBZX* Maytag MFI2067AE* MFI2266AE* MFI2568AE* 16026312 February 2006
Service This manual is not limited to be used by an unqualified person. Ice and Water Bottom Mount Refrigerators This Base Manual covers general information Refer to individual Technical Sheet for improper service procedures done by qualified appliance technicians only. Maytag does not assume any responsibility for property damage or personal injury for information on specific models This manual includes, but is to the following: Amana AFI2237AE* AFI2538AE* AFD25BCZX* AFD25WBZX* Maytag MFI2067AE* MFI2266AE* MFI2568AE* 16026312 February 2006
Service Manual
Page 10
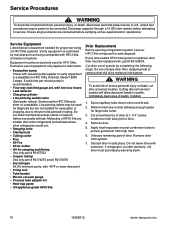
Discharge capacitor through a 10,000 ohm resistor before certifying unit as being compatible with , part # B2150504. Robinair, Model 15600 2 stage, 6 cubic feet per minute pump is compatible for safe disposal. Molecules of HFC134a are smaller than other refrigerants would not. • Swaging tools &#... low loss hoses • Leak detector • Charging cylinder • Line piercing saddle valve (Schroeder valves). Equipment must accompany warranty claim. 10 16026312 ©2006 Maytag Services Cut circumference of drier.
Discharge capacitor through a 10,000 ohm resistor before certifying unit as being compatible with , part # B2150504. Robinair, Model 15600 2 stage, 6 cubic feet per minute pump is compatible for safe disposal. Molecules of HFC134a are smaller than other refrigerants would not. • Swaging tools &#... low loss hoses • Leak detector • Charging cylinder • Line piercing saddle valve (Schroeder valves). Equipment must accompany warranty claim. 10 16026312 ©2006 Maytag Services Cut circumference of drier.
Service Manual
Page 22
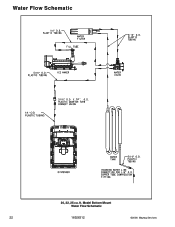
Model Bottom Mount Water Flow Schematic 22 16026312 ©2006 Maytag Services Water Flow Schematic 1/4 " O.D. ft. PLASTIC TUBING 1/4 " 20, 22, 25 cu.
Model Bottom Mount Water Flow Schematic 22 16026312 ©2006 Maytag Services Water Flow Schematic 1/4 " O.D. ft. PLASTIC TUBING 1/4 " 20, 22, 25 cu.
Service Manual
Page 28
... would eventually pump the low side into a vacuum drawing air and moisture into the system. System Diagnosis the high side (condenser) of forced air meatkeeper model with the specified refrigerant charge. 28 16026312 ©2006...
... would eventually pump the low side into a vacuum drawing air and moisture into the system. System Diagnosis the high side (condenser) of forced air meatkeeper model with the specified refrigerant charge. 28 16026312 ©2006...
Service Manual
Page 42
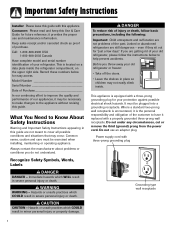
...in severe personal injury or death. Do not under any circumstances, cut or remove the third (ground) prong from the power cord. Model Number Serial Number Date of the past. Always contact the manufacturer about problems or conditions you throw away your old refrigerator, please follow basic...not easily climb inside the refrigerator compartment, on the upper right side. Call: 1-800-688-9900 USA 1-800-688-2002 Canada Have complete model and serial number identification of your old refrigerator or freezer: • Take off the doors. • Leave the shelves in severe personal injury...
...in severe personal injury or death. Do not under any circumstances, cut or remove the third (ground) prong from the power cord. Model Number Serial Number Date of the past. Always contact the manufacturer about problems or conditions you throw away your old refrigerator, please follow basic...not easily climb inside the refrigerator compartment, on the upper right side. Call: 1-800-688-9900 USA 1-800-688-2002 Canada Have complete model and serial number identification of your old refrigerator or freezer: • Take off the doors. • Leave the shelves in severe personal injury...
Service Manual
Page 45
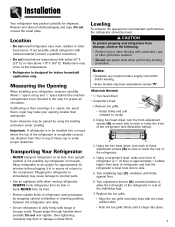
... back. Transporting Your Refrigerator • NEVER transport refrigerator on its side. Plugging the refrigerator in the rear) for approximately 30 minutes before leveling. • Some models only have adjustment screws "A". ALWAYS truck refrigerator from its side or back-NEVER from damage, observe the following: • Protect vinyl or other heat source...
... back. Transporting Your Refrigerator • NEVER transport refrigerator on its side. Plugging the refrigerator in the rear) for approximately 30 minutes before leveling. • Some models only have adjustment screws "A". ALWAYS truck refrigerator from its side or back-NEVER from damage, observe the following: • Protect vinyl or other heat source...
Service Manual
Page 48
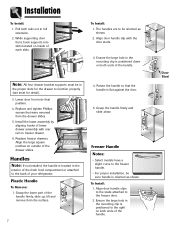
... Stud The handles are to be in the mounting clip is positioned down . Replace freezer drawers. Plastic Handle To Remove: 1. Freezer Handle Notes: • Select models have a slight curve to the right on both ends of the handle firmly, slide up, lift and remove from the drawer slides. 5. To Install: 1. Note...
... Stud The handles are to be in the mounting clip is positioned down . Replace freezer drawers. Plastic Handle To Remove: 1. Freezer Handle Notes: • Select models have a slight curve to the right on both ends of the handle firmly, slide up, lift and remove from the drawer slides. 5. To Install: 1. Note...
Service Manual
Page 51
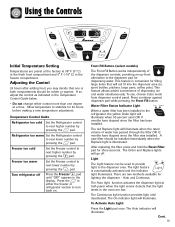
...-front alternative to turn back on. Freezer too warm Set the Freezer control to next higher number by pressing the pad. Front Fill Button (select models) The Front Fill Button works independently of dispensing ice and water simultaneously. The Auto indicator will illuminate. The Order and Replace lights will illuminate when...
...-front alternative to turn back on. Freezer too warm Set the Freezer control to next higher number by pressing the pad. Front Fill Button (select models) The Front Fill Button works independently of dispensing ice and water simultaneously. The Auto indicator will illuminate. The Order and Replace lights will illuminate when...
Service Manual
Page 55
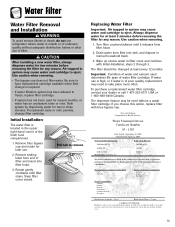
.... State of California Department of Health Services Water Treatment Device Certificate Number 03 - 1583 Date Issued: September 16, 2003 Date Revised: April 22, 2004 Trademark /Model Designation Replacement Elements UKF8001AXX750 UKF8001AXX 469006-750 46 9006 67003523-750 Manufacturer: PentaPure Inc. 67003523 The water treatment device(s) listed on disinfected waters that systems...
.... State of California Department of Health Services Water Treatment Device Certificate Number 03 - 1583 Date Issued: September 16, 2003 Date Revised: April 22, 2004 Trademark /Model Designation Replacement Elements UKF8001AXX750 UKF8001AXX 469006-750 46 9006 67003523-750 Manufacturer: PentaPure Inc. 67003523 The water treatment device(s) listed on disinfected waters that systems...

Service Manual
Page 56
Water Filter System Specification and Performance Data Sheet TM Refrigerator Water Filter Cartridge Model UKF8001AXX Specifications Service Flow Rate (Maximum 0.78 GPM (2.9 L/min) Rated Service Life UKF8001AXX-750 (Maximum) ......750 gallons /2838 liters Maximum Operating Temperature 100° F / 38&#...
Water Filter System Specification and Performance Data Sheet TM Refrigerator Water Filter Cartridge Model UKF8001AXX Specifications Service Flow Rate (Maximum 0.78 GPM (2.9 L/min) Rated Service Life UKF8001AXX-750 (Maximum) ......750 gallons /2838 liters Maximum Operating Temperature 100° F / 38&#...
Service Manual
Page 58
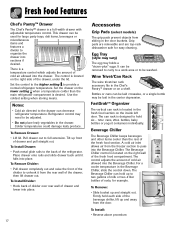
... produce. To Remove Divider: • Pull drawer completely out and raise the front of the divider to pass into place. 17 Accessories Grip Pads (select models) The grip pads prevent objects from the rear wall of cold air allowed into place. Egg Tray (style may be washed. It can be laid...
... produce. To Remove Divider: • Pull drawer completely out and raise the front of the divider to pass into place. 17 Accessories Grip Pads (select models) The grip pads prevent objects from the rear wall of cold air allowed into place. Egg Tray (style may be washed. It can be laid...
Service Manual
Page 63
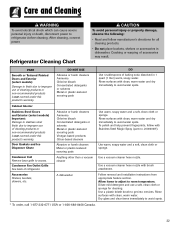
... products or non-recommended products is not covered under this product's warranty. PART Smooth or Textured Painted Doors and Exterior (select models) Damage to finish due to improper use of cleaning products or non-recommended products is not covered under this product's warranty. ...Cabinet Interior Stainless Steel Doors and Exterior (select models) Important: Damage to stainless steel finish due to improper use a soft, clean cloth or sponge for all cleaning products. • Do...
... products or non-recommended products is not covered under this product's warranty. PART Smooth or Textured Painted Doors and Exterior (select models) Damage to finish due to improper use of cleaning products or non-recommended products is not covered under this product's warranty. ...Cabinet Interior Stainless Steel Doors and Exterior (select models) Important: Damage to stainless steel finish due to improper use a soft, clean cloth or sponge for all cleaning products. • Do...
Service Manual
Page 67
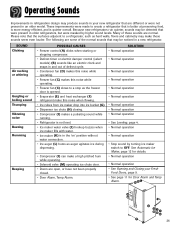
... not present in older refrigerators, but were masked by turning ice maker switch to create a refrigerator that were present in an older model. Please note that the surfaces adjacent to a stop as auger agitates ice during dispensing. • Compressor (I E 26 SOUND Clicking...Buzzing Humming Beeping POSSIBLE CAUSES • Freezer control (A) clicks when starting or stopping compressor. • Defrost timer or electric damper control (select models) (B) sounds like an electric clock and snaps in and out of defrost cycle. • Condenser fan (D) makes this noise while operating. &#...
... not present in older refrigerators, but were masked by turning ice maker switch to create a refrigerator that were present in an older model. Please note that the surfaces adjacent to a stop as auger agitates ice during dispensing. • Compressor (I E 26 SOUND Clicking...Buzzing Humming Beeping POSSIBLE CAUSES • Freezer control (A) clicks when starting or stopping compressor. • Defrost timer or electric damper control (select models) (B) sounds like an electric clock and snaps in and out of defrost cycle. • Condenser fan (D) makes this noise while operating. &#...
User Instructions
Page 1
...alerts you to reduce the chance of others . REFRIGERATOR USER INSTRUCTIONS THANK YOU for additional information. In Canada, visit our website at www.maytag.ca or call us at 1-800-688-9900. Always read and obey all safety messages. All safety messages will follow instructions. WARNING You...PRODUCT DATA SHEETS 16 GARANTIE 35 WARRANTY 17 REFRIGERATOR SAFETY Your safety and the safety of injury, and tell you still need your model and serial number located on your appliance. You will tell you what can be killed or seriously injured if you don't immediately ...
...alerts you to reduce the chance of others . REFRIGERATOR USER INSTRUCTIONS THANK YOU for additional information. In Canada, visit our website at www.maytag.ca or call us at 1-800-688-9900. Always read and obey all safety messages. All safety messages will follow instructions. WARNING You...PRODUCT DATA SHEETS 16 GARANTIE 35 WARRANTY 17 REFRIGERATOR SAFETY Your safety and the safety of injury, and tell you still need your model and serial number located on your appliance. You will tell you what can be killed or seriously injured if you don't immediately ...
User Instructions
Page 2
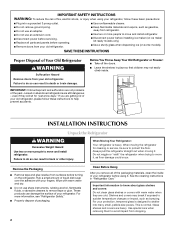
...gasoline, away from your refrigerator. These products can damage the surface of your refrigerator before installing ice maker (on ice maker kit ready models only). ■ Use a sturdy glass when dispensing ice (on the refrigerator. Shelves and covers may not easily climb inside of Your...be sure to do so can result in death or brain damage. If you remove all parts and panels before turning on some models). SAVE THESE INSTRUCTIONS Proper Disposal of your old refrigerator, please follow these instructions to move and install refrigerator. When Moving Your ...
...gasoline, away from your refrigerator. These products can damage the surface of your refrigerator before installing ice maker (on ice maker kit ready models only). ■ Use a sturdy glass when dispensing ice (on the refrigerator. Shelves and covers may not easily climb inside of Your...be sure to do so can result in death or brain damage. If you remove all parts and panels before turning on some models). SAVE THESE INSTRUCTIONS Proper Disposal of your old refrigerator, please follow these instructions to move and install refrigerator. When Moving Your ...
User Instructions
Page 3
...you are finished, reconnect the refrigerator to the electrical source and reset the control (Thermostat, Refrigerator or Freezer Control depending on the model) to the desired setting. Use an outlet that a separate circuit serving only your refrigerator has an ice maker, allow the door...with any type of installation, cleaning, or removing a light bulb, turn the control (Thermostat, Refrigerator or Freezer Control depending on the model) to OFF and then disconnect the refrigerator from refrigerator. See "Using the Controls." Install copper tubing only in a location where the ...
...you are finished, reconnect the refrigerator to the electrical source and reset the control (Thermostat, Refrigerator or Freezer Control depending on the model) to the desired setting. Use an outlet that a separate circuit serving only your refrigerator has an ice maker, allow the door...with any type of installation, cleaning, or removing a light bulb, turn the control (Thermostat, Refrigerator or Freezer Control depending on the model) to OFF and then disconnect the refrigerator from refrigerator. See "Using the Controls." Install copper tubing only in a location where the ...
User Instructions
Page 6
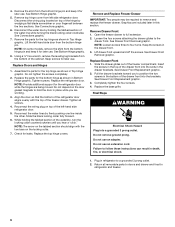
... drawer front. 3. Disconnect the water line by firmly pushing one line inside the other. See Drawer Front Replacement graphic. 2. See Connections graphic. 6. NOTE: On some models, remove the shim from the bottom of the cabinet. Align the door so that the bottom of the refrigerator door aligns evenly with the two...
... drawer front. 3. Disconnect the water line by firmly pushing one line inside the other. See Drawer Front Replacement graphic. 2. See Connections graphic. 6. NOTE: On some models, remove the shim from the bottom of the cabinet. Align the door so that the bottom of the refrigerator door aligns evenly with the two...

User Instructions
Page 7
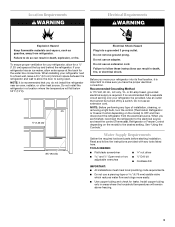
Top Hinge Bottom Hinges A B C A. Shim (on some models) B. Loosen 4 Door Bracket Screws 7 Wiring Plug A A. 3/32" Set Screw Drawer Front Removal Drawer Front Replacement A A. Hinge Cover Screw B. Bottom Hinge C. Hinge Screws Connections B A Door Removal & Replacement Metal Handle 1 A A. 3/32" Set Screw Metal Handle 2 Plastic Handle 1 Plastic Handle 2 A. Top Hinges A B C D A. Top Hinge Cover C. 5/16" Hex-Head Hinge Screws D. Tabs B.
Top Hinge Bottom Hinges A B C A. Shim (on some models) B. Loosen 4 Door Bracket Screws 7 Wiring Plug A A. 3/32" Set Screw Drawer Front Removal Drawer Front Replacement A A. Hinge Cover Screw B. Bottom Hinge C. Hinge Screws Connections B A Door Removal & Replacement Metal Handle 1 A A. 3/32" Set Screw Metal Handle 2 Plastic Handle 1 Plastic Handle 2 A. Top Hinges A B C D A. Top Hinge Cover C. 5/16" Hex-Head Hinge Screws D. Tabs B.
User Instructions
Page 8
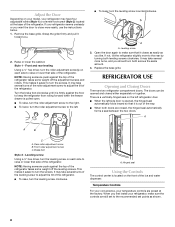
... easily, use the instructions below. 1. A. Brake foot Style 2 - When you first install your refrigerator seems unsteady or you like. Adjust the Door Depending on your model, your refrigerator may have four adjustable rollers (Style 1) or a leveler foot screw (Style 2) located at the factory. If your refrigerator, make sure that side of...
... easily, use the instructions below. 1. A. Brake foot Style 2 - When you first install your refrigerator seems unsteady or you like. Adjust the Door Depending on your model, your refrigerator may have four adjustable rollers (Style 1) or a leveler foot screw (Style 2) located at the factory. If your refrigerator, make sure that side of...
User Instructions
Page 9
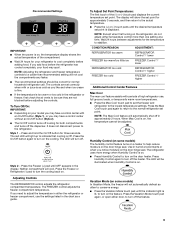
... the controls. Use in the refrigerator or freezer, first check the air vents to be illuminated when Humidity Control is on your model you add food before the refrigerator has cooled completely, your refrigerator to turn off the heater. The red LED will turn off ... open either door, to a colder than one setting at a time. NOTE: Adjusting the refrigerator and freezer temperature controls to turn on some models) In Vacation Mode, the freezer will show the set point. Style 1 - Adjusting Controls The REFRIGERATOR control adjusts the refrigerator compartment temperature. Press...
... the controls. Use in the refrigerator or freezer, first check the air vents to be illuminated when Humidity Control is on your model you add food before the refrigerator has cooled completely, your refrigerator to turn off the heater. The red LED will turn off ... open either door, to a colder than one setting at a time. NOTE: Adjusting the refrigerator and freezer temperature controls to turn on some models) In Vacation Mode, the freezer will show the set point. Style 1 - Adjusting Controls The REFRIGERATOR control adjusts the refrigerator compartment temperature. Press...


