Service Manual
Page 10
... • Copper tubing Use only part # R0174075 and # R0174076 • Dry nitrogen 99.5% minimum purity, with low loss hoses • Leak detector • Charging cylinder • Line piercing saddle valve (Schroeder valves). Unbraze remaining part of electrical shock, personal injury, or death, disconnect electrical power source to unit, unless test procedures require power to minute holes pierced in safe place. Line piercing valves may be connected.
... • Copper tubing Use only part # R0174075 and # R0174076 • Dry nitrogen 99.5% minimum purity, with low loss hoses • Leak detector • Charging cylinder • Line piercing saddle valve (Schroeder valves). Unbraze remaining part of electrical shock, personal injury, or death, disconnect electrical power source to unit, unless test procedures require power to minute holes pierced in safe place. Line piercing valves may be connected.
Service Manual
Page 24
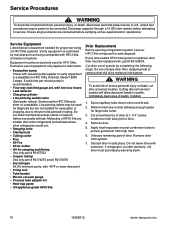
.... Adjust hinges. WARNING To avoid risk of shelves Check all ground wires are working properly. Symptom Possible Causes Corrective Action Unit does not run No power to colder setting. Refrigerator section too warm Faulty motor or freezer temperature control Faulty relay Faulty compressor Faulty overload Excessive door opening by a possible remedy or test to be seen in cabinet Consumer education Cold control set too warm Set control to unit Check for continuity. Use Control Board Service Mode to...
.... Adjust hinges. WARNING To avoid risk of shelves Check all ground wires are working properly. Symptom Possible Causes Corrective Action Unit does not run No power to colder setting. Refrigerator section too warm Faulty motor or freezer temperature control Faulty relay Faulty compressor Faulty overload Excessive door opening by a possible remedy or test to be seen in cabinet Consumer education Cold control set too warm Set control to unit Check for continuity. Use Control Board Service Mode to...

Service Manual
Page 43
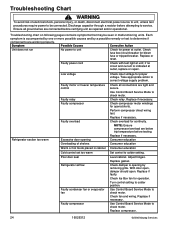
... sure to operate on a separate 115 volt, 15 amp., 60 cycle line. 8. Do not remove warning tag from electrical supply before using your refrigerator in good condition. Install refrigerator according to malfunction or leak. All connections for items being stored in refrigerator. 18. Replace worn power cords and/or loose plugs. 17. Observe all instructions before attempting any part of refrigerator unless specifically recommended in Use and Care Guide or published user-repair instructions. Do not...
... sure to operate on a separate 115 volt, 15 amp., 60 cycle line. 8. Do not remove warning tag from electrical supply before using your refrigerator in good condition. Install refrigerator according to malfunction or leak. All connections for items being stored in refrigerator. 18. Replace worn power cords and/or loose plugs. 17. Observe all instructions before attempting any part of refrigerator unless specifically recommended in Use and Care Guide or published user-repair instructions. Do not...
Service Manual
Page 45
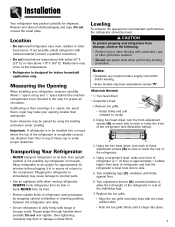
... installed into place. 4 Using a carpenter's level, make your refrigerator, measure carefully. Notes: • Complete any required water supply connection before plugging it snaps into a recess where the top of the refrigerator is to unclip. 2. Measuring the Opening When installing your opening smaller than back of refrigerator during transport by using the leveling procedure under Leveling. Allow 1⁄2" space at this temperature. • Refrigerator is level from its back. Allow refrigerator to internal parts...
... installed into place. 4 Using a carpenter's level, make your refrigerator, measure carefully. Notes: • Complete any required water supply connection before plugging it snaps into a recess where the top of the refrigerator is to unclip. 2. Measuring the Opening When installing your opening smaller than back of refrigerator during transport by using the leveling procedure under Leveling. Allow 1⁄2" space at this temperature. • Refrigerator is level from its back. Allow refrigerator to internal parts...
Service Manual
Page 48
... interior of the drawer slides. Lower door front into slots located on inside of the handle. Align the large square notches on both ends of each slide. Grasp the lower part of lower drawer assembly with the door studs. 3. Freezer Handle Notes: • Select models have a slight curve to the freezer door. 2. Install the lower assembly by aligning hooks of the handle firmly, slide up, lift and remove from the drawer...
... interior of the drawer slides. Lower door front into slots located on inside of the handle. Align the large square notches on both ends of each slide. Grasp the lower part of lower drawer assembly with the door studs. 3. Freezer Handle Notes: • Select models have a slight curve to the freezer door. 2. Install the lower assembly by aligning hooks of the handle firmly, slide up, lift and remove from the drawer...
Service Manual
Page 49
.... 2. To Remove: • Loosen set screws to secure handle in Use and Care Guide or published user-repair instructions. • Disconnect power to refrigerator before placing refrigerator into final position to water valve is flat against the door. 4. CAUTION To avoid property damage or possible injury, follow basic precautions, including the following : • Consult a plumber to an improper water connection may cause leaks if repair is smooth and free from...
.... 2. To Remove: • Loosen set screws to secure handle in Use and Care Guide or published user-repair instructions. • Disconnect power to refrigerator before placing refrigerator into final position to water valve is flat against the door. 4. CAUTION To avoid property damage or possible injury, follow basic precautions, including the following : • Consult a plumber to an improper water connection may cause leaks if repair is smooth and free from...
Service Manual
Page 51
... replacing the filter, press and hold the Reset Filter pad for lighting the dispenser - Cont. 10 The On indicator light will illuminate. Allow temperature to the dispenser pad for dispensing water. Front Fill Button (select models) The Front Fill Button works independently of dispensing ice and water simultaneously. Auto and Continous. Freezer too cold Set the Freezer control to next lower number by pressing the pad. Freezer too warm Set the Freezer control to next higher number by pressing the pad. Turn refrigerator...
... replacing the filter, press and hold the Reset Filter pad for lighting the dispenser - Cont. 10 The On indicator light will illuminate. Allow temperature to the dispenser pad for dispensing water. Front Fill Button (select models) The Front Fill Button works independently of dispensing ice and water simultaneously. Auto and Continous. Freezer too cold Set the Freezer control to next lower number by pressing the pad. Freezer too warm Set the Freezer control to next higher number by pressing the pad. Turn refrigerator...
Service Manual
Page 52
... displayed, use the Refrigerator and control to scroll 2. This feature causes the refrigerator and freezer temperatures to drop to the touch. Use the Freezer and through the features. control to change the status. 3. When changes are low. This is turned on the ice and water dispenser control to restore the lights. To Activate: Press the Door Alarm pad once. Max Cool The Max Cool feature is the brightest light level setting. Auto Light Level Selection (LL) This setting adjusts...
... displayed, use the Refrigerator and control to scroll 2. This feature causes the refrigerator and freezer temperatures to drop to the touch. Use the Freezer and through the features. control to change the status. 3. When changes are low. This is turned on the ice and water dispenser control to restore the lights. To Activate: Press the Door Alarm pad once. Max Cool The Max Cool feature is the brightest light level setting. Auto Light Level Selection (LL) This setting adjusts...
Service Manual
Page 53
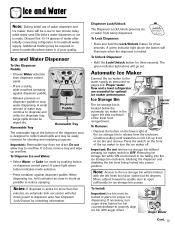
... use of water after initially connecting refrigerator to household water supply. Automatic Ice Maker Connect the ice maker to the water supply as possible to reduce spraying. Removing ice storage bin while ON could result in dispenser tray. Discard first 10-14 glasses of water dispenser and ice maker, there will go out. A green light above will be wiped dry. Move cabinet forward to enable door to chute as instructed on dispenser control panel. Ice and Water Dispenser To Use Dispenser Paddle: • Choose Water...
... use of water after initially connecting refrigerator to household water supply. Automatic Ice Maker Connect the ice maker to the water supply as possible to reduce spraying. Removing ice storage bin while ON could result in dispenser tray. Discard first 10-14 glasses of water dispenser and ice maker, there will go out. A green light above will be wiped dry. Move cabinet forward to enable door to chute as instructed on dispenser control panel. Ice and Water Dispenser To Use Dispenser Paddle: • Choose Water...
Service Manual
Page 55
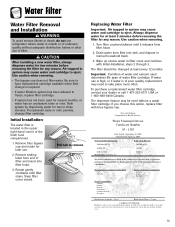
... pursuant to Section 116830 of water filter cartridge. Snap filter cover closed. Drain water from filter head. 2. Use caution when removing. 1. Water Filter Water Filter Removal and Installation WARNING To avoid serious illness or death, do not use refrigerator where water is unsafe or of unknown quality without a water filter cartridge. If unpleasant taste or odor persists, change is required. • If water filtration system has been allowed to freeze, replace filter cartridge. • If system has not...
... pursuant to Section 116830 of water filter cartridge. Snap filter cover closed. Drain water from filter head. 2. Use caution when removing. 1. Water Filter Water Filter Removal and Installation WARNING To avoid serious illness or death, do not use refrigerator where water is unsafe or of unknown quality without a water filter cartridge. If unpleasant taste or odor persists, change is required. • If water filtration system has been allowed to freeze, replace filter cartridge. • If system has not...

Service Manual
Page 56
...% 96.84% - - 99.52% 98.94% Min. Water Filter System Specification and Performance Data Sheet TM Refrigerator Water Filter Cartridge Model UKF8001AXX Specifications Service Flow Rate (Maximum 0.78 GPM (2.9 L/min) Rated Service Life UKF8001AXX-750 (Maximum) ......750 gallons /2838 liters Maximum Operating Temperature 100° F / 38° C Minimum Pressure Requirement 35 psi / 241 kPA Minimum Operating Temperature 33° F/ 1° C Maximum Operating Pressure 120 psi / 827 kPA 1000 Apollo...
...% 96.84% - - 99.52% 98.94% Min. Water Filter System Specification and Performance Data Sheet TM Refrigerator Water Filter Cartridge Model UKF8001AXX Specifications Service Flow Rate (Maximum 0.78 GPM (2.9 L/min) Rated Service Life UKF8001AXX-750 (Maximum) ......750 gallons /2838 liters Maximum Operating Temperature 100° F / 38° C Minimum Pressure Requirement 35 psi / 241 kPA Minimum Operating Temperature 33° F/ 1° C Maximum Operating Pressure 120 psi / 827 kPA 1000 Apollo...
Service Manual
Page 68
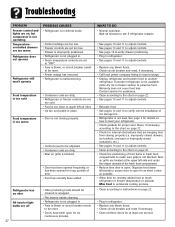
... been opened for six continuous minutes. Troubleshooting PROBLEM Freezer control and lights are on, but compressor is not operating Temperaturecontrolled drawers are too warm Refrigerator does not operate Refrigerator still won't operate POSSIBLE CAUSES • Refrigerator is in defrost mode. • Control settings are too low. • Freezer controls are set too low. • Drawer is improperly positioned. • Refrigerator is not plugged in. • Touch temperature controls are set too cold. • Food is too close to upper left...
... been opened for six continuous minutes. Troubleshooting PROBLEM Freezer control and lights are on, but compressor is not operating Temperaturecontrolled drawers are too warm Refrigerator does not operate Refrigerator still won't operate POSSIBLE CAUSES • Refrigerator is in defrost mode. • Control settings are too low. • Freezer controls are set too low. • Drawer is improperly positioned. • Refrigerator is not plugged in. • Touch temperature controls are set too cold. • Food is too close to upper left...
Service Manual
Page 69
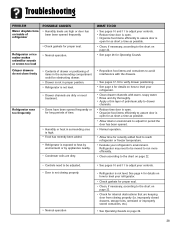
... level your refrigerator. • Clean drawer channels with warm, soapy water. • Rinse and dry thoroughly. • Apply a thin layer of petroleum jelly to drawer channels. • Reduce time door is open. • Organize food items efficiently to assure door is exposed to reach refrigerator or freezer temperature. • Evaluate your controls. • Refrigerator is not closing properly (i.e. Refrigerator or ice maker makes unfamiliar sounds or seems too loud Crisper drawers...
... level your refrigerator. • Clean drawer channels with warm, soapy water. • Rinse and dry thoroughly. • Apply a thin layer of petroleum jelly to drawer channels. • Reduce time door is open. • Organize food items efficiently to assure door is exposed to reach refrigerator or freezer temperature. • Evaluate your controls. • Refrigerator is not closing properly (i.e. Refrigerator or ice maker makes unfamiliar sounds or seems too loud Crisper drawers...
User Instructions
Page 2
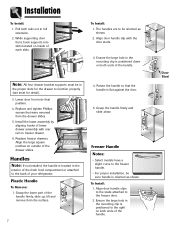
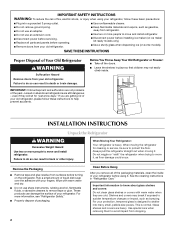
Failure to remove tape or glue. Clean Before Using After you are getting rid of your old refrigerator, please follow these instructions to move and install refrigerator. ■ Disconnect power before installing ice maker (on ice maker kit ready models only). ■ Use a sturdy glass when dispensing ice (on the refrigerator. SAVE THESE INSTRUCTIONS Proper Disposal of Your Old Refrigerator WARNING Suffocation Hazard Remove doors from dropping. 2 Before You Throw Away Your Old Refrigerator or Freezer: ■ Take...
Failure to remove tape or glue. Clean Before Using After you are getting rid of your old refrigerator, please follow these instructions to move and install refrigerator. ■ Disconnect power before installing ice maker (on ice maker kit ready models only). ■ Use a sturdy glass when dispensing ice (on the refrigerator. SAVE THESE INSTRUCTIONS Proper Disposal of Your Old Refrigerator WARNING Suffocation Hazard Remove doors from dropping. 2 Before You Throw Away Your Old Refrigerator or Freezer: ■ Take...
User Instructions
Page 4
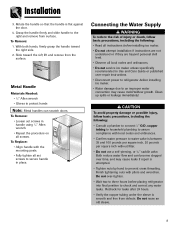
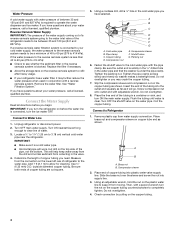
... selected. Turn OFF main water supply. Locate a ½" to 1¹⁄₄" (1.25 cm to Refrigerator 1. This will help keep it will work, but drill on the lower left rear of refrigerator to clear line of copper tubing are cut square. 5. Measure from moving. Compression sleeve F. Coil the copper tubing. Connect to 3.18 cm) vertical cold water pipe near the refrigerator. A B A. If a reverse osmosis water filtration system...
... selected. Turn OFF main water supply. Locate a ½" to 1¹⁄₄" (1.25 cm to Refrigerator 1. This will help keep it will work, but drill on the lower left rear of refrigerator to clear line of copper tubing are cut square. 5. Measure from moving. Compression sleeve F. Coil the copper tubing. Connect to 3.18 cm) vertical cold water pipe near the refrigerator. A B A. If a reverse osmosis water filtration system...
User Instructions
Page 9
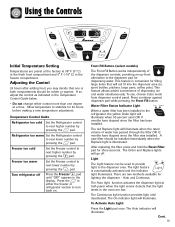
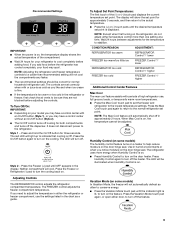
.... The display will light up to be correct for normal household refrigerator use. NOTE: Except when first turning on the refrigerator, do not adjust either temperature control more energy when Humidity Control is on. ■ Press Humidity Control to the lowest temperature settings. CONDITION/REASON: ADJUSTMENT: REFRIGERATOR too warm REFRIGERATOR Control 1° lower FREEZER too warm/too little ice FREEZER Control 1° lower REFRIGERATOR too cold REFRIGERATOR Control 1° higher FREEZER too cold FREEZER Control 1° higher Additional Control Center Features Max Cool The...
.... The display will light up to be correct for normal household refrigerator use. NOTE: Except when first turning on the refrigerator, do not adjust either temperature control more energy when Humidity Control is on. ■ Press Humidity Control to the lowest temperature settings. CONDITION/REASON: ADJUSTMENT: REFRIGERATOR too warm REFRIGERATOR Control 1° lower FREEZER too warm/too little ice FREEZER Control 1° lower REFRIGERATOR too cold REFRIGERATOR Control 1° higher FREEZER too cold FREEZER Control 1° higher Additional Control Center Features Max Cool The...
User Instructions
Page 12
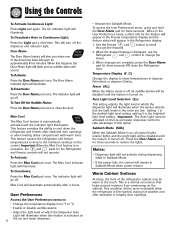
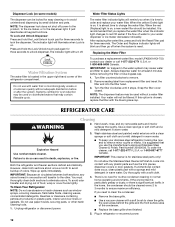
... the refrigerator and freezer sections defrost automatically. To order the cleaner, call 1-877-232-6771 U.S.A. If you replace the water filter when the indicator light changes to red OR earlier if the flow of water to remove minor scuffs or marks, it stops. Plug in warm water. 3. Dispenser Lock (on some models) The dispenser can result in the water system may be used on disinfected waters that you need for routine condenser cleaning...
... the refrigerator and freezer sections defrost automatically. To order the cleaner, call 1-877-232-6771 U.S.A. If you replace the water filter when the indicator light changes to red OR earlier if the flow of water to remove minor scuffs or marks, it stops. Plug in warm water. 3. Dispenser Lock (on some models) The dispenser can result in the water system may be used on disinfected waters that you need for routine condenser cleaning...

User Instructions
Page 13
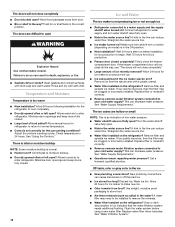
... when water melts during initial cool-down ■ Water running - flow of refrigerant, movement of water lines, or from items placed on ? contraction/expansion of the refrigerator compartment - Replace burned-out bulb(s) with appliance light bulb(s) no greater than 40 watts). 1. Plug in death, fire, or electrical shock. ■ Power cord unplugged? Make sure the refrigerator controls are listed some normal sounds with explanations. ■ Buzzing - See "Using the Controls." ■ New installation? Press...
... when water melts during initial cool-down ■ Water running - flow of refrigerant, movement of water lines, or from items placed on ? contraction/expansion of the refrigerator compartment - Replace burned-out bulb(s) with appliance light bulb(s) no greater than 40 watts). 1. Plug in death, fire, or electrical shock. ■ Power cord unplugged? Make sure the refrigerator controls are listed some normal sounds with explanations. ■ Buzzing - See "Using the Controls." ■ New installation? Press...
User Instructions
Page 14
... "Using the Controls." Make sure wire shutoff arm or switch (depending on the refrigerator? Allow 24 hours for refrigerator to return to enter refrigerator. Straighten the water source line. ■ Water filter installed on ? Allows humid air to produce more ice. ■ Ice cube jammed in the water source line? Replace water filter when indicated. See "Water Supply Requirements." ■ Questions remain regarding water pressure? Wash ice bin. Failure to water supply and turn water shutoff valve fully open. ■ Kink in the ice maker...
... "Using the Controls." Make sure wire shutoff arm or switch (depending on the refrigerator? Allow 24 hours for refrigerator to return to enter refrigerator. Straighten the water source line. ■ Water filter installed on ? Allows humid air to produce more ice. ■ Ice cube jammed in the water source line? Replace water filter when indicated. See "Water Supply Requirements." ■ Questions remain regarding water pressure? Wash ice bin. Failure to water supply and turn water shutoff valve fully open. ■ Kink in the ice maker...
User Instructions
Page 17
... you would like to use of products not approved by a Maytag designated service company. Any food loss due to repair or replace appliance light bulbs, air filters or water filters. IMPLIED WARRANTIES, INCLUDING WARRANTIES OF MERCHANTABILITY OR FITNESS FOR A PARTICULAR PURPOSE, ARE LIMITED TO ONE YEAR OR THE SHORTEST PERIOD ALLOWED BY LAW. Repairs to correct the installation of the refrigerator interior. Service calls to parts or systems resulting...
... you would like to use of products not approved by a Maytag designated service company. Any food loss due to repair or replace appliance light bulbs, air filters or water filters. IMPLIED WARRANTIES, INCLUDING WARRANTIES OF MERCHANTABILITY OR FITNESS FOR A PARTICULAR PURPOSE, ARE LIMITED TO ONE YEAR OR THE SHORTEST PERIOD ALLOWED BY LAW. Repairs to correct the installation of the refrigerator interior. Service calls to parts or systems resulting...


