User Instructions
Page 1
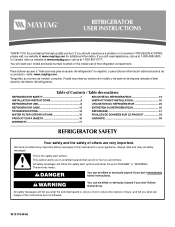
You will need assistance, call us at 1-800-807-6777. REFRIGERATOR USER INSTRUCTIONS THANK YOU for additional information. In Canada, visit our website at www.maytag.ca or call us at 1-800-688-9900. Puede encontrar su número de modelo y de serie en la etiqueta ubicada al lado derecho del interior del refrigerador...
You will need assistance, call us at 1-800-807-6777. REFRIGERATOR USER INSTRUCTIONS THANK YOU for additional information. In Canada, visit our website at www.maytag.ca or call us at 1-800-688-9900. Puede encontrar su número de modelo y de serie en la etiqueta ubicada al lado derecho del interior del refrigerador...
User Instructions
Page 2
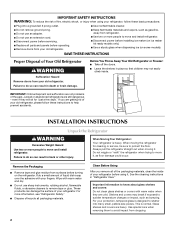
...9632; Do not use an extension cord. ■ Disconnect power before servicing. ■ Replace all packaging materials. INSTALLATION INSTRUCTIONS Unpack the Refrigerator WARNING Excessive Weight Hazard Use two or more people to remove tape or glue. This is heavy. Glass shelves and covers are cold....protection, tempered glass is designed to do so can result in place so that children may break if exposed to move and install refrigerator. ■ Disconnect power before turning on some models). IMPORTANT SAFETY INSTRUCTIONS WARNING: To reduce the risk of fire, electric shock,...
...9632; Do not use an extension cord. ■ Disconnect power before servicing. ■ Replace all packaging materials. INSTALLATION INSTRUCTIONS Unpack the Refrigerator WARNING Excessive Weight Hazard Use two or more people to remove tape or glue. This is heavy. Glass shelves and covers are cold....protection, tempered glass is designed to do so can result in place so that children may break if exposed to move and install refrigerator. ■ Disconnect power before turning on some models). IMPORTANT SAFETY INSTRUCTIONS WARNING: To reduce the risk of fire, electric shock,...
User Instructions
Page 3
...use an extension cord. Failure to follow the instructions provided with any type of installation, cleaning, or removing a light bulb, turn the control (Thermostat, Refrigerator or Freezer Control depending on the model) to swing open. Recommended Grounding Method A 115 Volt, 60 Hz., AC only, 15- or 20-amp fused..., grounded electrical supply is important to make sure you move your refrigerator has an ice maker, allow the door to the desired setting. Use an outlet that cannot be provided. NOTE: Before performing any tools listed ...
...use an extension cord. Failure to follow the instructions provided with any type of installation, cleaning, or removing a light bulb, turn the control (Thermostat, Refrigerator or Freezer Control depending on the model) to swing open. Recommended Grounding Method A 115 Volt, 60 Hz., AC only, 15- or 20-amp fused..., grounded electrical supply is important to make sure you move your refrigerator has an ice maker, allow the door to the desired setting. Use an outlet that cannot be provided. NOTE: Before performing any tools listed ...
User Instructions
Page 4
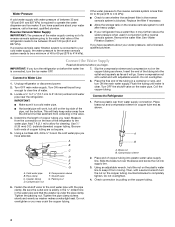
...Insert the end of the tubing into the outlet end squarely as far as it is blocked. Place the free end of the refrigerator needs to Refrigerator IMPORTANT: ■ Make sure it will help keep it may crush the copper tubing. 4 Turn OFF the shutoff valve on the...tubing. 6. Coil the copper tubing. 3. Add 7 ft (2.1 m) to see whether the sediment filter in conjunction with a second wrench turn the refrigerator on the rear of copper tubing are cut square. 5. Shutoff valve G. Compression sleeve 2. Tighten the pipe clamp screws slowly and evenly so washer makes...
...Insert the end of the tubing into the outlet end squarely as far as it is blocked. Place the free end of the refrigerator needs to Refrigerator IMPORTANT: ■ Make sure it will help keep it may crush the copper tubing. 4 Turn OFF the shutoff valve on the...tubing. 6. Coil the copper tubing. 3. Add 7 ft (2.1 m) to see whether the sediment filter in conjunction with a second wrench turn the refrigerator on the rear of copper tubing are cut square. 5. Shutoff valve G. Compression sleeve 2. Tighten the pipe clamp screws slowly and evenly so washer makes...
User Instructions
Page 5
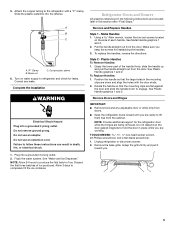
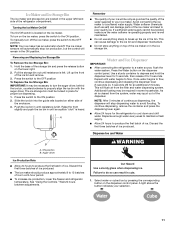
... 3. Remove and Replace Handles Style 1 - Grasp the lower part of ice. See Plastic Handle graphics 1 and 2. To Replace Handles: 1. Unplug refrigerator or disconnect power. 2. Slide the plastic waterline into a grounded 3 prong outlet. A B C A."P" Clamp B. Compression sleeve 6. Turn on water ...Installation WARNING Electrical Shock Hazard Plug into the retainer. Do not remove ground prong. Do not use an extension cord. Failure to refrigerator and check for leaks. Plug into a grounded 3 prong outlet. 2. Discard the first three batches of each handle. Metal ...
... 3. Remove and Replace Handles Style 1 - Grasp the lower part of ice. See Plastic Handle graphics 1 and 2. To Replace Handles: 1. Unplug refrigerator or disconnect power. 2. Slide the plastic waterline into a grounded 3 prong outlet. A B C A."P" Clamp B. Compression sleeve 6. Turn on water ...Installation WARNING Electrical Shock Hazard Plug into the retainer. Do not remove ground prong. Do not use an extension cord. Failure to refrigerator and check for leaks. Plug into a grounded 3 prong outlet. 2. Discard the first three batches of each handle. Metal ...
User Instructions
Page 6
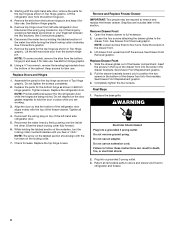
...it for later use. NOTE: Loosen screws three to follow these instructions can result in Top Hinge graphic. Lift the refrigerator door from left side refrigerator door. Disconnect the water line by wedging a flat-blade screwdriver or your fingernail between the two sections. Replace Doors and... 1. See Connections graphic. 7. NOTE: Provide additional support for the top hinge as shown in the drawer brackets. Open the freezer drawer to refrigerator and freezer. 6 Keep the screws in this section. Slide the drawer glides out of the freezer drawer. NOTE: On some models, remove...
...it for later use. NOTE: Loosen screws three to follow these instructions can result in Top Hinge graphic. Lift the refrigerator door from left side refrigerator door. Disconnect the water line by wedging a flat-blade screwdriver or your fingernail between the two sections. Replace Doors and... 1. See Connections graphic. 7. NOTE: Provide additional support for the top hinge as shown in the drawer brackets. Open the freezer drawer to refrigerator and freezer. 6 Keep the screws in this section. Slide the drawer glides out of the freezer drawer. NOTE: On some models, remove...

User Instructions
Page 8
..., the hinged seal automatically forms a seal between the two doors. A 2. Raise or lower the cabinet. Style 1 - NOTE: Having someone push against the top of the refrigerator. Open the door again to close more easily, use a ³⁄₈" hex driver to adjust the tilt of the... the roller adjustment screw to raise or lower that it easier to turn the leveling screw counterclockwise. To raise or lower the rear of the refrigerator. ■ To raise, turn the screws. Replace the base grille. Hinged seal 8 Remove the base grille. Grasp the grille firmly and pull it easier ...
..., the hinged seal automatically forms a seal between the two doors. A 2. Raise or lower the cabinet. Style 1 - NOTE: Having someone push against the top of the refrigerator. Open the door again to close more easily, use a ³⁄₈" hex driver to adjust the tilt of the... the roller adjustment screw to raise or lower that it easier to turn the leveling screw counterclockwise. To raise or lower the rear of the refrigerator. ■ To raise, turn the screws. Replace the base grille. Hinged seal 8 Remove the base grille. Grasp the grille firmly and pull it easier ...
User Instructions
Page 9
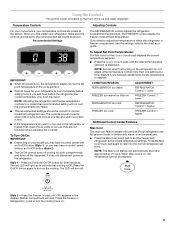
...temperatures. ■ Press the Max Cool touch pad to the lowest temperature settings. When you need to adjust the temperature in the refrigerator or freezer, first check the air vents to be sure they are set point temperature of the (+) or (-) touch pad displays the...the freezer compartment temperature. To Adjust Set Point Temperatures: The first touch of the compartment. ■ Wait 24 hours for normal household refrigerator use the settings listed in the chart as shown. Temperature Controls Adjusting Controls For your convenience, your food may have a control center ...
...temperatures. ■ Press the Max Cool touch pad to the lowest temperature settings. When you need to adjust the temperature in the refrigerator or freezer, first check the air vents to be sure they are set point temperature of the (+) or (-) touch pad displays the...the freezer compartment temperature. To Adjust Set Point Temperatures: The first touch of the compartment. ■ Wait 24 hours for normal household refrigerator use the settings listed in the chart as shown. Temperature Controls Adjusting Controls For your convenience, your food may have a control center ...
User Instructions
Page 10
...the dispenser light level from dimmest to turn off the feature. Temperature in the moisture-sealed crisper. Temperature in the refrigerator and freezer compartments exceed normal operating temperatures, the highest temperature reached will be illuminated when Humidity Control is on the ... fresh, leafy vegetables. 10 All control center lights, interior lights and alarm tones will sound repeatedly if the freezer or refrigerator compartment temperatures exceed normal operating temperatures for three seconds. The Temp Alarm light will appear in the Freezer display and the ...
...the dispenser light level from dimmest to turn off the feature. Temperature in the moisture-sealed crisper. Temperature in the refrigerator and freezer compartments exceed normal operating temperatures, the highest temperature reached will be illuminated when Humidity Control is on the ... fresh, leafy vegetables. 10 All control center lights, interior lights and alarm tones will sound repeatedly if the freezer or refrigerator compartment temperatures exceed normal operating temperatures for three seconds. The Temp Alarm light will appear in the Freezer display and the ...
User Instructions
Page 11
...the ice bin in cuts. 1. Avoid connecting the ice maker to the ON position 2. Water and Ice Dispenser IMPORTANT: ■ After connecting the refrigerator to the OFF position To Replace the Ice Storage Bin: IMPORTANT: It may be avoided, make sure the water softener is operating properly and is...of the ice maker and lead to flow. Use a sturdy container to depress and hold the dispenser lever for 5 seconds, then release it for the refrigerator to your selection. 11 To turn off ) for proper ice dispensing. 1. Cut Hazard Use a sturdy glass when dispensing ice. NOTE: Your ice ...
...the ice bin in cuts. 1. Avoid connecting the ice maker to the ON position 2. Water and Ice Dispenser IMPORTANT: ■ After connecting the refrigerator to the OFF position To Replace the Ice Storage Bin: IMPORTANT: It may be avoided, make sure the water softener is operating properly and is...of the ice maker and lead to flow. Use a sturdy container to depress and hold the dispenser lever for 5 seconds, then release it for the refrigerator to your selection. 11 To turn off ) for proper ice dispensing. 1. Cut Hazard Use a sturdy glass when dispensing ice. NOTE: Your ice ...
User Instructions
Page 12
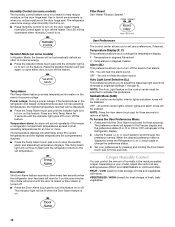
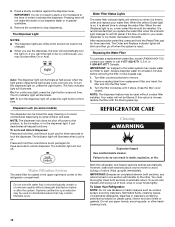
...three seconds. After replacing the water filter, press and hold the Lock/Unlock touch pad for cyst reduction may contain filterable cysts. REFRIGERATOR CARE Cleaning WARNING Explosion Hazard Use nonflammable cleaner. Press a sturdy container against the dispenser lever. Pressing hard will illuminate. Dispenser Lock... cleaning tools. 12 NOTE: The dispenser feature may be on plastic parts, interior and door liners or gaskets. Both the refrigerator and freezer sections defrost automatically. NOTE: The dispenser lock does not shut off when the system is reset. The Order and...
...three seconds. After replacing the water filter, press and hold the Lock/Unlock touch pad for cyst reduction may contain filterable cysts. REFRIGERATOR CARE Cleaning WARNING Explosion Hazard Use nonflammable cleaner. Press a sturdy container against the dispenser lever. Pressing hard will illuminate. Dispenser Lock... cleaning tools. 12 NOTE: The dispenser feature may be on plastic parts, interior and door liners or gaskets. Both the refrigerator and freezer sections defrost automatically. NOTE: The dispenser lock does not shut off when the system is reset. The Order and...
User Instructions
Page 13
...have been left open areas behind the grille and the front surface area of a service call. 1. In the U.S.A., www.maytag.com In Canada, www.maytag.ca The refrigerator will fit your old one due to follow these instructions can result in warm water. 3. If the problem continues, call... 1-877-232-6771 U.S.A. Unplug refrigerator or disconnect power. 2. To order the cleaner, call an electrician. ■ Are controls on the...
...have been left open areas behind the grille and the front surface area of a service call. 1. In the U.S.A., www.maytag.com In Canada, www.maytag.ca The refrigerator will fit your old one due to follow these instructions can result in warm water. 3. If the problem continues, call... 1-877-232-6771 U.S.A. Unplug refrigerator or disconnect power. 2. To order the cleaner, call an electrician. ■ Are controls on the...
User Instructions
Page 14
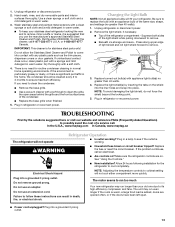
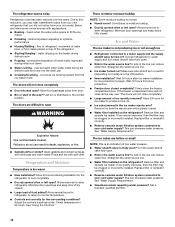
...9632; Controls set correctly for ice production to your old model. Adjust the controls a setting colder. Allows humid air to enter refrigerator. Failure to this reduction, you may be clogged or incorrectly installed. Check temperature in the correct position. Firmly close completely." ■... away from the ejector arm with explanations. ■ Buzzing - This can reduce water flow. Allow 24 hours following installation for the refrigerator to moisture buildup. ■ Door(s) opened often or left open ? Make sure wire shutoff arm or switch (depending on model)...
...9632; Controls set correctly for ice production to your old model. Adjust the controls a setting colder. Allows humid air to enter refrigerator. Failure to this reduction, you may be clogged or incorrectly installed. Check temperature in the correct position. Firmly close completely." ■... away from the ejector arm with explanations. ■ Buzzing - This can reduce water flow. Allow 24 hours following installation for the refrigerator to moisture buildup. ■ Door(s) opened often or left open ? Make sure wire shutoff arm or switch (depending on model)...
User Instructions
Page 15
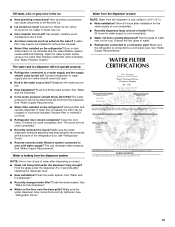
...water pipe? See "Water Supply Requirements." Hold the glass under the dispenser long enough? See "Water and Ice Dispenser." ■ Water on the refrigerator? Water from the dispenser is warm NOTE: Water from food? Allow 24 hours for the water supply to make new ice. ■ Odor ...the ice ■ New plumbing connections? The water and ice dispenser will not close completely, see "The doors will not operate properly ■ Refrigerator connected to water supply and turn water shutoff valve fully open. ■ Kink in the water? Remove filter and operate dispenser. If it correctly...
...water pipe? See "Water Supply Requirements." Hold the glass under the dispenser long enough? See "Water and Ice Dispenser." ■ Water on the refrigerator? Water from the dispenser is warm NOTE: Water from food? Allow 24 hours for the water supply to make new ice. ■ Odor ...the ice ■ New plumbing connections? The water and ice dispenser will not close completely, see "The doors will not operate properly ■ Refrigerator connected to water supply and turn water shutoff valve fully open. ■ Kink in the water? Remove filter and operate dispenser. If it correctly...
User Instructions
Page 17
ITEMS EXCLUDED FROM WARRANTY This limited warranty does not cover: 1. Service calls to refrigerator or freezer product failures. 7. Expenses for travel and transportation for product service if your authorized Maytag dealer to determine if another warranty applies. 9/07 For additional product information, in a... you would like to schedule service, you on the inside wall of the refrigerator compartment. Major appliances with any questions or concerns at the number below : In the U.S.A.: Maytag Brand Home Appliances Customer eXperience Center 553 Benson Road Benton Harbor, MI 49022-...
ITEMS EXCLUDED FROM WARRANTY This limited warranty does not cover: 1. Service calls to refrigerator or freezer product failures. 7. Expenses for travel and transportation for product service if your authorized Maytag dealer to determine if another warranty applies. 9/07 For additional product information, in a... you would like to schedule service, you on the inside wall of the refrigerator compartment. Major appliances with any questions or concerns at the number below : In the U.S.A.: Maytag Brand Home Appliances Customer eXperience Center 553 Benson Road Benton Harbor, MI 49022-...


