
User Instructions
Page 2
... turning on ice maker kit ready models only). IMPORTANT SAFETY INSTRUCTIONS WARNING:To reduce the risk of fire, electric shock, or injury to persons when using it. IMPORTANT: Child entrapment and suffocation are getting rid of your protection, tempered glass is designed to move and install refrigerator. ■ Disconnect power before using...
... turning on ice maker kit ready models only). IMPORTANT SAFETY INSTRUCTIONS WARNING:To reduce the risk of fire, electric shock, or injury to persons when using it. IMPORTANT: Child entrapment and suffocation are getting rid of your protection, tempered glass is designed to move and install refrigerator. ■ Disconnect power before using...

User Instructions
Page 3
...be provided. Use an outlet that you do so can result in both the Freezer and Refrigerator displays as gasoline, away from the electrical source. To ensure proper ventilation for your model, turn the refrigerator to allow for the water line connections. Recommended Grounding Method A 115 Volt, 60 Hz.,... and vapors, such as shown. Do not use an extension cord. Depending on the hinge side (some models require more) to OFF. NOTE: It is required. Before you move your refrigerator has an ice maker, allow for a ¹⁄₂" (1.25 cm) space at the back for...
...be provided. Use an outlet that you do so can result in both the Freezer and Refrigerator displays as gasoline, away from the electrical source. To ensure proper ventilation for your model, turn the refrigerator to allow for the water line connections. Recommended Grounding Method A 115 Volt, 60 Hz.,... and vapors, such as shown. Do not use an extension cord. Depending on the hinge side (some models require more) to OFF. NOTE: It is required. Before you move your refrigerator has an ice maker, allow for a ¹⁄₂" (1.25 cm) space at the back for...

User Instructions
Page 5
...Failure to completely fill the ice container. 5 Follow the connection instructions for your model, the water line may come down from the top or up from moving. Insert the end of 2 ft [61 cm]) with a second wrench turn the compression nut on the copper tubing...the valve inlet using a compression nut and sleeve as shown. Correct any leaks. NOTE: Allow 24 hours to produce the first batch of ice produced. Sleeve D. Connect to Refrigerator Depending on your model. Style 1 1. Tighten the compression nut. Compression nut B. Place a compression nut and sleeve on...
...Failure to completely fill the ice container. 5 Follow the connection instructions for your model, the water line may come down from the top or up from moving. Insert the end of 2 ft [61 cm]) with a second wrench turn the compression nut on the copper tubing...the valve inlet using a compression nut and sleeve as shown. Correct any leaks. NOTE: Allow 24 hours to produce the first batch of ice produced. Sleeve D. Connect to Refrigerator Depending on your model. Style 1 1. Tighten the compression nut. Compression nut B. Place a compression nut and sleeve on...

User Instructions
Page 6
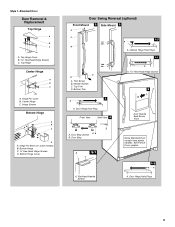
... from the cabinet. 4. See Metal Handle graphic 1. 3. Lift the refrigerator door free from the door. Unplug refrigerator or disconnect power. 2. Style 1-Standard Door Hex-Head Top Hinge Screw Freezer drawer models 1. Keep the refrigerator door closed until you are included later in death or electrical shock. ...additional support for the door while the hinges are ready to lift them free from the cabinet. Lift the refrigerator door free from the cabinet. 5. Freezer door models 1. See Side Mount graphic 2. Remove the parts for the top hinge as shown in the handle with ...
... from the cabinet. 4. See Metal Handle graphic 1. 3. Lift the refrigerator door free from the door. Unplug refrigerator or disconnect power. 2. Style 1-Standard Door Hex-Head Top Hinge Screw Freezer drawer models 1. Keep the refrigerator door closed until you are included later in death or electrical shock. ...additional support for the door while the hinges are ready to lift them free from the cabinet. Lift the refrigerator door free from the cabinet. 5. Freezer door models 1. See Side Mount graphic 2. Remove the parts for the top hinge as shown in the handle with ...

User Instructions
Page 7
...for the top hinge as shown in the Center Hinge graphic, and tighten all screws. 4. Freezer door models 1. Do not tighten the screws completely. 4. Tighten all parts together. Replace the refrigerator doors. Reconnect the wiring plug on top of the freezer drawer. Starting with the top of the left ... graphic. Do not depend on the door gasket magnets to the hinge. 6. Align each door so that the bottom of the refrigerator door is installed on some models, remove the shim from the bottom hinge pin and keep it opens from the bottom hinge pin. 4. Tighten all the screws....
...for the top hinge as shown in the Center Hinge graphic, and tighten all screws. 4. Freezer door models 1. Do not tighten the screws completely. 4. Tighten all parts together. Replace the refrigerator doors. Reconnect the wiring plug on top of the freezer drawer. Starting with the top of the left ... graphic. Do not depend on the door gasket magnets to the hinge. 6. Align each door so that the bottom of the refrigerator door is installed on some models, remove the shim from the bottom hinge pin and keep it opens from the bottom hinge pin. 4. Tighten all the screws....
User Instructions
Page 9
... A B C D A. Top Trim D. Bottom Trim A A Hex-Head Hinge Screws 6 1 1 3 A A. Top Hinge Center Hinge A B C A. Cabinet Hinge Hole Plugs 1-1 2nd 4th D B A. Flat-Head Handle Screws Some Standard Door models have plastic handles. Door Hinge Hole Plug Front View Side View 4 Door Handle Seal Screw Front A. Hinge Pin Shim (on some...
... A B C D A. Top Trim D. Bottom Trim A A Hex-Head Hinge Screws 6 1 1 3 A A. Top Hinge Center Hinge A B C A. Cabinet Hinge Hole Plugs 1-1 2nd 4th D B A. Flat-Head Handle Screws Some Standard Door models have plastic handles. Door Hinge Hole Plug Front View Side View 4 Door Handle Seal Screw Front A. Hinge Pin Shim (on some...
User Instructions
Page 10
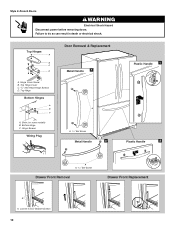
Hinge Screws Wiring Plug Door Removal & Replacement Metal Handle 1 A A. 3/32" Set Screw Metal Handle 2 Plastic Handle 1 Plastic Handle 2 A A. 3/32" Set Screw Drawer Front Removal Drawer Front Replacement A A. Loosen 4 Door Bracket Screws 10 Bottom Hinge C. Top Hinge Bottom Hinges A B C A. Shim (on some models) B. Hinge Cover Screw B. Failure to do so can result in death or electrical shock. Top Hinge Cover C. 5/16" Hex-Head Hinge Screws D. Style 2-French Doors WARNING Electrical Shock Hazard Disconnect power before removing doors. Top Hinges A B C D A.
Hinge Screws Wiring Plug Door Removal & Replacement Metal Handle 1 A A. 3/32" Set Screw Metal Handle 2 Plastic Handle 1 Plastic Handle 2 A A. 3/32" Set Screw Drawer Front Removal Drawer Front Replacement A A. Loosen 4 Door Bracket Screws 10 Bottom Hinge C. Top Hinge Bottom Hinges A B C A. Shim (on some models) B. Hinge Cover Screw B. Failure to do so can result in death or electrical shock. Top Hinge Cover C. 5/16" Hex-Head Hinge Screws D. Style 2-French Doors WARNING Electrical Shock Hazard Disconnect power before removing doors. Top Hinges A B C D A.

User Instructions
Page 11
...roller adjustment screw on each side to raise or lower that it closes as easily as you like . If your refrigerator may take several more easily, follow the instructions for your model. 5. Style1-Two Adjustable Rollers 7. Grasp the grille firmly and pull it easier to turn the screws. 2. ... take several more to the rear by turning both roller adjustment screws to the right. Adjust the Door Depending on your model, your refrigerator seems unsteady or you want the door to close more turns, and you should turn both screws the same amount. 5. Using a screwdriver ...
...roller adjustment screw on each side to raise or lower that it closes as easily as you like . If your refrigerator may take several more easily, follow the instructions for your model. 5. Style1-Two Adjustable Rollers 7. Grasp the grille firmly and pull it easier to turn the screws. 2. ... take several more to the rear by turning both roller adjustment screws to the right. Adjust the Door Depending on your model, your refrigerator seems unsteady or you want the door to close more turns, and you should turn both screws the same amount. 5. Using a screwdriver ...

User Instructions
Page 12
... both screws the same amount. 4. Grasp the grille firmly and pull it closes as easily as shown. REFRIGERATOR USE Opening and Closing Doors (French door models) There are still set correctly when milk or juice is as cold as you like and when ice cream... automatically folds inward so that it easier to the recommended setting as you like . Style 3-Leveling screw 1. IMPORTANT: ■ Wait 24 hours for normal household refrigerator use a ³⁄₈" hex driver to be sure they are closed either Electronic, Dial or Digital Controls. Style 1 Recommended...
... both screws the same amount. 4. Grasp the grille firmly and pull it closes as easily as shown. REFRIGERATOR USE Opening and Closing Doors (French door models) There are still set correctly when milk or juice is as cold as you like and when ice cream... automatically folds inward so that it easier to the recommended setting as you like . Style 3-Leveling screw 1. IMPORTANT: ■ Wait 24 hours for normal household refrigerator use a ³⁄₈" hex driver to be sure they are closed either Electronic, Dial or Digital Controls. Style 1 Recommended...

User Instructions
Page 16
...grille. ■ Use a vacuum cleaner with an appliance bulb of the refrigerator compartment - Freezer door models ■ Top of food, wrap or cover foods tightly. or 1-800-807-6777 Canada. Unplug the refrigerator or disconnect power. 2. Slide the shield toward the back of the compartment ... is particularly greasy or dusty, or there is for routine condenser cleaning in warm water. Freezer drawer models ■ Top of odors. Both the refrigerator and freezer sections defrost automatically. IMPORTANT: Because air circulates between both sections to do not force the shield...
...grille. ■ Use a vacuum cleaner with an appliance bulb of the refrigerator compartment - Freezer door models ■ Top of food, wrap or cover foods tightly. or 1-800-807-6777 Canada. Unplug the refrigerator or disconnect power. 2. Slide the shield toward the back of the compartment ... is particularly greasy or dusty, or there is for routine condenser cleaning in warm water. Freezer drawer models ■ Top of odors. Both the refrigerator and freezer sections defrost automatically. IMPORTANT: Because air circulates between both sections to do not force the shield...

User Instructions
Page 17
In the U.S.A., www.maytag.com In Canada, www.maytag.ca Refrigerator Operation The refrigerator will not operate The motor seems to run too much WARNING Your new refrigerator may run even longer if the ... will not close completely ■ Door blocked open . flow of refrigerant, movement of water lines, or from your old model. may run longer than your old one due to this reduction,...Plug in death, fire, or electrical shock. ■ Power cord unplugged? Allow 24 hours following installation for the refrigerator to see if the outlet is being ejected from door. ■ Bin or shelf...
In the U.S.A., www.maytag.com In Canada, www.maytag.ca Refrigerator Operation The refrigerator will not operate The motor seems to run too much WARNING Your new refrigerator may run even longer if the ... will not close completely ■ Door blocked open . flow of refrigerant, movement of water lines, or from your old model. may run longer than your old one due to this reduction,...Plug in death, fire, or electrical shock. ■ Power cord unplugged? Allow 24 hours following installation for the refrigerator to see if the outlet is being ejected from door. ■ Bin or shelf...

User Instructions
Page 18
...A kink in the line can decrease water pressure. This can reduce water flow. Adjust the controls a setting colder. Connect refrigerator to open ? Allow 24 hours for ice maker to a water supply and the supply shutoff valve turned on? If ice volume improves, then the filter...on model) is an indication of ice recently removed? Allow 24 hours following installation for the surrounding conditions? Wash ice bin. Allow 24 hours for ice maker to cool completely. ■ Door(s) opened often or left open . ■ Kink in 24 hours. Allows humid air to enter refrigerator....
...A kink in the line can decrease water pressure. This can reduce water flow. Adjust the controls a setting colder. Connect refrigerator to open ? Allow 24 hours for ice maker to a water supply and the supply shutoff valve turned on? If ice volume improves, then the filter...on model) is an indication of ice recently removed? Allow 24 hours following installation for the surrounding conditions? Wash ice bin. Allow 24 hours for ice maker to cool completely. ■ Door(s) opened often or left open . ■ Kink in 24 hours. Allows humid air to enter refrigerator....

User Instructions
Page 21
...use or when it is installed in a manner that have access to the Internet and you need further assistance, you can find your model number and serial number on the label, located on how to use of original purchase date is designed to repair or replace appliance .... 4. Service calls to correct the installation of your major appliance if it is used in the country in accordance with the product, Maytag brand of the refrigerator compartment. Repairs to parts or systems resulting from the date of purchase, when this warranty. 8. DISCLAIMER OF IMPLIED WARRANTIES; Please keep ...
...use or when it is installed in a manner that have access to the Internet and you need further assistance, you can find your model number and serial number on the label, located on how to use of original purchase date is designed to repair or replace appliance .... 4. Service calls to correct the installation of your major appliance if it is used in the country in accordance with the product, Maytag brand of the refrigerator compartment. Repairs to parts or systems resulting from the date of purchase, when this warranty. 8. DISCLAIMER OF IMPLIED WARRANTIES; Please keep ...
Parts Catalog
Page 2
CABINET PARTS For Models: MFF2558VEA10, MFF2558VEB10, MFF2558VEM10, MFF2558VEQ10, MFF2558VEW10 (Monochromatic Satina) (Black) (Monochromatic Stainless) (Bisque) (White) Illus. Part No. DESCRIPTION 22 Grille, Toe 67006377 White 67006375 Black 67006376 Bisque W10191107 Apollo Grey 23 M0114003 Clip, Speed 24 W10164397 Tube, Drain 25 67006425 Screw 26 67003796 Fiber, Acoustic 27 12479803 Cover, Water Valve 28...
CABINET PARTS For Models: MFF2558VEA10, MFF2558VEB10, MFF2558VEM10, MFF2558VEQ10, MFF2558VEW10 (Monochromatic Satina) (Black) (Monochromatic Stainless) (Bisque) (White) Illus. Part No. DESCRIPTION 22 Grille, Toe 67006377 White 67006375 Black 67006376 Bisque W10191107 Apollo Grey 23 M0114003 Clip, Speed 24 W10164397 Tube, Drain 25 67006425 Screw 26 67003796 Fiber, Acoustic 27 12479803 Cover, Water Valve 28...

Parts Catalog
Page 4
...Seal 20 67002492 Gasket, Bottom 21 B8381501 Gasket 22 W10175909 Grille, Fz Air 23 W10167023 Shroud, Evap.Fan 24 2169142 Blade, Fan (Evaporator) 25 Bracket, Door W10122147 Left W10122148 Right 26 67006473 Screw (8) 27 Cradle..., Side W10146443 Left W10146444 Right 34 W10157765 Diverter, Air Following Parts Not Illustrated 67006095 Harness, Lights (Freezer) 4 W10205734 FREEZER LINER PARTS For Models: MFF2558VEA10, MFF2558VEB10, MFF2558VEM10, MFF2558VEQ10, MFF2558VEW10 (Monochromatic Satina) (Black) (Monochromatic Stainless) (Bisque) (White) Illus. DESCRIPTION 1 Liner (Not ...
...Seal 20 67002492 Gasket, Bottom 21 B8381501 Gasket 22 W10175909 Grille, Fz Air 23 W10167023 Shroud, Evap.Fan 24 2169142 Blade, Fan (Evaporator) 25 Bracket, Door W10122147 Left W10122148 Right 26 67006473 Screw (8) 27 Cradle..., Side W10146443 Left W10146444 Right 34 W10157765 Diverter, Air Following Parts Not Illustrated 67006095 Harness, Lights (Freezer) 4 W10205734 FREEZER LINER PARTS For Models: MFF2558VEA10, MFF2558VEB10, MFF2558VEM10, MFF2558VEQ10, MFF2558VEW10 (Monochromatic Satina) (Black) (Monochromatic Stainless) (Bisque) (White) Illus. DESCRIPTION 1 Liner (Not ...
Parts Catalog
Page 6
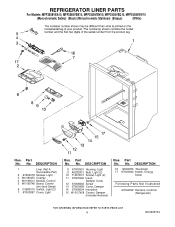
..., Damper (Includes Harness) Illus. Part No. Part No. No. DESCRIPTION 16 12002355 Thermistor 17 67003940 Switch, Energy Saver Following Parts Not Illustrated 67004032 Harness, Controls (Refrigerator) 6 W10205734 Part No. REFRIGERATOR LINER PARTS For Models: MFF2558VEA10, MFF2558VEB10, MFF2558VEM10, MFF2558VEQ10, MFF2558VEW10 (Monochromatic Satina) (Black) (Monochromatic Stainless) (Bisque) (White) Illus. No. No.
..., Damper (Includes Harness) Illus. Part No. Part No. No. DESCRIPTION 16 12002355 Thermistor 17 67003940 Switch, Energy Saver Following Parts Not Illustrated 67004032 Harness, Controls (Refrigerator) 6 W10205734 Part No. REFRIGERATOR LINER PARTS For Models: MFF2558VEA10, MFF2558VEB10, MFF2558VEM10, MFF2558VEQ10, MFF2558VEW10 (Monochromatic Satina) (Black) (Monochromatic Stainless) (Bisque) (White) Illus. No. No.
Parts Catalog
Page 10
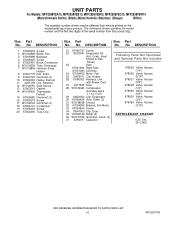
..., & Instr. Part No. DESCRIPTION Illus. No. Sheet) 23 Dam 67001084 Right Side 67001083 Left Side 24 67004432 Motor, Fan 25 10428101 Clip, Heater 26 13060302 Harness, Unit with Power Cord 27 2317845 Drier 28...Access (3/8") 978028 Valve, Access (1/2") 978029 Valve, Access (5/8") 978030 Valve, Access (3/4") 876764 Valve, Access (3/16") REFRIGERANT CHARGE 5.25 Ozs. (R−134A) 10 W10205734 UNIT PARTS For Models: MFF2558VEA10, MFF2558VEB10, MFF2558VEM10, MFF2558VEQ10, MFF2558VEW10 (Monochromatic Satina) (Black) (Monochromatic Stainless) (Bisque) (White) Illus....
..., & Instr. Part No. DESCRIPTION Illus. No. Sheet) 23 Dam 67001084 Right Side 67001083 Left Side 24 67004432 Motor, Fan 25 10428101 Clip, Heater 26 13060302 Harness, Unit with Power Cord 27 2317845 Drier 28...Access (3/8") 978028 Valve, Access (1/2") 978029 Valve, Access (5/8") 978030 Valve, Access (3/4") 876764 Valve, Access (3/16") REFRIGERANT CHARGE 5.25 Ozs. (R−134A) 10 W10205734 UNIT PARTS For Models: MFF2558VEA10, MFF2558VEB10, MFF2558VEM10, MFF2558VEQ10, MFF2558VEW10 (Monochromatic Satina) (Black) (Monochromatic Stainless) (Bisque) (White) Illus....

Parts Catalog
Page 11
SHELF PARTS For Models: MFF2558VEA10, MFF2558VEB10, MFF2558VEM10, MFF2558VEQ10, MFF2558VEW10 (Monochromatic Satina) (Black) (Monochromatic Stainless) (Bisque) (White) W10205734 11
SHELF PARTS For Models: MFF2558VEA10, MFF2558VEB10, MFF2558VEM10, MFF2558VEQ10, MFF2558VEW10 (Monochromatic Satina) (Black) (Monochromatic Stainless) (Bisque) (White) W10205734 11

Parts Catalog
Page 14
ICEMAKER PARTS For Models: MFF2558VEA10, MFF2558VEB10, MFF2558VEM10, MFF2558VEQ10, MFF2558VEW10 (Monochromatic Satina) (Black) (Monochromatic Stainless) (Bisque) (White) Illus. No. Part No. DESCRIPTION 1 2256086 Bracket, Ice Maker 2 67003729 Tube, Plastic 3 67003932 ..., Ice Maker 19 M0114003 Clip, Speed 20 626678 Module Assembly (Includes Items 21& 22) 21 626684 Motor 22 489136 Screw 23 W10137519 Elbow, Fill Tube 24 67005603 Funnel, Fill Tube 25 W10182748 Pan, Ice 100 W10122519 Complete Ice Maker 14 W10205734
ICEMAKER PARTS For Models: MFF2558VEA10, MFF2558VEB10, MFF2558VEM10, MFF2558VEQ10, MFF2558VEW10 (Monochromatic Satina) (Black) (Monochromatic Stainless) (Bisque) (White) Illus. No. Part No. DESCRIPTION 1 2256086 Bracket, Ice Maker 2 67003729 Tube, Plastic 3 67003932 ..., Ice Maker 19 M0114003 Clip, Speed 20 626678 Module Assembly (Includes Items 21& 22) 21 626684 Motor 22 489136 Screw 23 W10137519 Elbow, Fill Tube 24 67005603 Funnel, Fill Tube 25 W10182748 Pan, Ice 100 W10122519 Complete Ice Maker 14 W10205734

Parts Catalog
Page 15
... Epoxy) 833938 Kit, Terminal Connector TORX SCREW WRENCH 1117510 Torx Key ACCESSORIES 31462 Cleaner, 10 oz. No. DESCRIPTION Illus. Part No. No. OPTIONAL PARTS For Models: MFF2558VEA10, MFF2558VEB10, MFF2558VEM10, MFF2558VEQ10, MFF2558VEW10 (Monochromatic Satina) (Black) (Monochromatic Stainless) (Bisque) (White) Illus. Illus. Part No. Part No. No. Stainless Steel W10205734 15...
... Epoxy) 833938 Kit, Terminal Connector TORX SCREW WRENCH 1117510 Torx Key ACCESSORIES 31462 Cleaner, 10 oz. No. DESCRIPTION Illus. Part No. No. OPTIONAL PARTS For Models: MFF2558VEA10, MFF2558VEB10, MFF2558VEM10, MFF2558VEQ10, MFF2558VEW10 (Monochromatic Satina) (Black) (Monochromatic Stainless) (Bisque) (White) Illus. Illus. Part No. Part No. No. Stainless Steel W10205734 15...

