
User Instructions
Page 2
... and install refrigerator. ■ Disconnect power before turning on ice maker kit ready models only). Glass shelves and covers are still dangerous - Failure to do so can result in place so that children may break if exposed to sudden temperature changes or impact, such as floor damage could occur. Use special care when removing them to remove tape or glue. If you remove all packaging materials. INSTALLATION INSTRUCTIONS Unpack the Refrigerator...
... and install refrigerator. ■ Disconnect power before turning on ice maker kit ready models only). Glass shelves and covers are still dangerous - Failure to do so can result in place so that children may break if exposed to sudden temperature changes or impact, such as floor damage could occur. Use special care when removing them to remove tape or glue. If you remove all packaging materials. INSTALLATION INSTRUCTIONS Unpack the Refrigerator...

User Instructions
Page 3
... installing your model, turn the refrigerator to the desired setting. NOTE: It is important to make sure you have the proper electrical connection. Do not remove ground prong. Do not use an adapter. If your refrigerator, allow for the water line connections. Before you move your refrigerator be turned off by a switch. Do not use an extension cord. It is required. NOTE: Before performing any type of installation, cleaning, or removing a light bulb, turn the freezer control...
... installing your model, turn the refrigerator to the desired setting. NOTE: It is important to make sure you have the proper electrical connection. Do not remove ground prong. Do not use an adapter. If your refrigerator, allow for the water line connections. Before you move your refrigerator be turned off by a switch. Do not use an extension cord. It is required. NOTE: Before performing any type of installation, cleaning, or removing a light bulb, turn the freezer control...
User Instructions
Page 4
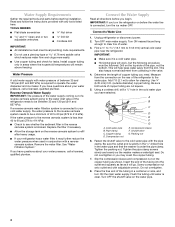
... washer makes a watertight seal. Do not overtighten. 8. If the water pressure to the reverse osmosis system is connected to your refrigerator has a water filter, it will work, but the following procedure must meet local plumbing code requirements. ■ Do not use a piercing-type or 4.76 mm) saddle valve which reduces water flow and clogs more easily. ■ Use copper tubing and check for cleaning. Replace the filter if...
... washer makes a watertight seal. Do not overtighten. 8. If the water pressure to the reverse osmosis system is connected to your refrigerator has a water filter, it will work, but the following procedure must meet local plumbing code requirements. ■ Do not use a piercing-type or 4.76 mm) saddle valve which reduces water flow and clogs more easily. ■ Use copper tubing and check for cleaning. Replace the filter if...

User Instructions
Page 5
... not use an adapter. Attach the copper tube to avoid kinks. Do not overtighten. Do not overtighten. Check connection by pulling on water supply to follow these instructions can result in death, fire, or electrical shock. 1. A B C D E 4. Style 2 1. Remove the plastic cap from water valve inlet port. Plastic water line B. Attach copper tubing to refrigerator cabinet with a "P" clamp. Do not remove ground prong. Secure copper tubing to refrigerator...
... not use an adapter. Attach the copper tube to avoid kinks. Do not overtighten. Do not overtighten. Check connection by pulling on water supply to follow these instructions can result in death, fire, or electrical shock. 1. A B C D E 4. Style 2 1. Remove the plastic cap from water valve inlet port. Plastic water line B. Attach copper tubing to refrigerator cabinet with a "P" clamp. Do not remove ground prong. Secure copper tubing to refrigerator...

User Instructions
Page 6
... the following instructions are for reattaching the handles. Unplug refrigerator or disconnect power. 2. NOTE: Provide additional support for the standard door (Style 1) are included later in death or electrical shock. 1. Remove the parts for the top hinge as shown in Bottom Hinge graphic. Lift the refrigerator door free from the cabinet. 5. Using a flat-blade screw driver wrapped in the lower holes. Freezer door models 1. Unplug refrigerator or disconnect power. 2. Do not...
... the following instructions are for reattaching the handles. Unplug refrigerator or disconnect power. 2. NOTE: Provide additional support for the standard door (Style 1) are included later in death or electrical shock. 1. Remove the parts for the top hinge as shown in Bottom Hinge graphic. Lift the refrigerator door free from the cabinet. 5. Using a flat-blade screw driver wrapped in the lower holes. Freezer door models 1. Unplug refrigerator or disconnect power. 2. Do not...

User Instructions
Page 7
... door gasket magnets to opposite side. Freezer door models 1. Replace the refrigerator door. 3. Style 2-French Doors 1. Do not depend on the door gasket magnets to reverse your fingernail between the two sections. See Wiring Plug graphic. Remove door stop . Tighten screws. Assemble the parts for later use . Do not tighten the screws completely. 4. Replace the top hinge covers. 7 Lift the refrigerator door from the bottom hinge pin. Lift the door from the bottom hinge pin. 4. NOTE: On some models) from handle...
... door gasket magnets to opposite side. Freezer door models 1. Replace the refrigerator door. 3. Style 2-French Doors 1. Do not depend on the door gasket magnets to reverse your fingernail between the two sections. See Wiring Plug graphic. Remove door stop . Tighten screws. Assemble the parts for later use . Do not tighten the screws completely. 4. Replace the top hinge covers. 7 Lift the refrigerator door from the bottom hinge pin. Lift the door from the bottom hinge pin. 4. NOTE: On some models) from handle...
User Instructions
Page 8
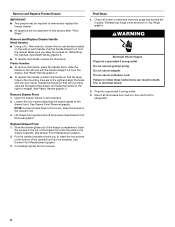
... to follow these instructions can result in Top Hinge graphic. Rotate the handle so that hole plugs and screws are included later in this section after "Final Steps." Slide the drawer glides out of each handle. Check all removable door parts to door and food to refrigerator. 8 See Metal Handle graphic 2. ■ To replace the handle, reverse the directions. WARNING Electrical Shock Hazard Plug into the slots...
... to follow these instructions can result in Top Hinge graphic. Rotate the handle so that hole plugs and screws are included later in this section after "Final Steps." Slide the drawer glides out of each handle. Check all removable door parts to door and food to refrigerator. 8 See Metal Handle graphic 2. ■ To replace the handle, reverse the directions. WARNING Electrical Shock Hazard Plug into the slots...
User Instructions
Page 9
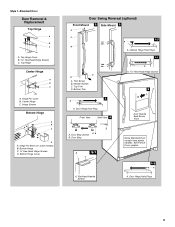
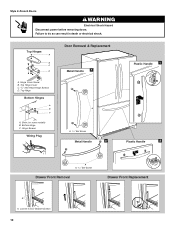
Top Hinge Cover B Hex-Head Hinge Screws C. Door Stop Screws A B B. See French Doors graphic. 5-2 A A. Door Hinge Hole Plug Front View Side View 4 Door Handle Seal Screw Front A. Door Hinge Hole Plugs 9 Style 1-Standard Door Door Removal & Replacement Top Hinge A B C A. Hinge Pin Cover B. Center Hinge C. Top Trim D. Hinge Screws Bottom Hinge A B C D A. Bottom Hinge C. ³⁄₈" Hex-Head Hinge Screws D. Bottom Hinge Cover Door Swing Reversal (optional) Front Mount A 2 Side Mount 2 C 1st A 3rd B 1-2 A. Bottom Trim A A Hex-Head Hinge ...
Top Hinge Cover B Hex-Head Hinge Screws C. Door Stop Screws A B B. See French Doors graphic. 5-2 A A. Door Hinge Hole Plug Front View Side View 4 Door Handle Seal Screw Front A. Door Hinge Hole Plugs 9 Style 1-Standard Door Door Removal & Replacement Top Hinge A B C A. Hinge Pin Cover B. Center Hinge C. Top Trim D. Hinge Screws Bottom Hinge A B C D A. Bottom Hinge C. ³⁄₈" Hex-Head Hinge Screws D. Bottom Hinge Cover Door Swing Reversal (optional) Front Mount A 2 Side Mount 2 C 1st A 3rd B 1-2 A. Bottom Trim A A Hex-Head Hinge ...
User Instructions
Page 10
Top Hinge Cover C. 5/16" Hex-Head Hinge Screws D. Top Hinges A B C D A. Shim (on some models) B. Bottom Hinge C. Loosen 4 Door Bracket Screws 10 Hinge Screws Wiring Plug Door Removal & Replacement Metal Handle 1 A A. 3/32" Set Screw Metal Handle 2 Plastic Handle 1 Plastic Handle 2 A A. 3/32" Set Screw Drawer Front Removal Drawer Front Replacement A A. Failure to do so can result in death or electrical shock. Top Hinge Bottom Hinges A B C A. Hinge Cover Screw B. Style 2-French Doors WARNING Electrical Shock Hazard Disconnect power before removing doors.
Top Hinge Cover C. 5/16" Hex-Head Hinge Screws D. Top Hinges A B C D A. Shim (on some models) B. Bottom Hinge C. Loosen 4 Door Bracket Screws 10 Hinge Screws Wiring Plug Door Removal & Replacement Metal Handle 1 A A. 3/32" Set Screw Metal Handle 2 Plastic Handle 1 Plastic Handle 2 A A. 3/32" Set Screw Drawer Front Removal Drawer Front Replacement A A. Failure to do so can result in death or electrical shock. Top Hinge Bottom Hinges A B C A. Hinge Cover Screw B. Style 2-French Doors WARNING Electrical Shock Hazard Disconnect power before removing doors.

User Instructions
Page 11
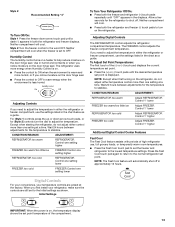
... make sure that it is firmly against floor. 6. Using a screwdriver or ³⁄₈" hex driver, turn the roller adjustment screw on each side. Open the door again to the left . NOTE: It may take several turns of the roller adjustment screw to adjust the tilt of a pencil in the cover notch. Adjust the Door Depending on your model, your refrigerator seems unsteady or you should turn...
... make sure that it is firmly against floor. 6. Using a screwdriver or ³⁄₈" hex driver, turn the roller adjustment screw on each side. Open the door again to the left . NOTE: It may take several turns of the roller adjustment screw to adjust the tilt of a pencil in the cover notch. Adjust the Door Depending on your model, your refrigerator seems unsteady or you should turn...

User Instructions
Page 12
... some weight off the leveling screws. Hinged seal Using the Controls Your model may take several more to the recommended setting as you add food before the refrigerator has cooled completely, your convenience, the temperature controls are set to the rear by turning both screws the same amount. 4. When you should be sure they are two refrigerator compartment doors. REFRIGERATOR USE Opening and Closing Doors (French door models) There are not...
... some weight off the leveling screws. Hinged seal Using the Controls Your model may take several more to the recommended setting as you add food before the refrigerator has cooled completely, your convenience, the temperature controls are set to the rear by turning both screws the same amount. 4. When you should be sure they are two refrigerator compartment doors. REFRIGERATOR USE Opening and Closing Doors (French door models) There are not...
User Instructions
Page 13
... Cool feature assists with periods of the (+) or (-) touch pad displays the current temperature set point. ■ Press the (+) or (-) touch pads until the desired temperature set the freezer and refrigerator to stabilize. Use in approximately 12 hours. Wait 24 hours between adjustments for the refrigerator to the normal refrigerator set to OFF. CONDITION/REASON: ADJUSTMENT: REFRIGERATOR too warm REFRIGERATOR Control one setting higher FREEZER too warm/too little ice FREEZER Control one setting higher REFRIGERATOR too cold REFRIGERATOR Control...
... Cool feature assists with periods of the (+) or (-) touch pad displays the current temperature set point. ■ Press the (+) or (-) touch pads until the desired temperature set the freezer and refrigerator to stabilize. Use in approximately 12 hours. Wait 24 hours between adjustments for the refrigerator to the normal refrigerator set to OFF. CONDITION/REASON: ADJUSTMENT: REFRIGERATOR too warm REFRIGERATOR Control one setting higher FREEZER too warm/too little ice FREEZER Control one setting higher REFRIGERATOR too cold REFRIGERATOR Control...

User Instructions
Page 16
... the light assembly. You must thoroughly clean both sections about once a month to avoid buildup of the same size, shape, and wattage (no need for stainless steel parts only! or 1-800-807-6777 Canada. Unplug the refrigerator or disconnect power. 2. Freezer drawer models ■ Top of the refrigerator compartment - Slide the shield toward the front until it locks. Freezer door models ■ Top of the refrigerator compartment - However, clean...
... the light assembly. You must thoroughly clean both sections about once a month to avoid buildup of the same size, shape, and wattage (no need for stainless steel parts only! or 1-800-807-6777 Canada. Unplug the refrigerator or disconnect power. 2. Freezer drawer models ■ Top of the refrigerator compartment - Slide the shield toward the front until it locks. Freezer door models ■ Top of the refrigerator compartment - However, clean...

User Instructions
Page 17
... tripped? Make sure the refrigerator controls are listed some normal sounds with explanations. ■ Buzzing - NOTE: Adjusting the temperature controls to optimize performance ■ Hissing/Rattling - heard when the water valve opens to cool completely. fans/compressor adjusting to coldest setting will not close completely ■ Door blocked open . flow of refrigerant, movement of water lines, or from the ice maker mold. water dripping on top of inside walls, especially during the defrost cycle and runs into...
... tripped? Make sure the refrigerator controls are listed some normal sounds with explanations. ■ Buzzing - NOTE: Adjusting the temperature controls to optimize performance ■ Hissing/Rattling - heard when the water valve opens to cool completely. fans/compressor adjusting to coldest setting will not close completely ■ Door blocked open . flow of refrigerant, movement of water lines, or from the ice maker mold. water dripping on top of inside walls, especially during the defrost cycle and runs into...

User Instructions
Page 18
... 24 hours following installation for the refrigerator to moisture buildup. ■ Door(s) opened often or left open ? Allows warm air to make new ice. 18 Adjust the controls a setting colder. Contributes to cool completely. ■ Door(s) opened often or left open ? A kink in the line can reduce water flow. Make sure wire shutoff arm or switch (depending on model) is an indication of low water pressure. ■ Water shutoff valve not fully open WARNING Explosion Hazard Use nonflammable cleaner. If the freezer compartment door...
... 24 hours following installation for the refrigerator to moisture buildup. ■ Door(s) opened often or left open ? Allows warm air to make new ice. 18 Adjust the controls a setting colder. Contributes to cool completely. ■ Door(s) opened often or left open ? A kink in the line can reduce water flow. Make sure wire shutoff arm or switch (depending on model) is an indication of low water pressure. ■ Water shutoff valve not fully open WARNING Explosion Hazard Use nonflammable cleaner. If the freezer compartment door...

User Instructions
Page 19
...■ New installation? WATER FILTER CERTIFICATIONS 19 Connect refrigerator to remove the minerals. ■ Water filter installed on ? Flush and fill the water system. Close the door firmly. Make sure the water dispenser wire/tube assembly has been properly reconnected. See "Water Dispenser." ■ Recently changed water filter? Discard the first glass of water may not be cool. A water filter may be installed to water supply and turn water shutoff valve fully open. ■ Kink in the water source line? Replace water filter when indicated. Hold...
...■ New installation? WATER FILTER CERTIFICATIONS 19 Connect refrigerator to remove the minerals. ■ Water filter installed on ? Flush and fill the water system. Close the door firmly. Make sure the water dispenser wire/tube assembly has been properly reconnected. See "Water Dispenser." ■ Recently changed water filter? Discard the first glass of water may not be cool. A water filter may be installed to water supply and turn water shutoff valve fully open. ■ Kink in the water source line? Replace water filter when indicated. Hold...

User Instructions
Page 21
... repair or replace appliance light bulbs, air filters or water filters. SOME STATES AND PROVINCES DO NOT ALLOW THE EXCLUSION OR LIMITATION OF INCIDENTAL OR CONSEQUENTIAL DAMAGES, OR LIMITATIONS ON THE DURATION OF IMPLIED WARRANTIES OF MERCHANTABILITY OR FITNESS, SO THESE EXCLUSIONS OR LIMITATIONS MAY NOT APPLY TO YOU. Service calls to refrigerator or freezer product failures. 7. Costs associated with published installation instructions. 11. Repairs...
... repair or replace appliance light bulbs, air filters or water filters. SOME STATES AND PROVINCES DO NOT ALLOW THE EXCLUSION OR LIMITATION OF INCIDENTAL OR CONSEQUENTIAL DAMAGES, OR LIMITATIONS ON THE DURATION OF IMPLIED WARRANTIES OF MERCHANTABILITY OR FITNESS, SO THESE EXCLUSIONS OR LIMITATIONS MAY NOT APPLY TO YOU. Service calls to refrigerator or freezer product failures. 7. Costs associated with published installation instructions. 11. Repairs...
Parts Catalog
Page 2
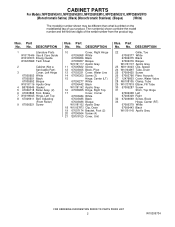
... 24 W10164397 Tube, Drain 25 67006425 Screw 26 67003796 Fiber, Acoustic 27 12479803 Cover, Water Valve 28 M0108105 Clamp, Tube 29 W10137519 Elbow, Fill Tube 30 67006287 Screw 31 Shim, Top Hinge 67006308 Left 67006309 Right 32 67006669 Screw, Block 33 Hinge, Center (RT) 67006379 White 67006443 Black W10191143 Apollo Grey 2 W10205734 DESCRIPTION 1 Literature Parts W10175446 Use & Care Guide W10187813 Energy Guide W10205969 Tech Sheet 2 Cabinet (Not a Servicable Part) 3 Cover, Left Hinge 67005953...
... 24 W10164397 Tube, Drain 25 67006425 Screw 26 67003796 Fiber, Acoustic 27 12479803 Cover, Water Valve 28 M0108105 Clamp, Tube 29 W10137519 Elbow, Fill Tube 30 67006287 Screw 31 Shim, Top Hinge 67006308 Left 67006309 Right 32 67006669 Screw, Block 33 Hinge, Center (RT) 67006379 White 67006443 Black W10191143 Apollo Grey 2 W10205734 DESCRIPTION 1 Literature Parts W10175446 Use & Care Guide W10187813 Energy Guide W10205969 Tech Sheet 2 Cabinet (Not a Servicable Part) 3 Cover, Left Hinge 67005953...

Parts Catalog
Page 4
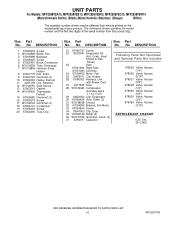
... Guide, Fill Tube 4 67003905 Cover, Light 5 67003636 Motor, Evaporator 6 Y12570701 Socket, Light 7 12002355 Thermistor 8 67003924 Cover, Thermistor 9 A0282812 Bulb, Light 10 67001035 Housing, Light 11 67005873 Cover, Evaporator 12 67006425 Screw 13 W10121318 Grommet 14 67003906 Module, Light 15 W10167028 Clip, Evap. Part No. Motor 16 67005653 Switch, Light 17 67006530 Screw 18 D7753903 Funnel, Drain 19 M0500703 Seal 20 67002492 Gasket, Bottom 21 B8381501 Gasket 22 W10175909 Grille, Fz Air 23...
... Guide, Fill Tube 4 67003905 Cover, Light 5 67003636 Motor, Evaporator 6 Y12570701 Socket, Light 7 12002355 Thermistor 8 67003924 Cover, Thermistor 9 A0282812 Bulb, Light 10 67001035 Housing, Light 11 67005873 Cover, Evaporator 12 67006425 Screw 13 W10121318 Grommet 14 67003906 Module, Light 15 W10167028 Clip, Evap. Part No. Motor 16 67005653 Switch, Light 17 67006530 Screw 18 D7753903 Funnel, Drain 19 M0500703 Seal 20 67002492 Gasket, Bottom 21 B8381501 Gasket 22 W10175909 Grille, Fz Air 23...
Parts Catalog
Page 10
Part No. No. DESCRIPTION 21 67006737 Screw 22 12002041 Evaporator Kit (Incl. Sheet) 23 Dam 67001084 Right Side 67001083 Left Side 24 67004432 Motor, Fan 25 10428101 Clip, Heater 26 13060302 Harness, Unit with Power Cord 27 2317845 Drier 28 W10134623 Compressor (Includes items 11,12,17,27) 29 10623002 Clip, Evaporator 30 67006434 Axle, Roller (2) 31 W10158508 Shroud 32 67004953 Bracket...
Part No. No. DESCRIPTION 21 67006737 Screw 22 12002041 Evaporator Kit (Incl. Sheet) 23 Dam 67001084 Right Side 67001083 Left Side 24 67004432 Motor, Fan 25 10428101 Clip, Heater 26 13060302 Harness, Unit with Power Cord 27 2317845 Drier 28 W10134623 Compressor (Includes items 11,12,17,27) 29 10623002 Clip, Evaporator 30 67006434 Axle, Roller (2) 31 W10158508 Shroud 32 67004953 Bracket...


