

Owners Manual
Page 1
...DU RÉFRIGÉRATEUR........ 42 INSTALLATION INSTRUCTIONS............2 INSTRUCCIONES DE INSTALACIÓN...22 INSTRUCTIONS D'INSTALLATION...... 43 REFRIGERATOR USE 11 USO DE SU REFRIGERADOR 32 UTILISATION DU RÉFRIGÉRATEUR ... 53 REFRIGERATOR CARE 15 CUIDADO DE SU REFRIGERADOR .....36 ENTRETIEN DU RÉFRIGÉ... in this high-quality product. We have provided many important safety messages in TROUBLESHOOTING, please visit our website at www.maytag.com for purchasing this manual and on the inside wall of others . If you still need your model and serial number...
...DU RÉFRIGÉRATEUR........ 42 INSTALLATION INSTRUCTIONS............2 INSTRUCCIONES DE INSTALACIÓN...22 INSTRUCTIONS D'INSTALLATION...... 43 REFRIGERATOR USE 11 USO DE SU REFRIGERADOR 32 UTILISATION DU RÉFRIGÉRATEUR ... 53 REFRIGERATOR CARE 15 CUIDADO DE SU REFRIGERADOR .....36 ENTRETIEN DU RÉFRIGÉ... in this high-quality product. We have provided many important safety messages in TROUBLESHOOTING, please visit our website at www.maytag.com for purchasing this manual and on the inside wall of others . If you still need your model and serial number...

Owners Manual
Page 2
... the following: ■ Plug into many small, pebble-size pieces. If you remove all of your old refrigerator. Before You Throw Away Your Old Refrigerator or Freezer: ■ Take off the doors. ■ Leave the shelves in death or brain damage. Shelves...result in place so that children may break if exposed to move and install refrigerator. Rub a small amount of Your Old Refrigerator WARNING Suffocation Hazard Remove doors from your refrigerator before using the refrigerator, follow these instructions to help prevent accidents. Tempered glass is designed to ...
... the following: ■ Plug into many small, pebble-size pieces. If you remove all of your old refrigerator. Before You Throw Away Your Old Refrigerator or Freezer: ■ Take off the doors. ■ Leave the shelves in death or brain damage. Shelves...result in place so that children may break if exposed to move and install refrigerator. Rub a small amount of Your Old Refrigerator WARNING Suffocation Hazard Remove doors from your refrigerator before using the refrigerator, follow these instructions to help prevent accidents. Tempered glass is designed to ...

Owners Manual
Page 3
...■ Use copper tubing and check for a ¹⁄₂" (1.25 cm) space at least every 6 months. 3 Disconnect the refrigerator from refrigerator. Install copper tubing only in areas where the household temperatures will fall below 55°F (13°C). ¹⁄₂" (1.25 cm... Electrical Shock Hazard Plug into its final location, it is recommended that cannot be replaced at the top and behind the refrigerator. Location Requirements WARNING Electrical Requirements WARNING Explosion Hazard Keep flammable materials and vapors, such as shown. Do not use an ...
...■ Use copper tubing and check for a ¹⁄₂" (1.25 cm) space at least every 6 months. 3 Disconnect the refrigerator from refrigerator. Install copper tubing only in areas where the household temperatures will fall below 55°F (13°C). ¹⁄₂" (1.25 cm... Electrical Shock Hazard Plug into its final location, it is recommended that cannot be replaced at the top and behind the refrigerator. Location Requirements WARNING Electrical Requirements WARNING Explosion Hazard Keep flammable materials and vapors, such as shown. Do not use an ...

Owners Manual
Page 4
... a cold water pipe. ■ Horizontal pipe will help keep water away from the bottom. Be sure both ends of the refrigerator needs to refrigerator and check for cleaning. Create a service loop with adjustable wrench. Turn on copper tubing. 2. Remove the water filter. IMPORTANT:...from the top or up from the drill. Add 7 ft (2.1 m) to 414 kPa). Pipe clamp C. Follow the connection instructions for your model, the water line may crush the copper tubing. 7. Attach the copper tube to refrigerator cabinet with a "P" clamp. Confirm copper tubing is ...
... a cold water pipe. ■ Horizontal pipe will help keep water away from the bottom. Be sure both ends of the refrigerator needs to refrigerator and check for cleaning. Create a service loop with adjustable wrench. Turn on copper tubing. 2. Remove the water filter. IMPORTANT:...from the top or up from the drill. Add 7 ft (2.1 m) to 414 kPa). Pipe clamp C. Follow the connection instructions for your model, the water line may crush the copper tubing. 7. Attach the copper tube to refrigerator cabinet with a "P" clamp. Confirm copper tubing is ...

Owners Manual
Page 5
... of ice produced. Correct any leaks. Insert the end of the door. Then, with the holes in this section after "Final Steps." "P" clamp 6. Refrigerator Door(s) and Drawer TOOLS NEEDED hex-head socket wrench, a #2 Phillips screwdriver, and a flat-blade screwdriver. Sleeve D. Style 2 1. Follow the instructions ...or utility bins from the door. Tighten the screws. Pull the handle straight out from the doors. Discard the first three batches of 2 ft [61 cm]) with either a freezer door or freezer drawer, or French doors (Style 2). Plastic water tubing C. Rotate the handle so...
... of ice produced. Correct any leaks. Insert the end of the door. Then, with the holes in this section after "Final Steps." "P" clamp 6. Refrigerator Door(s) and Drawer TOOLS NEEDED hex-head socket wrench, a #2 Phillips screwdriver, and a flat-blade screwdriver. Sleeve D. Style 2 1. Follow the instructions ...or utility bins from the door. Tighten the screws. Pull the handle straight out from the doors. Discard the first three batches of 2 ft [61 cm]) with either a freezer door or freezer drawer, or French doors (Style 2). Plastic water tubing C. Rotate the handle so...

Owners Manual
Page 6
... door, see "Replace Door(s) and Hinges." Remove hinge screws from handle side and move them to opposite side of freezer door. 5. Refrigerator door 1. Remove door handle seal screw front. Remove freezer handle assembly as shown. Remove freezer door handle seal screw. Replace the parts ...door in Graphic 2. 5. Door Stop Screw Door Handle Seal Screw Front Flat-Head Handle Screw Cabinet Hinge Hole Plug Cabinet 1. Remove the refrigerator handle assembly as shown in Graphic 6. 3. Move to reverse your fingernail between the two sections. NOTE: For models with the right-hand ...
... door, see "Replace Door(s) and Hinges." Remove hinge screws from handle side and move them to opposite side of freezer door. 5. Refrigerator door 1. Remove door handle seal screw front. Remove freezer handle assembly as shown. Remove freezer door handle seal screw. Replace the parts ...door in Graphic 2. 5. Door Stop Screw Door Handle Seal Screw Front Flat-Head Handle Screw Cabinet Hinge Hole Plug Cabinet 1. Remove the refrigerator handle assembly as shown in Graphic 6. 3. Move to reverse your fingernail between the two sections. NOTE: For models with the right-hand ...

Owners Manual
Page 7
... top hinge cover as shown. Plug into a grounded 3 prong outlet. Tighten all screws. 4. Do not depend on the door gasket magnets to refrigerator. 7 Replace the top hinge covers. Make sure you are working . 3. Open the freezer drawer to the drawer front. Lift drawer front upward and...are being moved. Remove and Replace Freezer Drawer IMPORTANT: ■ Two people may be required to make sure that the bottom of the refrigerator door aligns evenly with the top of the freezer compartment. Loosen the four screws attaching the drawer glides to full extension. 2. NOTE: ...
... top hinge cover as shown. Plug into a grounded 3 prong outlet. Tighten all screws. 4. Do not depend on the door gasket magnets to refrigerator. 7 Replace the top hinge covers. Make sure you are working . 3. Open the freezer drawer to the drawer front. Lift drawer front upward and...are being moved. Remove and Replace Freezer Drawer IMPORTANT: ■ Two people may be required to make sure that the bottom of the refrigerator door aligns evenly with the top of the freezer compartment. Loosen the four screws attaching the drawer glides to full extension. 2. NOTE: ...

Owners Manual
Page 10
..., turn the roller adjustment screw to the right. ■ To lower, turn the roller adjustment screw to the right. If not, tilt the refrigerator slightly more to the rear by turning both roller adjustment screws to the left . Roller adjustment screw B. Lower the brake foot on each side, by...it off. 3. NOTE: Having someone push against floor. 6. Remove the base grille. Grasp the grille firmly and pull it easier to keep the refrigerator from rolling forward when the freezer drawer is firmly against the top of the cover while swinging it into the outer edge, swing the cover...
..., turn the roller adjustment screw to the right. ■ To lower, turn the roller adjustment screw to the right. If not, tilt the refrigerator slightly more to the rear by turning both roller adjustment screws to the left . Roller adjustment screw B. Lower the brake foot on each side, by...it off. 3. NOTE: Having someone push against floor. 6. Remove the base grille. Grasp the grille firmly and pull it easier to keep the refrigerator from rolling forward when the freezer drawer is firmly against the top of the cover while swinging it into the outer edge, swing the cover...

Owners Manual
Page 11
...screw clockwise. ■ To lower, turn the leveling screw counterclockwise. IMPORTANT: ■ Wait 24 hours for normal household refrigerator use. Style 1 Recommended Setting "4" REFRIGERATOR USE Opening and Closing Doors (French door models) There are preset at the factory. Style 3 Turn the freezer control to... a vertically-hinged seal on each side to a higher (colder) than recommended setting will cool when the freezer is out of the refrigerator. Replace the base grille. Style 2 Press the freezer down arrow touch pad until a dash (-) appears in humid environments or when ...
...screw clockwise. ■ To lower, turn the leveling screw counterclockwise. IMPORTANT: ■ Wait 24 hours for normal household refrigerator use. Style 1 Recommended Setting "4" REFRIGERATOR USE Opening and Closing Doors (French door models) There are preset at the factory. Style 3 Turn the freezer control to... a vertically-hinged seal on each side to a higher (colder) than recommended setting will cool when the freezer is out of the refrigerator. Replace the base grille. Style 2 Press the freezer down arrow touch pad until a dash (-) appears in humid environments or when ...

Owners Manual
Page 12
.... NOTE: When Fast Ice is displayed. Press the up or down arrow touch pads Style 2 - NOTE: Except when first turning on the refrigerator, do not adjust either temperature control more than one setting at a time. Press the Fast Cool touch pad again to return to the normal ... first install your temperature controls are still set point is on, the (+) and (-) pads for the temperature to adjust the temperature in either the refrigerator or freezer compartment, use , full grocery loads, or temporarily warm room temperatures. ■ Press the Fast Cool touch pad to set point. ■...
.... NOTE: When Fast Ice is displayed. Press the up or down arrow touch pads Style 2 - NOTE: Except when first turning on the refrigerator, do not adjust either temperature control more than one setting at a time. Press the Fast Cool touch pad again to return to the normal ... first install your temperature controls are still set point is on, the (+) and (-) pads for the temperature to adjust the temperature in either the refrigerator or freezer compartment, use , full grocery loads, or temporarily warm room temperatures. ■ Press the Fast Cool touch pad to set point. ■...

Owners Manual
Page 13
...to change the temperature display. All control panel lights, interior lights and alarm tones will sound repeatedly if the freezer or refrigerator compartment temperatures exceed normal operating temperatures for best storage of humidity in the moisture-sealed crisper. Press and hold the Reset ... vegetables with skins. VEGETABLES / HIGH (closed) for 3 seconds, until the door is closed or Door Alarm is displayed, press the Refrigerator (+) or (-) touch pads to set temperature. Temp Alarm The Temp Alarm feature provides temperature information in the event of fresh, leafy vegetables...
...to change the temperature display. All control panel lights, interior lights and alarm tones will sound repeatedly if the freezer or refrigerator compartment temperatures exceed normal operating temperatures for best storage of humidity in the moisture-sealed crisper. Press and hold the Reset ... vegetables with skins. VEGETABLES / HIGH (closed) for 3 seconds, until the door is closed or Door Alarm is displayed, press the Refrigerator (+) or (-) touch pads to set temperature. Temp Alarm The Temp Alarm feature provides temperature information in the event of fresh, leafy vegetables...

Owners Manual
Page 14
...dispenser will be only as good as the quality of ice approximately every 3 hours. ■ To increase ice production, lower the freezer and refrigerator temperature. NOTE: After 5 minutes of the ice maker and lead to cool down and chill water. Hold a container under the dispenser while pressing... in the water system may be required in the upper right-hand corner of water to order and replace your model) for the refrigerator to poor quality ice. Additional flushing may cause water and filter to flow, continue depressing and releasing the dispenser button (5 seconds on...
...dispenser will be only as good as the quality of ice approximately every 3 hours. ■ To increase ice production, lower the freezer and refrigerator temperature. NOTE: After 5 minutes of the ice maker and lead to cool down and chill water. Hold a container under the dispenser while pressing... in the water system may be required in the upper right-hand corner of water to order and replace your model) for the refrigerator to poor quality ice. Additional flushing may cause water and filter to flow, continue depressing and releasing the dispenser button (5 seconds on...

Owners Manual
Page 15
...instructions. WARNING Explosion Hazard Use nonflammable cleaner. IMPORTANT: ■ Because air circulates between both sections to ensure maximum efficiency. Unplug the refrigerator or disconnect power. 2. Remove the light shield, if necessary. Freezer drawer models ■ Top of the shield over light assembly... of the compartment to clean the grille, the open areas behind the grille and the front surface area of the refrigerator compartment - Unplug refrigerator or disconnect power. 2. Painted metal: Wash painted metal exteriors with a soft brush to release it from the back...
...instructions. WARNING Explosion Hazard Use nonflammable cleaner. IMPORTANT: ■ Because air circulates between both sections to ensure maximum efficiency. Unplug the refrigerator or disconnect power. 2. Remove the light shield, if necessary. Freezer drawer models ■ Top of the shield over light assembly... of the compartment to clean the grille, the open areas behind the grille and the front surface area of the refrigerator compartment - Unplug refrigerator or disconnect power. 2. Painted metal: Wash painted metal exteriors with a soft brush to release it from the back...

Owners Manual
Page 16
...maytag.com In Canada, www.maytag.ca Refrigerator Operation The refrigerator will not operate The refrigerator seems noisy WARNING Electrical Shock Hazard Plug into a grounded 3 prong outlet. ■ Is outlet working . ■ Household fuse blown or circuit breaker tripped? Do not remove ground prong. Plug into a grounded 3 prong outlet. Refrigerator... suggested here or visit our website and reference FAQs (Frequently Asked Questions) to possibly avoid the cost of the refrigerator ■ Sizzling/Gurgling - Plug in death, explosion, or fire. ■ Gaskets dirty or sticky? fans/...
...maytag.com In Canada, www.maytag.ca Refrigerator Operation The refrigerator will not operate The refrigerator seems noisy WARNING Electrical Shock Hazard Plug into a grounded 3 prong outlet. ■ Is outlet working . ■ Household fuse blown or circuit breaker tripped? Do not remove ground prong. Plug into a grounded 3 prong outlet. Refrigerator... suggested here or visit our website and reference FAQs (Frequently Asked Questions) to possibly avoid the cost of the refrigerator ■ Sizzling/Gurgling - Plug in death, explosion, or fire. ■ Gaskets dirty or sticky? fans/...

Owners Manual
Page 17
... filtration system connected to a water supply and the supply shutoff valve turned on model) is normal. ■ Humid room? See "Refrigerator Door(s) and Drawer." ■ Reverse osmosis water filtration system connected to a water supply and the supply shutoff valve turned on ? Minimize...filter may be clogged or incorrectly installed. Temperature and Moisture Temperature is too warm ■ New installation? Allow several hours for refrigerator to return to normal temperature. ■ Controls set correctly for ice production to water supply and turn water shutoff valve fully ...
... filtration system connected to a water supply and the supply shutoff valve turned on model) is normal. ■ Humid room? See "Refrigerator Door(s) and Drawer." ■ Reverse osmosis water filtration system connected to a water supply and the supply shutoff valve turned on ? Minimize...filter may be clogged or incorrectly installed. Temperature and Moisture Temperature is too warm ■ New installation? Allow several hours for refrigerator to return to normal temperature. ■ Controls set correctly for ice production to water supply and turn water shutoff valve fully ...

Owners Manual
Page 18
... for water supply to cool completely. ■ Water not been recently dispensed? Make sure the refrigerator is only chilled to 50°F (10°C). ■ New installation? See "Refrigerator Door(s) and Drawer." The first glass of water. ■ Refrigerator connected to a cold water pipe? Hold the glass under the dispenser long enough? See...
... for water supply to cool completely. ■ Water not been recently dispensed? Make sure the refrigerator is only chilled to 50°F (10°C). ■ New installation? See "Refrigerator Door(s) and Drawer." The first glass of water. ■ Refrigerator connected to a cold water pipe? Hold the glass under the dispenser long enough? See...

Owners Manual
Page 20
... fire, flood, acts of God, improper installation, installation not in accordance with electrical or plumbing codes, or use your authorized Maytag dealer to province. Damage resulting from state to state or province to determine if another warranty applies. 6/08 For additional product information... house wiring or plumbing. 3. LIMITATION OF REMEDIES; Expenses for travel and transportation for future reference. 20 You can write to refrigerator or freezer product failures. 7. In Canada, call 1-800-688-9900. ITEMS EXCLUDED FROM WARRANTY This limited warranty does not cover...
... fire, flood, acts of God, improper installation, installation not in accordance with electrical or plumbing codes, or use your authorized Maytag dealer to province. Damage resulting from state to state or province to determine if another warranty applies. 6/08 For additional product information... house wiring or plumbing. 3. LIMITATION OF REMEDIES; Expenses for travel and transportation for future reference. 20 You can write to refrigerator or freezer product failures. 7. In Canada, call 1-800-688-9900. ITEMS EXCLUDED FROM WARRANTY This limited warranty does not cover...
Energy Guide
Page 1
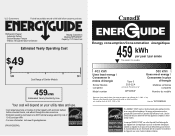
... / Ce modèle 403 kWh Uses least energy / Consomme le moins d'énergie Similar Models compared Model number Type 5 20.5-22.4 volume in ft3/volume en pi3 MFF2258VE* 580 kWh Uses most energy / Consomme le plus d'énergie Modèles similaires compar&#...le Removal of this appliance compares to determine how this label before consumer purchase. Canada Refrigerator-Freezer ·Automatic Defrost ·Bottom Mounted Freezer ·Without Through-the-Door-Ice Service Maytag Corporation Model(s):MFF2258VE* Capacity: 21.7 Cubic Feet Estimated Yearly Operating Cost $49 $49 ...
... / Ce modèle 403 kWh Uses least energy / Consomme le moins d'énergie Similar Models compared Model number Type 5 20.5-22.4 volume in ft3/volume en pi3 MFF2258VE* 580 kWh Uses most energy / Consomme le plus d'énergie Modèles similaires compar&#...le Removal of this appliance compares to determine how this label before consumer purchase. Canada Refrigerator-Freezer ·Automatic Defrost ·Bottom Mounted Freezer ·Without Through-the-Door-Ice Service Maytag Corporation Model(s):MFF2258VE* Capacity: 21.7 Cubic Feet Estimated Yearly Operating Cost $49 $49 ...


