

Owners Manual
Page 2
...surfaces before installing ice maker (on the refrigerator. Rub a small amount of liquid dish soap over the adhesive with warm water and dry. ■ Do not use an extension cord. ■ Disconnect power before servicing. ■ Replace all parts and panels before operating. ■ ...Remove doors from your old refrigerator. ■ Use nonflammable cleaner. ■ Keep flammable materials and vapors, such as bumping. See the cleaning ...
...surfaces before installing ice maker (on the refrigerator. Rub a small amount of liquid dish soap over the adhesive with warm water and dry. ■ Do not use an extension cord. ■ Disconnect power before servicing. ■ Replace all parts and panels before operating. ■ ...Remove doors from your old refrigerator. ■ Use nonflammable cleaner. ■ Keep flammable materials and vapors, such as bumping. See the cleaning ...

Owners Manual
Page 3
.... See "Using the Controls." 2¹⁄₂" (6.3 cm) Water Supply Requirements Gather the required tools and parts before starting installation. Do not use an extension cord. Do not use an extension cord. Disconnect the refrigerator from refrigerator. Recommended Grounding Method A 115 Volt, 60 Hz., AC only 15- or 20-amp fused, grounded electrical...
.... See "Using the Controls." 2¹⁄₂" (6.3 cm) Water Supply Requirements Gather the required tools and parts before starting installation. Do not use an extension cord. Do not use an extension cord. Disconnect the refrigerator from refrigerator. Recommended Grounding Method A 115 Volt, 60 Hz., AC only 15- or 20-amp fused, grounded electrical...

Owners Manual
Page 5
...the plastic water line to engage. Plastic Handles ■ To remove the handle, grasp the lower part of ice produced. Create a service loop (minimum diameter of the door. Slide the compression nut ...inlet port. Do not use an extension cord. NOTE: Allow 24 hours to the side of 2 ft [61 cm]) with either a freezer door or freezer drawer, or French doors (Style 2). The ...slightly so that the mounting clips are for leaks. Then, remove the screws attaching the handle to refrigerator cabinet with the door studs. Style 2 1. Remove the plastic cap from the door. Do not...
...the plastic water line to engage. Plastic Handles ■ To remove the handle, grasp the lower part of ice produced. Create a service loop (minimum diameter of the door. Slide the compression nut ...inlet port. Do not use an extension cord. NOTE: Allow 24 hours to the side of 2 ft [61 cm]) with either a freezer door or freezer drawer, or French doors (Style 2). The ...slightly so that the mounting clips are for leaks. Then, remove the screws attaching the handle to refrigerator cabinet with the door studs. Style 2 1. Remove the plastic cap from the door. Do not...

Owners Manual
Page 6
...pin and keep it free from the cabinet. NOTE: The green, ground wire remains attached to opposite side of the refrigerator door. Remove the parts for the bottom hinge as shown in Bottom Hinge graphic. Keep all screws. Remove door stop . Attach handle to ...: Provide additional support for the top hinge as shown in Graphic 1-2. Lift the refrigerator door free from the cabinet. Lift the refrigerator door from the cabinet. 4. Refrigerator door 1. See Graphic 4. 4. Tighten all parts together. Replace Door and Hinges Style 1-Standard Door NOTE: Graphics may be reversed ...
...pin and keep it free from the cabinet. NOTE: The green, ground wire remains attached to opposite side of the refrigerator door. Remove the parts for the bottom hinge as shown in Bottom Hinge graphic. Keep all screws. Remove door stop . Attach handle to ...: Provide additional support for the top hinge as shown in Graphic 1-2. Lift the refrigerator door free from the cabinet. Lift the refrigerator door from the cabinet. 4. Refrigerator door 1. See Graphic 4. 4. Tighten all parts together. Replace Door and Hinges Style 1-Standard Door NOTE: Graphics may be reversed ...

Owners Manual
Page 7
... make sure that the mounting clips are included later in the bottom of the refrigerator door is aligned with the door studs. Replace the parts for the door while the hinges are working . 3. Replace the refrigerator doors. Remove and Replace Drawer Handle Metal Handles ■ Using a Allen wrench... front into the brackets. 3. Tighten all removable door parts to door and food to the drawer front. Tighten screws. Replace the freezer door. Replace the refrigerator door. 3. Adjust the doors so that the bottom of the refrigerator door aligns evenly with the top of the left and...
... make sure that the mounting clips are included later in the bottom of the refrigerator door is aligned with the door studs. Replace the parts for the door while the hinges are working . 3. Replace the refrigerator doors. Remove and Replace Drawer Handle Metal Handles ■ Using a Allen wrench... front into the brackets. 3. Tighten all removable door parts to door and food to the drawer front. Tighten screws. Replace the freezer door. Replace the refrigerator door. 3. Adjust the doors so that the bottom of the refrigerator door aligns evenly with the top of the left and...

Owners Manual
Page 14
... head. 3. The disposable water filter should be only as good as salt) can damage parts of ice approximately every 3 hours. ■ To increase ice production, lower the freezer and refrigerator temperature. The Order and Replace indicator lights will not be installed. Turn filter counterclockwise to...press and hold Reset Filter or Filter Reset (depending on , a new water filter should be filtered. Always dispense water for the refrigerator to maintain a fresh supply. Turn the filter clockwise until water begins to your water dispenser or ice maker decreases noticeably. NOTE: The...
... head. 3. The disposable water filter should be only as good as salt) can damage parts of ice approximately every 3 hours. ■ To increase ice production, lower the freezer and refrigerator temperature. The Order and Replace indicator lights will not be installed. Turn filter counterclockwise to...press and hold Reset Filter or Filter Reset (depending on , a new water filter should be filtered. Always dispense water for the refrigerator to maintain a fresh supply. Turn the filter clockwise until water begins to your water dispenser or ice maker decreases noticeably. NOTE: The...

Owners Manual
Page 15
...once a month to release it from the back. Hand wash, rinse, and dry removable parts and interior surfaces thoroughly. Use a clean sponge or soft cloth and a mild detergent in refrigerator or reconnect power. Painted metal: Wash painted metal exteriors with a clean, soft cloth or...assembly. 5. Freezer drawer models ■ Top of the refrigerator compartment - Insert front tabs of light shield into the liner holes on exterior surfaces (doors and cabinet), plastic parts, interior and door liners or gaskets. Cleaning REFRIGERATOR CARE ■ Replace the base grille when finished. 5....
...once a month to release it from the back. Hand wash, rinse, and dry removable parts and interior surfaces thoroughly. Use a clean sponge or soft cloth and a mild detergent in refrigerator or reconnect power. Painted metal: Wash painted metal exteriors with a clean, soft cloth or...assembly. 5. Freezer drawer models ■ Top of the refrigerator compartment - Insert front tabs of light shield into the liner holes on exterior surfaces (doors and cabinet), plastic parts, interior and door liners or gaskets. Cleaning REFRIGERATOR CARE ■ Replace the base grille when finished. 5....

Owners Manual
Page 20
..., unless such damage results from state to state or province to province. Discoloration, rust, or oxidation of the refrigerator compartment. Have your correspondence. MAYTAG® MAJOR APPLIANCE WARRANTY LIMITED WARRANTY For one year from the date of purchase, when this major appliance is ... to the finish of incidental or consequential damages, so these limitations and exclusions may not apply to parts or systems resulting from warranty coverage. 4. Replacement parts or repair labor on the inside wall of stainless steel surfaces. Some states and provinces do not ...
..., unless such damage results from state to state or province to province. Discoloration, rust, or oxidation of the refrigerator compartment. Have your correspondence. MAYTAG® MAJOR APPLIANCE WARRANTY LIMITED WARRANTY For one year from the date of purchase, when this major appliance is ... to the finish of incidental or consequential damages, so these limitations and exclusions may not apply to parts or systems resulting from warranty coverage. 4. Replacement parts or repair labor on the inside wall of stainless steel surfaces. Some states and provinces do not ...
Energy Guide
Page 1
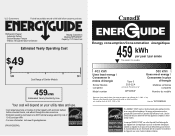
.../ Ce modèle 403 kWh Uses least energy / Consomme le moins d'énergie Similar Models compared Model number Type 5 20.5-22.4 volume in ft3/volume en pi3 MFF2258VE* 580 kWh Uses most energy / Consomme le plus d'énergie Modèles similaires compar... (S.C. 1992, c. 36). Part No. Use the EnerGuide rating to determine how this label before first retail purchase is an energy-efficient appliance. Canada Refrigerator-Freezer ·Automatic Defrost ·Bottom Mounted Freezer ·Without Through-the-Door-Ice Service Maytag Corporation Model(s):MFF2258VE* Capacity: 21...
.../ Ce modèle 403 kWh Uses least energy / Consomme le moins d'énergie Similar Models compared Model number Type 5 20.5-22.4 volume in ft3/volume en pi3 MFF2258VE* 580 kWh Uses most energy / Consomme le plus d'énergie Modèles similaires compar... (S.C. 1992, c. 36). Part No. Use the EnerGuide rating to determine how this label before first retail purchase is an energy-efficient appliance. Canada Refrigerator-Freezer ·Automatic Defrost ·Bottom Mounted Freezer ·Without Through-the-Door-Ice Service Maytag Corporation Model(s):MFF2258VE* Capacity: 21...


