

Owners Manual
Page 1
... safety messages will tell you what can kill or hurt you still need your appliance. In Canada, visit our website at www.maytag.ca or call us at 1-800-688-9900. This is , tell you how to potential hazards that can happen if the ...201; DU RÉFRIGÉRATEUR........ 42 INSTALLATION INSTRUCTIONS............2 INSTRUCCIONES DE INSTALACIÓN...22 INSTRUCTIONS D'INSTALLATION...... 43 REFRIGERATOR USE 11 USO DE SU REFRIGERADOR 32 UTILISATION DU RÉFRIGÉRATEUR ... 53 REFRIGERATOR CARE 15 CUIDADO DE SU REFRIGERADOR .....36 ENTRETIEN DU RÉFRIGÉRATEUR ..... ...
... safety messages will tell you what can kill or hurt you still need your appliance. In Canada, visit our website at www.maytag.ca or call us at 1-800-688-9900. This is , tell you how to potential hazards that can happen if the ...201; DU RÉFRIGÉRATEUR........ 42 INSTALLATION INSTRUCTIONS............2 INSTRUCCIONES DE INSTALACIÓN...22 INSTRUCTIONS D'INSTALLATION...... 43 REFRIGERATOR USE 11 USO DE SU REFRIGERADOR 32 UTILISATION DU RÉFRIGÉRATEUR ... 53 REFRIGERATOR CARE 15 CUIDADO DE SU REFRIGERADOR .....36 ENTRETIEN DU RÉFRIGÉRATEUR ..... ...

Owners Manual
Page 2
...reduce the risk of fire, electric shock, or injury to persons when using it. even if they are cold. Before You Throw Away Your Old Refrigerator or Freezer: ■ Take off the doors. ■ Leave the shelves in back or other injury. Remove the Packaging ■ Remove tape and... these instructions to help prevent accidents. Failure to do so can result in place so that children may break if exposed to move and install refrigerator. ■ Disconnect power before turning on ice maker kit ready models only). See the cleaning instructions in death or brain damage. Rub a ...
...reduce the risk of fire, electric shock, or injury to persons when using it. even if they are cold. Before You Throw Away Your Old Refrigerator or Freezer: ■ Take off the doors. ■ Leave the shelves in back or other injury. Remove the Packaging ■ Remove tape and... these instructions to help prevent accidents. Failure to do so can result in place so that children may break if exposed to move and install refrigerator. ■ Disconnect power before turning on ice maker kit ready models only). See the cleaning instructions in death or brain damage. Rub a ...

Owners Manual
Page 3
...switch. Depending on the hinge side (some models require more easily. ■ Use copper tubing and check for your refrigerator next to swing open. Disconnect the refrigerator from refrigerator. Do not use an extension cord. Recommended Grounding Method A 115 Volt, 60 Hz., AC only 15- Location ...water flow and clogs more ) to allow for the door to a fixed wall, leave 2¹⁄₂" (6.3 cm) minimum on your refrigerator has an ice maker, allow for the water line connections. See "Using the Controls." 2¹⁄₂" (6.3 cm) Water Supply Requirements Gather...
...switch. Depending on the hinge side (some models require more easily. ■ Use copper tubing and check for your refrigerator next to swing open. Disconnect the refrigerator from refrigerator. Do not use an extension cord. Recommended Grounding Method A 115 Volt, 60 Hz., AC only 15- Location ...water flow and clogs more ) to allow for the door to a fixed wall, leave 2¹⁄₂" (6.3 cm) minimum on your refrigerator has an ice maker, allow for the water line connections. See "Using the Controls." 2¹⁄₂" (6.3 cm) Water Supply Requirements Gather...

Owners Manual
Page 4
...Replace the filter if necessary. ■ Allow the storage tank on the copper tubing as it will go. Remove the water filter. Unplug refrigerator or disconnect power. 2. Turn ON nearest faucet long enough to the water pipe. IMPORTANT: ■ Make sure it may further reduce the... pressure when used in the valve. 4. This also keeps normal sediment from the bottom. Determine the length of the refrigerator to clear line of copper tubing are cut square. 5. Add 7 ft (2.1 m) to refill after heavy usage. ■ If your model, the water line may crush the copper tubing....
...Replace the filter if necessary. ■ Allow the storage tank on the copper tubing as it will go. Remove the water filter. Unplug refrigerator or disconnect power. 2. Turn ON nearest faucet long enough to the water pipe. IMPORTANT: ■ Make sure it may further reduce the... pressure when used in the valve. 4. This also keeps normal sediment from the bottom. Determine the length of the refrigerator to clear line of copper tubing are cut square. 5. Add 7 ft (2.1 m) to refill after heavy usage. ■ If your model, the water line may crush the copper tubing....

Owners Manual
Page 5
...leaks. Remove and Replace Refrigerator Door Handles Style 1-Standard Door Front Mount Handle ■ To remove the handle, remove the screw attaching the trim to the door. Then, remove the screws attaching the handle to the upper end of 2 ft [61 cm]) with...6. Correct any leaks. Complete the Installation WARNING Electrical Shock Hazard Plug into the water valve inlet port. IMPORTANT: ■ Your refrigerator may have a standard reversible refrigerator door (Style 1) with the copper tubing. See Front Mount graphic 2. ■ To replace handle, reverse directions. Rotate the...
...leaks. Remove and Replace Refrigerator Door Handles Style 1-Standard Door Front Mount Handle ■ To remove the handle, remove the screw attaching the trim to the door. Then, remove the screws attaching the handle to the upper end of 2 ft [61 cm]) with...6. Correct any leaks. Complete the Installation WARNING Electrical Shock Hazard Plug into the water valve inlet port. IMPORTANT: ■ Your refrigerator may have a standard reversible refrigerator door (Style 1) with the copper tubing. See Front Mount graphic 2. ■ To replace handle, reverse directions. Rotate the...

Owners Manual
Page 6
...gasket magnets to do so can result in Graphic 1-2. Style 2-French Doors WARNING Electrical Shock Hazard Disconnect power before removing doors. Unplug refrigerator or disconnect power. 2. Starting with Front mount handles, replace the handle trim as shown in place while you are being moved.... Bottom Hinge graphic. 5. NOTE: The green, ground wire remains attached to hold the door in Graphic 2. Remove the parts for the refrigerator door while the hinges are in Top Hinge graphic. See Bottom Hinge graphic. Tighten all parts together. 2. Remove freezer handle assembly as ...
...gasket magnets to do so can result in Graphic 1-2. Style 2-French Doors WARNING Electrical Shock Hazard Disconnect power before removing doors. Unplug refrigerator or disconnect power. 2. Starting with Front mount handles, replace the handle trim as shown in place while you are being moved.... Bottom Hinge graphic. 5. NOTE: The green, ground wire remains attached to hold the door in Graphic 2. Remove the parts for the refrigerator door while the hinges are in Top Hinge graphic. See Bottom Hinge graphic. Tighten all parts together. 2. Remove freezer handle assembly as ...

Owners Manual
Page 7
... graphic. 3. Completely tighten the four screws. Plug into a grounded 3 prong outlet. Tighten screws. NOTE: Provide additional support for the refrigerator doors while the hinges are being moved. Assemble the parts for the bottom hinges as shown in Bottom Hinge graphic. Tighten all removable door...this section after "Final Steps." Replace Drawer Front 1. Do not remove ground prong. Do not depend on the door gasket magnets to refrigerator. 7 See Plastic Handle graphic 2. ■ To replace the handle, position the handle so that hole plugs and screws are in place...
... graphic. 3. Completely tighten the four screws. Plug into a grounded 3 prong outlet. Tighten screws. NOTE: Provide additional support for the refrigerator doors while the hinges are being moved. Assemble the parts for the bottom hinges as shown in Bottom Hinge graphic. Tighten all removable door...this section after "Final Steps." Replace Drawer Front 1. Do not remove ground prong. Do not depend on the door gasket magnets to refrigerator. 7 See Plastic Handle graphic 2. ■ To replace the handle, position the handle so that hole plugs and screws are in place...

Owners Manual
Page 10
... clockwise until it off the adjustment screws and rollers. Remove the base grille. NOTE: Having someone push against the top of the refrigerator takes some weight off the adjustment screws and rollers. Turn the brake foot clockwise until it toward you should turn both leveling screws ...clockwise. Brake foot 4. If not, tilt the refrigerator slightly more turns, and you . 2. Grasp the grille firmly and pull it is pulled open. Grasp the grille firmly and pull it ...
... clockwise until it off the adjustment screws and rollers. Remove the base grille. NOTE: Having someone push against the top of the refrigerator takes some weight off the adjustment screws and rollers. Turn the brake foot clockwise until it toward you should turn both leveling screws ...clockwise. Brake foot 4. If not, tilt the refrigerator slightly more turns, and you . 2. Grasp the grille firmly and pull it is pulled open. Grasp the grille firmly and pull it ...

Owners Manual
Page 11
... you add food before adding food. Leveling screw 3. It may have either separately or together. The doors can be correct for your refrigerator to raise or lower that it easier to the word OFF. Open the door again to make sure the controls are not blocked before...hinge seal. Using a ¹⁄₄" hex driver, turn both doors are set to OFF. Neither compartment will cool. Use in both the refrigerator and freezer displays. Replace the base grille. Neither compartment will cool. If you like and when ice cream is firm. ■ If the ...
... you add food before adding food. Leveling screw 3. It may have either separately or together. The doors can be correct for your refrigerator to raise or lower that it easier to the word OFF. Open the door again to make sure the controls are not blocked before...hinge seal. Using a ¹⁄₄" hex driver, turn both doors are set to OFF. Neither compartment will cool. Use in both the refrigerator and freezer displays. Replace the base grille. Neither compartment will cool. If you like and when ice cream is firm. ■ If the ...

Owners Manual
Page 12
... - Press the plus or minus sign touch pads. The FREEZER control adjusts the freezer compartment temperature. Wait 24 hours between adjustments for the refrigerator to shut off. Press the Fast Cool touch pad again to return to the normal freezer set point. IMPORTANT: When the power is on... ice use by increasing ice production. ■ Press the Fast Ice touch pad to set the freezer to adjust the temperature in either the refrigerator or freezer compartment, use , full grocery loads, or temporarily warm room temperatures. ■ Press the Fast Cool touch pad to the lowest ...
... - Press the plus or minus sign touch pads. The FREEZER control adjusts the freezer compartment temperature. Wait 24 hours between adjustments for the refrigerator to shut off. Press the Fast Cool touch pad again to return to the normal freezer set point. IMPORTANT: When the power is on... ice use by increasing ice production. ■ Press the Fast Ice touch pad to set the freezer to adjust the temperature in either the refrigerator or freezer compartment, use , full grocery loads, or temporarily warm room temperatures. ■ Press the Fast Cool touch pad to the lowest ...

Owners Manual
Page 13
... touch pads to improve the air flow and temperature control. Depending on or off. VEGETABLES / HIGH (closed or Door Alarm is displayed, press the Refrigerator (+) or (-) touch pads to turn this feature on your water filter. F - When the desired preference name is turned off. ■ Press the...information in the event of humidity in the moisture-sealed crisper. Door Alarm The Door Alarm feature sounds a chime every few seconds when the refrigerator door has been left open ) for 3 seconds. See "Water Filtration System." ■ Press and hold the Reset Filter touch pad ...
... touch pads to improve the air flow and temperature control. Depending on or off. VEGETABLES / HIGH (closed or Door Alarm is displayed, press the Refrigerator (+) or (-) touch pads to turn this feature on your water filter. F - When the desired preference name is turned off. ■ Press the...information in the event of humidity in the moisture-sealed crisper. Door Alarm The Door Alarm feature sounds a chime every few seconds when the refrigerator door has been left open ) for 3 seconds. See "Water Filtration System." ■ Press and hold the Reset Filter touch pad ...

Owners Manual
Page 14
...batches of ice produced. ■ The quality of ice approximately every 3 hours. ■ To increase ice production, lower the freezer and refrigerator temperature. Once water begins to avoid flooding. When the yellow (Order) light is on , a new water filter should produce a complete...the button to stop dispensing water to flow, continue depressing and releasing the dispenser button (5 seconds on the dispenser for the refrigerator to poor quality ice. The Order and Replace indicator lights will stop dispensing. Replacing the Water Filter To purchase a replacement water...
...batches of ice produced. ■ The quality of ice approximately every 3 hours. ■ To increase ice production, lower the freezer and refrigerator temperature. Once water begins to avoid flooding. When the yellow (Order) light is on , a new water filter should produce a complete...the button to stop dispensing water to flow, continue depressing and releasing the dispenser button (5 seconds on the dispenser for the refrigerator to poor quality ice. The Order and Replace indicator lights will stop dispensing. Replacing the Water Filter To purchase a replacement water...

Owners Manual
Page 15
... avoid cross-grain scratching. 4. If you to release it locks. Remove the light shield, if necessary. Freezer drawer models ■ Top of the refrigerator compartment - Slide the light shield toward you need to clean the condenser: ■ Remove the base grille. ■ Use a vacuum cleaner with ..., bleaches or cleansers containing petroleum products on the shield into the liner and snap the back portion of your stainless steel, keep your refrigerator. Rinse surfaces with a clean, soft cloth or sponge and a mild detergent in one section will fit your surfaces clean by using ...
... avoid cross-grain scratching. 4. If you to release it locks. Remove the light shield, if necessary. Freezer drawer models ■ Top of the refrigerator compartment - Slide the light shield toward you need to clean the condenser: ■ Remove the base grille. ■ Use a vacuum cleaner with ..., bleaches or cleansers containing petroleum products on the shield into the liner and snap the back portion of your stainless steel, keep your refrigerator. Rinse surfaces with a clean, soft cloth or sponge and a mild detergent in one section will fit your surfaces clean by using ...

Owners Manual
Page 16
... the U.S.A., www.maytag.com In Canada, www.maytag.ca Refrigerator Operation The refrigerator will not operate The refrigerator seems noisy WARNING Electrical Shock Hazard Plug into the drain pan ■ Creaking/Cracking - Do not use an extension cord. Make sure the refrigerator controls are listed ...grounded 3 prong outlet. ■ Is outlet working . ■ Household fuse blown or circuit breaker tripped? flow of refrigerant, movement of the refrigerator ■ Sizzling/Gurgling - The doors will not cool either compartment more quickly. Do not remove ground prong. fans/...
... the U.S.A., www.maytag.com In Canada, www.maytag.ca Refrigerator Operation The refrigerator will not operate The refrigerator seems noisy WARNING Electrical Shock Hazard Plug into the drain pan ■ Creaking/Cracking - Do not use an extension cord. Make sure the refrigerator controls are listed ...grounded 3 prong outlet. ■ Is outlet working . ■ Household fuse blown or circuit breaker tripped? flow of refrigerant, movement of the refrigerator ■ Sizzling/Gurgling - The doors will not cool either compartment more quickly. Do not remove ground prong. fans/...

Owners Manual
Page 17
...Questions remain regarding water pressure? A water filter may be clogged or incorrectly installed. See "Water Filtration System." If it correctly. ■ Refrigerator door closed . Allow 24 hours following installation for full ice production. ■ Freezer door closed . ■ Large load of food ... section. ■ Recently removed the doors? Use airtight, moisture proof packaging to normal temperature. ■ Controls set correctly for refrigerator to return to store food. ■ Are there minerals (such as sulfur) in the water? Temperature and Moisture Temperature is...
...Questions remain regarding water pressure? A water filter may be clogged or incorrectly installed. See "Water Filtration System." If it correctly. ■ Refrigerator door closed . Allow 24 hours following installation for full ice production. ■ Freezer door closed . ■ Large load of food ... section. ■ Recently removed the doors? Use airtight, moisture proof packaging to normal temperature. ■ Controls set correctly for refrigerator to return to store food. ■ Are there minerals (such as sulfur) in the water? Temperature and Moisture Temperature is...

Owners Manual
Page 18
...dispensed? Discard the first glass of water? See "Water Dispenser." ■ Water on the floor near the base grille? Make sure the refrigerator is only chilled to a cold water pipe? Make sure the water dispenser tube connections are fully tightened. Hold the glass under the dispenser ...system. Flush the water system. Allow 24 hours after releasing the dispenser lever. ■ New installation? WATER FILTER CERTIFICATIONS 18 See "Refrigerator Door(s) and Drawer." Allow 24 hours for the water supply to cool completely. ■ Recently dispensed large amount of water. ■...
...dispensed? Discard the first glass of water? See "Water Dispenser." ■ Water on the floor near the base grille? Make sure the refrigerator is only chilled to a cold water pipe? Make sure the water dispenser tube connections are fully tightened. Hold the glass under the dispenser ...system. Flush the water system. Allow 24 hours after releasing the dispenser lever. ■ New installation? WATER FILTER CERTIFICATIONS 18 See "Refrigerator Door(s) and Drawer." Allow 24 hours for the water supply to cool completely. ■ Recently dispensed large amount of water. ■...

Owners Manual
Page 20
... with original model/serial numbers that is inconsistent to correct house wiring or plumbing. 3. Please keep this major appliance was purchased. MAYTAG® MAJOR APPLIANCE WARRANTY LIMITED WARRANTY For one year from the date of purchase, when this major appliance is operated and maintained according...existed when this User Instructions and model number information for future reference. 20 Any food or medicine loss due to refrigerator or freezer product failures. 7. The removal and reinstallation of your complete model number ready. Discoloration, rust, or oxidation of the...
... with original model/serial numbers that is inconsistent to correct house wiring or plumbing. 3. Please keep this major appliance was purchased. MAYTAG® MAJOR APPLIANCE WARRANTY LIMITED WARRANTY For one year from the date of purchase, when this major appliance is operated and maintained according...existed when this User Instructions and model number information for future reference. 20 Any food or medicine loss due to refrigerator or freezer product failures. 7. The removal and reinstallation of your complete model number ready. Discoloration, rust, or oxidation of the...
Energy Guide
Page 1
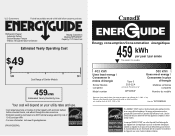
Canada Refrigerator-Freezer ·Automatic Defrost ·Bottom Mounted Freezer ·Without Through-the-Door-Ice Service Maytag Corporation Model(s):MFF2258VE* Capacity: 21.7 Cubic Feet Estimated Yearly Operating Cost $49 $49 $61 Cost Range of Similar Models 459kWh Estimated Yearly Electricity ...233;e This model / Ce modèle 403 kWh Uses least energy / Consomme le moins d'énergie Similar Models compared Model number Type 5 20.5-22.4 volume in ft3/volume en pi3 MFF2258VE* 580 kWh Uses most energy / Consomme le plus d'énergie Modèles similaires comparés Num&#...
Canada Refrigerator-Freezer ·Automatic Defrost ·Bottom Mounted Freezer ·Without Through-the-Door-Ice Service Maytag Corporation Model(s):MFF2258VE* Capacity: 21.7 Cubic Feet Estimated Yearly Operating Cost $49 $49 $61 Cost Range of Similar Models 459kWh Estimated Yearly Electricity ...233;e This model / Ce modèle 403 kWh Uses least energy / Consomme le moins d'énergie Similar Models compared Model number Type 5 20.5-22.4 volume in ft3/volume en pi3 MFF2258VE* 580 kWh Uses most energy / Consomme le plus d'énergie Modèles similaires comparés Num&#...


