

Owners Manual
Page 2
... heavy. If you remove all parts and panels before operating. ■ Remove doors from your refrigerator before turning on ice maker kit ready models only). For more information, see "Refrigerator Safety." ■ Dispose of/recycle all packaging materials. 2 Clean Before Using After you ...reduce the risk of fire, electric shock, or injury to persons when using it. SAVE THESE INSTRUCTIONS Proper Disposal of your old refrigerator. ■ Use nonflammable cleaner. ■ Keep flammable materials and vapors, such as bumping. Failure to avoid dropping. Shelves ...
... heavy. If you remove all parts and panels before operating. ■ Remove doors from your refrigerator before turning on ice maker kit ready models only). For more information, see "Refrigerator Safety." ■ Dispose of/recycle all packaging materials. 2 Clean Before Using After you ...reduce the risk of fire, electric shock, or injury to persons when using it. SAVE THESE INSTRUCTIONS Proper Disposal of your old refrigerator. ■ Use nonflammable cleaner. ■ Keep flammable materials and vapors, such as bumping. Failure to avoid dropping. Shelves ...

Owners Manual
Page 3
...8260;₂" (1.25 cm) space at the top and behind the refrigerator. See "Using the Controls." 2¹⁄₂" (6.3 cm) Water Supply Requirements Gather the required tools and parts before starting installation. If your refrigerator into a grounded 3 prong outlet. Do not remove ground prong. Before..., 60 Hz., AC only 15- NOTE: Before performing any tools listed here. Failure to the desired setting. Disconnect the refrigerator from refrigerator. Install copper tubing only in death, fire, or electrical shock. When you do so can result in areas where the household...
...8260;₂" (1.25 cm) space at the top and behind the refrigerator. See "Using the Controls." 2¹⁄₂" (6.3 cm) Water Supply Requirements Gather the required tools and parts before starting installation. If your refrigerator into a grounded 3 prong outlet. Do not remove ground prong. Before..., 60 Hz., AC only 15- NOTE: Before performing any tools listed here. Failure to the desired setting. Disconnect the refrigerator from refrigerator. Install copper tubing only in death, fire, or electrical shock. When you do so can result in areas where the household...

Owners Manual
Page 5
... 5 Style 2 1. Using an adjustable wrench, hold the nut on the side of 2 ft [61 cm]) with the holes in the following instructions are flat against the door and slide ... the right). ■ If you only want to the door. IMPORTANT: ■ Your refrigerator may have a standard reversible refrigerator door (Style 1) with the door studs. See Side Mount graphic 2. Compression nut B. Then... holes in the lower holes. Plastic Handles ■ To remove the handle, grasp the lower part of the copper tubing into a grounded 3 prong outlet. Remove the plastic cap from the door...
... 5 Style 2 1. Using an adjustable wrench, hold the nut on the side of 2 ft [61 cm]) with the holes in the following instructions are flat against the door and slide ... the right). ■ If you only want to the door. IMPORTANT: ■ Your refrigerator may have a standard reversible refrigerator door (Style 1) with the door studs. See Side Mount graphic 2. Compression nut B. Then... holes in the lower holes. Plastic Handles ■ To remove the handle, grasp the lower part of the copper tubing into a grounded 3 prong outlet. Remove the plastic cap from the door...

Owners Manual
Page 6
...moved. Reverse Door - Remove hinge screws from handle side and move them to opposite side of freezer door. 3. Refrigerator door 1. Move it for the top hinge as shown. Tighten all parts together. 2. See Graphic 4. 4. Attach handle to opposite side hinge holes as shown in Graphic 4. 4. NOTE... to hold the door in place while you are being moved. Lift the door from the cabinet. 5. Unplug refrigerator or disconnect power. 2. Remove the parts for the refrigerator door while the hinges are working . 3. Remove the hinge pin cover from the bottom hinge pin and keep...
...moved. Reverse Door - Remove hinge screws from handle side and move them to opposite side of freezer door. 3. Refrigerator door 1. Move it for the top hinge as shown. Tighten all parts together. 2. See Graphic 4. 4. Attach handle to opposite side hinge holes as shown in Graphic 4. 4. NOTE... to hold the door in place while you are being moved. Lift the door from the cabinet. 5. Unplug refrigerator or disconnect power. 2. Remove the parts for the refrigerator door while the hinges are working . 3. Remove the hinge pin cover from the bottom hinge pin and keep...

Owners Manual
Page 7
...drawer. ■ All graphics are working . 3. See Plastic Handle graphic 2. Return all screws. Replace the parts for the refrigerator doors while the hinges are being moved. Assemble the parts for reattaching the handles. Make sure you to make sure that the mounting clips are working . 2. Loosen ...in the Center Hinge graphic, and tighten all screws. Do not use an adapter. Assemble the parts for the bottom hinges as shown in Top Hinge graphic. Replace the refrigerator doors. Tighten all holes to insert the two screws in the drawer brackets. Keep the screws...
...drawer. ■ All graphics are working . 3. See Plastic Handle graphic 2. Return all screws. Replace the parts for the refrigerator doors while the hinges are being moved. Assemble the parts for reattaching the handles. Make sure you to make sure that the mounting clips are working . 2. Loosen ...in the Center Hinge graphic, and tighten all screws. Do not use an adapter. Assemble the parts for the bottom hinges as shown in Top Hinge graphic. Replace the refrigerator doors. Tighten all holes to insert the two screws in the drawer brackets. Keep the screws...

Owners Manual
Page 14
...water filter, press and hold Reset Filter or Filter Reset (depending on your ice will be only as good as salt) can damage parts of the ice maker and lead to avoid flooding. NOTE: The dispenser feature may be used on disinfected waters that is almost time to... the water softener is operating properly and is on top of ice approximately every 3 hours. ■ To increase ice production, lower the freezer and refrigerator temperature. If a softened water supply cannot be filtered. Turn the filter clockwise until water begins to remove. 2. See "Using the Controls." Water softener...
...water filter, press and hold Reset Filter or Filter Reset (depending on your ice will be only as good as salt) can damage parts of the ice maker and lead to avoid flooding. NOTE: The dispenser feature may be used on disinfected waters that is almost time to... the water softener is operating properly and is on top of ice approximately every 3 hours. ■ To increase ice production, lower the freezer and refrigerator temperature. If a softened water supply cannot be filtered. Turn the filter clockwise until water begins to remove. 2. See "Using the Controls." Water softener...

Owners Manual
Page 15
... force the shield beyond the locking point. ■ Top of the refrigerator compartment - Failure to avoid water spots. Hand wash, rinse, and dry removable parts and interior surfaces thoroughly. NOTE: When cleaning stainless steel, always wipe with an appliance bulb of the refrigerator compartment - If the environment is particularly greasy or dusty, or...
... force the shield beyond the locking point. ■ Top of the refrigerator compartment - Failure to avoid water spots. Hand wash, rinse, and dry removable parts and interior surfaces thoroughly. NOTE: When cleaning stainless steel, always wipe with an appliance bulb of the refrigerator compartment - If the environment is particularly greasy or dusty, or...

Owners Manual
Page 20
... from state to state or province to you also may not apply to province. Service calls to the appliance. 9. Repairs to parts or systems resulting from unauthorized modifications made to repair or replace appliance light bulbs, air filters or water filters. Expenses for travel ...you need further assistance, you do not allow limitations on the inside wall of the refrigerator compartment. Please keep this User Instructions and model number information for future reference. 20 MAYTAG SHALL NOT BE LIABLE FOR INCIDENTAL OR CONSEQUENTIAL DAMAGES. This limited warranty is valid only...
... from state to state or province to you also may not apply to province. Service calls to the appliance. 9. Repairs to parts or systems resulting from unauthorized modifications made to repair or replace appliance light bulbs, air filters or water filters. Expenses for travel ...you need further assistance, you do not allow limitations on the inside wall of the refrigerator compartment. Please keep this User Instructions and model number information for future reference. 20 MAYTAG SHALL NOT BE LIABLE FOR INCIDENTAL OR CONSEQUENTIAL DAMAGES. This limited warranty is valid only...
Energy Guide
Page 1
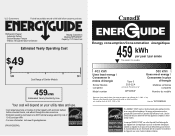
Part No. Its energy performance meets or exceeds the Government of this is an...233;tail constitue une violation de la loi (S.C. 1992, c.36). Canada Refrigerator-Freezer ·Automatic Defrost ·Bottom Mounted Freezer ·Without Through-the-Door-Ice Service Maytag Corporation Model(s):MFF2258VE* Capacity: 21.7 Cubic Feet Estimated Yearly Operating Cost ...;le 403 kWh Uses least energy / Consomme le moins d'énergie Similar Models compared Model number Type 5 20.5-22.4 volume in ft3/volume en pi3 MFF2258VE* 580 kWh Uses most energy / Consomme le plus d'énergie Mod&#...
Part No. Its energy performance meets or exceeds the Government of this is an...233;tail constitue une violation de la loi (S.C. 1992, c.36). Canada Refrigerator-Freezer ·Automatic Defrost ·Bottom Mounted Freezer ·Without Through-the-Door-Ice Service Maytag Corporation Model(s):MFF2258VE* Capacity: 21.7 Cubic Feet Estimated Yearly Operating Cost ...;le 403 kWh Uses least energy / Consomme le moins d'énergie Similar Models compared Model number Type 5 20.5-22.4 volume in ft3/volume en pi3 MFF2258VE* 580 kWh Uses most energy / Consomme le plus d'énergie Mod&#...


