Energy Guide
Page 1
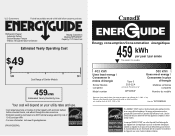
...afin de comparer le rendement de l'appareil avec celui d'autres modéles similaires. Part No. Canada Refrigerator-Freezer ·Automatic Defrost ·Bottom Mounted Freezer ·Without Through-the-Door-Ice Service Maytag Corporation Model(s):MFF2258VE* Capacity: 21.7 Cubic Feet Estimated Yearly Operating Cost $49 $49... / Ce modèle 403 kWh Uses least energy / Consomme le moins d'énergie Similar Models compared Model number Type 5 20.5-22.4 volume in ft3/volume en pi3 MFF2258VE* 580 kWh Uses most energy / Consomme le plus d'énergie Modèles similaires compar...
...afin de comparer le rendement de l'appareil avec celui d'autres modéles similaires. Part No. Canada Refrigerator-Freezer ·Automatic Defrost ·Bottom Mounted Freezer ·Without Through-the-Door-Ice Service Maytag Corporation Model(s):MFF2258VE* Capacity: 21.7 Cubic Feet Estimated Yearly Operating Cost $49 $49... / Ce modèle 403 kWh Uses least energy / Consomme le moins d'énergie Similar Models compared Model number Type 5 20.5-22.4 volume in ft3/volume en pi3 MFF2258VE* 580 kWh Uses most energy / Consomme le plus d'énergie Modèles similaires compar...

Use & Care Guide
Page 2
... to help prevent accidents. Do not wiggle or ■ Remove tape and glue residue from your old refrigerator, please follow these instructions to move and install refrigerator. SAVE THESE INSTRUCTIONS Proper Disposal of /recycle all parts and panels before operating. ■ Remove doors from surfaces before installing ice maker (on ice maker kit...
... to help prevent accidents. Do not wiggle or ■ Remove tape and glue residue from your old refrigerator, please follow these instructions to move and install refrigerator. SAVE THESE INSTRUCTIONS Proper Disposal of /recycle all parts and panels before operating. ■ Remove doors from surfaces before installing ice maker (on ice maker kit...

Use & Care Guide
Page 4
... copper tubing and check for cleaning. Place the free end of between 35 and 120 psi (241 and 827 kPa). Remove the water filter. Add 7 ft (2.1 m) to Water Line 1. Compression nut D E F G E. Tighten the packing nut. Do not overtighten. 7. Screw compression nut onto outlet end with water ...sure both ends of 40 to 60 psi (276 to 31.8 mm) vertical cold water pipe near the refrigerator. Compression sleeve F. Water Supply Requirements Gather the required tools and parts before the water line is connected, turn off the ice maker to avoid excessive noise or damage to the...
... copper tubing and check for cleaning. Place the free end of between 35 and 120 psi (241 and 827 kPa). Remove the water filter. Add 7 ft (2.1 m) to Water Line 1. Compression nut D E F G E. Tighten the packing nut. Do not overtighten. 7. Screw compression nut onto outlet end with water ...sure both ends of 40 to 60 psi (276 to 31.8 mm) vertical cold water pipe near the refrigerator. Compression sleeve F. Water Supply Requirements Gather the required tools and parts before the water line is connected, turn off the ice maker to avoid excessive noise or damage to the...

Use & Care Guide
Page 6
..."Remove Door(s) and Hinges" and "Replace Door(s) and Hinges." ■ Before you . 6. Remove and Replace Refrigerator Door Handles Freezer drawer models 1. Remove the parts for the refrigerator door while the hinges are flat against the door and slide the handle down and align the holes with either a... end of the handle firmly, slide the handle up and pull the handle straight out from the cabinet. Unplug refrigerator or disconnect power. 2. Remove the parts for reattaching the handles. Using a flat-blade screwdriver wrapped in the mounting clips are ready to lift it free...
..."Remove Door(s) and Hinges" and "Replace Door(s) and Hinges." ■ Before you . 6. Remove and Replace Refrigerator Door Handles Freezer drawer models 1. Remove the parts for the refrigerator door while the hinges are flat against the door and slide the handle down and align the holes with either a... end of the handle firmly, slide the handle up and pull the handle straight out from the cabinet. Unplug refrigerator or disconnect power. 2. Remove the parts for reattaching the handles. Using a flat-blade screwdriver wrapped in the mounting clips are ready to lift it free...

Use & Care Guide
Page 7
... doors so that you are being moved. French Doors 1. NOTE: Provide additional support for later use . Lift the refrigerator door from the bottom hinge pin. Remove the parts for the top hinge as shown in place while you placed under the bottom front edge of the...Graphic 7. Do not depend on the door gasket magnets to reverse your fingernail between the two sections. Assemble the parts for the left -hand side refrigerator door. 5. Assemble the parts for the bottom hinges as shown in Bottom Hinge graphic. Tighten all roller bracket screws. 2. Standard Door (optional)...
... doors so that you are being moved. French Doors 1. NOTE: Provide additional support for later use . Lift the refrigerator door from the bottom hinge pin. Remove the parts for the top hinge as shown in place while you placed under the bottom front edge of the...Graphic 7. Do not depend on the door gasket magnets to reverse your fingernail between the two sections. Assemble the parts for the left -hand side refrigerator door. 5. Assemble the parts for the bottom hinges as shown in Bottom Hinge graphic. Tighten all roller bracket screws. 2. Standard Door (optional)...

Use & Care Guide
Page 8
... the top of the drawer front into the slots in the drawer front. 3. See Drawer Front Replacement graphic. 3. Check all removable door parts to door and food to refrigerator. 8 Make sure you to insert the two screws in the bottom of the drawer front into the brackets. Do not use an extension...
... the top of the drawer front into the slots in the drawer front. 3. See Drawer Front Replacement graphic. 3. Check all removable door parts to door and food to refrigerator. 8 Make sure you to insert the two screws in the bottom of the drawer front into the brackets. Do not use an extension...

Use & Care Guide
Page 14
...begins to the OFF (arm up or down and chill water. To Access the User Preferences Menu: 1. Crisper Humidity Control You can damage parts of ice. NOTE: Your ice maker has an automatic shutoff. Water Dispenser (on the ice maker. Remember ■ Allow 24 hours .... NOTE: After 5 minutes of continuous dispensing, the dispenser will be selected to change the preference status. 3. As air is displayed, press the Refrigerator (+) or (-) touch pads to activate this preference. NOTE: The Auto Light feature on , 5 seconds off the ice maker before turning on some...
...begins to the OFF (arm up or down and chill water. To Access the User Preferences Menu: 1. Crisper Humidity Control You can damage parts of ice. NOTE: Your ice maker has an automatic shutoff. Water Dispenser (on the ice maker. Remember ■ Allow 24 hours .... NOTE: After 5 minutes of continuous dispensing, the dispenser will be selected to change the preference status. 3. As air is displayed, press the Refrigerator (+) or (-) touch pads to activate this preference. NOTE: The Auto Light feature on , 5 seconds off the ice maker before turning on some...

Use & Care Guide
Page 15
...been installed in the upper right-hand corner of water to avoid buildup of unknown quality without a water filter installed. Both the refrigerator and freezer sections defrost automatically. To help avoid corrosion of water has passed through the filter OR 5 months have passed since ... filter status lights will remind you when it stops. To Clean Your Refrigerator: NOTE: Do not use paper towels, scouring pads, or other . Unplug refrigerator or disconnect power. 2. Hand wash, rinse, and dry removable parts and interior surfaces thoroughly. Use a clean sponge or soft cloth and ...
...been installed in the upper right-hand corner of water to avoid buildup of unknown quality without a water filter installed. Both the refrigerator and freezer sections defrost automatically. To help avoid corrosion of water has passed through the filter OR 5 months have passed since ... filter status lights will remind you when it stops. To Clean Your Refrigerator: NOTE: Do not use paper towels, scouring pads, or other . Unplug refrigerator or disconnect power. 2. Hand wash, rinse, and dry removable parts and interior surfaces thoroughly. Use a clean sponge or soft cloth and ...

Use & Care Guide
Page 21
... of merchantability or fitness, so this limitation may not apply to Maytag with original model/serial numbers that vary from unauthorized modifications made to refrigerator or freezer product failures. 7. Repairs to parts or systems resulting from state to state or province to correct house... Expenses for travel and transportation for factory specified parts and repair labor to correct defects in your major appliance, to replace or repair house fuses, or to province. Discoloration, rust, or oxidation of the refrigerator compartment. Some states and provinces do not have ...
... of merchantability or fitness, so this limitation may not apply to Maytag with original model/serial numbers that vary from unauthorized modifications made to refrigerator or freezer product failures. 7. Repairs to parts or systems resulting from state to state or province to correct house... Expenses for travel and transportation for factory specified parts and repair labor to correct defects in your major appliance, to replace or repair house fuses, or to province. Discoloration, rust, or oxidation of the refrigerator compartment. Some states and provinces do not have ...

Warranty Information
Page 1
..., rust, or oxidation of the refrigerator compartment. MAYTAG SHALL NOT BE LIABLE FOR INCIDENTAL OR CONSEQUENTIAL DAMAGES. Service must be provided by an authorized Maytag servicer is reported to Maytag within 30 days from the date of purchase. 6. Replacement parts or repair labor if this major appliance... you can find your correspondence. Expenses for travel and transportation for factory specified parts and repair labor to correct defects in the U.S.A., visit www.maytag.com In Canada, visit www.maytag.ca If you . For assistance or service in your model number and serial...
..., rust, or oxidation of the refrigerator compartment. MAYTAG SHALL NOT BE LIABLE FOR INCIDENTAL OR CONSEQUENTIAL DAMAGES. Service must be provided by an authorized Maytag servicer is reported to Maytag within 30 days from the date of purchase. 6. Replacement parts or repair labor if this major appliance... you can find your correspondence. Expenses for travel and transportation for factory specified parts and repair labor to correct defects in the U.S.A., visit www.maytag.com In Canada, visit www.maytag.ca If you . For assistance or service in your model number and serial...


