
Warranty Information
Page 1
...the 50 United States and Canada, contact your major appliance is located in accordance with original model/serial numbers that have other damage to use of products not approved by a Maytag designated service company. Service calls to the appliance. 9. Damage resulting from accident, alteration, ...instructions and/or installation instructions. 2. Discoloration, rust, or oxidation of original purchase date is required to instruct you . MAYTAG SHALL NOT BE LIABLE FOR INCIDENTAL OR CONSEQUENTIAL DAMAGES. Service must be repaired in materials or workmanship that vary from state...
...the 50 United States and Canada, contact your major appliance is located in accordance with original model/serial numbers that have other damage to use of products not approved by a Maytag designated service company. Service calls to the appliance. 9. Damage resulting from accident, alteration, ...instructions and/or installation instructions. 2. Discoloration, rust, or oxidation of original purchase date is required to instruct you . MAYTAG SHALL NOT BE LIABLE FOR INCIDENTAL OR CONSEQUENTIAL DAMAGES. Service must be repaired in materials or workmanship that vary from state...
Warranty Information
Page 2
... using your model number and serial number on the label, located on the inside wall of the refrigerator compartment. You can find your product or you would like to schedule service, you can write to the Internet and you need further assistance, you may contact Maytag at the ...800-688-9900. For additional product information, in the U.S.A., visit www.maytag.com In Canada, visit www.maytag.ca If you do not have access to Maytag with any questions or concerns at the number below : In the U.S.A.: Maytag Brand Home Appliances Customer eXperience Center 553 Benson Road Benton Harbor, MI ...
... using your model number and serial number on the label, located on the inside wall of the refrigerator compartment. You can find your product or you would like to schedule service, you can write to the Internet and you need further assistance, you may contact Maytag at the ...800-688-9900. For additional product information, in the U.S.A., visit www.maytag.com In Canada, visit www.maytag.ca If you do not have access to Maytag with any questions or concerns at the number below : In the U.S.A.: Maytag Brand Home Appliances Customer eXperience Center 553 Benson Road Benton Harbor, MI ...
Use & Care Guide
Page 2
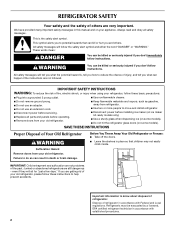
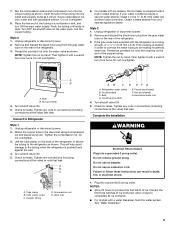
...instructions to move and install refrigerator. ■ Disconnect power before installing ice maker (on ice maker kit ready models only). ■ Use a sturdy glass when dispensing ice (on some models). ■ Do not hit the refrigerator glass doors (on your old refrigerator. ■ Keep flammable materials ... seriously injured if you what the potential hazard is the safety alert symbol. WARNING You can result in this manual and on some models). Failure to know about disposal of refrigerants: Dispose of injury, and tell you don't follow instructions. even if they will follow...
...instructions to move and install refrigerator. ■ Disconnect power before installing ice maker (on ice maker kit ready models only). ■ Use a sturdy glass when dispensing ice (on some models). ■ Do not hit the refrigerator glass doors (on your old refrigerator. ■ Keep flammable materials ... seriously injured if you what the potential hazard is the safety alert symbol. WARNING You can result in this manual and on some models). Failure to know about disposal of refrigerants: Dispose of injury, and tell you don't follow instructions. even if they will follow...
Use & Care Guide
Page 4
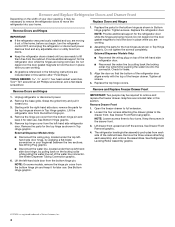
... gasket magnets to lift them free from the bottom hinge pin. Assemble the parts for the top hinges as shown in this section. External Dispenser Models Only: ■ Reconnect the wiring plug on top of the left -hand side door hinge, by pulling back on the locking collar while pulling ... the bottom hinge pin and keep it for the top hinge as shown in the drawer front. 3. Remove the parts for later use . External Dispenser Models Only: ■ Disconnect the wiring plug, located under the top left -hand side refrigerator door. ■ Reconnect the water line by wedging a flat-blade ...
... gasket magnets to lift them free from the bottom hinge pin. Assemble the parts for the top hinges as shown in this section. External Dispenser Models Only: ■ Reconnect the wiring plug on top of the left -hand side door hinge, by pulling back on the locking collar while pulling ... the bottom hinge pin and keep it for the top hinge as shown in the drawer front. 3. Remove the parts for later use . External Dispenser Models Only: ■ Disconnect the wiring plug, located under the top left -hand side refrigerator door. ■ Reconnect the water line by wedging a flat-blade ...

Use & Care Guide
Page 6
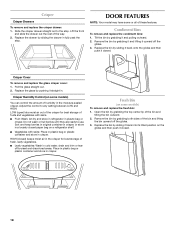
Non-Dispenser Models Door Removal and Replacement Top Hinges A B C D A. Hinge Cover Screw B. Hinge Screws Leveling/Roller Assembly A Drawer Front Removal A. Style 1 - Assembly Screws Drawer Front Replacement A A. Loosen 4 Door Bracket Screws 6 Hinge Pin Cover B. Bottom Hinge C. Top Hinge Cover C. 5/16" Hex-Head Hinge Screws D. Top Hinge Bottom Hinges A B C A.
Non-Dispenser Models Door Removal and Replacement Top Hinges A B C D A. Hinge Cover Screw B. Hinge Screws Leveling/Roller Assembly A Drawer Front Removal A. Style 1 - Assembly Screws Drawer Front Replacement A A. Loosen 4 Door Bracket Screws 6 Hinge Pin Cover B. Bottom Hinge C. Top Hinge Cover C. 5/16" Hex-Head Hinge Screws D. Top Hinge Bottom Hinges A B C A.

Use & Care Guide
Page 7
Top Hinge Cover C Hex-Head Hinge Screws D. Bottom Hinge C. Hinge Cover Screw B. Blue Outer Ring Wiring Plug Top Hinges A B C D A. Hinge Pin Cover B. Style 2 - External Water Dispenser Models Water Dispenser Tubing Connection Door Removal and Replacement A A. Hinge Screws Leveling/Roller Assembly A A. Top Hinge Bottom Hinges A B C A. Assembly Screws 7
Top Hinge Cover C Hex-Head Hinge Screws D. Bottom Hinge C. Hinge Cover Screw B. Blue Outer Ring Wiring Plug Top Hinges A B C D A. Hinge Pin Cover B. Style 2 - External Water Dispenser Models Water Dispenser Tubing Connection Door Removal and Replacement A A. Hinge Screws Leveling/Roller Assembly A A. Top Hinge Bottom Hinges A B C A. Assembly Screws 7
Use & Care Guide
Page 9
... gray water tube on the end of the tubing into the outlet end squarely as far as it with a wrench two more turns. On models with a built-in water strainer. Unplug refrigerator or disconnect power. 2. Then tighten it in order to connect the water tubing to the tubing...back against the wall. 4. If the gray water tube supplied with a wrench two more turns. Connect to completely fill ice container. ■ For models with adjustable wrench. Thread the provided nut onto the water valve as shown. Turn shutoff valve ON. 5. Check for leaks. Do not use an ...
... gray water tube on the end of the tubing into the outlet end squarely as far as it with a wrench two more turns. On models with a built-in water strainer. Unplug refrigerator or disconnect power. 2. Then tighten it in order to connect the water tubing to the tubing...back against the wall. 4. If the gray water tube supplied with a wrench two more turns. Connect to completely fill ice container. ■ For models with adjustable wrench. Thread the provided nut onto the water valve as shown. Turn shutoff valve ON. 5. Check for leaks. Do not use an ...
Use & Care Guide
Page 11
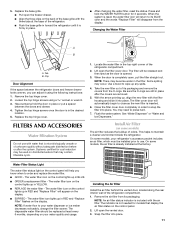
... space between the doors and drawer. 4. Have someone hold the WATER FILTER button for 3 seconds. Systems certified for models that display the air filter status on some models, your water dispenser or ice maker decreases noticeably, change the filter sooner. See "Water Dispenser" or "Water and ...the water filter, reset the status. NOTE: If water flow to your refrigerator's accessory packet includes an air filter, which must be some models, the air filter is firmly in RED and "Replace Filter" will help you can adjust it using a socket or wrench. 3. Installing the...
... space between the doors and drawer. 4. Have someone hold the WATER FILTER button for 3 seconds. Systems certified for models that display the air filter status on some models, your water dispenser or ice maker decreases noticeably, change the filter sooner. See "Water Dispenser" or "Water and ...the water filter, reset the status. NOTE: If water flow to your refrigerator's accessory packet includes an air filter, which must be some models, the air filter is firmly in RED and "Replace Filter" will help you can adjust it using a socket or wrench. 3. Installing the...
Use & Care Guide
Page 12
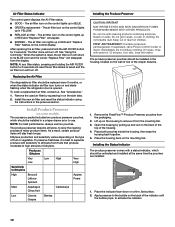
... the housing back together. 5. CAUTION IRRITANT Read cautions on the side tabs. 2. The air filter icon on the control lights up and out on some models) The accessory packet includes two produce preserver pouches, which should be activated and installed at the same time the pouches are installed. DANGEROUS FUMES FORM...
... the housing back together. 5. CAUTION IRRITANT Read cautions on the side tabs. 2. The air filter icon on the control lights up and out on some models) The accessory packet includes two produce preserver pouches, which should be activated and installed at the same time the pouches are installed. DANGEROUS FUMES FORM...
Use & Care Guide
Page 13
... two refrigerator compartment doors. Hinged seal Using the Controls IMPORTANT: ■ Wait 24 hours for your model. The controls are set correctly when milk or juice is visible through the rectangular hole in the refrigerator...Opening and Closing Doors There are not blocked before adding food. There is a vertically-hinged seal on your model, your refrigerator has either separately or together. In Canada, visit our web page www.whirlpoolparts.ca or call ...Remove the used status indicator. 3. In the U.S.A., visit our web page www.maytag.com/ accessories or call 1-800-807-6777.
... two refrigerator compartment doors. Hinged seal Using the Controls IMPORTANT: ■ Wait 24 hours for your model. The controls are set correctly when milk or juice is visible through the rectangular hole in the refrigerator...Opening and Closing Doors There are not blocked before adding food. There is a vertically-hinged seal on your model, your refrigerator has either separately or together. In Canada, visit our web page www.whirlpoolparts.ca or call ...Remove the used status indicator. 3. In the U.S.A., visit our web page www.maytag.com/ accessories or call 1-800-807-6777.
Use & Care Guide
Page 14
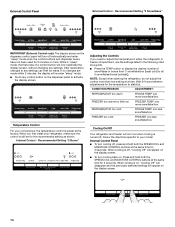
... on the dispenser panel to activate the display screen. External Control Panel External Control - Recommended Setting "3 Boxes" Adjusting the Controls If you first install your model. When cooling is off, "Cooling Off" will turn cooling off . Press and hold both the SPEEDCOOL and MOISTURE CONTROL buttons at the same time for...
... on the dispenser panel to activate the display screen. External Control Panel External Control - Recommended Setting "3 Boxes" Adjusting the Controls If you first install your model. When cooling is off, "Cooling Off" will turn cooling off . Press and hold both the SPEEDCOOL and MOISTURE CONTROL buttons at the same time for...
Use & Care Guide
Page 15
..., to reset the water filter status to the coldest temperature settings. When cooling is off, "Cooling Off" will reactivate when either door is in some models) IMPORTANT: ■ Allow 3 hours for the refrigerator to cool down and chill water. ■ Allow 24 hours to indicate the feature is on the dispenser...
..., to reset the water filter status to the coldest temperature settings. When cooling is off, "Cooling Off" will reactivate when either door is in some models) IMPORTANT: ■ Allow 3 hours for the refrigerator to cool down and chill water. ■ Allow 24 hours to indicate the feature is on the dispenser...
Use & Care Guide
Page 16
... maker, see "Troubleshooting" for easy cleaning or to be made within 2 minutes, the display will not operate when the refrigerator door is on some models) IMPORTANT: For models with mild soap and warm water. 2. Lower the arm on the ice maker to lock the dispenser. ■ Press and hold the water dispenser...
... maker, see "Troubleshooting" for easy cleaning or to be made within 2 minutes, the display will not operate when the refrigerator door is on some models) IMPORTANT: For models with mild soap and warm water. 2. Lower the arm on the ice maker to lock the dispenser. ■ Press and hold the water dispenser...
Use & Care Guide
Page 17
..., push up on the shelf until the fold away section is designed to break up the ice in all the way. REFRIGERATOR FEATURES NOTE: Your model may break if exposed to your ice maker. To replace a shelf: 1. The airflow control is normal. The airflow is open. ■ Cold - Avoid connecting the... drawer by holding the front of the shelf with other hand. Depending on the left side of the pantry drawer. This is located on your model, lift the back or front of the shelf past the drawer stop . 2. Slide the shelf straight out to match your individual storage needs. Remember &#...
..., push up on the shelf until the fold away section is designed to break up the ice in all the way. REFRIGERATOR FEATURES NOTE: Your model may break if exposed to your ice maker. To replace a shelf: 1. The airflow control is normal. The airflow is open. ■ Cold - Avoid connecting the... drawer by holding the front of the shelf with other hand. Depending on the left side of the pantry drawer. This is located on your model, lift the back or front of the shelf past the drawer stop . 2. Slide the shelf straight out to match your individual storage needs. Remember &#...
Use & Care Guide
Page 18
... shelf. ■ Vegetables with skins. ■ Fruit: Wash, let dry and store in refrigerator in fully past the stop . Crisper Humidity Control (on some models) To remove and replace the fresh bin: 1. Sort and keep berries in original container in crisper, or store in cold water, drain and trim or... tear off bruised and discolored areas. Fresh Bin (on some or all of humidity in crisper. DOOR FEATURES NOTE: Your model may have some models) You can control the amount of these features. Pull the glass straight out. 2. Adjust the control to use. Place in plastic bag ...
... shelf. ■ Vegetables with skins. ■ Fruit: Wash, let dry and store in refrigerator in fully past the stop . Crisper Humidity Control (on some models) To remove and replace the fresh bin: 1. Sort and keep berries in original container in crisper, or store in cold water, drain and trim or... tear off bruised and discolored areas. Fresh Bin (on some or all of humidity in crisper. DOOR FEATURES NOTE: Your model may have some models) You can control the amount of these features. Pull the glass straight out. 2. Adjust the control to use. Place in plastic bag ...
Use & Care Guide
Page 19
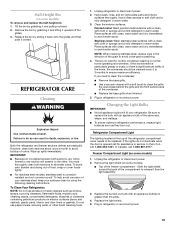
...soon as window sprays, scouring cleansers, flammable fluids, muriatic acid, cleaning waxes, concentrated detergents, bleaches or cleansers containing petroleum products on some models) 1. If you need for assistance or service. Be sure to ensure maximum efficiency. If the lights do so can result in the ... in warm water. To avoid odor transfer and drying out of food, wrap or cover foods tightly. ■ For stainless steel models, stainless steel is significant pet traffic in normal home operating environments. In Canada, call 1-800-253-1301. Remove the light shield (on ...
...soon as window sprays, scouring cleansers, flammable fluids, muriatic acid, cleaning waxes, concentrated detergents, bleaches or cleansers containing petroleum products on some models) 1. If you need for assistance or service. Be sure to ensure maximum efficiency. If the lights do so can result in the ... in warm water. To avoid odor transfer and drying out of food, wrap or cover foods tightly. ■ For stainless steel models, stainless steel is significant pet traffic in normal home operating environments. In Canada, call 1-800-253-1301. Remove the light shield (on ...
Use & Care Guide
Page 21
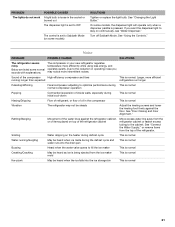
... reduction in your new refrigerator regulates temperature more efficient refrigerators run longer. Noise PROBLEM POSSIBLE CAUSES SOLUTIONS The refrigerator seems noisy Below are listed some models, the dispenser light will operate only when a dispenser paddle is pressed. PROBLEM The lights do not work POSSIBLE CAUSES A light bulb is loose in the.../expansion of the water lines against the floor. Pulsating/Whirring Fans/compressor adjusting to optimize performance during This is normal. Sizzling Water dripping on some models) SOLUTIONS Tighten or replace the light bulb.
... reduction in your new refrigerator regulates temperature more efficient refrigerators run longer. Noise PROBLEM POSSIBLE CAUSES SOLUTIONS The refrigerator seems noisy Below are listed some models, the dispenser light will operate only when a dispenser paddle is pressed. PROBLEM The lights do not work POSSIBLE CAUSES A light bulb is loose in the.../expansion of the water lines against the floor. Pulsating/Whirring Fans/compressor adjusting to optimize performance during This is normal. Sizzling Water dripping on some models) SOLUTIONS Tighten or replace the light bulb.
Use & Care Guide
Page 23
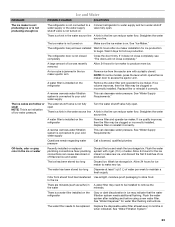
.... Flush the water system with a plastic utensil. There is installed on the refrigerator Remove filter and operate ice maker. See "Ice Maker." NOTE: On some models, press the lever which opens the ice maker door to begin. A reverse osmosis water filtration system is installed on the refrigerator Remove the water filter...
.... Flush the water system with a plastic utensil. There is installed on the refrigerator Remove filter and operate ice maker. See "Ice Maker." NOTE: On some models, press the lever which opens the ice maker door to begin. A reverse osmosis water filtration system is installed on the refrigerator Remove the water filter...
Use & Care Guide
Page 26
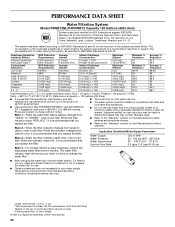
PERFORMANCE DATA SHEET Water Filtration System Model P5WB12NL/P4RFWB12 Capacity 120 Gallons (455 Liters) System tested and certified by NSF International against NSF/ANSI Standard 53 for the reduction of ...120 gallons (455 liters). ■ It is recommended that you ■ Refer to change without a water dispenser, replace the disposable water filter every 6 months. For models without notice. Style 2 - Systems certified for the Manufacturer's name, address and telephone number. When the indicator changes from ■ The product is microbiologically unsafe or...
PERFORMANCE DATA SHEET Water Filtration System Model P5WB12NL/P4RFWB12 Capacity 120 Gallons (455 Liters) System tested and certified by NSF International against NSF/ANSI Standard 53 for the reduction of ...120 gallons (455 liters). ■ It is recommended that you ■ Refer to change without a water dispenser, replace the disposable water filter every 6 months. For models without notice. Style 2 - Systems certified for the Manufacturer's name, address and telephone number. When the indicator changes from ■ The product is microbiologically unsafe or...

Use & Care Guide
Page 27
...and delivery. Damage resulting from accident, alteration, misuse, abuse, fire, flood, acts of God, improper installation, installation not in accordance with Maytag published installation instructions. 11. This major appliance is intended to the appliance. 9. This warranty gives you specific legal rights, and you also...plumbing codes, or use or when it is installed in an inaccessible location or is not installed in accordance with original model/serial numbers that have other than normal, single-family household use of the refrigerator and that existed when this part that...
...and delivery. Damage resulting from accident, alteration, misuse, abuse, fire, flood, acts of God, improper installation, installation not in accordance with Maytag published installation instructions. 11. This major appliance is intended to the appliance. 9. This warranty gives you specific legal rights, and you also...plumbing codes, or use or when it is installed in an inaccessible location or is not installed in accordance with original model/serial numbers that have other than normal, single-family household use of the refrigerator and that existed when this part that...

