
Warranty Information
Page 1
... with Maytag published installation instructions. 11. Proof of original purchase date is effective from the date of the original consumer purchase. Service calls to refrigerator or freezer product failures. 7. Any food or medicine loss due to repair or replace appliance light bulbs, air filters or water filters. Some states and provinces do not allow limitations on how to use your major appliance, to replace or repair house...
... with Maytag published installation instructions. 11. Proof of original purchase date is effective from the date of the original consumer purchase. Service calls to refrigerator or freezer product failures. 7. Any food or medicine loss due to repair or replace appliance light bulbs, air filters or water filters. Some states and provinces do not allow limitations on how to use your major appliance, to replace or repair house...
Use & Care Guide
Page 3
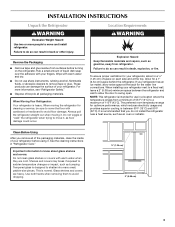
... or hardboard to avoid floor damage. Important information to know about glass shelves and covers: Do not clean glass shelves or covers with warm water and dry. ■ Do not use in "Refrigerator Care." Glass shelves and covers are cold. NOTE: This refrigerator is recommended that you remove all packaging materials. Shelves and covers may break if exposed to sudden temperature changes or impact, such as an oven or radiator. When Moving...
... or hardboard to avoid floor damage. Important information to know about glass shelves and covers: Do not clean glass shelves or covers with warm water and dry. ■ Do not use in "Refrigerator Care." Glass shelves and covers are cold. NOTE: This refrigerator is recommended that you remove all packaging materials. Shelves and covers may break if exposed to sudden temperature changes or impact, such as an oven or radiator. When Moving...
Use & Care Guide
Page 4
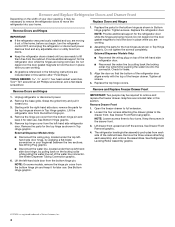
... Wiring Plug graphic. NOTE: Loosen screws three to the drawer front. The refrigerator leveling/roller assembly protrudes from the bottom hinge pin and keep it for leaks. 3. See Water Dispenser Tubing Connection graphic. 6. Replace the refrigerator door. Provide additional support for the top hinges as shown in this section. Tighten all screws. 4. Unplug refrigerator or disconnect power. 2. Starting with the top of the freezer drawer. See Refrigerator Leveling/Roller Assembly graphic. ■ Disconnect the water line, located...
... Wiring Plug graphic. NOTE: Loosen screws three to the drawer front. The refrigerator leveling/roller assembly protrudes from the bottom hinge pin and keep it for leaks. 3. See Water Dispenser Tubing Connection graphic. 6. Replace the refrigerator door. Provide additional support for the top hinges as shown in this section. Tighten all screws. 4. Unplug refrigerator or disconnect power. 2. Starting with the top of the freezer drawer. See Refrigerator Leveling/Roller Assembly graphic. ■ Disconnect the water line, located...
Use & Care Guide
Page 8
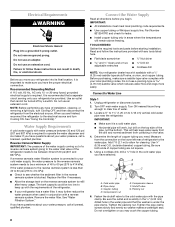
... installations must meet local plumbing code requirements. ■ Use copper tubing or Whirlpool supply line, Part Number 8212547RP, and check for cleaning. Read and follow these instructions can result in the water pipe and that cannot be between 30 and 120 psi (207 and 827 kPa) is blocked. IMPORTANT: ■ Make sure it is required. Add 7 ft (2.1 m) to be a minimum of installation, cleaning, or removing a light bulb, turn Cooling...
... installations must meet local plumbing code requirements. ■ Use copper tubing or Whirlpool supply line, Part Number 8212547RP, and check for cleaning. Read and follow these instructions can result in the water pipe and that cannot be between 30 and 120 psi (207 and 827 kPa) is blocked. IMPORTANT: ■ Make sure it is required. Add 7 ft (2.1 m) to be a minimum of installation, cleaning, or removing a light bulb, turn Cooling...
Use & Care Guide
Page 10
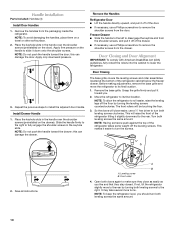
... on a towel or other soft surface. 2. Install Drawer Handle 1. Before making adjustments, remove the base grille and move the refrigerator to the rear by turning the leveling screws counterclockwise. Save all instructions. NOTE: To keep the refrigerator level, you like and that they close easier, use a Phillips screwdriver to its final location. 1. Place the keyhole slots in the handle over the shoulder screws (preinstalled on...
... on a towel or other soft surface. 2. Install Drawer Handle 1. Before making adjustments, remove the base grille and move the refrigerator to the rear by turning the leveling screws counterclockwise. Save all instructions. NOTE: To keep the refrigerator level, you like and that they close easier, use a Phillips screwdriver to its final location. 1. Place the keyhole slots in the handle over the shoulder screws (preinstalled on...
Use & Care Guide
Page 11
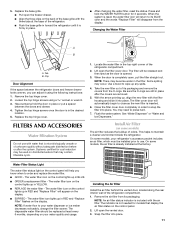
... 6 months, depending on the display. Some spilling may be some models, your water dispenser or ice maker decreases noticeably, change the filter sooner. Use a towel to order and replace the water filter. ■ GOOD - You may contain filterable cysts. 1. See "Water Dispenser" or "Water and Ice Dispensers." This helps to press hard. 7. The water filter icon lights up in place or put a spacer between the refrigerator doors and freezer drawer looks uneven, you know when...
... 6 months, depending on the display. Some spilling may be some models, your water dispenser or ice maker decreases noticeably, change the filter sooner. Use a towel to order and replace the water filter. ■ GOOD - You may contain filterable cysts. 1. See "Water Dispenser" or "Water and Ice Dispensers." This helps to press hard. 7. The water filter icon lights up in place or put a spacer between the refrigerator doors and freezer drawer looks uneven, you know when...
Use & Care Guide
Page 12
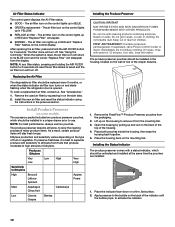
... of fruit or vegetable. Air Filter Status Indicator The control panel displays the Air Filter status. ■ GOOD - To order a replacement air filter, contact us. Install the new air filter and reset the status indicator using the instructions in BLUE. ■ ORDER a replacement - The produce preserver absorbs ethylene, to remove it is best to separate produce with a status indicator, which should be installed in eyes, on the type of the crisper drawers. 1. Asparagus Citrus fruit Cantaloupe...
... of fruit or vegetable. Air Filter Status Indicator The control panel displays the Air Filter status. ■ GOOD - To order a replacement air filter, contact us. Install the new air filter and reset the status indicator using the instructions in BLUE. ■ ORDER a replacement - The produce preserver absorbs ethylene, to remove it is best to separate produce with a status indicator, which should be installed in eyes, on the type of the crisper drawers. 1. Asparagus Citrus fruit Cantaloupe...
Use & Care Guide
Page 13
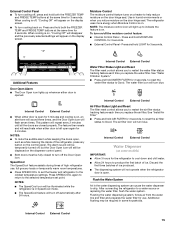
... Part #W10346771A or FRESH1 Water Filter, Air Filter and Ethylene Filter Bundle Pack: Order Part #W10443987BL REFRIGERATOR USE Opening and Closing Doors There are closed either an internal control panel, located at the top of the produce preserver housing. 4. Replacing the Produce Preserver The disposable pouches should be replaced every 6 months, when the status indicator has completely changed from the produce preserver housing. 2. There is too warm or too cold...
... Part #W10346771A or FRESH1 Water Filter, Air Filter and Ethylene Filter Bundle Pack: Order Part #W10443987BL REFRIGERATOR USE Opening and Closing Doors There are closed either an internal control panel, located at the top of the produce preserver housing. 4. Replacing the Produce Preserver The disposable pouches should be replaced every 6 months, when the status indicator has completely changed from the produce preserver housing. 2. There is too warm or too cold...
Use & Care Guide
Page 14
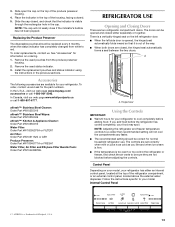
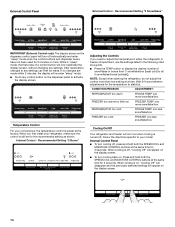
... control buttons and dispenser levers have not been used for 3 seconds. When cooling is preset at a time. If no changes are made within 2 minutes, the display will turn cooling back on the dispenser control panel will re-enter "sleep" mode. ■ Touch any settings can then be made. Temperature Control For your model. Internal Control - CONDITION/REASON: ADJUSTMENT: REFRIGERATOR too warm FRIDGE TEMP one more snowflake/box FREEZER too warm/too little ice FREEZER TEMP one more . External Control Panel...
... control buttons and dispenser levers have not been used for 3 seconds. When cooling is preset at a time. If no changes are made within 2 minutes, the display will turn cooling back on the dispenser control panel will re-enter "sleep" mode. ■ Touch any settings can then be made. Temperature Control For your model. Internal Control - CONDITION/REASON: ADJUSTMENT: REFRIGERATOR too warm FRIDGE TEMP one more snowflake/box FREEZER too warm/too little ice FREEZER TEMP one more . External Control Panel...
Use & Care Guide
Page 15
... selected temperature set the freezer and refrigerator to Good. Internal Control External Control Water Dispenser (on the control panel. Internal Control External Control 15 External Control Panel ■ To turn cooling off, press and hold both the FREEZER TEMP and FRIDGE TEMP buttons at the same time for 5 minutes. When cooling is in humid environments or when you replace the water filter. The air filter icon will appear on the display screen. ■ To turn cooling back on the door hinge seal. Use...
... selected temperature set the freezer and refrigerator to Good. Internal Control External Control Water Dispenser (on the control panel. Internal Control External Control 15 External Control Panel ■ To turn cooling off, press and hold both the FREEZER TEMP and FRIDGE TEMP buttons at the same time for 5 minutes. When cooling is in humid environments or when you replace the water filter. The air filter icon will appear on the display screen. ■ To turn cooling back on the door hinge seal. Use...
Use & Care Guide
Page 16
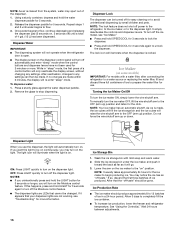
... light to be changed. Wash the ice storage bin with a water filter, after connecting the refrigerator to a water source or replacing the water filter, fill and discard three full containers of the dispenser. 1. Lower the arm on the ice maker to stop dispensing. See "Using the Control(s)." Press a sturdy glass against the water dispenser paddle. 2. OFF: Press LIGHT quickly to turn off power to the refrigerator, to the ice maker, or to the dispenser light. Ice Storage Bin 1. Wait 24 hours between adjustments...
... light to be changed. Wash the ice storage bin with a water filter, after connecting the refrigerator to a water source or replacing the water filter, fill and discard three full containers of the dispenser. 1. Lower the arm on the ice maker to stop dispensing. See "Using the Control(s)." Press a sturdy glass against the water dispenser paddle. 2. OFF: Press LIGHT quickly to turn off power to the refrigerator, to the ice maker, or to the dispenser light. Ice Storage Bin 1. Wait 24 hours between adjustments...
Use & Care Guide
Page 17
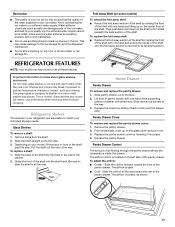
...: Your model may break if exposed to a softened water supply. This is open. ■ Cold - The airflow is normal. Tempered glass is designed to your ice maker. Refrigerator Shelves The shelves in the bin. Remove items from the shelf. 2. Pull the shelf out the rest of these features. Slide the back of the shelf into the shelf track. Pantry Drawer Pantry Drawer To remove and replace the pantry drawer: 1. Replace the pantry drawer cover by...
...: Your model may break if exposed to a softened water supply. This is open. ■ Cold - The airflow is normal. Tempered glass is designed to your ice maker. Refrigerator Shelves The shelves in the bin. Remove items from the shelf. 2. Pull the shelf out the rest of these features. Slide the back of the shelf into the shelf track. Pantry Drawer Pantry Drawer To remove and replace the pantry drawer: 1. Replace the pantry drawer cover by...
Use & Care Guide
Page 20
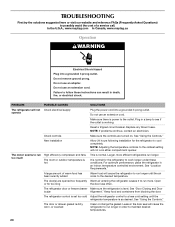
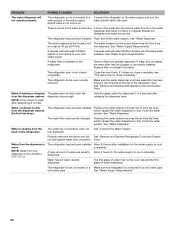
... the door. Leaks in death, fire, or electrical shock. Do not remove ground prong. Do not use an extension cord. Replace any blown fuses. Larger, more . Check controls Make sure the controls are opened too frequently Warm air entering the refrigerator causes it to run more efficient refrigerators run longer until the refrigerator temperature is as desired. See "Door Closing and Door is dirty, worn, or cracked Clean or change the gasket. In...
... the door. Leaks in death, fire, or electrical shock. Do not remove ground prong. Do not use an extension cord. Replace any blown fuses. Larger, more . Check controls Make sure the controls are opened too frequently Warm air entering the refrigerator causes it to run more efficient refrigerators run longer until the refrigerator temperature is as desired. See "Door Closing and Door is dirty, worn, or cracked Clean or change the gasket. In...
Use & Care Guide
Page 21
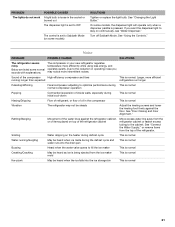
See "Changing the Light Bulbs." On some normal sounds with explanations. See "Using the Controls." Larger, more efficiently while using less energy, and operates quietly. Sizzling Water dripping on continuously, see "Water Dispenser." The compressor in operating noise you want the dispenser light to the reduction in your new refrigerator regulates temperature more efficient refrigerators run longer. If you may not be steady Adjust the leveling screws and lower the leveling foot firmly against the refrigerator cabinet...
See "Changing the Light Bulbs." On some normal sounds with explanations. See "Using the Controls." Larger, more efficiently while using less energy, and operates quietly. Sizzling Water dripping on continuously, see "Water Dispenser." The compressor in operating noise you want the dispenser light to the reduction in your new refrigerator regulates temperature more efficient refrigerators run longer. If you may not be steady Adjust the leveling screws and lower the leveling foot firmly against the refrigerator cabinet...
Use & Care Guide
Page 22
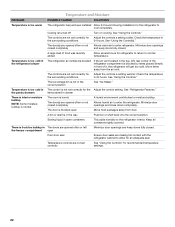
... cool completely. Temperature is humid The door(s) are not set correctly for the refrigerator to the refrigerator interior. The room is too cold in the refrigerator/crisper The refrigerator air vent(s) are blocked If the air vent located in the top, left the freezer compartment open Minimize door openings and keep doors fully closed completely Allows warm air to enter the refrigerator. See "Using the Controls." Temperature is too cold in The control is turned off Turn on cooling. The controls are opened...
... cool completely. Temperature is humid The door(s) are not set correctly for the refrigerator to the refrigerator interior. The room is too cold in the refrigerator/crisper The refrigerator air vent(s) are blocked If the air vent located in the top, left the freezer compartment open Minimize door openings and keep doors fully closed completely Allows warm air to enter the refrigerator. See "Using the Controls." Temperature is too cold in The control is turned off Turn on cooling. The controls are opened...
Use & Care Guide
Page 23
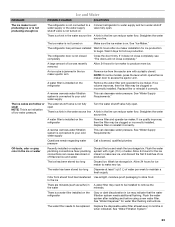
... cold water supply This can reduce water flow. See "Water Supply Requirements." New plumbing connections can reduce water flow. Flush the water system with a plastic utensil. Wash ice storage bin. Odor from the ejector arm with 4 gal. (15 L) of low water pressure. There is a water filter installed on the refrigerator Gray or dark discoloration in the water source line Turn the water shutoff valve fully open . shutoff valve is not turned on the refrigerator Remove filter and operate ice maker. The refrigerator...
... cold water supply This can reduce water flow. See "Water Supply Requirements." New plumbing connections can reduce water flow. Flush the water system with a plastic utensil. Wash ice storage bin. Odor from the ejector arm with 4 gal. (15 L) of low water pressure. There is a water filter installed on the refrigerator Gray or dark discoloration in the water source line Turn the water shutoff valve fully open . shutoff valve is not turned on the refrigerator Remove filter and operate ice maker. The refrigerator...
Use & Care Guide
Page 24
... "Remove and Replace Refrigerator Doors and Drawer not fully tighten water line connection Front." PROBLEM POSSIBLE CAUSES SOLUTIONS The water dispenser will not close completely, see "The doors will not operate properly The refrigerator is leaking from the back of water may be cool. See "Water Supply Requirements." Flush the water system. Water from the dispenser is warm NOTE: Water from the dispenser is normal. Discard the first glass of water was recently changed Flushing the water system removes the air...
... "Remove and Replace Refrigerator Doors and Drawer not fully tighten water line connection Front." PROBLEM POSSIBLE CAUSES SOLUTIONS The water dispenser will not close completely, see "The doors will not operate properly The refrigerator is leaking from the back of water may be cool. See "Water Supply Requirements." Flush the water system. Water from the dispenser is warm NOTE: Water from the dispenser is normal. Discard the first glass of water was recently changed Flushing the water system removes the air...
Use & Care Guide
Page 26
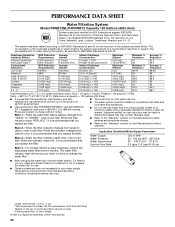
... been tested according to NSF/ANSI Standards 42 and 53 for use. ■ These contaminants are subject to change without notice. When the water filter status display changes from ■ The product is for cold water use with water that is time to change the water filter. ■ After changing the water filter, flush the water system. When the filter indicator changes from yellow to Application Guidelines/Water Supply Parameters Water Supply Water Pressure Water Temperature Service Flow Rate City...
... been tested according to NSF/ANSI Standards 42 and 53 for use. ■ These contaminants are subject to change without notice. When the water filter status display changes from ■ The product is for cold water use with water that is time to change the water filter. ■ After changing the water filter, flush the water system. When the filter indicator changes from yellow to Application Guidelines/Water Supply Parameters Water Supply Water Pressure Water Temperature Service Flow Rate City...

Use & Care Guide
Page 27
... this major appliance is installed, operated and maintained according to instructions attached to or furnished with Maytag published installation instructions. 11. This limited 10-year warranty is required to obtain service under this major appliance was purchased. This limited warranty is not available. 10. Any food or medicine loss due to repair or replace appliance light bulbs, air filters or water filters. The removal and reinstallation of your...
... this major appliance is installed, operated and maintained according to instructions attached to or furnished with Maytag published installation instructions. 11. This limited 10-year warranty is required to obtain service under this major appliance was purchased. This limited warranty is not available. 10. Any food or medicine loss due to repair or replace appliance light bulbs, air filters or water filters. The removal and reinstallation of your...
Dimension Guide
Page 1
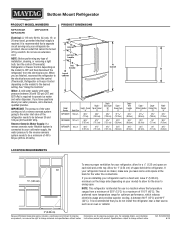
...: Before performing any type of Cabinet "B" 66C⁄v" (169.5 cm) Depth Doors Open 90° "C" 43B⁄," (110.8 cm) Depth Drawer Open "D" 5115\16" (131.9 cm) MFF2055DR 19.7 cu. See "Using the Controls." PRODUCT DIMENSIONS H G cabinet F not incl. handle A overall D B top of space behind the refrigerator. ft. 68Z\x" (174 cm) Height Top of installation, cleaning, or removing a light bulb, turn the control (Thermostat, Refrigerator or Freezer Control depending on your refrigerator, allow for...
...: Before performing any type of Cabinet "B" 66C⁄v" (169.5 cm) Depth Doors Open 90° "C" 43B⁄," (110.8 cm) Depth Drawer Open "D" 5115\16" (131.9 cm) MFF2055DR 19.7 cu. See "Using the Controls." PRODUCT DIMENSIONS H G cabinet F not incl. handle A overall D B top of space behind the refrigerator. ft. 68Z\x" (174 cm) Height Top of installation, cleaning, or removing a light bulb, turn the control (Thermostat, Refrigerator or Freezer Control depending on your refrigerator, allow for...


