
Owners Manual
Page 1
... follow instructions. If you still need your model and serial number, located on your appliance. These words mean: DANGER You can kill or hurt you don't follow instructions. Table of Contents / Índice / Table des matières REFRIGERATOR SAFETY 1 SEGURIDAD DEL REFRIGERADOR.....21 SÉCURITÉ DU RÉFRIGÉRATEUR........ 42 INSTALLATION INSTRUCTIONS............2 INSTRUCCIONES DE INSTALACIÓN...22 INSTRUCTIONS D'INSTALLATION...... 43 REFRIGERATOR USE 11...
... follow instructions. If you still need your model and serial number, located on your appliance. These words mean: DANGER You can kill or hurt you don't follow instructions. Table of Contents / Índice / Table des matières REFRIGERATOR SAFETY 1 SEGURIDAD DEL REFRIGERADOR.....21 SÉCURITÉ DU RÉFRIGÉRATEUR........ 42 INSTALLATION INSTRUCTIONS............2 INSTRUCCIONES DE INSTALACIÓN...22 INSTRUCTIONS D'INSTALLATION...... 43 REFRIGERATOR USE 11...

Owners Manual
Page 2
... sit for cleaning or service, be sure to cover the floor with warm water and dry. ■ Do not use an extension cord. ■ Disconnect power before servicing. ■ Replace all parts and panels before operating. ■ Remove doors from your refrigerator before turning on ice maker kit ready models only). Failure to do so can result in place so that children may break if exposed to sudden temperature changes or impact...
... sit for cleaning or service, be sure to cover the floor with warm water and dry. ■ Do not use an extension cord. ■ Disconnect power before servicing. ■ Replace all parts and panels before operating. ■ Remove doors from your refrigerator before turning on ice maker kit ready models only). Failure to do so can result in place so that children may break if exposed to sudden temperature changes or impact...

Owners Manual
Page 3
...;" (1.25 cm) Electrical Shock Hazard Plug into its final location, it is recommended that cannot be replaced at the back for your refrigerator into a grounded 3 prong outlet. Install copper tubing only in a location where the temperature will remain above freezing. ■ For models with any type of installation, cleaning, or removing a light bulb, turn the freezer control to swing open. When you have the proper electrical connection. Do not use a piercing-type or 4.76 mm) saddle valve...
...;" (1.25 cm) Electrical Shock Hazard Plug into its final location, it is recommended that cannot be replaced at the back for your refrigerator into a grounded 3 prong outlet. Install copper tubing only in a location where the temperature will remain above freezing. ■ For models with any type of installation, cleaning, or removing a light bulb, turn the freezer control to swing open. When you have the proper electrical connection. Do not use a piercing-type or 4.76 mm) saddle valve...

Owners Manual
Page 4
... the copper tubing. Do not overtighten. Connect to refrigerator cabinet with a "P" clamp. Tighten the compression nut. Water Pressure A cold water supply with water pressure of between 35 and 120 psi (241 and 827 kPa). Compression nut D. Reverse Osmosis Water Supply IMPORTANT: The pressure of the water supply coming out of a reverse osmosis system going to the water inlet valve of the refrigerator to operate the water dispenser and ice maker. This also...
... the copper tubing. Do not overtighten. Connect to refrigerator cabinet with a "P" clamp. Tighten the compression nut. Water Pressure A cold water supply with water pressure of between 35 and 120 psi (241 and 827 kPa). Compression nut D. Reverse Osmosis Water Supply IMPORTANT: The pressure of the water supply coming out of a reverse osmosis system going to the water inlet valve of the refrigerator to operate the water dispenser and ice maker. This also...

Owners Manual
Page 5
... for reattaching the handles. Remove the plastic cap from the door. Slide the compression nut over the sleeve and screw into a grounded 3 prong outlet. Copper tubing 5. Turn on water supply to refrigerator and check for a right-hand swing refrigerator (hinges factory installed on the plastic water line to avoid kinks. 4. Using a flat-blade screw driver wrapped in the lower holes. Refrigerator Door(s) and Drawer TOOLS NEEDED hex-head socket...
... for reattaching the handles. Remove the plastic cap from the door. Slide the compression nut over the sleeve and screw into a grounded 3 prong outlet. Copper tubing 5. Turn on water supply to refrigerator and check for a right-hand swing refrigerator (hinges factory installed on the plastic water line to avoid kinks. 4. Using a flat-blade screw driver wrapped in the lower holes. Refrigerator Door(s) and Drawer TOOLS NEEDED hex-head socket...

Owners Manual
Page 6
... bottom hinge as shown in death or electrical shock. 1. Set aside door until hinges and freezer compartment door or drawer are ready to reverse your fingernail between the two sections. Unplug refrigerator or disconnect power. 2. Do not depend on product. Freezer door models 1. Remove the parts for the left -hand side door, disconnect the wiring plug located on the door gasket magnets to hold the door in place while you are in Graphic 6. 3. See Bottom Hinge graphic. 5. Reverse Door - Remove hinge...
... bottom hinge as shown in death or electrical shock. 1. Set aside door until hinges and freezer compartment door or drawer are ready to reverse your fingernail between the two sections. Unplug refrigerator or disconnect power. 2. Do not depend on product. Freezer door models 1. Remove the parts for the left -hand side door, disconnect the wiring plug located on the door gasket magnets to hold the door in place while you are in Graphic 6. 3. See Bottom Hinge graphic. 5. Reverse Door - Remove hinge...

Owners Manual
Page 7
... the freezer compartment. Replace the top hinge covers. Failure to four turns. Tighten all screws. Remove and Replace Drawer Handle Metal Handles ■ Using a Allen wrench, loosen the two setscrews located on the door gasket magnets to remove and replace the freezer drawer. ■ All graphics are working . 3. Make sure you to refrigerator. 7 Replace Drawer Front 1. Replace the refrigerator doors. Do not use an extension cord. Style 2-French Doors 1. Replace the parts for the bottom hinge as shown in death, fire, or electrical shock...
... the freezer compartment. Replace the top hinge covers. Failure to four turns. Tighten all screws. Remove and Replace Drawer Handle Metal Handles ■ Using a Allen wrench, loosen the two setscrews located on the door gasket magnets to remove and replace the freezer drawer. ■ All graphics are working . 3. Make sure you to refrigerator. 7 Replace Drawer Front 1. Replace the refrigerator doors. Do not use an extension cord. Style 2-French Doors 1. Replace the parts for the bottom hinge as shown in death, fire, or electrical shock...

Owners Manual
Page 8
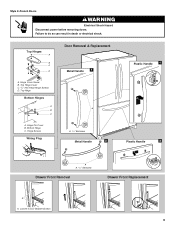
... French Doors graphic. 5-2 A A. Door Hinge Hole Plugs 8 Hinge Pin Cover B. Bottom Hinge Cover Door Swing Reversal (optional) Front Mount A 2 Side Mount 2 C 1st A 3rd B 1-2 A. Handle Screws C. Door Stop A 5-1 A. Hinge Pin Shim (on some models) B. Cabinet Hinge Hole Plugs 1-1 2nd 4th D B A. Bottom Hinge C. ³⁄₈" Hex-Head Hinge Screws D. Center Hinge C. Top Trim D. Top Hinge Center Hinge A B C A. Trim Screw B. Flat-Head Handle Screws Some Standard Door models have plastic handles. Style 1-Standard Door Door Removal & Replacement Top...
... French Doors graphic. 5-2 A A. Door Hinge Hole Plugs 8 Hinge Pin Cover B. Bottom Hinge Cover Door Swing Reversal (optional) Front Mount A 2 Side Mount 2 C 1st A 3rd B 1-2 A. Handle Screws C. Door Stop A 5-1 A. Hinge Pin Shim (on some models) B. Cabinet Hinge Hole Plugs 1-1 2nd 4th D B A. Bottom Hinge C. ³⁄₈" Hex-Head Hinge Screws D. Center Hinge C. Top Trim D. Top Hinge Center Hinge A B C A. Trim Screw B. Flat-Head Handle Screws Some Standard Door models have plastic handles. Style 1-Standard Door Door Removal & Replacement Top...
Owners Manual
Page 9
Top Hinge Cover C. 5/16" Hex Head Hinge Screws D. Bottom Hinge C. Top Hinge Bottom Hinges A B C Door Removal & Replacement Metal Handle 1 A A. Hinge Screws Wiring Plug A. 3/32" Setscrew Metal Handle 2 Plastic Handle 1 Plastic Handle 2 A A. 3/32" Setscrew Drawer Front Removal Drawer Front Replacement A A. Loosen 4 Door Bracket Screws 9 Hinge Pin Cover B. Style 2-French Doors WARNING Electrical Shock Hazard Disconnect power before removing doors. Hinge Cover Screw B. Top Hinges A B C D A. Failure to do so can result in death or electrical shock.
Top Hinge Cover C. 5/16" Hex Head Hinge Screws D. Bottom Hinge C. Top Hinge Bottom Hinges A B C Door Removal & Replacement Metal Handle 1 A A. Hinge Screws Wiring Plug A. 3/32" Setscrew Metal Handle 2 Plastic Handle 1 Plastic Handle 2 A A. 3/32" Setscrew Drawer Front Removal Drawer Front Replacement A A. Loosen 4 Door Bracket Screws 9 Hinge Pin Cover B. Style 2-French Doors WARNING Electrical Shock Hazard Disconnect power before removing doors. Hinge Cover Screw B. Top Hinges A B C D A. Failure to do so can result in death or electrical shock.

Owners Manual
Page 10
... driver, turn the roller adjustment screw(s) on each side to turn both adjustment screws the same amount. 5. Front roller adjustment screw B. Grasp the grille firmly and pull it toward you like . Remove the base grille. This makes it is pulled open. Brake foot 4. Style 3-Leveling Screw 1. Style1-Freezer Door Models 1. Grasp the grille firmly and pull it toward you . 10 Style 2-Freezer Drawer Models 1. Roller adjustment screw...
... driver, turn the roller adjustment screw(s) on each side to turn both adjustment screws the same amount. 5. Front roller adjustment screw B. Grasp the grille firmly and pull it toward you like . Remove the base grille. This makes it is pulled open. Brake foot 4. Style 3-Leveling Screw 1. Style1-Freezer Door Models 1. Grasp the grille firmly and pull it toward you . 10 Style 2-Freezer Drawer Models 1. Roller adjustment screw...

Owners Manual
Page 11
... on the door hinge seal. There is a vertically-hinged seal on each side to turn the leveling screw on the left refrigerator door. ■ When the left side door is out of the refrigerator takes some models) The humidity control turns on a heater to the word OFF. Humidity Control (on some weight off the leveling screws. Use in both the refrigerator and freezer displays. Style 1 Recommended Setting "4" REFRIGERATOR USE Opening and Closing Doors (French door models) There are...
... on the door hinge seal. There is a vertically-hinged seal on each side to turn the leveling screw on the left refrigerator door. ■ When the left side door is out of the refrigerator takes some models) The humidity control turns on a heater to the word OFF. Humidity Control (on some weight off the leveling screws. Use in both the refrigerator and freezer displays. Style 1 Recommended Setting "4" REFRIGERATOR USE Opening and Closing Doors (French door models) There are...

Owners Manual
Page 12
... warm/too little ice FREEZER Control one setting higher REFRIGERATOR too cold REFRIGERATOR Control one setting lower FREEZER too cold FREEZER Control one setting at a time. NOTE: Except when first turning on , the temperature display shows the set to the Initial settings as shown. ■ Press the control to OFF to save energy when the environment is displayed. When you need to adjust the temperature in either temperature control more than one setting lower Digital Controls For your convenience, your refrigerator, make...
... warm/too little ice FREEZER Control one setting higher REFRIGERATOR too cold REFRIGERATOR Control one setting lower FREEZER too cold FREEZER Control one setting at a time. NOTE: Except when first turning on , the temperature display shows the set to the Initial settings as shown. ■ Press the control to OFF to save energy when the environment is displayed. When you need to adjust the temperature in either temperature control more than one setting lower Digital Controls For your convenience, your refrigerator, make...

Owners Manual
Page 13
...: Press the Door Alarm touch pad for an hour or more. Press and hold Temp Alarm for the click. To manually turn off this feature on . NOTE: Your ice maker has an automatic shutoff. Temp Alarm The Temp Alarm feature provides temperature information in the moisture-sealed crisper. Digital Control User Preferences The control center allows you replace your model, adjust the control to change the temperature display. NOTE: The Auto Light feature on this...
...: Press the Door Alarm touch pad for an hour or more. Press and hold Temp Alarm for the click. To manually turn off this feature on . NOTE: Your ice maker has an automatic shutoff. Temp Alarm The Temp Alarm feature provides temperature information in the moisture-sealed crisper. Digital Control User Preferences The control center allows you replace your model, adjust the control to change the temperature display. NOTE: The Auto Light feature on this...

Owners Manual
Page 14
... hold Reset Filter or Filter Reset (depending on , 5 seconds off when the system is almost time to cool down and chill water. See "Using the Controls." Replacing the Water Filter To purchase a replacement water filter, model UKF8001AXX-750, contact your model) for the refrigerator to change the water filter. IMPORTANT: Air trapped in the ice storage bin. Turn filter counterclockwise to maintain a fresh supply. Remove sealing label from the filter and water dispensing system. NOTE: The dispenser feature may be avoided, make...
... hold Reset Filter or Filter Reset (depending on , 5 seconds off when the system is almost time to cool down and chill water. See "Using the Controls." Replacing the Water Filter To purchase a replacement water filter, model UKF8001AXX-750, contact your model) for the refrigerator to change the water filter. IMPORTANT: Air trapped in the ice storage bin. Turn filter counterclockwise to maintain a fresh supply. Remove sealing label from the filter and water dispensing system. NOTE: The dispenser feature may be avoided, make...

Owners Manual
Page 15
...), plastic parts, interior and door liners or gaskets. Plug in warm water. 3. Both the refrigerator and freezer sections defrost automatically. Stainless steel: Wash stainless steel surfaces with a clean, soft cloth or sponge and a mild detergent in normal home operating environments. Freezer drawer models ■ Top of the light assembly. NOTE: You may need for routine condenser cleaning in warm water. Replace the light shield. Freezer door models ■ Top of odors. WARNING Explosion Hazard Use nonflammable cleaner. However, clean both...
...), plastic parts, interior and door liners or gaskets. Plug in warm water. 3. Both the refrigerator and freezer sections defrost automatically. Stainless steel: Wash stainless steel surfaces with a clean, soft cloth or sponge and a mild detergent in normal home operating environments. Freezer drawer models ■ Top of the light assembly. NOTE: You may need for routine condenser cleaning in warm water. Replace the light shield. Freezer door models ■ Top of odors. WARNING Explosion Hazard Use nonflammable cleaner. However, clean both...

Owners Manual
Page 16
... when the water valve opens to optimize performance ■ Hissing/Rattling - fans/compressor adjusting to fill the ice maker ■ Pulsating - The doors will not close completely ■ Door blocked open . Do not use an adapter. Replace the fuse or reset the circuit breaker. See "Using the Control(s)." ■ New installation? Allow 24 hours following installation for the refrigerator to coldest setting will not operate The refrigerator seems noisy WARNING Electrical Shock Hazard Plug into...
... when the water valve opens to optimize performance ■ Hissing/Rattling - fans/compressor adjusting to fill the ice maker ■ Pulsating - The doors will not close completely ■ Door blocked open . Do not use an adapter. Replace the fuse or reset the circuit breaker. See "Using the Control(s)." ■ New installation? Allow 24 hours following installation for the refrigerator to coldest setting will not operate The refrigerator seems noisy WARNING Electrical Shock Hazard Plug into...

Owners Manual
Page 17
... dispenser. Adjust the controls a setting colder. Contributes to water supply and turn water shutoff valve fully open . ■ Kink in the line can reduce water flow. Remove filter and operate ice maker. Turn the water shutoff valve fully open . ■ Kink in this section. ■ Recently removed the doors? See "Water Supply Requirements." ■ Questions remain regarding water pressure? Discard ice. Flush the water system before using a new water filter. Replace water filter when indicated. If it correctly. ■ Reverse osmosis water filtration system connected...
... dispenser. Adjust the controls a setting colder. Contributes to water supply and turn water shutoff valve fully open . ■ Kink in the line can reduce water flow. Remove filter and operate ice maker. Turn the water shutoff valve fully open . ■ Kink in this section. ■ Recently removed the doors? See "Water Supply Requirements." ■ Questions remain regarding water pressure? Discard ice. Flush the water system before using a new water filter. Replace water filter when indicated. If it correctly. ■ Reverse osmosis water filtration system connected...

Owners Manual
Page 18
... of water after dispensing is normal. ■ Glass not being held under the dispenser 2 to 3 seconds after installation for water supply to cool completely. ■ Water not been recently dispensed? Make sure the water dispenser tube connections are fully tightened. See "Refrigerator Door(s) and Drawer." WATER FILTER CERTIFICATIONS 18 See "Water Dispenser." ■ Recently changed water filter? The first glass of water. ■ Refrigerator connected to a cold water pipe? Water is leaking from the dispenser is connected to a cold water pipe. Flush the water system...
... of water after dispensing is normal. ■ Glass not being held under the dispenser 2 to 3 seconds after installation for water supply to cool completely. ■ Water not been recently dispensed? Make sure the water dispenser tube connections are fully tightened. See "Refrigerator Door(s) and Drawer." WATER FILTER CERTIFICATIONS 18 See "Water Dispenser." ■ Recently changed water filter? The first glass of water. ■ Refrigerator connected to a cold water pipe? Water is leaking from the dispenser is connected to a cold water pipe. Flush the water system...

Owners Manual
Page 19
..., Asbestos and Lindane. PRODUCT DATA SHEETS Interior Water Filtration System Model UKF8001AXX-750 Capacity 750 Gallons (2839 Liters) System tested and certified by NSF International against NSF/ANSI Standard 53 for the Manufacturer's limited warranty. ■ The filter monitor system measures the amount of water that passes through the filter and alerts you replace the filter. Prices are subject to 22...
..., Asbestos and Lindane. PRODUCT DATA SHEETS Interior Water Filtration System Model UKF8001AXX-750 Capacity 750 Gallons (2839 Liters) System tested and certified by NSF International against NSF/ANSI Standard 53 for the Manufacturer's limited warranty. ■ The filter monitor system measures the amount of water that passes through the filter and alerts you replace the filter. Prices are subject to 22...

Owners Manual
Page 20
... house wiring or plumbing. 3. Service must be easily determined. 12. Service calls to refrigerator or freezer product failures. 7. Any food or medicine loss due to repair or replace appliance light bulbs, air filters or water filters. EXCLUSION OF INCIDENTAL AND CONSEQUENTIAL DAMAGES YOUR SOLE AND EXCLUSIVE REMEDY UNDER THIS LIMITED WARRANTY SHALL BE PRODUCT REPAIR AS PROVIDED HEREIN. ITEMS EXCLUDED FROM WARRANTY This limited warranty does not cover: 1. Service...
... house wiring or plumbing. 3. Service must be easily determined. 12. Service calls to refrigerator or freezer product failures. 7. Any food or medicine loss due to repair or replace appliance light bulbs, air filters or water filters. EXCLUSION OF INCIDENTAL AND CONSEQUENTIAL DAMAGES YOUR SOLE AND EXCLUSIVE REMEDY UNDER THIS LIMITED WARRANTY SHALL BE PRODUCT REPAIR AS PROVIDED HEREIN. ITEMS EXCLUDED FROM WARRANTY This limited warranty does not cover: 1. Service...


