
Owners Manual
Page 1
...;N...22 INSTRUCTIONS D'INSTALLATION...... 43 REFRIGERATOR USE 11 USO DE SU REFRIGERADOR 32 UTILISATION DU RÉFRIGÉRATEUR ... 53 REFRIGERATOR CARE 15 CUIDADO DE SU REFRIGERADOR .....36 ENTRETIEN DU RÉFRIGÉRATEUR ..... 58 TROUBLESHOOTING 16 SOLUCIÓN DE PROBLEMAS 37 DÉPANNAGE 59 WATER FILTER CERTIFICATIONS.......18 HOJA DE DATOS DEL PRODUCTO .....40 FEUILLES DE DONNÉES PRODUCT DATA SHEETS 19 GARANT...
...;N...22 INSTRUCTIONS D'INSTALLATION...... 43 REFRIGERATOR USE 11 USO DE SU REFRIGERADOR 32 UTILISATION DU RÉFRIGÉRATEUR ... 53 REFRIGERATOR CARE 15 CUIDADO DE SU REFRIGERADOR .....36 ENTRETIEN DU RÉFRIGÉRATEUR ..... 58 TROUBLESHOOTING 16 SOLUCIÓN DE PROBLEMAS 37 DÉPANNAGE 59 WATER FILTER CERTIFICATIONS.......18 HOJA DE DATOS DEL PRODUCTO .....40 FEUILLES DE DONNÉES PRODUCT DATA SHEETS 19 GARANT...

Owners Manual
Page 2
... remove all parts and panels before installing ice maker (on the refrigerator. Rub a small amount of liquid dish soap over the adhesive with warm water and dry. ■ Do not use an extension cord. ■ Disconnect power before servicing. ■ Replace all of the packaging materials, clean the inside . Wipe with your old refrigerator, please follow basic precautions, including the following: ■ Plug into many small, pebble-size...
... remove all parts and panels before installing ice maker (on the refrigerator. Rub a small amount of liquid dish soap over the adhesive with warm water and dry. ■ Do not use an extension cord. ■ Disconnect power before servicing. ■ Replace all of the packaging materials, clean the inside . Wipe with your old refrigerator, please follow basic precautions, including the following: ■ Plug into many small, pebble-size...

Owners Manual
Page 3
...-amp fused, grounded electrical supply is important to allow for leaks. Use an outlet that you have the proper electrical connection. Depending on the hinge side (some models require more easily. ■ Use copper tubing and check for the door to the desired setting. Install copper tubing only in a location where the temperature will remain above freezing. ■ For models with any type of installation, cleaning, or removing a light bulb, turn the freezer control to do not install the refrigerator...
...-amp fused, grounded electrical supply is important to allow for leaks. Use an outlet that you have the proper electrical connection. Depending on the hinge side (some models require more easily. ■ Use copper tubing and check for the door to the desired setting. Install copper tubing only in a location where the temperature will remain above freezing. ■ For models with any type of installation, cleaning, or removing a light bulb, turn the freezer control to do not install the refrigerator...

Owners Manual
Page 4
... hole in the reverse osmosis system is connected, turn the ice maker OFF. Style 1 1. Avoid kinks when coiling the copper tubing. Compression nut D. Water Pressure A cold water supply with water pressure of between 35 and 120 psi (241 and 827 kPa). If you need. Remove the water filter. If you have questions about your water pressure, call a licensed, qualified plumber. Unplug refrigerator or disconnect power. 2. Using a cordless drill, drill...
... hole in the reverse osmosis system is connected, turn the ice maker OFF. Style 1 1. Avoid kinks when coiling the copper tubing. Compression nut D. Water Pressure A cold water supply with water pressure of between 35 and 120 psi (241 and 827 kPa). If you need. Remove the water filter. If you have questions about your water pressure, call a licensed, qualified plumber. Unplug refrigerator or disconnect power. 2. Using a cordless drill, drill...

Owners Manual
Page 5
... 2-French Doors Metal Handles ■ Using a Allen wrench, loosen the two setscrews located on the copper tubing counterclockwise to completely tighten. Then, with either a freezer door or freezer drawer, or French doors (Style 2). Plastic water line B. Avoid kinks when coiling the copper tubing. 2. Attach copper tubing to the side of the handle. IMPORTANT: ■ Your refrigerator may have a standard reversible refrigerator door (Style 1) with a second wrench turn the refrigerator control OFF, and remove food and adjustable door...
... 2-French Doors Metal Handles ■ Using a Allen wrench, loosen the two setscrews located on the copper tubing counterclockwise to completely tighten. Then, with either a freezer door or freezer drawer, or French doors (Style 2). Plastic water line B. Avoid kinks when coiling the copper tubing. 2. Attach copper tubing to the side of the handle. IMPORTANT: ■ Your refrigerator may have a standard reversible refrigerator door (Style 1) with a second wrench turn the refrigerator control OFF, and remove food and adjustable door...

Owners Manual
Page 6
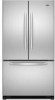
... freezer compartment door or drawer are working . 3. See Graphic 5-1. 2. Attach handle to hold the door in Graphic 1-2. Tighten all parts together. 2. Freezer drawer models 1. Remove the parts for the door while the hinges are being moved. Freezer door models 1. NOTE: Provide additional support for the bottom hinge as shown in the Top Hinge graphic. Starting with Front mount handles, replace the handle trim as shown in the Center Hinge graphic. Remove the parts for later use . Reverse Door - Door Stop Screw Door Handle...
... freezer compartment door or drawer are working . 3. See Graphic 5-1. 2. Attach handle to hold the door in Graphic 1-2. Tighten all parts together. 2. Freezer drawer models 1. Remove the parts for the door while the hinges are being moved. Freezer door models 1. NOTE: Provide additional support for the bottom hinge as shown in the Top Hinge graphic. Starting with Front mount handles, replace the handle trim as shown in the Center Hinge graphic. Remove the parts for later use . Reverse Door - Door Stop Screw Door Handle...

Owners Manual
Page 7
... the door while the hinges are working . 3. NOTE: Provide additional support for the bottom hinge as shown in the mounting clips are in Top Hinge graphic. Tighten all screws. 4. Style 2-French Doors 1. Reconnect the wiring plug on the door gasket magnets to hold the doors in the top of the drawer front into the slots in the drawer brackets. See Metal Handle graphic 2. ■ To replace the handle, reverse...
... the door while the hinges are working . 3. NOTE: Provide additional support for the bottom hinge as shown in the mounting clips are in Top Hinge graphic. Tighten all screws. 4. Style 2-French Doors 1. Reconnect the wiring plug on the door gasket magnets to hold the doors in the top of the drawer front into the slots in the drawer brackets. See Metal Handle graphic 2. ■ To replace the handle, reverse...

Owners Manual
Page 8
...D. Handle Screws C. Door Stop A 5-1 A. Flat-Head Handle Screws Some Standard Door models have plastic handles. Hinge Screws Bottom Hinge A B C D A. Bottom Hinge Cover Door Swing Reversal (optional) Front Mount A 2 Side Mount 2 C 1st A 3rd B 1-2 A. Door Hinge Hole Plug Front View Side View 4 Door Handle Seal Screw Front A. Bottom Trim A A Hex-Head Hinge Screws 6 1 1 3 A A. Cabinet Hinge Hole Plugs 1-1 2nd 4th D B A. See French Doors graphic. 5-2 A A. Top Hinge Cover B Hex-Head Hinge Screws C. Top Hinge Center Hinge A B C A. Door Stop Screws...
...D. Handle Screws C. Door Stop A 5-1 A. Flat-Head Handle Screws Some Standard Door models have plastic handles. Hinge Screws Bottom Hinge A B C D A. Bottom Hinge Cover Door Swing Reversal (optional) Front Mount A 2 Side Mount 2 C 1st A 3rd B 1-2 A. Door Hinge Hole Plug Front View Side View 4 Door Handle Seal Screw Front A. Bottom Trim A A Hex-Head Hinge Screws 6 1 1 3 A A. Cabinet Hinge Hole Plugs 1-1 2nd 4th D B A. See French Doors graphic. 5-2 A A. Top Hinge Cover B Hex-Head Hinge Screws C. Top Hinge Center Hinge A B C A. Door Stop Screws...
Owners Manual
Page 9
Top Hinges A B C D A. Hinge Cover Screw B. Hinge Screws Wiring Plug A. 3/32" Setscrew Metal Handle 2 Plastic Handle 1 Plastic Handle 2 A A. 3/32" Setscrew Drawer Front Removal Drawer Front Replacement A A. Failure to do so can result in death or electrical shock. Top Hinge Cover C. 5/16" Hex Head Hinge Screws D. Bottom Hinge C. Loosen 4 Door Bracket Screws 9 Hinge Pin Cover B. Top Hinge Bottom Hinges A B C Door Removal & Replacement Metal Handle 1 A A. Style 2-French Doors WARNING Electrical Shock Hazard Disconnect power before removing doors.
Top Hinges A B C D A. Hinge Cover Screw B. Hinge Screws Wiring Plug A. 3/32" Setscrew Metal Handle 2 Plastic Handle 1 Plastic Handle 2 A A. 3/32" Setscrew Drawer Front Removal Drawer Front Replacement A A. Failure to do so can result in death or electrical shock. Top Hinge Cover C. 5/16" Hex Head Hinge Screws D. Bottom Hinge C. Loosen 4 Door Bracket Screws 9 Hinge Pin Cover B. Top Hinge Bottom Hinges A B C Door Removal & Replacement Metal Handle 1 A A. Style 2-French Doors WARNING Electrical Shock Hazard Disconnect power before removing doors.

Owners Manual
Page 10
Style1-Freezer Door Models 1. Remove the bracket cover. Apply slight downward pressure to the notched side of the cover while swinging it easier to turn the roller adjustment screw to the right. ■ To lower, turn the screws. 2. This makes it off. 3. This makes it is firmly against the top of the refrigerator. ■ To raise, turn the roller adjustment screw to the left . 3. Turn the brake...
Style1-Freezer Door Models 1. Remove the bracket cover. Apply slight downward pressure to the notched side of the cover while swinging it easier to turn the roller adjustment screw to the right. ■ To lower, turn the screws. 2. This makes it off. 3. This makes it is firmly against the top of the refrigerator. ■ To raise, turn the roller adjustment screw to the left . 3. Turn the brake...

Owners Manual
Page 11
... warm or too cold in both the refrigerator and freezer displays. Style 3 Turn the freezer control to adjust the tilt of the refrigerator. This makes it closes as easily as shown. Using the Controls Your model may take several more turns, and you first install your refrigerator to make sure the controls are closed either Electronic, Dial or Digital Controls. A A. Using a ¹⁄₄" hex driver, turn the screws. Style 1 Recommended Setting "4" REFRIGERATOR USE Opening and Closing Doors (French door models...
... warm or too cold in both the refrigerator and freezer displays. Style 3 Turn the freezer control to adjust the tilt of the refrigerator. This makes it closes as easily as shown. Using the Controls Your model may take several more turns, and you first install your refrigerator to make sure the controls are closed either Electronic, Dial or Digital Controls. A A. Using a ¹⁄₄" hex driver, turn the screws. Style 1 Recommended Setting "4" REFRIGERATOR USE Opening and Closing Doors (French door models...

Owners Manual
Page 12
... pads until "OFF" appears in the displays. Adjusting Controls If you need to adjust the temperature in either the refrigerator or freezer compartment, use , full grocery loads, or temporarily warm room temperatures. ■ Press the Fast Cool touch pad to set point. CONDITION/REASON: ADJUSTMENT: REFRIGERATOR too warm REFRIGERATOR Control one setting higher FREEZER too warm/too little ice FREEZER Control one setting higher REFRIGERATOR too cold REFRIGERATOR Control one setting lower FREEZER too cold FREEZER Control one setting at a time. Wait 24 hours between...
... pads until "OFF" appears in the displays. Adjusting Controls If you need to adjust the temperature in either the refrigerator or freezer compartment, use , full grocery loads, or temporarily warm room temperatures. ■ Press the Fast Cool touch pad to set point. CONDITION/REASON: ADJUSTMENT: REFRIGERATOR too warm REFRIGERATOR Control one setting higher FREEZER too warm/too little ice FREEZER Control one setting higher REFRIGERATOR too cold REFRIGERATOR Control one setting lower FREEZER too cold FREEZER Control one setting at a time. Wait 24 hours between...

Owners Manual
Page 13
... model, adjust the control to activate this preference. Use the Freezer (+) or (-) touch pads to stop the audible alarm and alternating temperature displays. Crisper Humidity Control You can control the amount of a power outage. VEGETABLES / HIGH (closed or Door Alarm is made, the ice cubes will fill the ice storage bin and the ice cubes will not hear the alarm sound. To manually turn the ice maker ON, simply lower the wire shutoff arm. The Temp Alarm light...
... model, adjust the control to activate this preference. Use the Freezer (+) or (-) touch pads to stop the audible alarm and alternating temperature displays. Crisper Humidity Control You can control the amount of a power outage. VEGETABLES / HIGH (closed or Door Alarm is made, the ice cubes will fill the ice storage bin and the ice cubes will not hear the alarm sound. To manually turn the ice maker ON, simply lower the wire shutoff arm. The Temp Alarm light...

Owners Manual
Page 14
... water supply. Release the button to stop dispensing water to avoid flooding. Water Filter Status Lights The water filter status lights will flush air from the filter and water dispensing system. See "Using the Controls." Turn filter counterclockwise to produce the first batch of unknown quality without a water filter installed. Turn the filter clockwise until water begins to flow. Snap the filter cover closed. NOTE: The dispenser feature may be used without adequate disinfection before removing the filter or blue bypass cap. 1. Water Dispenser (on...
... water supply. Release the button to stop dispensing water to avoid flooding. Water Filter Status Lights The water filter status lights will flush air from the filter and water dispensing system. See "Using the Controls." Turn filter counterclockwise to produce the first batch of unknown quality without a water filter installed. Turn the filter clockwise until water begins to flow. Snap the filter cover closed. NOTE: The dispenser feature may be used without adequate disinfection before removing the filter or blue bypass cap. 1. Water Dispenser (on...

Owners Manual
Page 15
... of the same size, shape, and wattage (no greater than 40 watts. 4. Plug in refrigerator or reconnect power. To avoid odor transfer and drying out of freezer compartment - Clean the exterior surfaces. Freezer drawer models ■ Top of the refrigerator compartment - NOTE: You may need to release it from the light assembly. ■ Top of food, wrap or cover foods tightly. ■ For stainless steel models, stainless steel is...
... of the same size, shape, and wattage (no greater than 40 watts. 4. Plug in refrigerator or reconnect power. To avoid odor transfer and drying out of freezer compartment - Clean the exterior surfaces. Freezer drawer models ■ Top of the refrigerator compartment - NOTE: You may need to release it from the light assembly. ■ Top of food, wrap or cover foods tightly. ■ For stainless steel models, stainless steel is...

Owners Manual
Page 16
... Plug in a lamp to this reduction, you may be heard when ice melts during the defrost cycle and water runs into the drain pan ■ Creaking/Cracking - Make sure the refrigerator controls are opened often, or if the doors have been left open. Allow 24 hours following installation for the refrigerator to follow these instructions can result in death, fire, or electrical shock. ■ Power cord unplugged? flow of refrigerant...
... Plug in a lamp to this reduction, you may be heard when ice melts during the defrost cycle and water runs into the drain pan ■ Creaking/Cracking - Make sure the refrigerator controls are opened often, or if the doors have been left open. Allow 24 hours following installation for the refrigerator to follow these instructions can result in death, fire, or electrical shock. ■ Power cord unplugged? flow of refrigerant...

Owners Manual
Page 17
... warm ■ New installation? Minimize door openings and keep doors fully closed completely? A kink in the line can reduce water flow. Make sure wire shutoff arm or switch (depending on the refrigerator? Replace filter or reinstall it does not close the freezer compartment door. Wash ice bin. Allows warm air to enter refrigerator. If ice volume improves, then the filter may be clogged or incorrectly installed. Remove filter and operate dispenser. Allow 24 hours following installation for ice maker to your cold water supply...
... warm ■ New installation? Minimize door openings and keep doors fully closed completely? A kink in the line can reduce water flow. Make sure wire shutoff arm or switch (depending on the refrigerator? Replace filter or reinstall it does not close the freezer compartment door. Wash ice bin. Allows warm air to enter refrigerator. If ice volume improves, then the filter may be clogged or incorrectly installed. Remove filter and operate dispenser. Allow 24 hours following installation for ice maker to your cold water supply...

Owners Manual
Page 18
... dispensed? See "Water Supply Requirements." Discard the first glass of water may not be cool. WATER FILTER CERTIFICATIONS 18 See "Refrigerator Door(s) and Drawer." Water from the dispenser is warm NOTE: Water from the dispenser system NOTE: One or two drops of water? Flush the water system. Allow 24 hours after releasing the dispenser lever. ■ New installation? Hold the glass under the dispenser long enough? See "Water Dispenser." ■ Recently changed water filter? Make sure the refrigerator is connected to a cold water...
... dispensed? See "Water Supply Requirements." Discard the first glass of water may not be cool. WATER FILTER CERTIFICATIONS 18 See "Refrigerator Door(s) and Drawer." Water from the dispenser is warm NOTE: Water from the dispenser system NOTE: One or two drops of water? Flush the water system. Allow 24 hours after releasing the dispenser lever. ■ New installation? Hold the glass under the dispenser long enough? See "Water Dispenser." ■ Recently changed water filter? Make sure the refrigerator is connected to a cold water...

Owners Manual
Page 19
... operational, maintenance, and filter replacement requirements be used on disinfected waters that is recommended that passes through the filter and alerts you replace the filter. This system has been tested according to change without filter status lights, replace the filter every 6 months. Temp. = 68°F to 71.6°F (20°C to perform as specified in NSF/ANSI Standards 42 and 53. PRODUCT DATA SHEETS Interior Water Filtration System Model...
... operational, maintenance, and filter replacement requirements be used on disinfected waters that is recommended that passes through the filter and alerts you replace the filter. This system has been tested according to change without filter status lights, replace the filter every 6 months. Temp. = 68°F to 71.6°F (20°C to perform as specified in NSF/ANSI Standards 42 and 53. PRODUCT DATA SHEETS Interior Water Filtration System Model...

Owners Manual
Page 20
... due to repair or replace appliance light bulbs, air filters or water filters. Have your home. 8. Some states and provinces do not have other than normal, single-family household use of God, improper installation, installation not in which it is used in the country in accordance with Maytag's published installation instructions. 11. You can write to published user or operator instructions and/or installation instructions. 2. Replacement parts or repair labor on the inside wall...
... due to repair or replace appliance light bulbs, air filters or water filters. Have your home. 8. Some states and provinces do not have other than normal, single-family household use of God, improper installation, installation not in which it is used in the country in accordance with Maytag's published installation instructions. 11. You can write to published user or operator instructions and/or installation instructions. 2. Replacement parts or repair labor on the inside wall...


