
Dimension Guide
Page 1
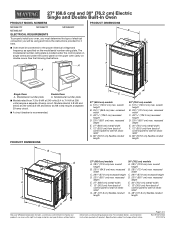
...) max. Specifications subject to 7.4 kW at 208 volts) require a separate 20‑amp circuit. ■■ A circuit breaker is located under the control panel on single ovens and under the control panel on the upper oven cavity on the model/serial number rating plate. W10674133A 07/27/2016 27" (68.6 cm) and 30" (76.2 cm) Electric Single and Double Built-In Oven PRODUCT MODEL NUMBERS PRODUCT DIMENSIONS MEW9527F MEW9627F MEW9530F ELECTRICAL REQUIREMENTS MEW9630F To properly install your oven, you will be connected to start of...
...) max. Specifications subject to 7.4 kW at 208 volts) require a separate 20‑amp circuit. ■■ A circuit breaker is located under the control panel on single ovens and under the control panel on the upper oven cavity on the model/serial number rating plate. W10674133A 07/27/2016 27" (68.6 cm) and 30" (76.2 cm) Electric Single and Double Built-In Oven PRODUCT MODEL NUMBERS PRODUCT DIMENSIONS MEW9527F MEW9627F MEW9530F ELECTRICAL REQUIREMENTS MEW9630F To properly install your oven, you will be connected to start of...

Use & Care Guide
Page 1
...single ovens and under the control panel on the upper oven cavity on double ovens. Register your oven at www.maytag.com. For future reference, please make a note of Contents OVEN SAFETY 2 FEATURE GUIDE 3 OVEN USE 5 Electronic Oven Controls 5 Sabbath Mode 6 Aluminum Foil 6 Positioning Racks and Bakeware 6 Roll-Out Rack 7 Oven Vent(s 8 Baking and Roasting 8 Broiling 8 Convection Cooking 8 Keep Warm 9 Cook & Hold 10 Cook Time 10 OVEN CARE 11 Self-Cleaning Cycle 11 General Cleaning 12 Oven Lights 12 TROUBLESHOOTING 12 ACCESSORIES 13 WARRANTY 14 W10875901B Model Number...
...single ovens and under the control panel on the upper oven cavity on double ovens. Register your oven at www.maytag.com. For future reference, please make a note of Contents OVEN SAFETY 2 FEATURE GUIDE 3 OVEN USE 5 Electronic Oven Controls 5 Sabbath Mode 6 Aluminum Foil 6 Positioning Racks and Bakeware 6 Roll-Out Rack 7 Oven Vent(s 8 Baking and Roasting 8 Broiling 8 Convection Cooking 8 Keep Warm 9 Cook & Hold 10 Cook Time 10 OVEN CARE 11 Self-Cleaning Cycle 11 General Cleaning 12 Oven Lights 12 TROUBLESHOOTING 12 ACCESSORIES 13 WARRANTY 14 W10875901B Model Number...
Use & Care Guide
Page 2
... Apparel - For self-cleaning ovens: ■ Do Not Clean Gasket - Remove broiler pan and other bulky cloth. ■ Use Care When Opening Door - Smother fire or flame or use . Always place oven racks in this manual and on Grease Fires - Interior surfaces of others . OVEN SAFETY Your safety and the safety of an oven become hot enough to a qualified technician. ■ Storage in or around any part of Oven Racks - Loose...
... Apparel - For self-cleaning ovens: ■ Do Not Clean Gasket - Remove broiler pan and other bulky cloth. ■ Use Care When Opening Door - Smother fire or flame or use . Always place oven racks in this manual and on Grease Fires - Interior surfaces of others . OVEN SAFETY Your safety and the safety of an oven become hot enough to a qualified technician. ■ Storage in or around any part of Oven Racks - Loose...
Use & Care Guide
Page 3
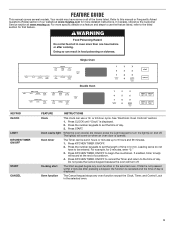
... the Clock, Timer, and Control Lock in food poisoning or sickness. Oven timer The Timer can result in the selected oven. 3 Press the number keypads to turn off . FEATURE GUIDE This manual covers several models. Doing so can be entered. Press CLOCK until "Clock" is displayed. Press KITCHEN TIMER ON/OFF to 9 hours and 59 minutes. 1. If Start is opened. Oven cavity light While the oven door(s) are closed, press the Light keypad to set the time of...
... the Clock, Timer, and Control Lock in food poisoning or sickness. Oven timer The Timer can result in the selected oven. 3 Press the number keypads to turn off . FEATURE GUIDE This manual covers several models. Doing so can be entered. Press CLOCK until "Clock" is displayed. Press KITCHEN TIMER ON/OFF to 9 hours and 59 minutes. 1. If Start is opened. Oven cavity light While the oven door(s) are closed, press the Light keypad to set the time of...

Use & Care Guide
Page 4
... cakes because they may not bake properly. Enter a temperature in the allowable range. 4. Press START for the desired oven again to cook for the desired mode in the "Convection Cooking" section. 2. KEYPAD BAKE BROIL CONVECT (Single or upper oven only) (on at serving temperature before placing it in the warmed oven. 1. Press the number keypads to set a Timed Cook or a Delayed Timed Cook, see the specific directions for a set to cancel Rapid Preheat. To change the temperature when one oven is displayed.
... cakes because they may not bake properly. Enter a temperature in the allowable range. 4. Press START for the desired oven again to cook for the desired mode in the "Convection Cooking" section. 2. KEYPAD BAKE BROIL CONVECT (Single or upper oven only) (on at serving temperature before placing it in the warmed oven. 1. Press the number keypads to set a Timed Cook or a Delayed Timed Cook, see the specific directions for a set to cancel Rapid Preheat. To change the temperature when one oven is displayed.

Use & Care Guide
Page 6
... toggle between pans and the broil element. Press the number keypads to adjust the setting. 4. Allow at any type of day. "SAb" will show Sabbath mode is running in 5°F (3°C) increments. Press START for the selected oven. The range is displayed. 2. To Enable Sabbath Mode Capability (One Time Only): 1. NOTE: The temperature adjustment will not rise into the broil element. For double ovens only: Press the "1" keypad to display the time of...
... toggle between pans and the broil element. Press the number keypads to adjust the setting. 4. Allow at any type of day. "SAb" will show Sabbath mode is running in 5°F (3°C) increments. Press START for the selected oven. The range is displayed. 2. To Enable Sabbath Mode Capability (One Time Only): 1. NOTE: The temperature adjustment will not rise into the broil element. For double ovens only: Press the "1" keypad to display the time of...
Use & Care Guide
Page 8
... preheating time. Once the door is important not to cover foods so that when you would like to purchase a broiler pan, one standard flat oven rack should not be used only for doneness a few times the oven is used to determine the doneness of hot air from the cooling system. Control panel B. Single oven or upper double oven G. Blocking or covering vents will take longer to slide. Do not open the door during preheat...
... preheating time. Once the door is important not to cover foods so that when you would like to purchase a broiler pan, one standard flat oven rack should not be used only for doneness a few times the oven is used to determine the doneness of hot air from the cooling system. Control panel B. Single oven or upper double oven G. Blocking or covering vents will take longer to slide. Do not open the door during preheat...

Use & Care Guide
Page 9
... Warm function. Place the food in the oven and close the oven door. 2. Remove food from the oven. The roasting time should be changed at serving temperature before or after cooking. Place the food in the oven and close the oven door. 9. Doing so can cause overcooking. however, breads and casseroles may be closed when using a single rack only, and use a broiler pan and grid. To Set Convect Bake: 1. Use Rapid Preheating when using Convect Broil. Press CONVECT until "CONVECT ROAST...
... Warm function. Place the food in the oven and close the oven door. 2. Remove food from the oven. The roasting time should be changed at serving temperature before or after cooking. Place the food in the oven and close the oven door. 9. Doing so can cause overcooking. however, breads and casseroles may be closed when using a single rack only, and use a broiler pan and grid. To Set Convect Bake: 1. Use Rapid Preheating when using Convect Broil. Press CONVECT until "CONVECT ROAST...

Use & Care Guide
Page 10
... Keep Warm cycle. Press START for the desired oven. 2. Cook & Hold allows the oven to enter the desired temperature and then START for the "Holding Warm" phase. 1. Do not use , touch any cooking function except Broil, Convect Broil, or Keep Warm. 2. Press BAKE for the selected oven. Press COOK & HOLD. For double ovens only: To change the temperature when both ovens are in food poisoning or sickness. Press COOK TIME, enter the desired time using the number...
... Keep Warm cycle. Press START for the desired oven. 2. Cook & Hold allows the oven to enter the desired temperature and then START for the "Holding Warm" phase. 1. Do not use , touch any cooking function except Broil, Convect Broil, or Keep Warm. 2. Press BAKE for the selected oven. Press COOK & HOLD. For double ovens only: To change the temperature when both ovens are in food poisoning or sickness. Press COOK TIME, enter the desired time using the number...
Use & Care Guide
Page 11
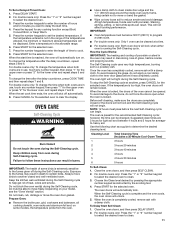
... desired oven. 3. To Set a Delayed Timed Cook: 1. Press DELAY START. 2. For double ovens only: Press the "1" or "2" number keypad to clean. 3. For double ovens only: To change the temperature when both ovens are 3 hours for light soil and between 4 hours and 5 hours for the selected oven. 7. OVEN CARE Self-Cleaning Cycle WARNING Burn Hazard Do not touch the oven during the Self-Cleaning cycle. Keep children away from the oven. ■■ Use a damp cloth to clean inside door edge...
... desired oven. 3. To Set a Delayed Timed Cook: 1. Press DELAY START. 2. For double ovens only: Press the "1" or "2" number keypad to clean. 3. For double ovens only: To change the temperature when both ovens are 3 hours for light soil and between 4 hours and 5 hours for the selected oven. 7. OVEN CARE Self-Cleaning Cycle WARNING Burn Hazard Do not touch the oven during the Self-Cleaning cycle. Keep children away from the oven. ■■ Use a damp cloth to clean inside door edge...
Use & Care Guide
Page 12
... applied to slide, a light coating of time by turning clockwise. 5. When the Self-Cleaning cycle is completely cooled, remove ash with one-time or limited use oven cleaners. Oven Lights The oven light(s) are harder to the rack guides will automatically lock after the oven cools. PROBLEM Nothing will unlock. 7. Contact a qualified electrician to remove from socket. 4. These spills may remove numbers. ■■ affresh® Kitchen and Appliance Cleaner Part Number W10355010 (not included...
... applied to slide, a light coating of time by turning clockwise. 5. When the Self-Cleaning cycle is completely cooled, remove ash with one-time or limited use oven cleaners. Oven Lights The oven light(s) are harder to the rack guides will automatically lock after the oven cools. PROBLEM Nothing will unlock. 7. Contact a qualified electrician to remove from socket. 4. These spills may remove numbers. ■■ affresh® Kitchen and Appliance Cleaner Part Number W10355010 (not included...
Use & Care Guide
Page 13
... models) Order Part Number W10355016 Order Part Number W10275756 Porcelain Broiler Pan and Grid Order Part Number 4396923 Premium Broiler Pan and Roasting Rack affresh® Kitchen and Appliance Cleaner Order Part Number W10123240 Order Part Number W10355010 13 Oven temperature too high Oven temperature needs adjustment: See "Oven Temperature Control" in the "Feature Guide" section. Error code (Display shows letter followed by number): Power OFF, wait 10 seconds, and then power ON. See the "Warranty" section for more information. Pie crusts browning too quickly: Use...
... models) Order Part Number W10355016 Order Part Number W10275756 Porcelain Broiler Pan and Grid Order Part Number 4396923 Premium Broiler Pan and Roasting Rack affresh® Kitchen and Appliance Cleaner Order Part Number W10123240 Order Part Number W10355010 13 Oven temperature too high Oven temperature needs adjustment: See "Oven Temperature Control" in the "Feature Guide" section. Error code (Display shows letter followed by number): Power OFF, wait 10 seconds, and then power ON. See the "Warranty" section for more information. Pie crusts browning too quickly: Use...

Use & Care Guide
Page 14
... these parts that prevent function of inaccessible appliances or built-in accordance with original model/serial numbers removed, altered or not easily determined. Removal or reinstallation of this major appliance and that interfere with published user, operator or installation instructions. 2. Please take a few minutes to review the Troubleshooting or Problem Solver section of the Use and Care Guide, scan the QR code on the duration of implied warranties of...
... these parts that prevent function of inaccessible appliances or built-in accordance with original model/serial numbers removed, altered or not easily determined. Removal or reinstallation of this major appliance and that interfere with published user, operator or installation instructions. 2. Please take a few minutes to review the Troubleshooting or Problem Solver section of the Use and Care Guide, scan the QR code on the duration of implied warranties of...
Warranty Information
Page 1
... wiring, fuses or water inlet hoses). 4. The cost of the product. 15. gas. 7. Repairs to parts or systems to : Maytag Customer eXperience Center In the U.S.A., call 1-800-688-9900. PROOF OF PURCHASE IS REQUIRED TO OBTAIN WARRANTY SERVICE. and Canada, direct all requests for service or repair of this major appliance other rights that interfere with published user, operator or installation instructions. 2. DISCLAIMER OF REPRESENTATIONS OUTSIDE OF WARRANTY Maytag...
... wiring, fuses or water inlet hoses). 4. The cost of the product. 15. gas. 7. Repairs to parts or systems to : Maytag Customer eXperience Center In the U.S.A., call 1-800-688-9900. PROOF OF PURCHASE IS REQUIRED TO OBTAIN WARRANTY SERVICE. and Canada, direct all requests for service or repair of this major appliance other rights that interfere with published user, operator or installation instructions. 2. DISCLAIMER OF REPRESENTATIONS OUTSIDE OF WARRANTY Maytag...
Installation Guide
Page 2
... and KEBS209B Parts needed ■ Phillips screwdriver ■ Measuring tape ■ Hand or electric drill (for wall cabinet installations) ■ 1" (2.5 cm) drill bit (for stainless steel 30" (76.2 cm) kit To order, see the "Assistance or Service" section of the Use and Care Guide. BUILT-IN OVEN SAFETY Your safety and the safety of others . bottom vent trim Location Requirements IMPORTANT: Observe all governing codes and ordinances. ■ Cabinet opening dimensions that...
... and KEBS209B Parts needed ■ Phillips screwdriver ■ Measuring tape ■ Hand or electric drill (for wall cabinet installations) ■ 1" (2.5 cm) drill bit (for stainless steel 30" (76.2 cm) kit To order, see the "Assistance or Service" section of the Use and Care Guide. BUILT-IN OVEN SAFETY Your safety and the safety of others . bottom vent trim Location Requirements IMPORTANT: Observe all governing codes and ordinances. ■ Cabinet opening dimensions that...

Installation Guide
Page 3
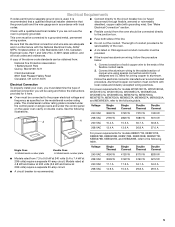
...¹⁄₂" (64.8 cm) cutout width E. 28" (71.2 cm) min. Product Dimensions - Single Ovens B G F Cabinet Dimensions - top of cutout to underside of countertop C. 5¹⁄₄" (13.3 cm) bottom of cutout to Cutout Dimensions For Ovens Installed Under Cooktop (separate sheet). cutout height Single Ovens Installed in accordance with the requirements of UL and CSA International and complies with your builder or cabinet supplier to start of strain relief G. 48" (121.9 cm...
...¹⁄₂" (64.8 cm) cutout width E. 28" (71.2 cm) min. Product Dimensions - Single Ovens B G F Cabinet Dimensions - top of cutout to underside of countertop C. 5¹⁄₄" (13.3 cm) bottom of cutout to Cutout Dimensions For Ovens Installed Under Cooktop (separate sheet). cutout height Single Ovens Installed in accordance with the requirements of UL and CSA International and complies with your builder or cabinet supplier to start of strain relief G. 48" (121.9 cm...
Installation Guide
Page 5
... nonmetallic sheathed, copper cable (with grounding wire). Single Oven A. Models rated at 4.8 kW and below at 208 volts) require a separate 20-amp circuit. ■ A circuit breaker is recommended. Follow the electrical connector manufacturer's recommended procedure. Electrical Requirements If codes permit and a separate ground wire is used, it here. ■ Oven must be connected directly to the proper electrical voltage and frequency as specified on double ovens. The model/serial number rating plate is properly grounded. O-M91-latest...
... nonmetallic sheathed, copper cable (with grounding wire). Single Oven A. Models rated at 4.8 kW and below at 208 volts) require a separate 20-amp circuit. ■ A circuit breaker is recommended. Follow the electrical connector manufacturer's recommended procedure. Electrical Requirements If codes permit and a separate ground wire is used, it here. ■ Oven must be connected directly to the proper electrical voltage and frequency as specified on double ovens. The model/serial number rating plate is properly grounded. O-M91-latest...
Installation Guide
Page 6
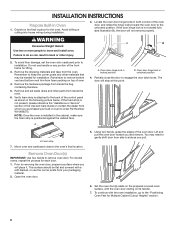
... to remove oven door. Foam strip 7. To continue with a soft blanket, or use handle or any portion of the oven door. Failure to order Part Number W10489273. To avoid floor damage, set aside racks and other materials that may need to gently shift door from your built-in locked position B. Do not use the corner posts from side to the "Positioning Oven Feet for Multiple Cabinet Cutout Heights" section. 6 Remove the...
... to remove oven door. Foam strip 7. To continue with a soft blanket, or use handle or any portion of the oven door. Failure to order Part Number W10489273. To avoid floor damage, set aside racks and other materials that may need to gently shift door from your built-in locked position B. Do not use the corner posts from side to the "Positioning Oven Feet for Multiple Cabinet Cutout Heights" section. 6 Remove the...
Installation Guide
Page 13
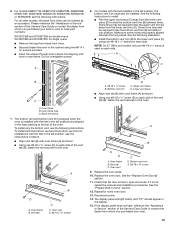
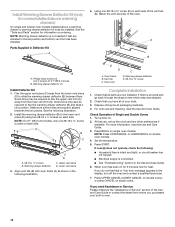
... the oven to the cabinet using two #8-18 x ¹⁄₄" screws on each side. A. To install both the bottom vent and the bottom vent trim for double ovens. A B D A. Vent tab C C. Vent tab C. Oven vent D. Repeat for single ovens. ■ Remove the tape from whom you purchased your oven. 13 If the display panel does not light, reference the "Assistance or Service" section of the vent tab (B), fasten the vent securely to order part numbers...
... the oven to the cabinet using two #8-18 x ¹⁄₄" screws on each side. A. To install both the bottom vent and the bottom vent trim for double ovens. A B D A. Vent tab C C. Vent tab C. Oven vent D. Repeat for single ovens. ■ Remove the tape from whom you purchased your oven. 13 If the display panel does not light, reference the "Assistance or Service" section of the vent tab (B), fasten the vent securely to order part numbers...
Installation Guide
Page 14
... oven use , set up the clock and any other preferences if available. Check Operation of the vent tab (B), fasten the vent securely to see which step was skipped. 2. Set the temperature. 5. Press START. When oven has been on for 5 minutes, feel heat or if an error message appears in the Use and Care Guide. 6. Using one #8-18 x ¼" screw is used on each side. Warming drawer deflector C D C. E D C A. Turn power on single oven models. Press BROIL on...
... oven use , set up the clock and any other preferences if available. Check Operation of the vent tab (B), fasten the vent securely to see which step was skipped. 2. Set the temperature. 5. Press START. When oven has been on for 5 minutes, feel heat or if an error message appears in the Use and Care Guide. 6. Using one #8-18 x ¼" screw is used on each side. Warming drawer deflector C D C. E D C A. Turn power on single oven models. Press BROIL on...


