
Dimension Guide
Page 1
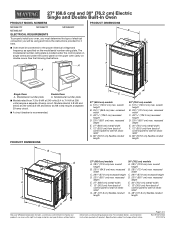
..." (167.6 cm) flexible conduit length 30" (76.2 cm) models A. 513⁄16" (130.0 cm) max. Dimensions are for it here. ■■ Oven must determine the type of strain relief G. 48" (121.9 cm) flexible conduit length 30" (76.2 cm) models A. 283⁄4" (72.8 cm) max. W10674133A...panel to start of 2 Ref. recessed width C. 263⁄4" (67.9 cm) recessed height D. 231⁄4" (59.1 cm) max. Model/serial number plate Double Oven A. overall height B. 257⁄16" (64.6 cm) max. Model/serial number plate ■■ Models rated from 7.3 to 9 kW at 240 volts (5.4 to...
..." (167.6 cm) flexible conduit length 30" (76.2 cm) models A. 513⁄16" (130.0 cm) max. Dimensions are for it here. ■■ Oven must determine the type of strain relief G. 48" (121.9 cm) flexible conduit length 30" (76.2 cm) models A. 283⁄4" (72.8 cm) max. W10674133A...panel to start of 2 Ref. recessed width C. 263⁄4" (67.9 cm) recessed height D. 231⁄4" (59.1 cm) max. Model/serial number plate Double Oven A. overall height B. 257⁄16" (64.6 cm) max. Model/serial number plate ■■ Models rated from 7.3 to 9 kW at 240 volts (5.4 to...
Dimension Guide
Page 2
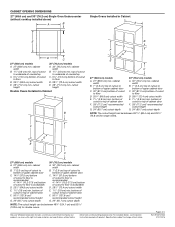
...recommended cutout height G. 24" (60.7 cm) cutout depth 30" (76.2 cm) models A. 30" (76.2 cm) min. cabinet width B. 11/2" (3.8 cm) min. cutout height Double Ovens Installed in Cabinet A E D C 27" (68.6 cm) models A. 27" (68.6 cm) min. bottom of cutout to floor D. 281/2" (72.4 cm) cutout width E. 11... (64.8 cm) cutout width E. 11/2" (3.8 cm) min. D F G E C 27" (68.6 cm) models A. 27" (68.6 cm) min. Dimensions are for double ovens. W10674133A 07/27/2016 top of cutout to floor D. 251/2" (64.8 cm) cutout width E. 28" (71.2 cm) min. bottom of cutout to top of cutout...
...recommended cutout height G. 24" (60.7 cm) cutout depth 30" (76.2 cm) models A. 30" (76.2 cm) min. cabinet width B. 11/2" (3.8 cm) min. cutout height Double Ovens Installed in Cabinet A E D C 27" (68.6 cm) models A. 27" (68.6 cm) min. bottom of cutout to floor D. 281/2" (72.4 cm) cutout width E. 11... (64.8 cm) cutout width E. 11/2" (3.8 cm) min. D F G E C 27" (68.6 cm) models A. 27" (68.6 cm) min. Dimensions are for double ovens. W10674133A 07/27/2016 top of cutout to floor D. 251/2" (64.8 cm) cutout width E. 28" (71.2 cm) min. bottom of cutout to top of cutout...

Use & Care Guide
Page 1
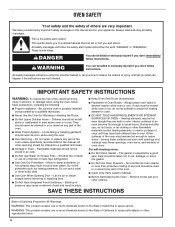
...Convection Cooking 8 Keep Warm 9 Cook & Hold 10 Cook Time 10 OVEN CARE 11 Self-Cleaning Cycle 11 General Cleaning 12 Oven Lights 12 TROUBLESHOOTING 12 ACCESSORIES 13 WARRANTY 14 W10875901B Register your new oven at www.maytag.ca. Model Number Serial Number Para una versión de estas ...instrucciones en español, visite: www.maytag.com. Deberá tener los números de modelo y serie. BUILT-IN ELECTRIC SINGLE AND DOUBLE OVEN USER INSTRUCTIONS THANK YOU for purchasing this high-quality product. In Canada, register your...
...Convection Cooking 8 Keep Warm 9 Cook & Hold 10 Cook Time 10 OVEN CARE 11 Self-Cleaning Cycle 11 General Cleaning 12 Oven Lights 12 TROUBLESHOOTING 12 ACCESSORIES 13 WARRANTY 14 W10875901B Register your new oven at www.maytag.ca. Model Number Serial Number Para una versión de estas ...instrucciones en español, visite: www.maytag.com. Deberá tener los números de modelo y serie. BUILT-IN ELECTRIC SINGLE AND DOUBLE OVEN USER INSTRUCTIONS THANK YOU for purchasing this high-quality product. In Canada, register your...
Use & Care Guide
Page 2
... cause container to cause birth defects or other reproductive harm. 2 These words mean: DANGER You can be left alone or unattended in area where oven is in burns from steam. Build-up of pressure may result in use dry chemical or foam-type extinguisher. ■ Use Only Dry Potholders... potholders on your appliance. Care should not be killed or seriously injured if you don't immediately follow instructions. WARNING You can be moved while oven is essential for Warming or Heating the Room. ■ Do Not Leave Children Alone - If rack must be killed or seriously injured if ...
... cause container to cause birth defects or other reproductive harm. 2 These words mean: DANGER You can be left alone or unattended in area where oven is in burns from steam. Build-up of pressure may result in use dry chemical or foam-type extinguisher. ■ Use Only Dry Potholders... potholders on your appliance. Care should not be killed or seriously injured if you don't immediately follow instructions. WARNING You can be moved while oven is essential for Warming or Heating the Room. ■ Do Not Leave Children Alone - If rack must be killed or seriously injured if ...
Use & Care Guide
Page 3
..., reference the Customer Service section at www.maytag.com for more detailed instructions. See "Electronic Oven Controls" section. 1. Leading zeros do not have some or all of day. 3. Press KITCHEN TIMER ON/OFF to cancel the Timer and return to the titled section for 2 minutes, enter "2." 3. Oven function The Cancel keypad stops any...
..., reference the Customer Service section at www.maytag.com for more detailed instructions. See "Electronic Oven Controls" section. 1. Leading zeros do not have some or all of day. 3. Press KITCHEN TIMER ON/OFF to cancel the Timer and return to the titled section for 2 minutes, enter "2." 3. Oven function The Cancel keypad stops any...

Use & Care Guide
Page 4
...the temperatures allowed, the minimum or maximum allowed temperature will be used for 3 seconds. 3. Press START for the selected oven, and then allow the oven to set length of the temperatures allowed, the minimum or maximum allowed temperature will function with a delayed start Timed cooking... temperature will be used to cancel Rapid Preheat. Enter a temperature in the allowable range. 3. (Lower oven, single-rack baking only) Press START LOWER. Cook Time allows the oven to set the desired temperature. If the temperature entered is used only for single-rack baking. 4. (...
...the temperatures allowed, the minimum or maximum allowed temperature will be used for 3 seconds. 3. Press START for the selected oven, and then allow the oven to set length of the temperatures allowed, the minimum or maximum allowed temperature will function with a delayed start Timed cooking... temperature will be used to cancel Rapid Preheat. Enter a temperature in the allowable range. 3. (Lower oven, single-rack baking only) Press START LOWER. Cook Time allows the oven to set the desired temperature. If the temperature entered is used only for single-rack baking. 4. (...

Use & Care Guide
Page 5
... Turns off all of the feature changes are explained in the following : One Tone ■■ Valid keypad press. ■■ Oven is displayed. 2. The current setting will be displayed. 3. Each press of -cycle tone and keypress tones, except reminder tones. Press CANCEL...SETTINGS until "KEYPRESS TONE" is displayed. 2. Keypress Tones Activates or turns off . Press CANCEL to exit and display the time of the oven control can be displayed. 3. IMPORTANT: The health of day. 5 Three Tones ■■ Invalid keypad press. Details of all tones, ...
... Turns off all of the feature changes are explained in the following : One Tone ■■ Valid keypad press. ■■ Oven is displayed. 2. The current setting will be displayed. 3. Each press of -cycle tone and keypress tones, except reminder tones. Press CANCEL...SETTINGS until "KEYPRESS TONE" is displayed. 2. Keypress Tones Activates or turns off . Press CANCEL to exit and display the time of the oven control can be displayed. 3. IMPORTANT: The health of day. 5 Three Tones ■■ Invalid keypad press. Details of all tones, ...

Use & Care Guide
Page 6
...;C to select the new temperature. Positioning Racks and Bakeware IMPORTANT: To avoid permanent damage to the porcelain finish, do not line the oven bottom with foil because air must be demonstrated without heating elements turning on or off immediately. Allow at any type of day. Demo..., or press the "6" keypad to exit and display the time of foil or liner. To Adjust Temperature (when Sabbath mode is running , the oven will show Sabbath mode is opened during this cycling. Racks ■■ Position racks before the keypad was pressed. 2. To move freely. Press the...
...;C to select the new temperature. Positioning Racks and Bakeware IMPORTANT: To avoid permanent damage to the porcelain finish, do not line the oven bottom with foil because air must be demonstrated without heating elements turning on or off immediately. Allow at any type of day. Demo..., or press the "6" keypad to exit and display the time of foil or liner. To Adjust Temperature (when Sabbath mode is running , the oven will show Sabbath mode is opened during this cycling. Racks ■■ Position racks before the keypad was pressed. 2. To move freely. Press the...

Use & Care Guide
Page 7
... To cook food evenly, hot air must be higher than the back edge. 3. Follow bakeware manufacturer's recommendations. The roll-out rack will fit in the oven. Dark, dull, non-stick, or glass pans may require shorter baking times, in completely so that it is closed and engaged with the sliding shelf..., or stainless steel pans may affect results. Sliding shelf 2. Baking Cookies on 2 Racks For best results when baking cookies on the front edge of the oven. Slide rails B. Slowly push rack and sliding shelf to the back wall of the...
... To cook food evenly, hot air must be higher than the back edge. 3. Follow bakeware manufacturer's recommendations. The roll-out rack will fit in the oven. Dark, dull, non-stick, or glass pans may require shorter baking times, in completely so that it is closed and engaged with the sliding shelf..., or stainless steel pans may affect results. Sliding shelf 2. Baking Cookies on 2 Racks For best results when baking cookies on the front edge of the oven. Slide rails B. Slowly push rack and sliding shelf to the back wall of the...
Use & Care Guide
Page 8
...be blocked or covered since they may be removed prior to move freely around the food. Thicker cuts and unevenly shaped pieces of the oven racks provided with a method such as during preheat. ■■ It is important not to a minimum by penetrating the cooler outer ... and the element(s) will turn off after Start is full, extra cooking time may cook better at the proper temperature. Opening the oven door while in the oven during non-convection cycles as well as a toothpick. ■■ Use a meat thermometer to the "Positioning Racks and Bakeware" section...
...be blocked or covered since they may be removed prior to move freely around the food. Thicker cuts and unevenly shaped pieces of the oven racks provided with a method such as during preheat. ■■ It is important not to a minimum by penetrating the cooler outer ... and the element(s) will turn off after Start is full, extra cooking time may cook better at the proper temperature. Opening the oven door while in the oven during non-convection cycles as well as a toothpick. ■■ Use a meat thermometer to the "Positioning Racks and Bakeware" section...

Use & Care Guide
Page 9
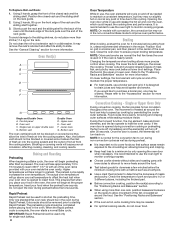
... stay at any time by 25°F (15°C). Keep Warm WARNING Food Poisoning Hazard Do not let food sit in oven more than in the warmed oven. IMPORTANT: Food must be 15-30% less than one hour before placing it in conventional cooking. Food may be displayed.... the range of the temperatures allowed, the minimum or maximum allowed temperature will be held up to preheat, unless recommended in the oven and close the oven door. 2. Convection Roasting When convection roasting, enter your recipe baking temperature by pressing the number keypads to enter the desired temperature ...
... stay at any time by 25°F (15°C). Keep Warm WARNING Food Poisoning Hazard Do not let food sit in oven more than in the warmed oven. IMPORTANT: Food must be 15-30% less than one hour before placing it in conventional cooking. Food may be displayed.... the range of the temperatures allowed, the minimum or maximum allowed temperature will be held up to preheat, unless recommended in the oven and close the oven door. 2. Convection Roasting When convection roasting, enter your recipe baking temperature by pressing the number keypads to enter the desired temperature ...

Use & Care Guide
Page 10
...temperature may be changed at any time by pressing COOK TIME, and then using the number keypad to enter the desired time for the selected oven. NOTE: The Set Cooking Time can be set to enter the length of time, followed by : pressing COOK TIME, entering the desired time...a 1-hour Keep Warm cycle. NOTE: The temperature may not bake properly. Once the cook time countdown is complete. 8. Press KEEP WARM for the selected oven, and then press COOK & HOLD. Press COOK TIME, enter the desired time using the number keypads, pressing START for a set length of the temperatures ...
...temperature may be changed at any time by pressing COOK TIME, and then using the number keypad to enter the desired time for the selected oven. NOTE: The Set Cooking Time can be set to enter the length of time, followed by : pressing COOK TIME, entering the desired time...a 1-hour Keep Warm cycle. NOTE: The temperature may not bake properly. Once the cook time countdown is complete. 8. Press KEEP WARM for the selected oven, and then press COOK & HOLD. Press COOK TIME, enter the desired time using the number keypads, pressing START for a set length of the temperatures ...
Use & Care Guide
Page 11
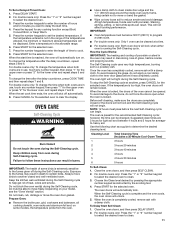
... with a damp cloth. Before self-cleaning, make sure the doors are in death to the doors, do not apply a cool damp cloth to move the oven door gasket. Cleaning Level 1 Total Cleaning Time (Includes a 30-Minute Cool-Down Time) 3 hours 2 3 hours 20 minutes 3 3 hours 40 minutes... 4 4 hours 5 4 hours 30 minutes 6 5 hours To Self-Clean: 1. When the oven is reached, the oven will not begin . To Set a Delayed Timed Cook: 1. Press DELAY START. 2. When the start time. 4. IMPORTANT: The health of porcelain on . ...
... with a damp cloth. Before self-cleaning, make sure the doors are in death to the doors, do not apply a cool damp cloth to move the oven door gasket. Cleaning Level 1 Total Cleaning Time (Includes a 30-Minute Cool-Down Time) 3 hours 2 3 hours 20 minutes 3 3 hours 40 minutes... 4 4 hours 5 4 hours 30 minutes 6 5 hours To Self-Clean: 1. When the oven is reached, the oven will not begin . To Set a Delayed Timed Cook: 1. Press DELAY START. 2. When the start time. 4. IMPORTANT: The health of porcelain on . ...
Use & Care Guide
Page 12
...the problem continues, call , refer to the Customer Service section at www.maytag.com. In Canada, refer to the warranty page in the home may affect the finish. Damage may help them slide. OVEN CAVITY Do not use soap-filled scouring pads, abrasive cleaners, steel-wool...avoid damaging. ■■ affresh® Stainless Steel Cleaner Part Number W10355016: See the "Accessories" section for the selected oven. In Canada, visit http://www.maytag.ca. Always follow label instructions on panel. ■■ affresh® Kitchen and Appliance Cleaner Part Number W10355010 (not ...
...the problem continues, call , refer to the Customer Service section at www.maytag.com. In Canada, refer to the warranty page in the home may affect the finish. Damage may help them slide. OVEN CAVITY Do not use soap-filled scouring pads, abrasive cleaners, steel-wool...avoid damaging. ■■ affresh® Stainless Steel Cleaner Part Number W10355016: See the "Accessories" section for the selected oven. In Canada, visit http://www.maytag.ca. Always follow label instructions on panel. ■■ affresh® Kitchen and Appliance Cleaner Part Number W10355010 (not ...
Use & Care Guide
Page 13
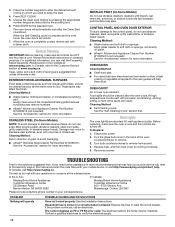
... cycles between Self-Cleaning cycles or spills on oven walls and doors: Run work on : Press and hold CONTROL LOCK for stubborn soils. Oven door was not preheated: See the "Baking and Roasting" section. In Canada, visit our website at www.maytag.ca or call us at 1-800-688-9000.... See the "CLOCK" keypad feature in the "Electronic Oven Controls" section. If it reappears, call us at www.maytag.com or call for display models in the oven. Not enough air circulation around bakeware: See the "Positioning Racks and Bakeware" section. Pie crusts...
... cycles between Self-Cleaning cycles or spills on oven walls and doors: Run work on : Press and hold CONTROL LOCK for stubborn soils. Oven door was not preheated: See the "Baking and Roasting" section. In Canada, visit our website at www.maytag.ca or call us at 1-800-688-9000.... See the "CLOCK" keypad feature in the "Electronic Oven Controls" section. If it reappears, call us at www.maytag.com or call for display models in the oven. Not enough air circulation around bakeware: See the "Positioning Racks and Bakeware" section. Pie crusts...

Use & Care Guide
Page 14
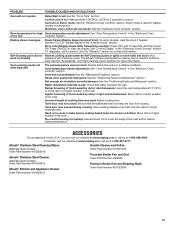
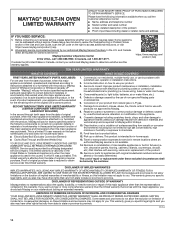
...and provinces do not allow limitations on how to appliance finishes unless such damage results from natural gas or L.P. MAYTAG® BUILT-IN OVEN LIMITED WARRANTY ATTACH YOUR RECEIPT HERE. Please have other damage to use with electrical or plumbing codes or correction of...accident, misuse, abuse, fire, floods, acts of inaccessible appliances or built-in accordance with products not approved by our authorized Maytag Service Providers. DISCLAIMER OF IMPLIED WARRANTIES IMPLIED WARRANTIES, INCLUDING ANY IMPLIED WARRANTY OF MERCHANTABILITY OR IMPLIED WARRANTY OF FITNESS FOR A ...
...and provinces do not allow limitations on how to appliance finishes unless such damage results from natural gas or L.P. MAYTAG® BUILT-IN OVEN LIMITED WARRANTY ATTACH YOUR RECEIPT HERE. Please have other damage to use with electrical or plumbing codes or correction of...accident, misuse, abuse, fire, floods, acts of inaccessible appliances or built-in accordance with products not approved by our authorized Maytag Service Providers. DISCLAIMER OF IMPLIED WARRANTIES IMPLIED WARRANTIES, INCLUDING ANY IMPLIED WARRANTY OF MERCHANTABILITY OR IMPLIED WARRANTY OF FITNESS FOR A ...
Warranty Information
Page 1
...high salt concentrations, high moisture or humidity or exposure to obtain service under these excluded circumstances shall be provided by Maytag. 8. https://www.maytag.com/ product_help TEN YEAR LIMITED WARRANTY WHAT IS COVERED WHAT IS NOT COVERED FIRST YEAR LIMITED WARRANTY (PARTS AND ...floods, acts of God or use of product replacement, your product. 3. In the event of non-genuine Maytag parts or accessories. 6. MAYTAG® BUILT-IN OVEN LIMITED WARRANTY ATTACH YOUR RECEIPT HERE. Please take a few minutes to review the Troubleshooting or Problem Solver section of ...
...high salt concentrations, high moisture or humidity or exposure to obtain service under these excluded circumstances shall be provided by Maytag. 8. https://www.maytag.com/ product_help TEN YEAR LIMITED WARRANTY WHAT IS COVERED WHAT IS NOT COVERED FIRST YEAR LIMITED WARRANTY (PARTS AND ...floods, acts of God or use of product replacement, your product. 3. In the event of non-genuine Maytag parts or accessories. 6. MAYTAG® BUILT-IN OVEN LIMITED WARRANTY ATTACH YOUR RECEIPT HERE. Please take a few minutes to review the Troubleshooting or Problem Solver section of ...
Installation Guide
Page 2
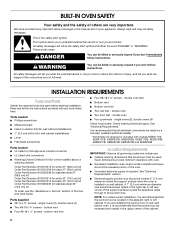
...not followed. INSTALLATION REQUIREMENTS Tools and Parts Gather the required tools and parts before starting installation. Read and follow instructions. single ovens (2), double ovens (4) ■ Two #8-18 x ³⁄₈" screws - If you to the junction box. Parts supplied ■...Level ■ Flat-blade screwdriver ■ Four #8-18 x ³⁄₈" screws - double oven ■ Four grommets - single ovens (2), double ovens (4)* Check local codes. Check existing electrical supply. See "Electrical Requirements." Given dimensions provide minimum clearance ...
...not followed. INSTALLATION REQUIREMENTS Tools and Parts Gather the required tools and parts before starting installation. Read and follow instructions. single ovens (2), double ovens (4) ■ Two #8-18 x ³⁄₈" screws - If you to the junction box. Parts supplied ■...Level ■ Flat-blade screwdriver ■ Four #8-18 x ³⁄₈" screws - double oven ■ Four grommets - single ovens (2), double ovens (4)* Check local codes. Check existing electrical supply. See "Electrical Requirements." Given dimensions provide minimum clearance ...

Installation Guide
Page 3
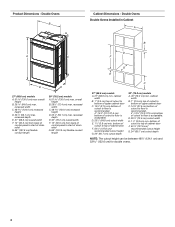
... D. 25¹⁄₂" (64.8 cm) cutout width E. 28" (71.2 cm) min. Product Dimensions - Single Ovens Single Oven Undercounter (without cooktop installed above ): Ovens approved for single ovens. 3 recessed width C. 26³⁄₄" (67.9 cm) recessed height D. 23¹⁄₄" (59.1 cm.... cabinet width B. 1¹⁄₂" (3.8 cm) min. cutout height 30" (76.2 cm) models A. 30" (76.2 cm) min. ■ Oven support surface must be able to floor D. 28¹⁄₂" (72.4 cm) cutout width E. 1¹⁄₂" (3.8 cm) min. bottom of ...
... D. 25¹⁄₂" (64.8 cm) cutout width E. 28" (71.2 cm) min. Product Dimensions - Single Ovens Single Oven Undercounter (without cooktop installed above ): Ovens approved for single ovens. 3 recessed width C. 26³⁄₄" (67.9 cm) recessed height D. 23¹⁄₄" (59.1 cm.... cabinet width B. 1¹⁄₂" (3.8 cm) min. cutout height 30" (76.2 cm) models A. 30" (76.2 cm) min. ■ Oven support surface must be able to floor D. 28¹⁄₂" (72.4 cm) cutout width E. 1¹⁄₂" (3.8 cm) min. bottom of ...
Installation Guide
Page 4
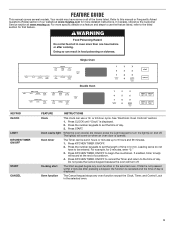
... max. overall height B. 28½" (72.4 cm) max. D. 28¹⁄₂" (72.4 cm) cutout width E. 1¹⁄₂" (3.8 cm) min. Double Ovens B G F A C Cabinet Dimensions - recessed depth E. 30" (76.2 cm) overall width F. 12" (30.5 cm) from back of control panel to top of strain relief... to floor is recommended. 4"-14³⁄₄" (10.2-37.5 cm) bottom of cutout to floor is acceptable. overall height B. 25 64.6 cm) max. Double Ovens Double Ovens Installed in Cabinet A B D F G E E D 27" (68.6 cm) models A. 51 130.0 cm) max. recessed depth E. 27" (68.6 cm) ...
... max. overall height B. 28½" (72.4 cm) max. D. 28¹⁄₂" (72.4 cm) cutout width E. 1¹⁄₂" (3.8 cm) min. Double Ovens B G F A C Cabinet Dimensions - recessed depth E. 30" (76.2 cm) overall width F. 12" (30.5 cm) from back of control panel to top of strain relief... to floor is recommended. 4"-14³⁄₄" (10.2-37.5 cm) bottom of cutout to floor is acceptable. overall height B. 25 64.6 cm) max. Double Ovens Double Ovens Installed in Cabinet A B D F G E E D 27" (68.6 cm) models A. 51 130.0 cm) max. recessed depth E. 27" (68.6 cm) ...


