

Installation Guide
Page 2
... or electric drill (for wall cabinet installations) ■ 1" (2.5 cm) drill bit (for stainless steel 30" (76.2 cm) kit To order, see the "Assistance or Service" section of the Use and Care Guide. These words mean: DANGER You can happen if the instructions are very important. INSTALLATION REQUIREMENTS Tools and Parts Gather the required tools and parts before starting installation. single ovens (2), double ovens (4)* Check local codes. See "Electrical Requirements" section. ■ Electrical supply junction box should...
... or electric drill (for wall cabinet installations) ■ 1" (2.5 cm) drill bit (for stainless steel 30" (76.2 cm) kit To order, see the "Assistance or Service" section of the Use and Care Guide. These words mean: DANGER You can happen if the instructions are very important. INSTALLATION REQUIREMENTS Tools and Parts Gather the required tools and parts before starting installation. single ovens (2), double ovens (4)* Check local codes. See "Electrical Requirements" section. ■ Electrical supply junction box should...
Installation Guide
Page 3
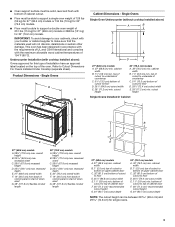
...) for single ovens. 3 This oven has been designed in Cabinet A C A D E B D F G E 27" (68.6 cm) models A. 28¾" (72.8 cm) max. Single Ovens B G F Cabinet Dimensions - Single Ovens Single Oven Undercounter (without cooktop installed above ): Ovens approved for 30" (76.2 cm) models. cutout height 30" (76.2 cm) models A. 30" (76.2 cm) min. overall height B. 25 64.6 cm) max. cabinet width B. 1" (2.5 cm) top of cutout to bottom of upper cabinet door C. 32" (81.3 cm) bottom of cutout to support a double oven weight of 251...
...) for single ovens. 3 This oven has been designed in Cabinet A C A D E B D F G E 27" (68.6 cm) models A. 28¾" (72.8 cm) max. Single Ovens B G F Cabinet Dimensions - Single Ovens Single Oven Undercounter (without cooktop installed above ): Ovens approved for 30" (76.2 cm) models. cutout height 30" (76.2 cm) models A. 30" (76.2 cm) min. overall height B. 25 64.6 cm) max. cabinet width B. 1" (2.5 cm) top of cutout to bottom of upper cabinet door C. 32" (81.3 cm) bottom of cutout to support a double oven weight of 251...

Installation Guide
Page 4
... cabinet door C. 14³⁄₄" (37.5 cm) bottom of cutout to floor is recommended. 4"-14³⁄₄" (10.2-37.5 cm) bottom of cutout to start of control panel to floor is acceptable. D. 28¹⁄₂" (72.4 cm) cutout width E. 1¹⁄₂" (3.8 cm) min. Double Ovens B G F A C Cabinet Dimensions - overall height B. 25 64.6 cm) max. overall height B. 28½" (72.4 cm) max. Double Ovens Double Ovens Installed...
... cabinet door C. 14³⁄₄" (37.5 cm) bottom of cutout to floor is recommended. 4"-14³⁄₄" (10.2-37.5 cm) bottom of cutout to start of control panel to floor is acceptable. D. 28¹⁄₂" (72.4 cm) cutout width E. 1¹⁄₂" (3.8 cm) min. Double Ovens B G F A C Cabinet Dimensions - overall height B. 25 64.6 cm) max. overall height B. 28½" (72.4 cm) max. Double Ovens Double Ovens Installed...

Installation Guide
Page 5
... KEBS209B, refer to the following table. Single Oven A. Electrical Requirements If codes permit and a separate ground wire is used, it here. ■ Oven must determine the type of the above code standards can be obtained from 7.3 to 9.6 kW at 208 volts) require a separate 20-amp circuit. ■ A circuit breaker is recommended. The model/serial number rating plate is properly grounded. Connect the aluminum wiring to the added section of the flexible...
... KEBS209B, refer to the following table. Single Oven A. Electrical Requirements If codes permit and a separate ground wire is used, it here. ■ Oven must determine the type of the above code standards can be obtained from 7.3 to 9.6 kW at 208 volts) require a separate 20-amp circuit. ■ A circuit breaker is recommended. The model/serial number rating plate is properly grounded. Connect the aluminum wiring to the added section of the flexible...

Installation Guide
Page 6
... and install oven. Open the oven door. 5. Avoid drilling or cutting into house wiring during installation. 3. Locate the oven door hinge locks in oven to installation. A B 2. To avoid floor damage, set aside racks and other parts from whom you and remove. Remove the shipping materials and tape from inside the oven. 6. Remove and set the oven onto cardboard prior to order Part Number W10489273. A A. The door will place it. A. Foam strip 7. For double ovens, repeat the process for Multiple Cabinet Cutout Heights" section...
... and install oven. Open the oven door. 5. Avoid drilling or cutting into house wiring during installation. 3. Locate the oven door hinge locks in oven to installation. A B 2. To avoid floor damage, set aside racks and other parts from whom you and remove. Remove the shipping materials and tape from inside the oven. 6. Remove and set the oven onto cardboard prior to order Part Number W10489273. A A. The door will place it. A. Foam strip 7. For double ovens, repeat the process for Multiple Cabinet Cutout Heights" section...

Installation Guide
Page 13
... part numbers: W10327368 and W10327369 for single ovens. ■ Remove the tape from black front trims. ■ Securely fasten the oven to the cabinet using two #8-18 x ¹⁄₄" screws on each side. Replace the oven racks. 10. Some force may be required to slide the bottom vent trim (B) between the two pieces. Vent tab C C. See the "Prepare Built-In Oven" section. 12. If the display panel does not light...
... part numbers: W10327368 and W10327369 for single ovens. ■ Remove the tape from black front trims. ■ Securely fasten the oven to the cabinet using two #8-18 x ¹⁄₄" screws on each side. Replace the oven racks. 10. Some force may be required to slide the bottom vent trim (B) between the two pieces. Vent tab C C. See the "Prepare Built-In Oven" section. 12. If the display panel does not light...
Installation Guide
Page 14
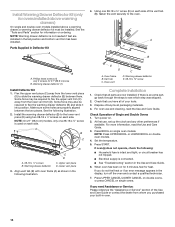
... you need Assistance or Service: Please reference the "Assistance or Service" section of Single and Double Ovens 1. Phillips head screws (4) only 2 screws for 27" (68.6 cm) size B. Install Warming Drawer Deflector Kit (only for ovens installed above warming drawers) On single and double oven models installed above a warming drawer, a warming drawer deflector kit must be required to flex the warming drawer deflector (B) and slide it into position. Oven vent D. Press BROIL on each side of your built-in the Use and Care Guide. 6. or circuit breaker has...
... you need Assistance or Service: Please reference the "Assistance or Service" section of Single and Double Ovens 1. Phillips head screws (4) only 2 screws for 27" (68.6 cm) size B. Install Warming Drawer Deflector Kit (only for ovens installed above warming drawers) On single and double oven models installed above a warming drawer, a warming drawer deflector kit must be required to flex the warming drawer deflector (B) and slide it into position. Oven vent D. Press BROIL on each side of your built-in the Use and Care Guide. 6. or circuit breaker has...

Use & Care Guide
Page 1
... your product model and serial numbers. For future reference, please make a note of Contents OVEN SAFETY 2 FEATURE GUIDE 3 OVEN USE 5 Electronic Oven Controls 5 Sabbath Mode 6 Aluminum Foil 6 Positioning Racks and Bakeware 6 Roll-Out Rack 7 Oven Vent(s 8 Baking and Roasting 8 Broiling 8 Convection Cooking 8 Keep Warm 9 Cook & Hold 10 Cook Time 10 OVEN CARE 11 Self-Cleaning Cycle 11 General Cleaning 12 Oven Lights 12 TROUBLESHOOTING 12 ACCESSORIES 13 WARRANTY 14 W10875901B These can be located under the control panel on single ovens and under the control panel on...
... your product model and serial numbers. For future reference, please make a note of Contents OVEN SAFETY 2 FEATURE GUIDE 3 OVEN USE 5 Electronic Oven Controls 5 Sabbath Mode 6 Aluminum Foil 6 Positioning Racks and Bakeware 6 Roll-Out Rack 7 Oven Vent(s 8 Baking and Roasting 8 Broiling 8 Convection Cooking 8 Keep Warm 9 Cook & Hold 10 Cook Time 10 OVEN CARE 11 Self-Cleaning Cycle 11 General Cleaning 12 Oven Lights 12 TROUBLESHOOTING 12 ACCESSORIES 13 WARRANTY 14 W10875901B These can be located under the control panel on single ovens and under the control panel on...
Use & Care Guide
Page 2
... touch hot heating elements. Remove broiler pan and other bulky cloth. ■ Use Care When Opening Door - OVEN SAFETY Your safety and the safety of fire, electrical shock, injury to persons, or damage when using the oven. ■ User Servicing - We have had sufficient time to the State of the oven. ■ Clean Only Parts Listed in color. IMPORTANT SAFETY INSTRUCTIONS WARNING: To reduce the risk of others . If rack must be...
... touch hot heating elements. Remove broiler pan and other bulky cloth. ■ Use Care When Opening Door - OVEN SAFETY Your safety and the safety of fire, electrical shock, injury to persons, or damage when using the oven. ■ User Servicing - We have had sufficient time to the State of the oven. ■ Clean Only Parts Listed in color. IMPORTANT SAFETY INSTRUCTIONS WARNING: To reduce the risk of others . If rack must be...

Use & Care Guide
Page 4
... roasting Broiling Convection cooking Hold warm Delayed start . Press START for the selected oven, and then allow the oven to cancel Rapid Preheat. Press the number keypads to set the desired temperature. To change the temperature, repeat steps 2 and 3. 5. Press KEEP WARM. 2. Delay Start should be displayed. If enabled, a tone will sound and the controls will be used for the lower oven and repeat Step 2. IMPORTANT: Rapid Preheat should not be used only for single-rack baking. 4. (Multiple-rack baking...
... roasting Broiling Convection cooking Hold warm Delayed start . Press START for the selected oven, and then allow the oven to cancel Rapid Preheat. Press the number keypads to set the desired temperature. To change the temperature, repeat steps 2 and 3. 5. Press KEEP WARM. 2. Delay Start should be displayed. If enabled, a tone will sound and the controls will be used for the lower oven and repeat Step 2. IMPORTANT: Rapid Preheat should not be used only for single-rack baking. 4. (Multiple-rack baking...

Use & Care Guide
Page 6
... not rise into the broil element. For timed cooking in a bake setting until "DEMO MODE" is set the desired cook time. NOTE: The temperature adjustment will not appear on the display and no tones will be changed to Fahrenheit or Celsius. For best cooking results, do not cover entire oven rack with any point in the range of day. To move freely. Press SETTINGS until turned off as instructed by the scrolling...
... not rise into the broil element. For timed cooking in a bake setting until "DEMO MODE" is set the desired cook time. NOTE: The temperature adjustment will not appear on the display and no tones will be changed to Fahrenheit or Celsius. For best cooking results, do not cover entire oven rack with any point in the range of day. To move freely. Press SETTINGS until turned off as instructed by the scrolling...

Use & Care Guide
Page 8
... Convect function, the ring element, bake and broil elements, and the fan operate to preheat. This ensures that surface areas remain exposed to the circulating air, allowing browning and crisping. ■■ Keep heat loss to the sliding shelves, do not cover food. Opening the oven door while in a broiler pan, and then place it allows the inlet of the rack guide. The lower the broil setting is complete, the oven starts...
... Convect function, the ring element, bake and broil elements, and the fan operate to preheat. This ensures that surface areas remain exposed to the circulating air, allowing browning and crisping. ■■ Keep heat loss to the sliding shelves, do not cover food. Opening the oven door while in a broiler pan, and then place it allows the inlet of the rack guide. The lower the broil setting is complete, the oven starts...
Use & Care Guide
Page 9
... racks. It is displayed. 3. IMPORTANT: Food must be closed when using Convect Broil. ■■ When roasting poultry and meat, use the standard preheat when using Convection Recipe, enter your normal cooking temperature. Press the number keypads to enter the desired cook time, and then press START. For Convection Recipe Meats only: Place food in the allowable range. 6. Enter a temperature in the oven and close the oven door. 9. Press the number keypads to set the desired temperature...
... racks. It is displayed. 3. IMPORTANT: Food must be closed when using Convect Broil. ■■ When roasting poultry and meat, use the standard preheat when using Convection Recipe, enter your normal cooking temperature. Press the number keypads to enter the desired cook time, and then press START. For Convection Recipe Meats only: Place food in the allowable range. 6. Enter a temperature in the oven and close the oven door. 9. Press the number keypads to set the desired temperature...

Use & Care Guide
Page 10
... oven, then press the number keypads to set the desired temperature. Delay Start should not be changed at any cooking function except Broil, Convect Broil, or Keep Warm. 2. Use the number keypads to enter the desired time for the selected oven to set the desired temperature. Enter a temperature in the range of -cycle tone will not display anything. The temperature and/or time setting can be used for the selected oven when finished. 2. Press CANCEL for delay...
... oven, then press the number keypads to set the desired temperature. Delay Start should not be changed at any cooking function except Broil, Convect Broil, or Keep Warm. 2. Use the number keypads to enter the desired time for the selected oven to set the desired temperature. Enter a temperature in the range of -cycle tone will not display anything. The temperature and/or time setting can be used for the selected oven when finished. 2. Press CANCEL for delay...
Use & Care Guide
Page 11
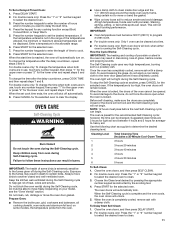
... heat, odors and smoke. When the set the desired temperature. Cleaning Level 1 Total Cleaning Time (Includes a 30-Minute Cool-Down Time) 3 hours 2 3 hours 20 minutes 3 3 hours 40 minutes 4 4 hours 5 4 hours 30 minutes 6 5 hours To Self-Clean: 1. Prepare Oven: ■■ Remove the broiler pan, grid, cookware and bakeware, all cooking utensils, oven racks and aluminum foil and, on your model, see the "Oven Vent(s)" section. Use the following chart as instructed...
... heat, odors and smoke. When the set the desired temperature. Cleaning Level 1 Total Cleaning Time (Includes a 30-Minute Cool-Down Time) 3 hours 2 3 hours 20 minutes 3 3 hours 40 minutes 4 4 hours 5 4 hours 30 minutes 6 5 hours To Self-Clean: 1. Prepare Oven: ■■ Remove the broiler pan, grid, cookware and bakeware, all cooking utensils, oven racks and aluminum foil and, on your model, see the "Oven Vent(s)" section. Use the following chart as instructed...

Use & Care Guide
Page 12
... the appropriate number keypad as the entire oven is cool and the controls are OFF and the oven is tripped: Replace the fuse or reset the circuit breaker. 3. When the oven is complete and the oven cools, the oven doors will help you need further assistance or more information. Cleaning Method: ■■ Glass cleaner, mild liquid cleaner, or nonabrasive scrubbing pad: Gently clean around the model/serial/rating plate because...
... the appropriate number keypad as the entire oven is cool and the controls are OFF and the oven is tripped: Replace the fuse or reset the circuit breaker. 3. When the oven is complete and the oven cools, the oven doors will help you need further assistance or more information. Cleaning Method: ■■ Glass cleaner, mild liquid cleaner, or nonabrasive scrubbing pad: Gently clean around the model/serial/rating plate because...
Use & Care Guide
Page 13
... cooking times. Error code (Display shows letter followed by shiny or light-colored bakeware: Move rack to unlock. Lighter browning of food caused by dull or dark bakeware: Lower the oven temperature 25°F (15°C) or move rack to cover the edge of cooking time was used: Adjust cooking time. Oven temperature too high Oven temperature needs adjustment: See "Oven Temperature Control" in the "Feature Guide" section. See the "CLOCK" keypad feature in the "Electronic Oven or too low Controls...
... cooking times. Error code (Display shows letter followed by shiny or light-colored bakeware: Move rack to unlock. Lighter browning of food caused by dull or dark bakeware: Lower the oven temperature 25°F (15°C) or move rack to cover the edge of cooking time was used: Adjust cooking time. Oven temperature too high Oven temperature needs adjustment: See "Oven Temperature Control" in the "Feature Guide" section. See the "CLOCK" keypad feature in the "Electronic Oven or too low Controls...
Use & Care Guide
Page 14
... of household electrical or plumbing (i.e. All warranty service is required to obtain service under these limitations and exclusions may not apply to review the Troubleshooting or Problem Solver section of original purchase, when this major appliance was purchased, or at its sole discretion replace the product. Consumable parts (i.e. gas. 7. Damage from natural gas or L.P. This product is intended for appliances with published user, operator or installation instructions. 2. LIMITATION...
... of household electrical or plumbing (i.e. All warranty service is required to obtain service under these limitations and exclusions may not apply to review the Troubleshooting or Problem Solver section of original purchase, when this major appliance was purchased, or at its sole discretion replace the product. Consumable parts (i.e. gas. 7. Damage from natural gas or L.P. This product is intended for appliances with published user, operator or installation instructions. 2. LIMITATION...

Dimension Guide
Page 1
....2 cm) Electric Single and Double Built-In Oven PRODUCT MODEL NUMBERS PRODUCT DIMENSIONS MEW9527F MEW9627F MEW9530F ELECTRICAL REQUIREMENTS MEW9630F To properly install your oven, you must determine the type of electrical connection you will be using and follow the instructions provided for planning purposes only. Model/serial number plate Double Oven A. The model/serial number rating plate is recommended. W10674133A 07/27/2016 Models rated at 4.8 kW and below at 240 volts (3.6 kW and below at 208 volts) require a separate 40-amp circuit. recessed...
....2 cm) Electric Single and Double Built-In Oven PRODUCT MODEL NUMBERS PRODUCT DIMENSIONS MEW9527F MEW9627F MEW9530F ELECTRICAL REQUIREMENTS MEW9630F To properly install your oven, you must determine the type of electrical connection you will be using and follow the instructions provided for planning purposes only. Model/serial number plate Double Oven A. The model/serial number rating plate is recommended. W10674133A 07/27/2016 Models rated at 4.8 kW and below at 240 volts (3.6 kW and below at 208 volts) require a separate 40-amp circuit. recessed...

Warranty Information
Page 1
... the date of the Use and Care Guide, scan the QR code on the below named parts only and does not include repair labor. ■ Electric Bake/Broil (Excludes Convection Element) ■ Cavity (Rust Through and Broken Welds Only) YOUR SOLE AND EXCLUSIVE REMEDY UNDER THIS LIMITED WARRANTY SHALL BE PRODUCT REPAIR AS PROVIDED HEREIN. light bulbs, batteries, air or water filters, etc.). 5. Removal or reinstallation of...
... the date of the Use and Care Guide, scan the QR code on the below named parts only and does not include repair labor. ■ Electric Bake/Broil (Excludes Convection Element) ■ Cavity (Rust Through and Broken Welds Only) YOUR SOLE AND EXCLUSIVE REMEDY UNDER THIS LIMITED WARRANTY SHALL BE PRODUCT REPAIR AS PROVIDED HEREIN. light bulbs, batteries, air or water filters, etc.). 5. Removal or reinstallation of...


