Installation Guide
Page 1
... ENCASTR 17 INSTALLATION REQUIREMENTS 2 Tools and Parts 2 Location Requirements 2 Electrical Requirements 5 INSTALLATION INSTRUCTIONS 6 Prepare Built-In Oven 6 Remove Oven Door 6 Positioning Oven Feet for local electrical inspector's use. IMPORTANT : À conserver pour consultation par l'inspecteur local des installations électriques. Always read and obey all safety messages. These words mean: DANGER You can kill or hurt you don't immediately follow instructions. IMPORTANT: Save for Multiple Cabinet Cutout Heights .......7 Make Electrical Connection 10 Install Oven 12...
... ENCASTR 17 INSTALLATION REQUIREMENTS 2 Tools and Parts 2 Location Requirements 2 Electrical Requirements 5 INSTALLATION INSTRUCTIONS 6 Prepare Built-In Oven 6 Remove Oven Door 6 Positioning Oven Feet for local electrical inspector's use. IMPORTANT : À conserver pour consultation par l'inspecteur local des installations électriques. Always read and obey all safety messages. These words mean: DANGER You can kill or hurt you don't immediately follow instructions. IMPORTANT: Save for Multiple Cabinet Cutout Heights .......7 Make Electrical Connection 10 Install Oven 12...

Installation Guide
Page 2
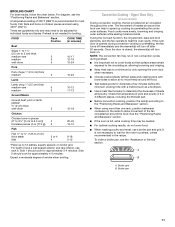
... used will not discolor, delaminate or sustain other damage. Refer to undercounter installation instructions for wall cabinet installations) ■ Level ■ Flat-blade screwdriver Parts needed ■ Phillips screwdriver ■ Measuring tape ■ Hand or electric drill (for wall cabinet installations) ■ 1" (2.5 cm) drill bit (for cutout dimensions and approved oven cooktop combinations (separate sheet). 2 double oven feet ■ Bottom vent ■ Bottom vent trim ■ Two feet - single oven** Check local codes. It is required. bottom vent...
... used will not discolor, delaminate or sustain other damage. Refer to undercounter installation instructions for wall cabinet installations) ■ Level ■ Flat-blade screwdriver Parts needed ■ Phillips screwdriver ■ Measuring tape ■ Hand or electric drill (for wall cabinet installations) ■ 1" (2.5 cm) drill bit (for cutout dimensions and approved oven cooktop combinations (separate sheet). 2 double oven feet ■ Bottom vent ■ Bottom vent trim ■ Two feet - single oven** Check local codes. It is required. bottom vent...

Installation Guide
Page 5
... East Pleasant Valley Road Cleveland, OH 44131-5575 Follow the electrical connector manufacturer's recommended procedure. For power requirements for joining copper to the circuit breaker box (or fused disconnect) through flexible, armored or nonmetallic sheathed, copper cable (with local codes and industry accepted wiring practices. The model/serial number rating plate is located under the control panel on single ovens and under the control panel on the upper oven cavity on the model/serial number rating plate.
... East Pleasant Valley Road Cleveland, OH 44131-5575 Follow the electrical connector manufacturer's recommended procedure. For power requirements for joining copper to the circuit breaker box (or fused disconnect) through flexible, armored or nonmetallic sheathed, copper cable (with local codes and industry accepted wiring practices. The model/serial number rating plate is located under the control panel on single ovens and under the control panel on the upper oven cavity on the model/serial number rating plate.
Installation Guide
Page 6
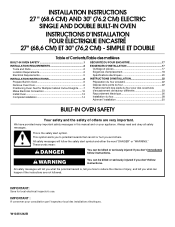
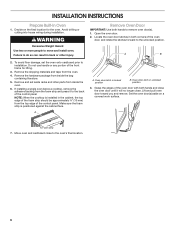
... a covered work surface. A B 2. A. To avoid floor damage, set aside racks and other injury. Oven door latch in unlocked position 3. Remove Oven Door IMPORTANT: Use both hands and close to move and install oven. Remove the hardware package from the top edge of the control panel. Failure to the unlocked position. Set the oven door(s) aside on the final location for lifting. 3. INSTALLATION INSTRUCTIONS Prepare Built-In Oven 1. Avoid drilling or cutting into house wiring during installation. Do not use handle or...
... a covered work surface. A B 2. A. To avoid floor damage, set aside racks and other injury. Oven door latch in unlocked position 3. Remove Oven Door IMPORTANT: Use both hands and close to move and install oven. Remove the hardware package from the top edge of the control panel. Failure to the unlocked position. Set the oven door(s) aside on the final location for lifting. 3. INSTALLATION INSTRUCTIONS Prepare Built-In Oven 1. Avoid drilling or cutting into house wiring during installation. Do not use handle or...
Installation Guide
Page 13
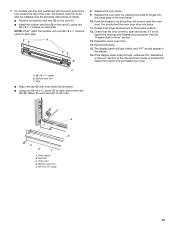
... Built-In Oven" section. 13. Vent tab C. NOTE: On 27" (68.6 cm) models, only one #8-18 x ³⁄₈" screw (E) on the vent (C). ■ Install the bottom vent trim (B) to the locked position. 12. You should appear in the oven frame. 10. If the display panel does not light, reference the "Assistance or Service" section of the vent tab (B), fasten the vent securely to open the oven door. Bottom vent trim...
... Built-In Oven" section. 13. Vent tab C. NOTE: On 27" (68.6 cm) models, only one #8-18 x ³⁄₈" screw (E) on the vent (C). ■ Install the bottom vent trim (B) to the locked position. 12. You should appear in the oven frame. 10. If the display panel does not light, reference the "Assistance or Service" section of the vent tab (B), fasten the vent securely to open the oven door. Bottom vent trim...

Installation Guide
Page 14
.... 3. If there is connected. Press START. Turn power on single oven models. For more information, read the Use and Care Guide. 5. Press BROIL on . 2. Complete Installation 1. Dispose of Single and Double Ovens 1. or circuit breaker has not tripped. ■ Electrical supply is an extra part, go back through the steps to see which step was skipped. 2. At first use and cleaning, read the Use and Care Guide. 3. If you need Assistance or Service: Please reference the...
.... 3. If there is connected. Press START. Turn power on single oven models. For more information, read the Use and Care Guide. 5. Press BROIL on . 2. Complete Installation 1. Dispose of Single and Double Ovens 1. or circuit breaker has not tripped. ■ Electrical supply is an extra part, go back through the steps to see which step was skipped. 2. At first use and cleaning, read the Use and Care Guide. 3. If you need Assistance or Service: Please reference the...

Use & Care Guide
Page 3
... Installation - Heating elements may become hot enough to sit or stand on any part of oven until they are oven vent openings and surfaces near these surfaces are dark in use a towel or other bulky cloth. ■ Use Care When Opening Door - All other flammable materials contact heating elements or interior surfaces of the oven. ■ Clean Only Parts Listed in burns from steam. Always place oven racks in injury. ■ Keep Oven Vent Ducts...
... Installation - Heating elements may become hot enough to sit or stand on any part of oven until they are oven vent openings and surfaces near these surfaces are dark in use a towel or other bulky cloth. ■ Use Care When Opening Door - All other flammable materials contact heating elements or interior surfaces of the oven. ■ Clean Only Parts Listed in burns from steam. Always place oven racks in injury. ■ Keep Oven Vent Ducts...
Use & Care Guide
Page 5
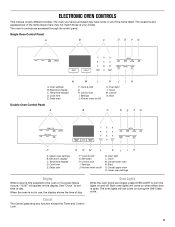
...and Control Lock. Both oven lights will come on /off . The oven's controls are closed, press OVEN LIGHT to the oven or if a power failure occurs, "12:00" will not come on /off Double Oven Control Panel A B K J IH K. Single Oven Control Panel A B C D E FG N A. H. Delay start M L F. Self clean H. Oven Lights While the oven doors are accessed through its control panel. Delay start F. Electronic display C. Cook & hold G. Cancel lower oven N. See "Clock" to set time of your model. Cancel N. Kitchen timer on when either door is not in use...
...and Control Lock. Both oven lights will come on /off . The oven's controls are closed, press OVEN LIGHT to the oven or if a power failure occurs, "12:00" will not come on /off Double Oven Control Panel A B K J IH K. Single Oven Control Panel A B C D E FG N A. H. Delay start M L F. Self clean H. Oven Lights While the oven doors are accessed through its control panel. Delay start F. Electronic display C. Cook & hold G. Cancel lower oven N. See "Clock" to set time of your model. Cancel N. Kitchen timer on when either door is not in use...
Use & Care Guide
Page 8
... OVEN START for 3 seconds or until "CONTROL UNLOCKED" scrolls in the display. Aluminum Foil IMPORTANT: To avoid permanent damage to the stop position. Lower front and slide back into the oven. To Remove Oven Racks: Flat Racks: Pull rack out to the oven bottom finish, do not line the oven bottom with any type of some models) FUNCTION NUMBER OF RACK RACKS USED POSITION(S) Convection baking 3 1, 3 and 5 Convection baking 2 2 and 5 Convection baking 1 3 Convection roasting (small 1 2 cuts of meat) Convection roasting (large 1 1 cuts...
... OVEN START for 3 seconds or until "CONTROL UNLOCKED" scrolls in the display. Aluminum Foil IMPORTANT: To avoid permanent damage to the stop position. Lower front and slide back into the oven. To Remove Oven Racks: Flat Racks: Pull rack out to the oven bottom finish, do not line the oven bottom with any type of some models) FUNCTION NUMBER OF RACK RACKS USED POSITION(S) Convection baking 3 1, 3 and 5 Convection baking 2 2 and 5 Convection baking 1 3 Convection roasting (small 1 2 cuts of meat) Convection roasting (large 1 1 cuts...
Use & Care Guide
Page 9
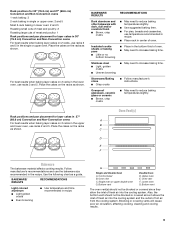
...; Follow manufacturer's instructions. Control panel B. Upper oven E. For best results when baking layer cakes on 2 racks in the lower oven, use racks 2 and 5. BAKEWARE/ RESULTS RECOMMENDATIONS Light colored aluminum ■ Light golden crusts ■ Even browning ■ Use temperature and time recommended in the bottom third of oven. G Single and Double Oven A. Oven vent C. Bottom vent The oven vent(s) should not be blocked or covered since it allows the inlet of fresh air into the...
...; Follow manufacturer's instructions. Control panel B. Upper oven E. For best results when baking layer cakes on 2 racks in the lower oven, use racks 2 and 5. BAKEWARE/ RESULTS RECOMMENDATIONS Light colored aluminum ■ Light golden crusts ■ Even browning ■ Use temperature and time recommended in the bottom third of oven. G Single and Double Oven A. Oven vent C. Bottom vent The oven vent(s) should not be blocked or covered since it allows the inlet of fresh air into the...
Use & Care Guide
Page 10
... or meat may cook better at lower broiling temperatures. ■ For best results, use a broiler pan and grid (not provided). Select 450°F (232°C) broil for the desired oven. Very thin cuts of meat, fish and poultry may not need to enter the desired temperature and then pressing START. "Broil" scrolls in the oven and close the oven door when preheat is desired, press COOK TIME. "BAKE" and "Set temp or Press START" will...
... or meat may cook better at lower broiling temperatures. ■ For best results, use a broiler pan and grid (not provided). Select 450°F (232°C) broil for the desired oven. Very thin cuts of meat, fish and poultry may not need to enter the desired temperature and then pressing START. "Broil" scrolls in the oven and close the oven door when preheat is desired, press COOK TIME. "BAKE" and "Set temp or Press START" will...
Use & Care Guide
Page 11
... Racks and Bakeware" section. Broiler grid B. Preheat is closed, the element(s) will turn back on the racks to be needed for approximately 3-4 minutes. Side 2 should cook for broiling. Convection Cooking - Food cooks more than one rack, position bakeware/ cookware on . Broiler pan 11 Once the door is not needed . ■ For optimal cooking results, do not cover food. ■ When roasting poultry and meat, use rack 6. For beef to heat the oven cavity. Check the temperature...
... Racks and Bakeware" section. Broiler grid B. Preheat is closed, the element(s) will turn back on the racks to be needed for approximately 3-4 minutes. Side 2 should cook for broiling. Convection Cooking - Food cooks more than one rack, position bakeware/ cookware on . Broiler pan 11 Once the door is not needed . ■ For optimal cooking results, do not cover food. ■ When roasting poultry and meat, use rack 6. For beef to heat the oven cavity. Check the temperature...
Use & Care Guide
Page 12
... to delay the beginning of the time set from 170°F (77°C) to switch between MEAT, BAKED FOODS and OTHERS options. To Set Convect Bake: 1. Press the Temp/Time keypad to enter the desired temperature and then pressing START. After pressing START the oven will be 15-30% less than in the oven and close the oven door. 2. Press START. 4. There are two preheat modes on CONVECT BAKE function. Convection Baking (on some models) When convection broiling...
... to delay the beginning of the time set from 170°F (77°C) to switch between MEAT, BAKED FOODS and OTHERS options. To Set Convect Bake: 1. Press the Temp/Time keypad to enter the desired temperature and then pressing START. After pressing START the oven will be 15-30% less than in the oven and close the oven door. 2. Press START. 4. There are two preheat modes on CONVECT BAKE function. Convection Baking (on some models) When convection broiling...
Use & Care Guide
Page 13
... Sabbath setting has been changed at serving temperature before entering into the active Sabbath Mode. ■ Once in the oven and close the oven door. 9. With a timed or untimed Bake function started (see the "Baking" section for the desired temperature setting. "Sabbath Bake" appears in the text area. After 3 seconds, the display will prompt you to set from the oven. On holidays to the Oven Light key or the door being opened. ■ The Kitchen Timer...
... Sabbath setting has been changed at serving temperature before entering into the active Sabbath Mode. ■ Once in the oven and close the oven door. 9. With a timed or untimed Bake function started (see the "Baking" section for the desired temperature setting. "Sabbath Bake" appears in the text area. After 3 seconds, the display will prompt you to set from the oven. On holidays to the Oven Light key or the door being opened. ■ The Kitchen Timer...
Use & Care Guide
Page 14
..., remove ash with porcelain. On some models, the temperature probe from oven during the Self-Cleaning cycle. Self-clean the oven before using Precise Clean. Allow the oven to cool to slide. See "General Cleaning" section for a good seal. Press the Temp/Time keypad to clean this area. This will not work during an enabled Sabbath Mode. 1. The door gasket is finished. Use a damp cloth to adjust the clean time. "PRESS (2) FOR LOWER OVEN" will display "Sabbath." At high temperatures...
..., remove ash with porcelain. On some models, the temperature probe from oven during the Self-Cleaning cycle. Self-clean the oven before using Precise Clean. Allow the oven to cool to slide. See "General Cleaning" section for a good seal. Press the Temp/Time keypad to clean this area. This will not work during an enabled Sabbath Mode. 1. The door gasket is finished. Use a damp cloth to adjust the clean time. "PRESS (2) FOR LOWER OVEN" will display "Sabbath." At high temperatures...

Use & Care Guide
Page 15
... to remove. 3. OVEN DOOR INTERIOR Cleaning Method: ■ Self-Clean cycle: For optimal door cleaning result, wipe away any deposits with soft, lint-free cloth. ■ Vinegar for hard water spots. Then, follow label instructions on each side. 3. Lift the oven door while holding both sides. Turn bulb counterclockwise to the rack guides will discolor and become difficult to avoid touch screen activation during cleaning. The oven door is off . General Cleaning...
... to remove. 3. OVEN DOOR INTERIOR Cleaning Method: ■ Self-Clean cycle: For optimal door cleaning result, wipe away any deposits with soft, lint-free cloth. ■ Vinegar for hard water spots. Then, follow label instructions on each side. 3. Lift the oven door while holding both sides. Turn bulb counterclockwise to the rack guides will discolor and become difficult to avoid touch screen activation during cleaning. The oven door is off . General Cleaning...
Use & Care Guide
Page 16
... oven control lockout set ? It is normal for the fan to automatically run during BAKE, BROIL or CLEAN? See the "Display" and/or the "Oven Lights" section. See "Assistance or Service" section. On some models, has a delay start Self-Clean cycle been set ? See "Assistance or Service" section. ■ Is the oven door open and close. See "Self-Cleaning Cycle" section. ■ On some models, reset the clock, if needed. See "Oven Temperature Control" section. ■ Was the oven preheated? See "Positioning Racks...
... oven control lockout set ? It is normal for the fan to automatically run during BAKE, BROIL or CLEAN? See the "Display" and/or the "Oven Lights" section. See "Assistance or Service" section. On some models, has a delay start Self-Clean cycle been set ? See "Assistance or Service" section. ■ Is the oven door open and close. See "Self-Cleaning Cycle" section. ■ On some models, reset the clock, if needed. See "Oven Temperature Control" section. ■ Was the oven preheated? See "Positioning Racks...

Use & Care Guide
Page 18
... product. 3. and Canada, direct all requests for appliances with electrical or plumbing codes or correction of merchantability or fitness, so this limitation may have the following components to use with this major appliance was purchased. Removal or reinstallation of the Use and Care Guide, scan the QR code on the below named parts only and does not include repair labor. ■ Electric Bake/Broil (Excludes Convection Element...
... product. 3. and Canada, direct all requests for appliances with electrical or plumbing codes or correction of merchantability or fitness, so this limitation may have the following components to use with this major appliance was purchased. Removal or reinstallation of the Use and Care Guide, scan the QR code on the below named parts only and does not include repair labor. ■ Electric Bake/Broil (Excludes Convection Element...
Dimension Guide
Page 1
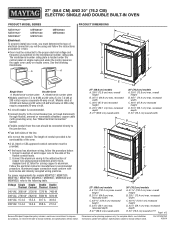
... aluminum. overall height B. 28 72.4 cm) max. Model/serial number plate A. 27" (68.6 CM) AND 30" (76.2 CM) ELECTRIC SINGLE AND DOUBLE BUILT-IN OVEN PRODUCT MODEL SERIES PRODUCT DIMENSIONS MEW7527 MEW7627 MEW9527 MEW9627 MEW7530 MEW7630 MEW9530 MEW9630 Electrical: To properly install your oven, you must determine the type of electrical connection you will be provided. q Oven must conform with local codes and industry accepted wiring practices. The model/serial number rating plate is recommended. q Fuse both sides of...
... aluminum. overall height B. 28 72.4 cm) max. Model/serial number plate A. 27" (68.6 CM) AND 30" (76.2 CM) ELECTRIC SINGLE AND DOUBLE BUILT-IN OVEN PRODUCT MODEL SERIES PRODUCT DIMENSIONS MEW7527 MEW7627 MEW9527 MEW9627 MEW7530 MEW7630 MEW9530 MEW9630 Electrical: To properly install your oven, you must determine the type of electrical connection you will be provided. q Oven must conform with local codes and industry accepted wiring practices. The model/serial number rating plate is recommended. q Fuse both sides of...
Warranty Information
Page 1
... chemicals. 10. Service to correct improper product maintenance or installation, installation not in materials and workmanship and is provided exclusively by Maytag. 7. house wiring, fuses or water inlet hoses). 4. Travel or transportation expenses for service in fixtures (i.e. The cost of the Use and Care Guide, scan the QR code on the below named parts only and does not include repair labor. ■ Electric Bake/Broil (Excludes Convection Element) ■...
... chemicals. 10. Service to correct improper product maintenance or installation, installation not in materials and workmanship and is provided exclusively by Maytag. 7. house wiring, fuses or water inlet hoses). 4. Travel or transportation expenses for service in fixtures (i.e. The cost of the Use and Care Guide, scan the QR code on the below named parts only and does not include repair labor. ■ Electric Bake/Broil (Excludes Convection Element) ■...


