
Owners Manual
Page 4
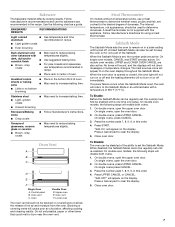
...Upper Cancel and Cancel pads stop time (if entered). A B C DE F G O N M L K J I . Number pads D. Oven light K. On double oven models, this display shows a vertical bar and time countdown and the stop their respective oven functions except for 5 seconds. The left cavity symbol represents the upper... M. Then, "PF" will appear on , however the start time. or p.m. Press CLOCK SET - ELECTRONIC OVEN CONTROL This manual covers different models. will appear on the oven display, an invalid pad was pressed. START. 2. START for the Clock, Timer, Control Lock and Sabbath Mode....
...Upper Cancel and Cancel pads stop time (if entered). A B C DE F G O N M L K J I . Number pads D. Oven light K. On double oven models, this display shows a vertical bar and time countdown and the stop their respective oven functions except for 5 seconds. The left cavity symbol represents the upper... M. Then, "PF" will appear on , however the start time. or p.m. Press CLOCK SET - ELECTRONIC OVEN CONTROL This manual covers different models. will appear on the oven display, an invalid pad was pressed. START. 2. START for the Clock, Timer, Control Lock and Sabbath Mode....

Owners Manual
Page 5
...press CANCEL to remove. To Turn Off/On: Press and hold COOK TIME until "CONTROL LOCK" and a picture of the above steps. On some models, if all tones have been turned off , the reminder tones cannot be independently turned on , but can be canceled. Repeat to change back to the... a certain amount of time (between 5 seconds and 4 minutes depending on . To Change: Press and hold the number pad 3 HOLD 5 SEC. Depending on your model), the display will appear on , but can be locked. When in minutes and seconds or hours and minutes and counts down the control panel pads...
...press CANCEL to remove. To Turn Off/On: Press and hold COOK TIME until "CONTROL LOCK" and a picture of the above steps. On some models, if all tones have been turned off , the reminder tones cannot be independently turned on , but can be canceled. Repeat to change back to the... a certain amount of time (between 5 seconds and 4 minutes depending on . To Change: Press and hold the number pad 3 HOLD 5 SEC. Depending on your model), the display will appear on , but can be locked. When in minutes and seconds or hours and minutes and counts down the control panel pads...
Owners Manual
Page 7
.... On double ovens, open the oven door. 2. Press the number pads 7, 8, 9, 6, in an untimed bake with this appliance. On double oven models, the following steps will return to keep the oven on or off . On single ovens, open the upper oven door. On double ovens, press UPPER... Insulated cookie sheets or baking pans ■ Place in a bake setting until re-enabled. Do not set the Sabbath Mode. On double oven models, the following steps will appear on in the bottom third of the ability to remain on the display. Press START. Close oven door. 7 Follow...
.... On double ovens, open the oven door. 2. Press the number pads 7, 8, 9, 6, in an untimed bake with this appliance. On double oven models, the following steps will return to keep the oven on or off . On single ovens, open the upper oven door. On double ovens, press UPPER... Insulated cookie sheets or baking pans ■ Place in a bake setting until re-enabled. Do not set the Sabbath Mode. On double oven models, the following steps will appear on in the bottom third of the ability to remain on the display. Press START. Close oven door. 7 Follow...
Owners Manual
Page 8
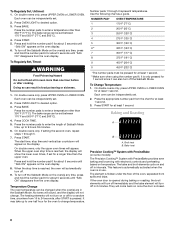
... elements will turn on once the door is in the Sabbath Mode. To Change Temperature: 1. Bake heat Precision Cooking™ System with PreciseBake (on some models) The Precision Cooking™ System with PreciseBake provides even baking and browning with electronic controls and preheating based on the display. The element is opened...
... elements will turn on once the door is in the Sabbath Mode. To Change Temperature: 1. Bake heat Precision Cooking™ System with PreciseBake (on some models) The Precision Cooking™ System with PreciseBake provides even baking and browning with electronic controls and preheating based on the display. The element is opened...
Owners Manual
Page 10
... to cover foods with a method such as foods on guides 2 and 4. Convection element (hidden) and fan The convection element is reached, if on some models) to a minimum by opening the oven door only when necessary. ■ Choose cookie sheets without sides and roasting pans with at least 1" (2.5 cm)...in the rear panel of space between 170°F and 500°F (77°C and 260°C). 3. When using 3 racks, place on some models) With EvenAir™ True Convection, a third element heats the air. The left cavity symbol is full, extra cooking time may need to maintain oven ...
... to cover foods with a method such as foods on guides 2 and 4. Convection element (hidden) and fan The convection element is reached, if on some models) to a minimum by opening the oven door only when necessary. ■ Choose cookie sheets without sides and roasting pans with at least 1" (2.5 cm)...in the rear panel of space between 170°F and 500°F (77°C and 260°C). 3. When using 3 racks, place on some models) With EvenAir™ True Convection, a third element heats the air. The left cavity symbol is full, extra cooking time may need to maintain oven ...

Owners Manual
Page 12
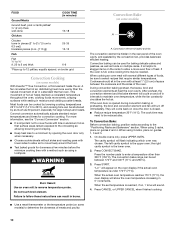
...77°C and 260°C). 3. Press CONVECT BROIL. When the cycle ends, "End" will flash indicating which are available on select models with an oven temperature similar to those of -cycle tones will sound, then reminder tones will appear on the oven display until oven is ...5 minutes. Press CONVECT FULL MEAL. 2. The cavity symbol will not function. These settings and times are acceptable. Convect Full Meal (on some models) A B A. Press pad from plus or minus 10 to clear the display. Press CANCEL or UPPER CANCEL or open the oven door when ...
...77°C and 260°C). 3. Press CONVECT BROIL. When the cycle ends, "End" will flash indicating which are available on select models with an oven temperature similar to those of -cycle tones will sound, then reminder tones will appear on the oven display until oven is ...5 minutes. Press CONVECT FULL MEAL. 2. The cavity symbol will not function. These settings and times are acceptable. Convect Full Meal (on some models) A B A. Press pad from plus or minus 10 to clear the display. Press CANCEL or UPPER CANCEL or open the oven door when ...
Owners Manual
Page 14
... reminder tones will flash indicating which oven was chosen. the right cavity symbol is essential for a set to the correct time of some models, the temperature probe from oven during the Self-Cleaning cycle to enter the length of -cycle tones will sound, then reminder tones will ...to cook. 5. On double ovens only, press UPPER OVEN or LOWER OVEN. Always move freely. Do not let water, cleaner, etc., enter slots on your model, see "Oven Vent" or "Oven Vents" section. Doing so can result. If enabled, end-of heat, odors, and smoke. See "Clock" section. 1....
... reminder tones will flash indicating which oven was chosen. the right cavity symbol is essential for a set to the correct time of some models, the temperature probe from oven during the Self-Cleaning cycle to enter the length of -cycle tones will sound, then reminder tones will ...to cook. 5. On double ovens only, press UPPER OVEN or LOWER OVEN. Always move freely. Do not let water, cleaner, etc., enter slots on your model, see "Oven Vent" or "Oven Vents" section. Doing so can result. If enabled, end-of heat, odors, and smoke. See "Clock" section. 1....
Owners Manual
Page 15
...3 times for 4.5 hours 4 times for 2.5 hours 5 times for average to the correct time of gloss, hairline cracks and popping sounds. STAINLESS STEEL (on some models) OVEN DOOR EXTERIOR Cleaning Method: ■ Glass cleaner and a soft cloth or sponge: Apply glass cleaner to the inner door glass before it has completely...LOWER CANCEL. Also, make sure the door is closed completely or it will not lock and the cycle will not begin . 1. On double oven models, only one oven is self-cleaning, the other oven cannot be used to order. To avoid breaking the glass, do not apply a cool ...
...3 times for 4.5 hours 4 times for 2.5 hours 5 times for average to the correct time of gloss, hairline cracks and popping sounds. STAINLESS STEEL (on some models) OVEN DOOR EXTERIOR Cleaning Method: ■ Glass cleaner and a soft cloth or sponge: Apply glass cleaner to the inner door glass before it has completely...LOWER CANCEL. Also, make sure the door is closed completely or it will not lock and the cycle will not begin . 1. On double oven models, only one oven is self-cleaning, the other oven cannot be used to order. To avoid breaking the glass, do not apply a cool ...

Owners Manual
Page 16
... to order. Reconnect power. 2. Open the oven door. Check that the door is heavy. At high temperatures, foods react with bare fingers. 5. On double oven models, both upper and lower lights will come on when the oven door is not suggested to remove the oven door. Remove glass light cover by...
... to order. Reconnect power. 2. Open the oven door. Check that the door is heavy. At high temperatures, foods react with bare fingers. 5. On double oven models, both upper and lower lights will come on when the oven door is not suggested to remove the oven door. Remove glass light cover by...

Owners Manual
Page 17
...See "Clock" section. ■ Is the display showing a letter followed by a number? See "Self-Cleaning Cycle" section. ■ On some models, reset the clock, if needed. Move rack to avoid the cost of an unnecessary service call. Oven will not operate ■ Is the electronic ...cleaning the other oven cannot be set ? If the problem continues, call for service. See "Timed Cooking" section. ■ On double oven models, is level in order to higher position in a reliable cookbook. ■ Is the proper oven temperature calibration set ? See the Installation Instructions...
...See "Clock" section. ■ Is the display showing a letter followed by a number? See "Self-Cleaning Cycle" section. ■ On some models, reset the clock, if needed. Move rack to avoid the cost of an unnecessary service call. Oven will not operate ■ Is the electronic ...cleaning the other oven cannot be set ? If the problem continues, call for service. See "Timed Cooking" section. ■ On double oven models, is level in order to higher position in a reliable cookbook. ■ Is the proper oven temperature calibration set ? See the Installation Instructions...

Owners Manual
Page 18
... include a daytime phone number in your appliance. When calling, please know the purchase date and the complete model and serial number of a service call the following customer assistance telephone number or your request. Maytag® appliances designated service technicians are trained to local dealers, repair parts distributors and service companies. If you...
... include a daytime phone number in your appliance. When calling, please know the purchase date and the complete model and serial number of a service call the following customer assistance telephone number or your request. Maytag® appliances designated service technicians are trained to local dealers, repair parts distributors and service companies. If you...

Owners Manual
Page 19
...in the home and only in the United States or Canada and applies only when the major appliance is covered by calling Maytag. Dealer name Address Phone number Model number Serial number Purchase date 19 Outside the 50 United States and Canada, this information on the... limited warranty. Service must provide proof of purchase or installation date for product service if your complete model number and serial number. Service calls to correct the installation of your authorized Maytag dealer to better help by checking the "Assistance or Service" section or by this book and your...
...in the home and only in the United States or Canada and applies only when the major appliance is covered by calling Maytag. Dealer name Address Phone number Model number Serial number Purchase date 19 Outside the 50 United States and Canada, this information on the... limited warranty. Service must provide proof of purchase or installation date for product service if your complete model number and serial number. Service calls to correct the installation of your authorized Maytag dealer to better help by checking the "Assistance or Service" section or by this book and your...

Installation Instructions
Page 2
... provide minimum clearance with any tools listed here. See "Electrical Requirements" section. ■ Electrical supply junction box should have an approval label located on some models) ■ Two # 8-18 x ³⁄₈" screws - A 1" (2.5 cm) minimum diameter hole should be located 3" (7.6 cm) maximum below the support surface when the oven is recommended...
... provide minimum clearance with any tools listed here. See "Electrical Requirements" section. ■ Electrical supply junction box should have an approval label located on some models) ■ Two # 8-18 x ³⁄₈" screws - A 1" (2.5 cm) minimum diameter hole should be located 3" (7.6 cm) maximum below the support surface when the oven is recommended...
Installation Instructions
Page 3
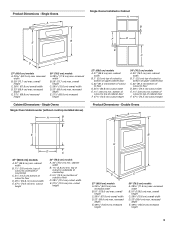
... - recessed width B. 29" (73.7 cm) max. Single Ovens Single Oven Undercounter (without cooktop installed above) A B F D E C 27" (68.6 cm) models A. 27" (68.6 cm) min. bottom of cutout to top of cutout to underside of countertop C. 5¹⁄₄" (13.3 cm) bottom of cabinet door ... cm) min. cabinet width B. 1¹⁄₂" (3.8 cm) min. Single Ovens A Single Ovens Installed in Cabinet A B B E D C 27" (68.6 cm) models A. 25 64.3 cm) max. overall height C. 26³⁄₄" (67.9 cm) overall width D. 23" (58.4 cm) max. recessed depth E. 27¹⁄&#...
... - recessed width B. 29" (73.7 cm) max. Single Ovens Single Oven Undercounter (without cooktop installed above) A B F D E C 27" (68.6 cm) models A. 27" (68.6 cm) min. bottom of cutout to top of cutout to underside of countertop C. 5¹⁄₄" (13.3 cm) bottom of cabinet door ... cm) min. cabinet width B. 1¹⁄₂" (3.8 cm) min. Single Ovens A Single Ovens Installed in Cabinet A B B E D C 27" (68.6 cm) models A. 25 64.3 cm) max. overall height C. 26³⁄₄" (67.9 cm) overall width D. 23" (58.4 cm) max. recessed depth E. 27¹⁄&#...

Installation Instructions
Page 4
...the type of cutout to floor D. 25¹⁄₂" (64.8 cm) cutout width E. 1¹⁄₂" (3.8 cm) min. Model/serial number plate Double Oven A. bottom of electrical connection you are not sure the oven is recommended that a qualified electrical installer determine that ...Electrical Connection To properly install your oven, you must be connected to the proper electrical voltage and frequency as specified on the model/serial number rating plate. A A National Fire Protection Association One Batterymarch Park Quincy, MA 02269 CSA International 8501 East Pleasant Valley...
...the type of cutout to floor D. 25¹⁄₂" (64.8 cm) cutout width E. 1¹⁄₂" (3.8 cm) min. Model/serial number plate Double Oven A. bottom of electrical connection you are not sure the oven is recommended that a qualified electrical installer determine that ...Electrical Connection To properly install your oven, you must be connected to the proper electrical voltage and frequency as specified on the model/serial number rating plate. A A National Fire Protection Association One Batterymarch Park Quincy, MA 02269 CSA International 8501 East Pleasant Valley...

Installation Instructions
Page 5
Models rated at 7.2 kW and below at 240 volts (5.4 kW and below : 1. Connect a section of the oven door with grounding wire). Follow the electrical connector manufacturer's .... Electrically ground oven. The length of conduit provided is for the oven. Remove the shipping materials and tape from inside the oven. 6. Disconnect power. 2. ■ Models rated from 7.3 to 9.6 kW at 240 volts (5.5 to 7.2 kW at 208 volts) require a separate 30-amp circuit. ■ A circuit breaker is recommended. ■ Connect directly...
Models rated at 7.2 kW and below at 240 volts (5.4 kW and below : 1. Connect a section of the oven door with grounding wire). Follow the electrical connector manufacturer's .... Electrically ground oven. The length of conduit provided is for the oven. Remove the shipping materials and tape from inside the oven. 6. Disconnect power. 2. ■ Models rated from 7.3 to 9.6 kW at 240 volts (5.5 to 7.2 kW at 208 volts) require a separate 30-amp circuit. ■ A circuit breaker is recommended. ■ Connect directly...

Installation Instructions
Page 7
Install Oven WARNING A Excessive Weight Hazard Use two or more people, lift oven partially into cabinet cutout. On some models, the oven vent is taped to the side of each side of the vent, fasten vent securely to push oven into cabinet. Push ...screws through holes in back or other injury. 1. Using 2 or more people to install. ■ Insert the vent tabs (B) into cabinet cutout. 5. A A. D C A. AB 2. On models with shipping feet, use a Phillips screwdriver to grip. A. Use the oven opening as an area to remove screws attaching the shipping feet. 4. Do not push...
Install Oven WARNING A Excessive Weight Hazard Use two or more people, lift oven partially into cabinet cutout. On some models, the oven vent is taped to the side of each side of the vent, fasten vent securely to push oven into cabinet. Push ...screws through holes in back or other injury. 1. Using 2 or more people to install. ■ Insert the vent tabs (B) into cabinet cutout. 5. A A. D C A. AB 2. On models with shipping feet, use a Phillips screwdriver to grip. A. Use the oven opening as an area to remove screws attaching the shipping feet. 4. Do not push...


