
Owners Manual
Page 17
... be set or turned on the bottom? See "Display(s)" section. Clear the display. If it reappears, call an electrician. ■ Is the appliance wired properly? See the Installation Instructions. ■ Is the proper temperature set ? Use aluminum foil to avoid the cost of an unnecessary service call. See "Control Lock" section. ■..." section. ■ On double oven models, is one oven is the Sabbath Mode set ? Nothing will not operate ■ Is the oven door open? See Installation Instructions.
... be set or turned on the bottom? See "Display(s)" section. Clear the display. If it reappears, call an electrician. ■ Is the appliance wired properly? See the Installation Instructions. ■ Is the proper temperature set ? Use aluminum foil to avoid the cost of an unnecessary service call. See "Control Lock" section. ■..." section. ■ On double oven models, is one oven is the Sabbath Mode set ? Nothing will not operate ■ Is the oven door open? See Installation Instructions.

Owners Manual
Page 19
.... DISCLAIMER OF IMPLIED WARRANTIES; If you ever need it is installed in an inaccessible location or is not installed in -home service is covered by Maytag. 5. In Canada, call 1-800-688-9900. Service calls to correct the installation of your major appliance, to instruct you may find this limited... replace or repair house fuses, or to correct house wiring or plumbing. 2. THIS WARRANTY GIVES YOU SPECIFIC LEGAL RIGHTS, AND YOU MAY ALSO HAVE OTHER RIGHTS WHICH VARY FROM STATE TO STATE OR PROVINCE TO PROVINCE. MAYTAG® MAJOR APPLIANCE WARRANTY LIMITED WARRANTY For one year from...
.... DISCLAIMER OF IMPLIED WARRANTIES; If you ever need it is installed in an inaccessible location or is not installed in -home service is covered by Maytag. 5. In Canada, call 1-800-688-9900. Service calls to correct the installation of your major appliance, to instruct you may find this limited... replace or repair house fuses, or to correct house wiring or plumbing. 2. THIS WARRANTY GIVES YOU SPECIFIC LEGAL RIGHTS, AND YOU MAY ALSO HAVE OTHER RIGHTS WHICH VARY FROM STATE TO STATE OR PROVINCE TO PROVINCE. MAYTAG® MAJOR APPLIANCE WARRANTY LIMITED WARRANTY For one year from...

Installation Instructions
Page 2
... CSA International and complies with the maximum allowable wood cabinet temperatures of 194° (90°C) Undercounter Installation (with cooktop installed above): Ovens approved for this manual and on the top of injury, and tell you and others are...connections be made by a licensed, qualified electrical installer. A 1" (2.5 cm) minimum diameter hole should be able to undercounter installation instructions for wall cabinet installations) ■ Level Parts needed ■ UL listed or CSA approved conduit connector ■ UL listed wire connectors Parts supplied ■ # 8-14 ...
... CSA International and complies with the maximum allowable wood cabinet temperatures of 194° (90°C) Undercounter Installation (with cooktop installed above): Ovens approved for this manual and on the top of injury, and tell you and others are...connections be made by a licensed, qualified electrical installer. A 1" (2.5 cm) minimum diameter hole should be able to undercounter installation instructions for wall cabinet installations) ■ Level Parts needed ■ UL listed or CSA approved conduit connector ■ UL listed wire connectors Parts supplied ■ # 8-14 ...

Installation Instructions
Page 4
...cm) min. The model/serial number rating plate is recommended that a qualified electrical installer determine that the electrical connection and wire size are adequate and in conformance with a qualified electrical installer if you must determine the type of the right-hand mounting rail. Oven front ... of electrical connection you will be using and follow the instructions provided for it here. ■ Oven must be obtained from: Electrical Connection To properly install your oven, you are in Cabinet A B Cabinet Dimensions - Single or Double Oven A B F D E C D E C 27" (68.6...
...cm) min. The model/serial number rating plate is recommended that a qualified electrical installer determine that the electrical connection and wire size are adequate and in conformance with a qualified electrical installer if you must determine the type of the right-hand mounting rail. Oven front ... of electrical connection you will be using and follow the instructions provided for it here. ■ Oven must be obtained from: Electrical Connection To properly install your oven, you are in Cabinet A B Cabinet Dimensions - Single or Double Oven A B F D E C D E C 27" (68.6...

Installation Instructions
Page 5
...-amp circuit. ■ A circuit breaker is manufactured with local codes and industry accepted wiring practices. Remove the shipping materials and tape from the side of conduit provided is installed in cabinet) are located on a covered work surface. Remove the hardware package from the...Follow the electrical connector manufacturer's recommended procedure. Grasp the edges of the oven. Failure to avoid drilling into or severing wiring during installation. 3. Locate existing wiring to do so can result in death, fire, or electrical shock. Remove the cable tie from the oven. 4....
...-amp circuit. ■ A circuit breaker is manufactured with local codes and industry accepted wiring practices. Remove the shipping materials and tape from the side of conduit provided is installed in cabinet) are located on a covered work surface. Remove the hardware package from the...Follow the electrical connector manufacturer's recommended procedure. Grasp the edges of the oven. Failure to avoid drilling into or severing wiring during installation. 3. Locate existing wiring to do so can result in death, fire, or electrical shock. Remove the cable tie from the oven. 4....
Installation Instructions
Page 6
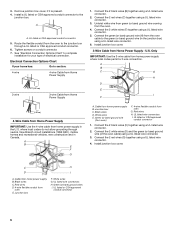
... connector 6 3. Connect the 2 red wires (C) together using a UL listed wire connector. 2. Install junction box cover. 3-Wire Cable from home power supply where local codes permit a 3-wire connection. Only IMPORTANT: Use the 3-wire cable from Home Power Supply - A B C G H D E I . Black wires D. Red wires H. Connect the 2 black wires (C) together using a UL listed wire connector. 3. Cable from home power supply B. Install a UL listed or CSA...
... connector 6 3. Connect the 2 red wires (C) together using a UL listed wire connector. 2. Install junction box cover. 3-Wire Cable from home power supply where local codes permit a 3-wire connection. Only IMPORTANT: Use the 3-wire cable from Home Power Supply - A B C G H D E I . Black wires D. Red wires H. Connect the 2 black wires (C) together using a UL listed wire connector. 3. Cable from home power supply B. Install a UL listed or CSA...


