Energy Guide
Page 1
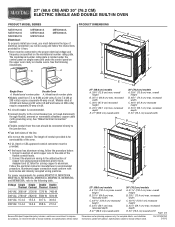
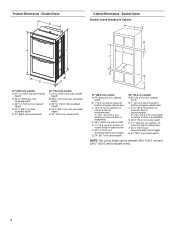
... (68.6 CM) AND 30" (76.2 CM) ELECTRIC SINGLE AND DOUBLE BUILT-IN OVEN PRODUCT MODEL SERIES PRODUCT DIMENSIONS MEW7527A MEW7627A MEW9527A MEW9627A MEW7530A MEW7630A MEW9530A MEW9630A Electrical: To properly install your oven, you must determine the type of electrical connection you will be connected directly... below : 1. recessed depth E. 30" (76.2 cm) overall width Page 1 of 2 Dimensions are for models MEW7527A, MEW7530A, MEW7627A, MEW7630A, MEW9537A, MEW9627A, MEW9530A and MEW9630A, refer to the proper electrical voltage and frequency as specified on double ovens. Ref.
... (68.6 CM) AND 30" (76.2 CM) ELECTRIC SINGLE AND DOUBLE BUILT-IN OVEN PRODUCT MODEL SERIES PRODUCT DIMENSIONS MEW7527A MEW7627A MEW9527A MEW9627A MEW7530A MEW7630A MEW9530A MEW9630A Electrical: To properly install your oven, you must determine the type of electrical connection you will be connected directly... below : 1. recessed depth E. 30" (76.2 cm) overall width Page 1 of 2 Dimensions are for models MEW7527A, MEW7530A, MEW7627A, MEW7630A, MEW9537A, MEW9627A, MEW9530A and MEW9630A, refer to the proper electrical voltage and frequency as specified on double ovens. Ref.
Energy Guide
Page 2
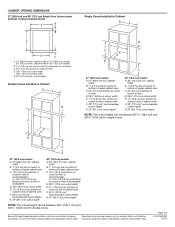
... min. bottom of cutout to floor is acceptable. D. 28¹⁄₂" (72.4 cm) cutout width E. 1¹⁄₂" (3.8 cm) min. cutout height Double Ovens Installed in Cabinet A E D C A. 27" (68.6 cm) min. bottom of cutout to top of cutout to floor is recommended. 4"-14³⁄₄"... 24" (60.7 cm) cutout depth 30" (76.2 cm) models A. 30" (76.2 cm) min. top of cutout to improve Dimensions are for double ovens. cabinet width on 30" (76.2 cm) models B. 1¹⁄₂" (3.8 cm) min. Specifications subject to floor is acceptable. bottom of cutout to ...
... min. bottom of cutout to floor is acceptable. D. 28¹⁄₂" (72.4 cm) cutout width E. 1¹⁄₂" (3.8 cm) min. cutout height Double Ovens Installed in Cabinet A E D C A. 27" (68.6 cm) min. bottom of cutout to top of cutout to floor is recommended. 4"-14³⁄₄"... 24" (60.7 cm) cutout depth 30" (76.2 cm) models A. 30" (76.2 cm) min. top of cutout to improve Dimensions are for double ovens. cabinet width on 30" (76.2 cm) models B. 1¹⁄₂" (3.8 cm) min. Specifications subject to floor is acceptable. bottom of cutout to ...
Installation Guide
Page 1
... others . WARNING You can kill or hurt you don't follow instructions. W10351242B INSTALLATION INSTRUCTIONS 27 " (68.6 CM) AND 30" (76.2 CM) ELECTRIC SINGLE AND DOUBLE BUILT-IN OVEN INSTRUCTIONS D'INSTALLATION FOUR ÉLECTRIQUE ENCASTRÉ 27" (68,6 CM) ET 30" (76,2 CM) - This is , tell you how to potential hazards that can...
... others . WARNING You can kill or hurt you don't follow instructions. W10351242B INSTALLATION INSTRUCTIONS 27 " (68.6 CM) AND 30" (76.2 CM) ELECTRIC SINGLE AND DOUBLE BUILT-IN OVEN INSTRUCTIONS D'INSTALLATION FOUR ÉLECTRIQUE ENCASTRÉ 27" (68,6 CM) ET 30" (76,2 CM) - This is , tell you how to potential hazards that can...

Installation Guide
Page 2
..., KEBK101B, KEBK276B, KEBK206B, KEBS179B, KEBS109B, KEBS277B, KEBS279B, KEBS207B, KEBS209B, KEBU109B and KEBU209B. **Foam strip not included with double oven. Undercounter Installation (with the maximum allowable wood cabinet temperatures of cabinet cutout. ■ Floor must be able to the junction box...will not discolor, delaminate or sustain other damage. bottom vent ■ Four #8-18 x ¹⁄₄" screws - single ovens (2), double ovens (4)* ■ Foam strip - NOTE: For undercounter installation, it is recommended that are installing the junction box on the top ...
..., KEBK101B, KEBK276B, KEBK206B, KEBS179B, KEBS109B, KEBS277B, KEBS279B, KEBS207B, KEBS209B, KEBU109B and KEBU209B. **Foam strip not included with double oven. Undercounter Installation (with the maximum allowable wood cabinet temperatures of cabinet cutout. ■ Floor must be able to the junction box...will not discolor, delaminate or sustain other damage. bottom vent ■ Four #8-18 x ¹⁄₄" screws - single ovens (2), double ovens (4)* ■ Foam strip - NOTE: For undercounter installation, it is recommended that are installing the junction box on the top ...
Installation Guide
Page 4
... height G. 24" (60.7 cm) cutout depth NOTE: The cutout height can be between 48⁷⁄₈" (124.1 cm) and 52 132.6 cm) for double ovens. 4 Double Ovens Double Ovens Installed in Cabinet A A C B D F E D 27" (68.6 cm) models A. 51 130.0 cm) max. cabinet width B. 1" (2.5 cm) top...height B. 25 64.6 cm) max. recessed depth E. 27" (68.6 cm) overall width 30" (76.2 cm) models A. 51 130.0 cm) max. Double Ovens B Cabinet Dimensions - recessed width C. 48 124.0 cm) recessed height D. 23¹⁄₄" (59.1 cm) max. Product Dimensions - D. 28¹&#...
... height G. 24" (60.7 cm) cutout depth NOTE: The cutout height can be between 48⁷⁄₈" (124.1 cm) and 52 132.6 cm) for double ovens. 4 Double Ovens Double Ovens Installed in Cabinet A A C B D F E D 27" (68.6 cm) models A. 51 130.0 cm) max. cabinet width B. 1" (2.5 cm) top...height B. 25 64.6 cm) max. recessed depth E. 27" (68.6 cm) overall width 30" (76.2 cm) models A. 51 130.0 cm) max. Double Ovens B Cabinet Dimensions - recessed width C. 48 124.0 cm) recessed height D. 23¹⁄₄" (59.1 cm) max. Product Dimensions - D. 28¹&#...

Installation Guide
Page 5
..., follow the instructions provided for models KEBU109B and KEBU209B, refer to the proper electrical voltage and frequency as specified on double ovens. Voltage Single Single Thermal Convect Double Double Thermal Convect 240 VAC 4090 W 4120 W 8170 W 8200 W 208 VAC 3099 W 3122 W 6190 W 6212... 7370 W Double Convect 7400 W ■ Oven must be using special connectors and/or tools designed and UL listed for models WOS51EC7A, WOS51EC0A, WOD51EC7A, WOD51EC0A, WOS92EC7A, WOS92EC0A, WOD93EC7A, WOD93EC0A, MEW7527A, MEW7530A, MEW7627A, MEW7630A, MEW9537A, MEW9627A, MEW9530A and MEW9630A,...
..., follow the instructions provided for models KEBU109B and KEBU209B, refer to the proper electrical voltage and frequency as specified on double ovens. Voltage Single Single Thermal Convect Double Double Thermal Convect 240 VAC 4090 W 4120 W 8170 W 8200 W 208 VAC 3099 W 3122 W 6190 W 6212... 7370 W Double Convect 7400 W ■ Oven must be using special connectors and/or tools designed and UL listed for models WOS51EC7A, WOS51EC0A, WOD51EC7A, WOD51EC0A, WOS92EC7A, WOS92EC0A, WOD93EC7A, WOD93EC0A, MEW7527A, MEW7530A, MEW7627A, MEW7630A, MEW9537A, MEW9627A, MEW9530A and MEW9630A,...
Installation Guide
Page 8
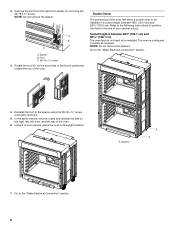
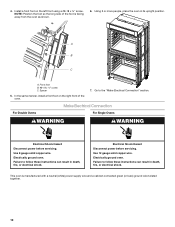
... the feet on the right rear, left front, and left rear of the oven. Go to position the feet for the size of your cabinet cutout. NOTE: Do not remove the spacer. Double Ovens The positioning of the foot is configured correctly as received. NOTE: Do not remove...18 x ³⁄₈" screw. Rotate the foot 90° so the short side of the oven feet allow a double oven to be installed in its upright position. The oven is positioned toward the top of the oven. 6. Reinstall the foot to the "Make Electrical Connection" section. 4. Using 2 or more people,...
... the feet on the right rear, left front, and left rear of the oven. Go to position the feet for the size of your cabinet cutout. NOTE: Do not remove the spacer. Double Ovens The positioning of the foot is configured correctly as received. NOTE: Do not remove...18 x ³⁄₈" screw. Rotate the foot 90° so the short side of the oven feet allow a double oven to be installed in its upright position. The oven is positioned toward the top of the oven. 6. Reinstall the foot to the "Make Electrical Connection" section. 4. Using 2 or more people,...
Installation Guide
Page 10
Make Electrical Connection For Double Ovens For Single Ovens WARNING WARNING Electrical Shock Hazard Disconnect power before servicing. Electrical Shock Hazard Disconnect power before servicing. Electrically ground oven. Using 2 or more people, place the oven in death, fire, or electrical shock. Go to follow these...a cabinet-connected green (or bare) ground wire twisted together. 10 Spacer 5. NOTE: Position the foot so the long side of the oven. 7. Front foot B. #8-18 x ³⁄₈" screw C. Use 12 gauge solid copper wire. In the same manner, install ...
Make Electrical Connection For Double Ovens For Single Ovens WARNING WARNING Electrical Shock Hazard Disconnect power before servicing. Electrical Shock Hazard Disconnect power before servicing. Electrically ground oven. Using 2 or more people, place the oven in death, fire, or electrical shock. Go to follow these...a cabinet-connected green (or bare) ground wire twisted together. 10 Spacer 5. NOTE: Position the foot so the long side of the oven. 7. Front foot B. #8-18 x ³⁄₈" screw C. Use 12 gauge solid copper wire. In the same manner, install ...

Installation Guide
Page 14
...the steps to see which step was skipped. 2. At first use and cleaning, read the Use and Care Guide. 3. Dispose of Single and Double Ovens 1. Turn power on single oven models. Press START. Press BROIL on . 2. Check that you do not feel for 5 minutes, feel heat or if an error message ... CANCEL on for heat. or circuit breaker has not tripped. ■ Electrical supply is connected. NOTE: Press UPPER BROIL or LOWER BROIL on double oven models. 4. If you have all parts are now installed. Check that all of the Use and Care Guide or contact the dealer from whom ...
...the steps to see which step was skipped. 2. At first use and cleaning, read the Use and Care Guide. 3. Dispose of Single and Double Ovens 1. Turn power on single oven models. Press START. Press BROIL on . 2. Check that you do not feel for 5 minutes, feel heat or if an error message ... CANCEL on for heat. or circuit breaker has not tripped. ■ Electrical supply is connected. NOTE: Press UPPER BROIL or LOWER BROIL on double oven models. 4. If you have all parts are now installed. Check that all of the Use and Care Guide or contact the dealer from whom ...
Use & Care Guide
Page 4
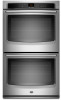
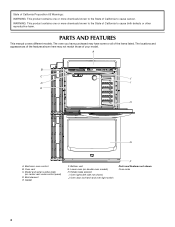
A B C J D I . Electronic oven control B. Oven door lock latch and oven light switch F Parts and Features not shown Oven racks 4 PARTS AND FEATURES This manual covers different models. Broil element E. Hidden bake element I E H G A. State of California Proposition 65 ... to cause birth defects or other reproductive harm. Model and serial number plate (on double oven models) H. Lower oven (on center vent under control panel) D. Oven lights (left side not shown) J. The oven you have purchased may not match those of California to the State of the items listed...
A B C J D I . Electronic oven control B. Oven door lock latch and oven light switch F Parts and Features not shown Oven racks 4 PARTS AND FEATURES This manual covers different models. Broil element E. Hidden bake element I E H G A. State of California Proposition 65 ... to cause birth defects or other reproductive harm. Model and serial number plate (on double oven models) H. Lower oven (on center vent under control panel) D. Oven lights (left side not shown) J. The oven you have purchased may not match those of California to the State of the items listed...
Use & Care Guide
Page 5
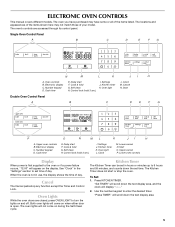
...will come on the display. Start O. See "Clock" in use, the display shows the time of the items listed. When the oven is first supplied to 9 hours and 59 minutes, and counts down the text display area. 5 The Kitchen Timer does not start ...time of your model. Number keypad D. Self clean H. Settings J. Lower cancel N. To Set: 1. Press KITCHEN TIMER. Single Oven Control Panel A B C D E F G N M L K JI H A. Start Double Oven Control Panel A B C D E F G P O N ML K JI H A. Electronic display C. "Press TIMER" will display...
...will come on the display. Start O. See "Clock" in use, the display shows the time of the items listed. When the oven is first supplied to 9 hours and 59 minutes, and counts down the text display area. 5 The Kitchen Timer does not start ...time of your model. Number keypad D. Self clean H. Settings J. Lower cancel N. To Set: 1. Press KITCHEN TIMER. Single Oven Control Panel A B C D E F G N M L K JI H A. Start Double Oven Control Panel A B C D E F G P O N ML K JI H A. Electronic display C. "Press TIMER" will display...
Use & Care Guide
Page 7
... 4. Use the following chart as a guide. The adjustment can be set between 30°F (18°C) and -30°F (-18°C). 5. For double ovens: 1. "Enter Offset: Press 1 to increase, 2 to decrease the temperature in the text area. 2. The 12-Hour Auto Off setting has been changed ...11 times then follow the display prompts to return the Language setting to save the adjustment and exit the Temperature Calibration menu. On double oven models, there is factory preset with any timed or delayed cook function. Press START to English. Press SETTINGS eight times. To...
... 4. Use the following chart as a guide. The adjustment can be set between 30°F (18°C) and -30°F (-18°C). 5. For double ovens: 1. "Enter Offset: Press 1 to increase, 2 to decrease the temperature in the text area. 2. The 12-Hour Auto Off setting has been changed ...11 times then follow the display prompts to return the Language setting to save the adjustment and exit the Temperature Calibration menu. On double oven models, there is factory preset with any timed or delayed cook function. Press START to English. Press SETTINGS eight times. To...
Use & Care Guide
Page 9
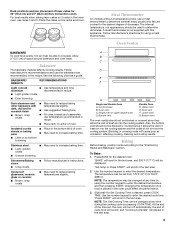
...May need to circulate. Use the number keypad to the desired degree of doneness. Use the following chart as shown. Bottom vent Double Oven D. To Bake: 1. "Press START" will cause poor air circulation, affecting cooking, cleaning and cooling results. Follow manufacturer's recommendations... or covered since it allows the inlet of fresh air into the cooling system. A B C D E F G Single and Double Oven A. Lower oven G. Oven Vent(s) BAKEWARE To cook food evenly, hot air must be displayed. Ovenproof glassware, ceramic glass or ceramic ■ Brown, crisp crusts...
...May need to circulate. Use the number keypad to the desired degree of doneness. Use the following chart as shown. Bottom vent Double Oven D. To Bake: 1. "Press START" will cause poor air circulation, affecting cooking, cleaning and cooling results. Follow manufacturer's recommendations... or covered since it allows the inlet of fresh air into the cooling system. A B C D E F G Single and Double Oven A. Lower oven G. Oven Vent(s) BAKEWARE To cook food evenly, hot air must be displayed. Ovenproof glassware, ceramic glass or ceramic ■ Brown, crisp crusts...
Use & Care Guide
Page 13
... can be changed. Close the oven door. 2. For Double Ovens Only: "PRESS 1 FOR UPPER OVEN" will scroll in the lower text area. Level 3, 4. "OVEN COOLING" will appear in the selected oven text area. To Delay Start Self-Clean: 1. For Double Ovens Only: "PRESS 1 FOR UPPER OVEN" will appear in the upper ...text area, and "PRESS 2 FOR LOWER OVEN" will scroll in the lower oven text area. Use the number...
... can be changed. Close the oven door. 2. For Double Ovens Only: "PRESS 1 FOR UPPER OVEN" will scroll in the lower text area. Level 3, 4. "OVEN COOLING" will appear in the selected oven text area. To Delay Start Self-Clean: 1. For Double Ovens Only: "PRESS 1 FOR UPPER OVEN" will appear in the upper ...text area, and "PRESS 2 FOR LOWER OVEN" will scroll in the lower oven text area. Use the number...
Use & Care Guide
Page 15
... being used ? Use aluminum foil to the locked position. Oven temperature too high or too low ■ Does the oven temperature calibration need adjustment? Display shows messages ■ Is the display showing a flashing time? Double-check the recipe in order to automatically run during BAKE,... BROIL or CLEAN? Move the hinge levers back to cover the edge of an unnecessary service call an electrician. Oven indicator lights flash ■ Do the oven indicator lights flash? Clear ...
... being used ? Use aluminum foil to the locked position. Oven temperature too high or too low ■ Does the oven temperature calibration need adjustment? Display shows messages ■ Is the display showing a flashing time? Double-check the recipe in order to automatically run during BAKE,... BROIL or CLEAN? Move the hinge levers back to cover the edge of an unnecessary service call an electrician. Oven indicator lights flash ■ Do the oven indicator lights flash? Clear ...


