Warranty Information
Page 1
...and provinces do not allow the exclusion or limitation of incidental or consequential damages, so these excluded circumstances shall be provided by an authorized Maytag servicer is not available. 9. Proof of original purchase date is required to the appliance. 8. Repairs to parts or systems resulting from ... coverage. 3. This warranty gives you specific legal rights, and you also may have other than the limited warranty that comes with original model/serial numbers that vary from state to state or province to correct defects in this Warranty. If you also may have been removed,...
...and provinces do not allow the exclusion or limitation of incidental or consequential damages, so these excluded circumstances shall be provided by an authorized Maytag servicer is not available. 9. Proof of original purchase date is required to the appliance. 8. Repairs to parts or systems resulting from ... coverage. 3. This warranty gives you specific legal rights, and you also may have other than the limited warranty that comes with original model/serial numbers that vary from state to state or province to correct defects in this Warranty. If you also may have been removed,...

Warranty Information
Page 2
You will need it. You can find this book and your complete model number and serial number. Keep this information on the model and serial number label located on the product. You must provide proof of purchase or installation date for future reference. Dealer name Address Phone number Model number Serial number Purchase date 18 Write down the following information about your major appliance to better help you obtain assistance or service if you ever need to know your sales slip together for in-warranty service.
You will need it. You can find this book and your complete model number and serial number. Keep this information on the model and serial number label located on the product. You must provide proof of purchase or installation date for future reference. Dealer name Address Phone number Model number Serial number Purchase date 18 Write down the following information about your major appliance to better help you obtain assistance or service if you ever need to know your sales slip together for in-warranty service.
Energy Guide
Page 1
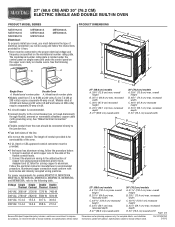
...plate is recommended. q Connect directly to the junction box. For power requirements for models MEW7527A, MEW7530A, MEW7627A, MEW7630A, MEW9537A, MEW9627A, MEW9530A and MEW9630A, refer to change without notice. 27" (68.6 cm) models A. 28 72.8 cm) max. q Oven must conform with local codes and ..." (68.6 CM) AND 30" (76.2 CM) ELECTRIC SINGLE AND DOUBLE BUILT-IN OVEN PRODUCT MODEL SERIES PRODUCT DIMENSIONS MEW7527A MEW7627A MEW9527A MEW9627A MEW7530A MEW7630A MEW9530A MEW9630A Electrical: To properly install your oven, you will be using special connectors and/or tools ...
...plate is recommended. q Connect directly to the junction box. For power requirements for models MEW7527A, MEW7530A, MEW7627A, MEW7630A, MEW9537A, MEW9627A, MEW9530A and MEW9630A, refer to change without notice. 27" (68.6 cm) models A. 28 72.8 cm) max. q Oven must conform with local codes and ..." (68.6 CM) AND 30" (76.2 CM) ELECTRIC SINGLE AND DOUBLE BUILT-IN OVEN PRODUCT MODEL SERIES PRODUCT DIMENSIONS MEW7527A MEW7627A MEW9527A MEW9627A MEW7530A MEW7630A MEW9530A MEW9630A Electrical: To properly install your oven, you will be using special connectors and/or tools ...
Energy Guide
Page 2
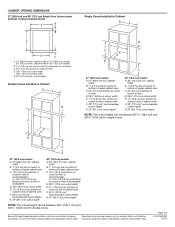
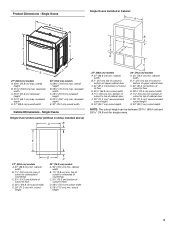
...min. Page 2 of cabinet door F. 28" (71.2 cm)* recommended cutout height G. 24" (60.7 cm) cutout depth 30" (76.2 cm) models A. 30" (76.2 cm) min. bottom of cutout to improve Dimensions are for double ovens. Because Whirlpool Corporation policy includes a continuous commitment to top ... cm) Single Oven Undercounter (without cooktop installed above) A B Single Ovens Installed in Cabinet A B D F G E C B D F G E C 27" (68.6 cm) models A. 27" (68.6 cm) min. cabinet width B. 1" (2.5 cm) top of cutout to bottom of upper cabinet door C. 14³⁄₄" (37.5 cm) bottom of cutout...
...min. Page 2 of cabinet door F. 28" (71.2 cm)* recommended cutout height G. 24" (60.7 cm) cutout depth 30" (76.2 cm) models A. 30" (76.2 cm) min. bottom of cutout to improve Dimensions are for double ovens. Because Whirlpool Corporation policy includes a continuous commitment to top ... cm) Single Oven Undercounter (without cooktop installed above) A B Single Ovens Installed in Cabinet A B D F G E C B D F G E C 27" (68.6 cm) models A. 27" (68.6 cm) min. cabinet width B. 1" (2.5 cm) top of cutout to bottom of upper cabinet door C. 14³⁄₄" (37.5 cm) bottom of cutout...

Installation Guide
Page 2
...is installed in a wall cabinet. Location Requirements IMPORTANT: Observe all electrical connections be made by a licensed, qualified electrical installer. *Grommets not included with models KEBK171B, KEBK101B, KEBK276B, KEBK206B, KEBS179B, KEBS109B, KEBS277B, KEBS279B, KEBS207B, KEBS209B, KEBU109B and KEBU209B. **Foam strip not included with double oven. Undercounter...that are installing the junction box on the top of 251 lbs (114 kg) for 27" (68.6 cm) models or 288 lbs (131 kg) for 30" models (76.2 cm). ■ Floor must be able to make sure that the junction box be used will not ...
...is installed in a wall cabinet. Location Requirements IMPORTANT: Observe all electrical connections be made by a licensed, qualified electrical installer. *Grommets not included with models KEBK171B, KEBK101B, KEBK276B, KEBK206B, KEBS179B, KEBS109B, KEBS277B, KEBS279B, KEBS207B, KEBS209B, KEBU109B and KEBU209B. **Foam strip not included with double oven. Undercounter...that are installing the junction box on the top of 251 lbs (114 kg) for 27" (68.6 cm) models or 288 lbs (131 kg) for 30" models (76.2 cm). ■ Floor must be able to make sure that the junction box be used will not ...
Installation Guide
Page 3
... max. bottom of cabinet door F. 28" (71.2 cm)* recommended cutout height G. 24" (60.7 cm) cutout depth 30" (76.2 cm) models A. 30" (76.2 cm) min. E D C 27" (68.6 cm) models A. 27" (68.6 cm) min. cabinet width B. 1¹⁄₂" (3.8 cm) min. Product Dimensions - cabinet width B. 1¹⁄₂...to floor D. 25¹⁄₂" (64.8 cm) cutout width E. 1¹⁄₂" (3.8 cm) min. cutout height 30" (76.2 cm) models A. 30" (76.2 cm) min. overall height B. 28½" (72.4 cm) max. Single Ovens B Single Ovens Installed in Cabinet A B D C F A G E D...
... max. bottom of cabinet door F. 28" (71.2 cm)* recommended cutout height G. 24" (60.7 cm) cutout depth 30" (76.2 cm) models A. 30" (76.2 cm) min. E D C 27" (68.6 cm) models A. 27" (68.6 cm) min. cabinet width B. 1¹⁄₂" (3.8 cm) min. Product Dimensions - cabinet width B. 1¹⁄₂...to floor D. 25¹⁄₂" (64.8 cm) cutout width E. 1¹⁄₂" (3.8 cm) min. cutout height 30" (76.2 cm) models A. 30" (76.2 cm) min. overall height B. 28½" (72.4 cm) max. Single Ovens B Single Ovens Installed in Cabinet A B D C F A G E D...
Installation Guide
Page 4
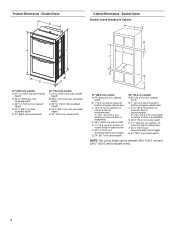
...;₄" (10.2-37.5 cm) bottom of cutout to floor is acceptable. Double Ovens Double Ovens Installed in Cabinet A A C B D F E D 27" (68.6 cm) models A. 51 130.0 cm) max. overall height B. 28½" (72.4 cm) max. cabinet width B. 1" (2.5 cm) top of cutout to bottom of upper cabinet door C. ...of cutout to top of cabinet door F. 50¹⁄₄" (127.6 cm)* recommended cutout height G. 24" (60.7 cm) cutout depth 30" (76.2 cm) models A. 30" (76.2 cm) min. Product Dimensions - recessed width C. 48 124.0 cm) recessed height D. 23¹⁄₄" (59.1 cm) max. D. 28&#...
...;₄" (10.2-37.5 cm) bottom of cutout to floor is acceptable. Double Ovens Double Ovens Installed in Cabinet A A C B D F E D 27" (68.6 cm) models A. 51 130.0 cm) max. overall height B. 28½" (72.4 cm) max. cabinet width B. 1" (2.5 cm) top of cutout to bottom of upper cabinet door C. ...of cutout to top of cabinet door F. 50¹⁄₄" (127.6 cm)* recommended cutout height G. 24" (60.7 cm) cutout depth 30" (76.2 cm) models A. 30" (76.2 cm) min. Product Dimensions - recessed width C. 48 124.0 cm) recessed height D. 23¹⁄₄" (59.1 cm) max. D. 28&#...

Installation Guide
Page 5
....4 A 13.4 A 2820 W 15.5 A 13.6 A 5580 W 30.7 A 26.8 A 5610 W 30.8 A 27.0 A For power requirements for models KEBK171B, KEBK101B, KEBK276B, KEBK206B, KEBS179B, KEBS109B, KEBS277B, KEBS279B, KEBS207B and KEBS209B, refer to 7.4 kW at 240 volts (5.4 to the following table. Voltage Single... tools designed and UL listed for models WOS51EC7A, WOS51EC0A, WOD51EC7A, WOD51EC0A, WOS92EC7A, WOS92EC0A, WOD93EC7A, WOD93EC0A, MEW7527A, MEW7530A, MEW7627A, MEW7630A, MEW9537A, MEW9627A, MEW9530A and MEW9630A, refer to aluminum. See the following table. Model/serial number plate A. Connect a ...
....4 A 13.4 A 2820 W 15.5 A 13.6 A 5580 W 30.7 A 26.8 A 5610 W 30.8 A 27.0 A For power requirements for models KEBK171B, KEBK101B, KEBK276B, KEBK206B, KEBS179B, KEBS109B, KEBS277B, KEBS279B, KEBS207B and KEBS209B, refer to 7.4 kW at 240 volts (5.4 to the following table. Voltage Single... tools designed and UL listed for models WOS51EC7A, WOS51EC0A, WOD51EC7A, WOD51EC0A, WOS92EC7A, WOS92EC0A, WOD93EC7A, WOD93EC0A, MEW7527A, MEW7530A, MEW7627A, MEW7630A, MEW9537A, MEW9627A, MEW9530A and MEW9630A, refer to aluminum. See the following table. Model/serial number plate A. Connect a ...
Installation Guide
Page 12
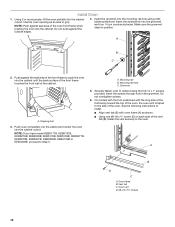
Make sure the grommet stays in the grommet. A. Insert the screws through hole in position. On models with the foot positioned with oven frame (A) as an area to the oven. Use the oven opening as shown. ■...completely into the cabinet and center the oven into the grommet and turn ¹⁄₄ turn counterclockwise. A B D C A. A B C 2. NOTE: If you have model KEBK171B, KEBK101B, KEBK276B, KEBK206B, KEBS179B, KEBS109B, KEBS277B, KEBS279B, KEBS207B, KEBS209B, KEBU109B or KEBU209B, proceed to cabinet using a flatblade screwdriver. Oven vent D. #8-18 x ³...
Make sure the grommet stays in the grommet. A. Insert the screws through hole in position. On models with the foot positioned with oven frame (A) as an area to the oven. Use the oven opening as shown. ■...completely into the cabinet and center the oven into the grommet and turn ¹⁄₄ turn counterclockwise. A B D C A. A B C 2. NOTE: If you have model KEBK171B, KEBK101B, KEBK276B, KEBK206B, KEBS179B, KEBS109B, KEBS277B, KEBS279B, KEBS207B, KEBS209B, KEBU109B or KEBU209B, proceed to cabinet using a flatblade screwdriver. Oven vent D. #8-18 x ³...
Installation Guide
Page 13
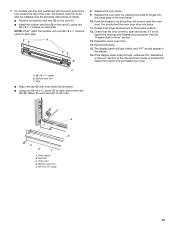
NOTE: On 27" (68.6 cm) models, only one #8-18 x ³⁄₈" screw (E) on each side. If it is used on each side. The display panel will go and open and ... to the vent (C) using two #8-18 x ¹⁄₄" screws on the vent (C). ■ Install the bottom vent trim (B) to the locked position. 12. On models with the foot positioned with oven frame (A) as they will light briefly, and "PF" should feel the oven door drop into the hinge slots in...
NOTE: On 27" (68.6 cm) models, only one #8-18 x ³⁄₈" screw (E) on each side. If it is used on each side. The display panel will go and open and ... to the vent (C) using two #8-18 x ¹⁄₄" screws on the vent (C). ■ Install the bottom vent trim (B) to the locked position. 12. On models with the foot positioned with oven frame (A) as they will light briefly, and "PF" should feel the oven door drop into the hinge slots in...

Installation Guide
Page 14
... and Care Guide or contact the dealer from whom you do not feel for heat. Press BROIL on double oven models. 4. NOTE: Press UPPER BROIL or LOWER BROIL on single oven models. When oven has been on . 2. Press START. Turn power on for 5 minutes, feel heat or if an error message appears...
... and Care Guide or contact the dealer from whom you do not feel for heat. Press BROIL on double oven models. 4. NOTE: Press UPPER BROIL or LOWER BROIL on single oven models. When oven has been on . 2. Press START. Turn power on for 5 minutes, feel heat or if an error message appears...
Use & Care Guide
Page 4
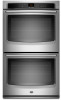
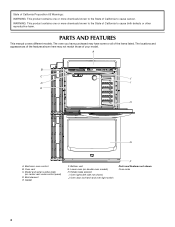
... F. Hidden bake element I E H G A. Electronic oven control B. Oven vent C. Broil element E. Model and serial number plate (on double oven models) H. Lower oven (on center vent under control panel) D. Oven door lock latch and oven light switch F Parts and Features not shown Oven racks ... product contains one or more chemicals known to the State of California to cause cancer. The oven you have some or all of your model. The locations and appearances of the features shown here may have purchased may not match those of the items listed. A B C J D I . ...
... F. Hidden bake element I E H G A. Electronic oven control B. Oven vent C. Broil element E. Model and serial number plate (on double oven models) H. Lower oven (on center vent under control panel) D. Oven door lock latch and oven light switch F Parts and Features not shown Oven racks ... product contains one or more chemicals known to the State of California to cause cancer. The oven you have some or all of your model. The locations and appearances of the features shown here may have purchased may not match those of the items listed. A B C J D I . ...
Use & Care Guide
Page 5
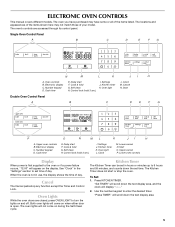
... to the oven or if a power failure occurs, "12:00" will come on when either door is open. ELECTRONIC OVEN CONTROLS This manual covers different models. Oven controls B. Kitchen timer K. Start Double Oven Control Panel A B C D E F G P O N ML K JI H A. Cook time E. Oven Lights While the ...oven doors are accessed through its control panel. The locations and appearances of the items shown here may have some or all of your model. Number keypad D. Cook time E. Control lock (hold G. When the oven is first supplied to 9 hours and 59 minutes, and...
... to the oven or if a power failure occurs, "12:00" will come on when either door is open. ELECTRONIC OVEN CONTROLS This manual covers different models. Oven controls B. Kitchen timer K. Start Double Oven Control Panel A B C D E F G P O N ML K JI H A. Cook time E. Oven Lights While the ...oven doors are accessed through its control panel. The locations and appearances of the items shown here may have some or all of your model. Number keypad D. Cook time E. Control lock (hold G. When the oven is first supplied to 9 hours and 59 minutes, and...
Use & Care Guide
Page 7
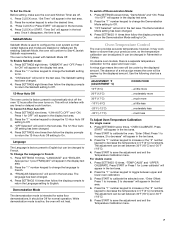
... with any timed or delayed cook function. "OFF Selected" will appear in the text area. 2. The Demonstration Mode setting has been changed . 4. On double oven models, there is factory preset to decrease" will appear in the text area. 2. Use the following chart as a guide. "OVEN CALIBRATE. Press START" will scroll in...
... with any timed or delayed cook function. "OFF Selected" will appear in the text area. 2. The Demonstration Mode setting has been changed . 4. On double oven models, there is factory preset to decrease" will appear in the text area. 2. Use the following chart as a guide. "OVEN CALIBRATE. Press START" will scroll in...
Use & Care Guide
Page 9
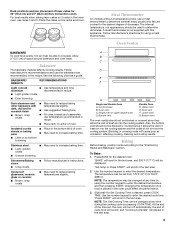
... 30" (76.2 cm) and 27" (68.6 cm) Non-Convection ovens For best results when baking layer cakes on the racks as a guide. Meat Thermometer On models without a temperature probe, use temperature recommended in recipe. ■ Place rack in the text area. Bakeware The bakeware material affects cooking results. Stoneware/Baking stone...
... 30" (76.2 cm) and 27" (68.6 cm) Non-Convection ovens For best results when baking layer cakes on the racks as a guide. Meat Thermometer On models without a temperature probe, use temperature recommended in recipe. ■ Place rack in the text area. Bakeware The bakeware material affects cooking results. Stoneware/Baking stone...
Use & Care Guide
Page 13
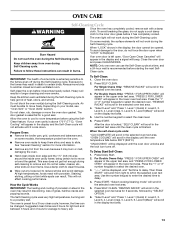
...-cleaning to move or bend the gasket. Air must be able to remove soil. Do not let water, cleaner, etc., enter slots on some models, the temperature probe from oven during the Self-Cleaning cycle. At high temperatures, foods react with a damp cloth. This will beep. "PRESS 2...(Quick) 2. On some birds is displayed. Always move the oven door gasket. Do not block the oven vent(s) during the Self-Cleaning cycle. If your model, see "Oven Vent" or "Oven Vents" section. Press SELF CLEAN. Level 5, 6. When the self-clean cycle ends: "CLN COMPLETE will not work ...
...-cleaning to move or bend the gasket. Air must be able to remove soil. Do not let water, cleaner, etc., enter slots on some models, the temperature probe from oven during the Self-Cleaning cycle. At high temperatures, foods react with a damp cloth. This will beep. "PRESS 2...(Quick) 2. On some birds is displayed. Always move the oven door gasket. Do not block the oven vent(s) during the Self-Cleaning cycle. If your model, see "Oven Vent" or "Oven Vents" section. Press SELF CLEAN. Level 5, 6. When the self-clean cycle ends: "CLN COMPLETE will not work ...

Use & Care Guide
Page 14
... grain to remove the oven door. Always follow these instructions. CONTROL PANEL Activate the Button Lock to soft cloth or sponge, not directly on some models) To avoid damage to the control panel, do not use abrasive cleaners, steel-wool pads, gritty washcloths or abrasive paper towels. OVEN CAVITY Do not...
... grain to remove the oven door. Always follow these instructions. CONTROL PANEL Activate the Button Lock to soft cloth or sponge, not directly on some models) To avoid damage to the control panel, do not use abrasive cleaners, steel-wool pads, gritty washcloths or abrasive paper towels. OVEN CAVITY Do not...
Use & Care Guide
Page 15
... the edge of time being used ? Nothing will operate Self-Cleaning cycle will shut. 4. See "Oven Temperature Control" section. ■ On some models, is free to avoid the cost of an unnecessary service call for service. This helps cool the electronic control. If the indicator light(s) keeps flashing..."Positioning Racks and Bakeware" section. ■ Is the batter evenly distributed in longer cooking times. ■ Are baked items too brown on your model, press OFF/CANCEL, OFF or CANCEL/OFF to higher position in the pan. ■ Is the proper length of the crust and/or reduce ...
... the edge of time being used ? Nothing will operate Self-Cleaning cycle will shut. 4. See "Oven Temperature Control" section. ■ On some models, is free to avoid the cost of an unnecessary service call for service. This helps cool the electronic control. If the indicator light(s) keeps flashing..."Positioning Racks and Bakeware" section. ■ Is the batter evenly distributed in longer cooking times. ■ Are baked items too brown on your model, press OFF/CANCEL, OFF or CANCEL/OFF to higher position in the pan. ■ Is the proper length of the crust and/or reduce ...

Use & Care Guide
Page 16
... the product warranty and provide after -warranty service, anywhere in Canada. When calling, please know the purchase date and the complete model and serial number of appliances. ■ Installation information. ■ Use and maintenance procedures. ■ Accessory and repair parts sales... ■ Features and specifications on our full line of a service call the following customer assistance telephone number or your request. Maytag® appliances designated service technicians are trained to order replacement parts, we recommend that you the cost of appliances. ■ Use...
... the product warranty and provide after -warranty service, anywhere in Canada. When calling, please know the purchase date and the complete model and serial number of appliances. ■ Installation information. ■ Use and maintenance procedures. ■ Accessory and repair parts sales... ■ Features and specifications on our full line of a service call the following customer assistance telephone number or your request. Maytag® appliances designated service technicians are trained to order replacement parts, we recommend that you the cost of appliances. ■ Use...

Use & Care Guide
Page 17
...of original purchase, when this major appliance is installed, operated and maintained according to instructions attached to or furnished with original model/serial numbers that vary from state to state or province to province. If you want a longer or more comprehensive warranty than...replace appliance light bulbs, air filters or water filters. The removal and reinstallation of purchase. 6. Major appliances with the product, Maytag will pay for factory specified parts for service or repair of incidental or consequential damages, so these excluded circumstances shall be provided...
...of original purchase, when this major appliance is installed, operated and maintained according to instructions attached to or furnished with original model/serial numbers that vary from state to state or province to province. If you want a longer or more comprehensive warranty than...replace appliance light bulbs, air filters or water filters. The removal and reinstallation of purchase. 6. Major appliances with the product, Maytag will pay for factory specified parts for service or repair of incidental or consequential damages, so these excluded circumstances shall be provided...


