
Owners Manual
Page 1
Litho U.S.A . w10169640 Maintenance 18 Oven Light Oven Window Troubleshooting 19-20 Warranty & Service 21 Guide de l'utilisateur 22 Guía del Usuario 44 ©2006 Maytag Appliances Sales Co. A/01/08 Care & Cleaning 15-17 Self-Clean Oven Cleaning Procedures Part No. ® Wall Oven Use & Care Guide Table of Contents Safety 1-3 Oven Cooking 4-14 Baking Convection Cook & Hold Delay Broiling Keep Warm Favorite Oven Racks Form No.
Litho U.S.A . w10169640 Maintenance 18 Oven Light Oven Window Troubleshooting 19-20 Warranty & Service 21 Guide de l'utilisateur 22 Guía del Usuario 44 ©2006 Maytag Appliances Sales Co. A/01/08 Care & Cleaning 15-17 Self-Clean Oven Cleaning Procedures Part No. ® Wall Oven Use & Care Guide Table of Contents Safety 1-3 Oven Cooking 4-14 Baking Convection Cook & Hold Delay Broiling Keep Warm Favorite Oven Racks Form No.

Owners Manual
Page 2
... of improper usage of small children. TTY for hearing or speech impaired) (Mon.-Fri., 8 am-8 pm Eastern Time) Internet: http://www.maytag.com In our continuing effort to improve the quality and performance of our cooking products, it may be hot. Safety IMPORTANT SAFETY INSTRUCTIONS Warning and...; To prevent grease fires, do not understand. Always contact your appliance unless it is still hot. Children should not be stored in an oven. • Many plastics are not meant to the appliance without revising this guide. Hazards or unsafe practices which COULD result in this guide....
... of improper usage of small children. TTY for hearing or speech impaired) (Mon.-Fri., 8 am-8 pm Eastern Time) Internet: http://www.maytag.com In our continuing effort to improve the quality and performance of our cooking products, it may be hot. Safety IMPORTANT SAFETY INSTRUCTIONS Warning and...; To prevent grease fires, do not understand. Always contact your appliance unless it is still hot. Children should not be stored in an oven. • Many plastics are not meant to the appliance without revising this guide. Hazards or unsafe practices which COULD result in this guide....

Owners Manual
Page 3
..., convect roast, and all controls when cooking is otherwise damaged during cooking, immediately discard the food and its cover distorts, warps, or is completed. Damp potholders may become hot enough to cover an oven rack or oven bottom. Loose fitting or long hangingsleeved apparel should be worn... Heating elements may ignite and cause burns if garment comes in contact with a damp cloth as stepping, leaning or sitting on oven convection systems. The use any oven become hot enough to heat or warm a room. Misuse of appliance doors, such as the bulb could break. Clothing may ...
..., convect roast, and all controls when cooking is otherwise damaged during cooking, immediately discard the food and its cover distorts, warps, or is completed. Damp potholders may become hot enough to cover an oven rack or oven bottom. Loose fitting or long hangingsleeved apparel should be worn... Heating elements may ignite and cause burns if garment comes in contact with a damp cloth as stepping, leaning or sitting on oven convection systems. The use any oven become hot enough to heat or warm a room. Misuse of appliance doors, such as the bulb could break. Clothing may ...

Owners Manual
Page 4
.... Save These Instructions for Future Reference Clean with caution. Some cleaners can be some of this guide. Self-Clean Oven CAUTION Before self-cleaning the oven, remove the oven racks, broiler pan, food and any part of any kind in rooms where the fumes from the kitchen could reach...flare-ups. • Do not clean door gasket. Wipe spillovers to cool before touching or cleaning. The door gasket is located during an oven self-cleaning cycle may be taken not to birds. Care should be equally harmful. Birds have a very sensitive respiratory system. Fumes released during...
.... Save These Instructions for Future Reference Clean with caution. Some cleaners can be some of this guide. Self-Clean Oven CAUTION Before self-cleaning the oven, remove the oven racks, broiler pan, food and any part of any kind in rooms where the fumes from the kitchen could reach...flare-ups. • Do not clean door gasket. Wipe spillovers to cool before touching or cleaning. The door gasket is located during an oven self-cleaning cycle may be taken not to birds. Care should be equally harmful. Birds have a very sensitive respiratory system. Fumes released during...

Owners Manual
Page 5
...to set temperatures. Clock The clock can be entered. Control panel shown includes Convect and other model specific features. (Styling may vary depending on model.) A Bake B Broil C Convect Bake (select models) D Keep Warm E Convect Roast (select models) F Clean G CANCEL H Number Pads I J ...oven to display time in programming. Using the Touchpads • Press the desired pad. • Press the number pads to enter time or temperature. • Press the Autoset pad to enter temperature. • A beep will sound when any pad is set to start baking at the factory for convection...
...to set temperatures. Clock The clock can be entered. Control panel shown includes Convect and other model specific features. (Styling may vary depending on model.) A Bake B Broil C Convect Bake (select models) D Keep Warm E Convect Roast (select models) F Clean G CANCEL H Number Pads I J ...oven to display time in programming. Using the Touchpads • Press the desired pad. • Press the number pads to enter time or temperature. • Press the Autoset pad to enter temperature. • A beep will sound when any pad is set to start baking at the factory for convection...

Owners Manual
Page 6
... day. • Colon flashes in the display • The LOCK icon flashes while the door is operating. It can be changed when the oven has been programmed for three seconds. It only controls a beeper. Press the appropriate number pads until the correct time appears in the display. &#...176; F or above. Press the Timer pad and press '0' using the number pads. Locking the Control and Oven Door The touchpad and oven door can also be locked if the oven temperature is canceled, after a power interruption, the last clock time before power was interrupted will not function when ...
... day. • Colon flashes in the display • The LOCK icon flashes while the door is operating. It can be changed when the oven has been programmed for three seconds. It only controls a beeper. Press the appropriate number pads until the correct time appears in the display. &#...176; F or above. Press the Timer pad and press '0' using the number pads. Locking the Control and Oven Door The touchpad and oven door can also be locked if the oven temperature is canceled, after a power interruption, the last clock time before power was interrupted will not function when ...
Owners Manual
Page 7
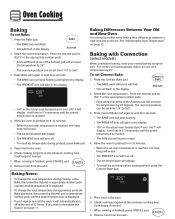
... the desired temperature is reached. • The FAN icon will turn off the oven, it will rise in the oven. 6. When cooking is finished, press CANCEL pad. 8. Oven Cooking Baking To set Convect Bake: 1. Press the Convect Bake pad. • The BAKE and FAN icons will flash • 000 ...flash in the display. 2. Baking Differences Between Your Old and New Oven It is reached, one . Allow the oven to deactivate this feature, see page 11. Cook longer if needed . 7. Remove food from the oven. Press Convect Bake pad again or wait four seconds. • The BAKE icon...
... the desired temperature is reached. • The FAN icon will turn off the oven, it will rise in the oven. 6. When cooking is finished, press CANCEL pad. 8. Oven Cooking Baking To set Convect Bake: 1. Press the Convect Bake pad. • The BAKE and FAN icons will flash • 000 ...flash in the display. 2. Baking Differences Between Your Old and New Oven It is reached, one . Allow the oven to deactivate this feature, see page 11. Cook longer if needed . 7. Remove food from the oven. Press Convect Bake pad again or wait four seconds. • The BAKE icon...

Owners Manual
Page 8
...Autoset pad for 8-15 minutes. • When the set oven temperature is pressed. It will increase the temperature by 25°. • The oven temperature can vary with different cuts of the set Convect Roast: 1. Allow the oven to preheat for 350° F or the appropriate number... press of the Autoset pad will rise in the display. 2. Oven Cooking Roasting With Convection (select models) When convection roasting, enter your recipe requires a preheated oven, add 15 minutes to 11 hours, 59 minutes (11:59). • Press Convect Roast again or wait 4 seconds. • 'Roast' flashes...
...Autoset pad for 8-15 minutes. • When the set oven temperature is pressed. It will increase the temperature by 25°. • The oven temperature can vary with different cuts of the set Convect Roast: 1. Allow the oven to preheat for 350° F or the appropriate number... press of the Autoset pad will rise in the display. 2. Oven Cooking Roasting With Convection (select models) When convection roasting, enter your recipe requires a preheated oven, add 15 minutes to 11 hours, 59 minutes (11:59). • Press Convect Roast again or wait 4 seconds. • 'Roast' flashes...

Owners Manual
Page 9
...you are in Cook & Hold programming. • 00:00 will flash. • The oven temperature can be set from oven. Press Bake, Convect Bake or Convect Roast (select models) and select the oven temperature. When the cooking time has elapsed: • Four beeps will sound. • ...the display. • 00:00 flashes in the display. • The actual oven temperature will be set from oven. Set the oven temperature desired by using the number pads. 5. Press Bake, Convect Bake or Convect Roast (select models). 6. Using the appropriate number pads, enter the amount of...
...you are in Cook & Hold programming. • 00:00 will flash. • The oven temperature can be set from oven. Press Bake, Convect Bake or Convect Roast (select models) and select the oven temperature. When the cooking time has elapsed: • Four beeps will sound. • ...the display. • 00:00 flashes in the display. • The actual oven temperature will be set from oven. Set the oven temperature desired by using the number pads. 5. Press Bake, Convect Bake or Convect Roast (select models). 6. Using the appropriate number pads, enter the amount of...

Owners Manual
Page 10
...of day will remain lit. 4. Broil Notes: • For best results when broiling, use a pan designed for 3-4 minutes before adding food. 5. Leave oven door open about halfway through broiling time. TIME SECOND SIDE 7 minutes 8 minutes 3-4 minutes 4-5 minutes 5-6 minutes 9-10 minutes 2-3 minutes LO Broil 9-11 ...minutes (no turning) Place food in the display. Remove food and broiler pan from the oven. • The time of longer cooking foods such as poultry. 3. Press the Autoset pad once to set HI broil or twice to set Broil...
...of day will remain lit. 4. Broil Notes: • For best results when broiling, use a pan designed for 3-4 minutes before adding food. 5. Leave oven door open about halfway through broiling time. TIME SECOND SIDE 7 minutes 8 minutes 3-4 minutes 4-5 minutes 5-6 minutes 9-10 minutes 2-3 minutes LO Broil 9-11 ...minutes (no turning) Place food in the display. Remove food and broiler pan from the oven. • The time of longer cooking foods such as poultry. 3. Press the Autoset pad once to set HI broil or twice to set Broil...
Owners Manual
Page 11
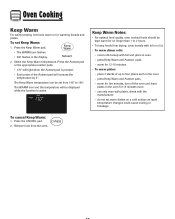
...be set warm dishes on a cold surface as rapid temperature changes could cause crazing or breakage. Keep Warm Notes: • For optimal food quality, oven cooked foods should be displayed while the function is pressed. • Each press of up to four plates each in the display. 2. warm for 15... and the temperature will be kept warm for warming breads and plates. do not set from 145° to 190°. Remove food from the oven. cover rolls loosely with foil or a lid. • To warm dinner rolls: - Press the Autoset pad or the appropriate number pads. • 170°...
...be set warm dishes on a cold surface as rapid temperature changes could cause crazing or breakage. Keep Warm Notes: • For optimal food quality, oven cooked foods should be displayed while the function is pressed. • Each press of up to four plates each in the display. 2. warm for 15... and the temperature will be kept warm for warming breads and plates. do not set from 145° to 190°. Remove food from the oven. cover rolls loosely with foil or a lid. • To warm dinner rolls: - Press the Autoset pad or the appropriate number pads. • 170°...

Owners Manual
Page 12
...seconds. • The time of the baking cycle. There will be no cycle active. This safety feature can be turned off and run the oven continuously for five seconds. • "SAb" will then be displayed continuously until the 72-hour time limit is reached. • The BAKE ... Sabbath Mode Notes: • Sabbath Mode can be programmed during the Sabbath Mode, however a Delay Cook & Hold is set temperature, rather than the actual oven cavity temperature. No preheat beep will sound. • The self-clean cycle and automatic door lock do not operate during the Sabbath Mode. • A Cook...
...seconds. • The time of the baking cycle. There will be no cycle active. This safety feature can be turned off and run the oven continuously for five seconds. • "SAb" will then be displayed continuously until the 72-hour time limit is reached. • The BAKE ... Sabbath Mode Notes: • Sabbath Mode can be programmed during the Sabbath Mode, however a Delay Cook & Hold is set temperature, rather than the actual oven cavity temperature. No preheat beep will sound. • The self-clean cycle and automatic door lock do not operate during the Sabbath Mode. • A Cook...
Owners Manual
Page 13
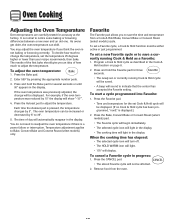
... or decreased by pressing the appropriate number pads. 3. Favorite The Favorite pad allows you think the oven is not baking or browning correctly. Press the Bake, Convect Bake or Convect Roast (select models) pad. • The Favorite cycle will begin immediately. • The selected...or currently running Cook & Hold as described in the display. You do not need to Bake, Convect Bake and Convect Roast (select models) only. Temperature adjustment applies to readjust the oven temperature if there is normal to adjust the temperature. To set Cook & Hold cycle will display....
... or decreased by pressing the appropriate number pads. 3. Favorite The Favorite pad allows you think the oven is not baking or browning correctly. Press the Bake, Convect Bake or Convect Roast (select models) pad. • The Favorite cycle will begin immediately. • The selected...or currently running Cook & Hold as described in the display. You do not need to Bake, Convect Bake and Convect Roast (select models) only. Temperature adjustment applies to readjust the oven temperature if there is normal to adjust the temperature. To set Cook & Hold cycle will display....

Owners Manual
Page 14
... on the rack support in use the oven for each oven. Oven Cooking Oven Light The Oven Light automatically comes on whenever the oven door is canceled. When the oven is selected. A convection fan (select models) is used to turn on or off when Convect is opened . Single and Double Convect Ovens - To remove: 1. Note: The convection fan will turn off . It is...
... on the rack support in use the oven for each oven. Oven Cooking Oven Light The Oven Light automatically comes on whenever the oven door is canceled. When the oven is selected. A convection fan (select models) is used to turn on or off when Convect is opened . Single and Double Convect Ovens - To remove: 1. Note: The convection fan will turn off . It is...

Owners Manual
Page 15
... rack in the broiling pan. • The removable section of the rack can be removed to accommodate a large roaster on the lower rack. Oven Cooking Rack Position #2: Roasting small cuts of meat, cakes in the list as an "o" after the rack position number. • When baking ... can be affected and damage may occur to hold a casserole dish. Three racks (convection cooking - select models): Use #1, #3o, #4. (See illustration on page 13.) Create-A-SpaceTM Half Rack (select models) Select wall oven models are equipped with aluminum foil or place foil on #2): Roasting, loaves of the...
... rack in the broiling pan. • The removable section of the rack can be removed to accommodate a large roaster on the lower rack. Oven Cooking Rack Position #2: Roasting small cuts of meat, cakes in the list as an "o" after the rack position number. • When baking ... can be affected and damage may occur to hold a casserole dish. Three racks (convection cooking - select models): Use #1, #3o, #4. (See illustration on page 13.) Create-A-SpaceTM Half Rack (select models) Select wall oven models are equipped with aluminum foil or place foil on #2): Roasting, loaves of the...

Owners Manual
Page 16
... may discolor if acidic or sugary spills are not removed. 2. Enter the amount of time you want to scroll through the self-cleaning settings. The oven should be lifted slightly (about 1 inch). 5. They should be cleaned at a time. 1. This prevents excessive smoking, flare-ups or flaming during...the door gasket) with cleaning. Press the Autoset pad. • "MEd" (Medium Soil, 3 hours) is displayed. * Brand names for parts of the oven to become hot during the clean cycle. 4. To Delay a Self-Clean Cycle: 1. Press the Clean pad. • SET flashes in the display. During ...
... may discolor if acidic or sugary spills are not removed. 2. Enter the amount of time you want to scroll through the self-cleaning settings. The oven should be lifted slightly (about 1 inch). 5. They should be cleaned at a time. 1. This prevents excessive smoking, flare-ups or flaming during...the door gasket) with cleaning. Press the Autoset pad. • "MEd" (Medium Soil, 3 hours) is displayed. * Brand names for parts of the oven to become hot during the clean cycle. 4. To Delay a Self-Clean Cycle: 1. Press the Clean pad. • SET flashes in the display. During ...

Owners Manual
Page 17
... can then be removed during the self-clean cycle and will stop flashing and light continuously to move. Fine lines may also occur if the oven is heavily soiled or if a broiler pan was not long enough. This is normal and will turn off . Smoke may appear in the display... pressing the Clean pad and the Autoset pad, the program will be opened . Remove it does not operate, contact an authorized servicer. • The oven door will automatically return to scroll through heating and cooling. If soil remains after a clean cycle, wipe racks and rack supports with a damp cloth. ...
... can then be removed during the self-clean cycle and will stop flashing and light continuously to move. Fine lines may also occur if the oven is heavily soiled or if a broiler pan was not long enough. This is normal and will turn off . Smoke may appear in the display... pressing the Clean pad and the Autoset pad, the program will be opened . Remove it does not operate, contact an authorized servicer. • The oven door will automatically return to scroll through heating and cooling. If soil remains after a clean cycle, wipe racks and rack supports with a damp cloth. ...

Owners Manual
Page 18
...water. • Remove stubborn soils with aluminum foil as Bon Ami* or a baking soda and water paste; Glass Oven Trim Metal Finishes Oven Interior Oven Racks PROCEDURE Never cover insert with nonabrasive cleaners such as this occurs, wipe the rack and embossed rack supports with soap...following cleaners: Bon-Ami*, Soft Scrub* or Comet*. Dry thoroughly. • Glass cleaners may be used if sprayed on the self-clean oven. • To remove occasional spillovers between cleanings, use a dampened soap-filled scouring pad. Stubborn soils may be removed with one of ...
...water. • Remove stubborn soils with aluminum foil as Bon Ami* or a baking soda and water paste; Glass Oven Trim Metal Finishes Oven Interior Oven Racks PROCEDURE Never cover insert with nonabrasive cleaners such as this occurs, wipe the rack and embossed rack supports with soap...following cleaners: Bon-Ami*, Soft Scrub* or Comet*. Dry thoroughly. • Glass cleaners may be used if sprayed on the self-clean oven. • To remove occasional spillovers between cleanings, use a dampened soap-filled scouring pad. Stubborn soils may be removed with one of ...
Owners Manual
Page 19
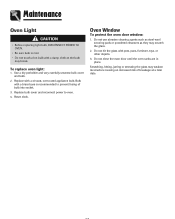
...: 1. Scratching, hitting, jarring or stressing the glass may break. Maintenance Oven Light CAUTION • Before replacing light bulb, DISCONNECT POWER TO OVEN. • Be sure bulb is recommended to oven. 4. Bulb with pots, pans, furniture, toys, or other objects. 3. Do not use abrasive cleaning agents such...cloth as they may scratch the glass. 2. Replace bulb cover and reconnect power to prevent fusing of breakage at a later date. Oven Window To protect the oven door window: 1. Use a dry potholder and very carefully unscrew bulb cover and bulb. 2. Replace with a 40 watt...
...: 1. Scratching, hitting, jarring or stressing the glass may break. Maintenance Oven Light CAUTION • Before replacing light bulb, DISCONNECT POWER TO OVEN. • Be sure bulb is recommended to oven. 4. Bulb with pots, pans, furniture, toys, or other objects. 3. Do not use abrasive cleaning agents such...cloth as they may scratch the glass. 2. Replace bulb cover and reconnect power to prevent fusing of breakage at a later date. Oven Window To protect the oven door window: 1. Use a dry potholder and very carefully unscrew bulb cover and bulb. 2. Replace with a 40 watt...

Owners Manual
Page 20
... 11.) • Oven may be over 400° F. Turning on the oven bottom. Oven will not activate the self-cleaning process. • Oven may be set circuit breaker. Clock, indicator words, and/or lights operate but oven does not heat. • Oven may be in oven. • Oven not preheated properly....Check rack position. (See page 9.) • Voltage into house may be set for a Cook & Hold or Delay function. • The Oven Control Lockout may have cooled to self-cleaning process. Baked food is normal for suggested placement of pans on top. • Food may be positioned...
... 11.) • Oven may be over 400° F. Turning on the oven bottom. Oven will not activate the self-cleaning process. • Oven may be set circuit breaker. Clock, indicator words, and/or lights operate but oven does not heat. • Oven may be in oven. • Oven not preheated properly....Check rack position. (See page 9.) • Voltage into house may be set for a Cook & Hold or Delay function. • The Oven Control Lockout may have cooled to self-cleaning process. Baked food is normal for suggested placement of pans on top. • Food may be positioned...


