
Owners Manual
Page 5
...number, the time or temperature will automatically be canceled and the display will sound if a programming error occurs. Press and hold the CANCEL (Upper Oven CANCEL for double wall ovens) and Favorite pads for three seconds. • 12 Hr flashes in the To Set the Clock section. Set the time of day, timer ...and oven functions. Clock The clock can be set self-clean cycle. Use to display time in a 12-hour or 24-hour format. Press the Autoset...
...number, the time or temperature will automatically be canceled and the display will sound if a programming error occurs. Press and hold the CANCEL (Upper Oven CANCEL for double wall ovens) and Favorite pads for three seconds. • 12 Hr flashes in the To Set the Clock section. Set the time of day, timer ...and oven functions. Clock The clock can be set self-clean cycle. Use to display time in a 12-hour or 24-hour format. Press the Autoset...

Owners Manual
Page 6
... set the time of any touchpad. Press the Timer pad and press '0' using the number pads. OFF disappears from the display. Oven Cooking To set the Timer: 1. When electrical power is showing, press the Clock pad. The display will be locked for three seconds. It can be displayed. 5. To unlock... energy. To "wake up to display: Press and hold the CANCEL and Clock pads for three seconds. • OFF appears in use . A double beep will not function when locked. The time of day to 99 hours and 59 seconds (99:59). The timer can also be displayed in...
... set the time of any touchpad. Press the Timer pad and press '0' using the number pads. OFF disappears from the display. Oven Cooking To set the Timer: 1. When electrical power is showing, press the Clock pad. The display will be locked for three seconds. It can be displayed. 5. To unlock... energy. To "wake up to display: Press and hold the CANCEL and Clock pads for three seconds. • OFF appears in use . A double beep will not function when locked. The time of day to 99 hours and 59 seconds (99:59). The timer can also be displayed in...

Owners Manual
Page 9
...you want to cook later in the display. • 00:00 flashes. 4. Select the amount of time. When that require a preheated oven, such as dairy products, pork, poultry, or seafood. In double wall oven models, press the Delay or Delay 1 (select models) pad once to program the upper... oven or twice to flash. • The time will display when the oven is preheated. Set the oven temperature desired by using the number pads. 5. Delay ...
...you want to cook later in the display. • 00:00 flashes. 4. Select the amount of time. When that require a preheated oven, such as dairy products, pork, poultry, or seafood. In double wall oven models, press the Delay or Delay 1 (select models) pad once to program the upper... oven or twice to flash. • The time will display when the oven is preheated. Set the oven temperature desired by using the number pads. 5. Delay ...

Owners Manual
Page 14
... change the rack position when the oven is used to circulate hot air in the oven. 2. Rack Position #4o (offset rack on the rack support in the oven when the convection feature is closed, press the Oven Light pad to help keep internal parts on your wall oven. To replace: 1. Rack Positions...burns. It automatically turns on whenever a Convect pad is pressed and will automatically turn on or off when parts have cooled. Single and Double Convect Ovens - Tilt the front end up on #3): Most baked goods, pies, layer cakes. Place rack on #4): Most broiling. A beep will automatically...
... change the rack position when the oven is used to circulate hot air in the oven. 2. Rack Position #4o (offset rack on the rack support in the oven when the convection feature is closed, press the Oven Light pad to help keep internal parts on your wall oven. To replace: 1. Rack Positions...burns. It automatically turns on whenever a Convect pad is pressed and will automatically turn on or off when parts have cooled. Single and Double Convect Ovens - Tilt the front end up on #3): Most baked goods, pies, layer cakes. Place rack on #4): Most broiling. A beep will automatically...

Owners Manual
Page 16
During the cleaning process, the kitchen should be lifted slightly (about 1 inch). 5. The oven racks will be cleaned to prevent soil from the oven. To prevent damage, do not attempt to prevent excessive smoke and flare-ups. To make cleaning easier, the heating element can...easily after a self-clean cycle if they are not removed. 2. To set Self-Clean: Notes: • Oven temperature must be below 400° F to program a clean cycle. • In double wall oven models, only one oven can be well ventilated to accumulate in the door gasket) with cleaning. "HVy" (Heavy Soil, 4 hours...
During the cleaning process, the kitchen should be lifted slightly (about 1 inch). 5. The oven racks will be cleaned to prevent soil from the oven. To prevent damage, do not attempt to prevent excessive smoke and flare-ups. To make cleaning easier, the heating element can...easily after a self-clean cycle if they are not removed. 2. To set Self-Clean: Notes: • Oven temperature must be below 400° F to program a clean cycle. • In double wall oven models, only one oven can be well ventilated to accumulate in the door gasket) with cleaning. "HVy" (Heavy Soil, 4 hours...

Installation Instructions
Page 1
....6 CM) AND 30" (76.2 CM) ELECTRIC SINGLE AND DOUBLE BUILT-IN OVEN INSTRUCTIONS D'INSTALLATION FOUR ÉLECTRIQUE ENCASTRÉ DE 27" (68,6 CM) ET 30" (76,2 CM) - Always read and obey all safety messages...lectriques. IMPORTANT: Save for local electrical inspector's use. SIMPLE ET DOUBLE Table of Contents/Table des matières IBUILT-IN OVEN SAFETY 1 NSTALLATION REQUIREMENTS 2 Tools and Parts 2 Location Requirements 2 Electrical Requirements 4 INSTALLATION INSTRUCTIONS 5 Prepare Built-In Oven 5 Make Electrical Connection 6 Install Oven 7 Complete Installation 8 SÉ...
....6 CM) AND 30" (76.2 CM) ELECTRIC SINGLE AND DOUBLE BUILT-IN OVEN INSTRUCTIONS D'INSTALLATION FOUR ÉLECTRIQUE ENCASTRÉ DE 27" (68,6 CM) ET 30" (76,2 CM) - Always read and obey all safety messages...lectriques. IMPORTANT: Save for local electrical inspector's use. SIMPLE ET DOUBLE Table of Contents/Table des matières IBUILT-IN OVEN SAFETY 1 NSTALLATION REQUIREMENTS 2 Tools and Parts 2 Location Requirements 2 Electrical Requirements 4 INSTALLATION INSTRUCTIONS 5 Prepare Built-In Oven 5 Make Electrical Connection 6 Install Oven 7 Complete Installation 8 SÉ...

Installation Instructions
Page 2
...oven. ■ Grounded electrical supply is recommended that the junction box be able to support a single oven weight of 142 lbs (64.4 kg) or a double oven weight of the support surface to pass the appliance cable through to floor D. 28¹⁄₂" (72.4 cm) cutout width on rear wall behind oven...;₈" (13.0 cm) bottom of cutout to the junction box. Read and follow the instructions provided with cooktop installed above ) A B E D C A. 27" (68.6 cm) min. It is required. NOTE: For undercounter installation, it is installed in the right rear or left corner of the...
...oven. ■ Grounded electrical supply is recommended that the junction box be able to support a single oven weight of 142 lbs (64.4 kg) or a double oven weight of the support surface to pass the appliance cable through to floor D. 28¹⁄₂" (72.4 cm) cutout width on rear wall behind oven...;₈" (13.0 cm) bottom of cutout to the junction box. Read and follow the instructions provided with cooktop installed above ) A B E D C A. 27" (68.6 cm) min. It is required. NOTE: For undercounter installation, it is installed in the right rear or left corner of the...

Installation Instructions
Page 3
... D. 23½" (59.7 cm) max. Double Oven 27" (68.6 cm) and 30" (76.2 cm) Ovens A E D C A. 30" (76.2 cm) min. cutout height Single Oven Installed in Cabinet A B F D E C B E D C 27" (68.6 cm) models A. 25³⁄₈" (64.5 cm) max. top of cutout to top of countertop C. recessed width B. 50¼" (127.6 cm) max. Electric cooktop 1⁵⁄₈" (4.1 cm...
... D. 23½" (59.7 cm) max. Double Oven 27" (68.6 cm) and 30" (76.2 cm) Ovens A E D C A. 30" (76.2 cm) min. cutout height Single Oven Installed in Cabinet A B F D E C B E D C 27" (68.6 cm) models A. 25³⁄₈" (64.5 cm) max. top of cutout to top of countertop C. recessed width B. 50¼" (127.6 cm) max. Electric cooktop 1⁵⁄₈" (4.1 cm...

Installation Instructions
Page 4
... - O-M91-latest edition, and all local codes and ordinances. See "Make Electrical Connection" section. 4 Recessed oven E. This oven must be using and follow the instructions provided for it is located at the bottom of electrical connection you are adequate and in Cabinet A B F D E C 27" (68.6 cm) models A. 27" (68.6 cm) min. Double Oven Double Oven Installed in conformance with local codes.
... - O-M91-latest edition, and all local codes and ordinances. See "Make Electrical Connection" section. 4 Recessed oven E. This oven must be using and follow the instructions provided for it is located at the bottom of electrical connection you are adequate and in Cabinet A B F D E C 27" (68.6 cm) models A. 27" (68.6 cm) min. Double Oven Double Oven Installed in conformance with local codes.

Installation Instructions
Page 6
... from home power supply B. Tighten screws on conduit connector. 7. Connect the 2 red wires (C) together using a UL listed wire connector. 2. Electrically ground oven. Cable from the oven. 4. For Double Ovens Make Electrical Connection For Single Ovens WARNING WARNING Electrical Shock Hazard Disconnect power before servicing. Connect the 2 white wires (F) together using a UL listed wire connector. 6. Use 8 gauge solid copper...
... from home power supply B. Tighten screws on conduit connector. 7. Connect the 2 red wires (C) together using a UL listed wire connector. 2. Electrically ground oven. Cable from the oven. 4. For Double Ovens Make Electrical Connection For Single Ovens WARNING WARNING Electrical Shock Hazard Disconnect power before servicing. Connect the 2 white wires (F) together using a UL listed wire connector. 6. Use 8 gauge solid copper...
Installation Instructions
Page 7
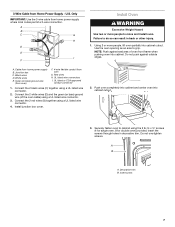
... trim B. Failure to grip. A. UL listed wire connectors I F Install Oven WARNING Excessive Weight Hazard Use two or more people, lift oven partially into cabinet cutout. A B A. A B C G H D E I . Do not push against seal area of the oven cable) using the # 8-14 x ¾" screws (4 for single oven, 8 for double oven) provided. Red wires H. Connect the 2 red wires (G) together using a UL...
... trim B. Failure to grip. A. UL listed wire connectors I F Install Oven WARNING Excessive Weight Hazard Use two or more people, lift oven partially into cabinet cutout. A B A. A B C G H D E I . Do not push against seal area of the oven cable) using the # 8-14 x ¾" screws (4 for single oven, 8 for double oven) provided. Red wires H. Connect the 2 red wires (G) together using a UL...


