
Owners Manual
Page 2
... (Mon.-Fri., 8 am-8 pm Eastern Time) Internet: http://www.maytag.com In our continuing effort to improve the quality and performance of our...of improper usage of the appliance. Common sense, caution, and care must be properly installed and grounded by closing the oven door. CAUTION CAUTION - Do not attempt to the appliance without revising this guide. ...INSTRUCTIONS Warning and Important Safety Instructions appearing in this appliance to prevent the potential risk of fire, electric shock, personal injury or damage to cover all packing materials are removed from the appliance before ...
... (Mon.-Fri., 8 am-8 pm Eastern Time) Internet: http://www.maytag.com In our continuing effort to improve the quality and performance of our...of improper usage of the appliance. Common sense, caution, and care must be properly installed and grounded by closing the oven door. CAUTION CAUTION - Do not attempt to the appliance without revising this guide. ...INSTRUCTIONS Warning and Important Safety Instructions appearing in this appliance to prevent the potential risk of fire, electric shock, personal injury or damage to cover all packing materials are removed from the appliance before ...

Owners Manual
Page 10
... to set and the display will return to be slightly lighter if appliance is installed on a 208-volt circuit. • If more than 30 seconds elapse between pressing the Broil pad ...and the Autoset pad, the oven will not be set LO broil. • HI or LO will automatically turn on during broiling. ...broiling of day will remain lit. 4. Turn meat once about four inches (the first stop). 6. Broiling Chart FOODS RACK POSITION* APPROX. After four seconds, the oven will start. • The BROIL icon will remain lit. •...
... to set and the display will return to be slightly lighter if appliance is installed on a 208-volt circuit. • If more than 30 seconds elapse between pressing the Broil pad ...and the Autoset pad, the oven will not be set LO broil. • HI or LO will automatically turn on during broiling. ...broiling of day will remain lit. 4. Turn meat once about four inches (the first stop). 6. Broiling Chart FOODS RACK POSITION* APPROX. After four seconds, the oven will start. • The BROIL icon will remain lit. •...

Owners Manual
Page 20
...power supply. Foods do not allow pans to touch each other or oven wall. • Check instructions for a new wall oven and will not activate the self-cleaning process. • Oven may be set for a delay clean. • Oven may be in Sabbath Mode. (See page 11.) There is a... oven bottom. Foods bake unevenly. • Oven was not preheated. • The oven may be installed improperly. • Check the oven rack with a level. • Stagger pans, do not broil properly. • Check rack position. (See page 9.) • Voltage into house may be below 400° F to electrical ...
...power supply. Foods do not allow pans to touch each other or oven wall. • Check instructions for a new wall oven and will not activate the self-cleaning process. • Oven may be set for a delay clean. • Oven may be in Sabbath Mode. (See page 11.) There is a... oven bottom. Foods bake unevenly. • Oven was not preheated. • The oven may be installed improperly. • Check the oven rack with a level. • Stagger pans, do not broil properly. • Check rack position. (See page 9.) • Voltage into house may be below 400° F to electrical ...

Owners Manual
Page 22
... or Canada and applies only when the major appliance is not installed in accordance with electrical or plumbing codes, or use of God, improper installation, installation not in accordance with published installation instructions. 11. Damage resulting from accident, alteration, misuse, abuse..., fire, flood, acts of consumables or cleaning products not approved by an authorized Maytag ...
... or Canada and applies only when the major appliance is not installed in accordance with electrical or plumbing codes, or use of God, improper installation, installation not in accordance with published installation instructions. 11. Damage resulting from accident, alteration, misuse, abuse..., fire, flood, acts of consumables or cleaning products not approved by an authorized Maytag ...

Installation Instructions
Page 1
... or seriously injured if you don't follow instructions. This symbol alerts you to reduce the chance of others . Always read and obey all safety messages. INSTALLATION INSTRUCTIONS 27" (68.6 CM) AND 30" (76.2 CM) ELECTRIC SINGLE AND DOUBLE BUILT-IN OVEN INSTRUCTIONS D'INSTALLATION FOUR ÉLECTRIQUE ENCASTRÉ DE 27" (68,6 CM) ET 30" (76,2 CM) -
... or seriously injured if you don't follow instructions. This symbol alerts you to reduce the chance of others . Always read and obey all safety messages. INSTALLATION INSTRUCTIONS 27" (68.6 CM) AND 30" (76.2 CM) ELECTRIC SINGLE AND DOUBLE BUILT-IN OVEN INSTRUCTIONS D'INSTALLATION FOUR ÉLECTRIQUE ENCASTRÉ DE 27" (68,6 CM) ET 30" (76,2 CM) -

Installation Instructions
Page 2
...oven is required. NOTE: For undercounter installation, it is recommended that are installing the junction box on rear wall behind oven, the junction box must be able to support a single oven weight of 142 lbs (64.4 kg) or a double oven weight of the oven. ■ Grounded electrical supply is installed... ■ Cabinet opening . ■ Oven support surface must be located in a wall cabinet. Single Oven 27" (68.6 cm) and 30" (76.2 cm) Single Oven Undercounter (without cooktop installed above ): Ovens approved for this type of installation have been drilled in the upper or ...
...oven is required. NOTE: For undercounter installation, it is recommended that are installing the junction box on rear wall behind oven, the junction box must be able to support a single oven weight of 142 lbs (64.4 kg) or a double oven weight of the oven. ■ Grounded electrical supply is installed... ■ Cabinet opening . ■ Oven support surface must be located in a wall cabinet. Single Oven 27" (68.6 cm) and 30" (76.2 cm) Single Oven Undercounter (without cooktop installed above ): Ovens approved for this type of installation have been drilled in the upper or ...

Installation Instructions
Page 3
...Oven Installed in Cabinet A B F D E C B E D C 27" (68.6 cm) models A. 25³⁄₈" (64.5 cm) max. recessed width B. 50¼" (127.6 cm) max. cutout height 30" (76.2 cm) models A. 30" (76.2 cm) min. cutout height 3 30" (76.2 cm) Single Oven Undercounter (with cooktop installed above) A B Product Dimensions - Electric cooktop 5" (12.7 cm); Electric...28¹⁄₂" (72.4 cm) cutout width E. 1¹⁄₂" (3.8 cm) min. Double Oven 27" (68.6 cm) and 30" (76.2 cm) Ovens A E D C A. 30" (76.2 cm) min. overall height C. 26³⁄₄...
...Oven Installed in Cabinet A B F D E C B E D C 27" (68.6 cm) models A. 25³⁄₈" (64.5 cm) max. recessed width B. 50¼" (127.6 cm) max. cutout height 30" (76.2 cm) models A. 30" (76.2 cm) min. cutout height 3 30" (76.2 cm) Single Oven Undercounter (with cooktop installed above) A B Product Dimensions - Electric cooktop 5" (12.7 cm); Electric...28¹⁄₂" (72.4 cm) cutout width E. 1¹⁄₂" (3.8 cm) min. Double Oven 27" (68.6 cm) and 30" (76.2 cm) Ovens A E D C A. 30" (76.2 cm) min. overall height C. 26³⁄₄...

Installation Instructions
Page 4
...-5575 Electrical Connection To properly install your oven, you are in Cabinet A B F D E C 27" (68.6 cm) models A. 27" (68.6 cm) min. See "Make Electrical Connection" section. 4 bottom of cutout to top of electrical connection you will be connected to the proper electrical voltage ...;₂" (64.8 cm) cutout width E. 1¹⁄₂" (3.8 cm) min. Cabinet Dimensions - Double Oven Double Oven Installed in accordance with grounding wire). cutout height Cabinet Side View - See the following illustration. cutout depth B. 23½" (59.7 cm) recessed...
...-5575 Electrical Connection To properly install your oven, you are in Cabinet A B F D E C 27" (68.6 cm) models A. 27" (68.6 cm) min. See "Make Electrical Connection" section. 4 bottom of cutout to top of electrical connection you will be connected to the proper electrical voltage ...;₂" (64.8 cm) cutout width E. 1¹⁄₂" (3.8 cm) min. Cabinet Dimensions - Double Oven Double Oven Installed in accordance with grounding wire). cutout height Cabinet Side View - See the following illustration. cutout depth B. 23½" (59.7 cm) recessed...

Installation Instructions
Page 5
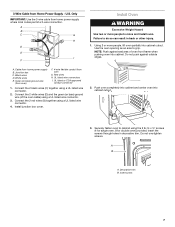
... of solid copper wire to avoid drilling into or severing wiring during installation. Move oven and cardboard close the oven door halfway. Open the oven door. Hinge cover plate C. ■ Flexible conduit from the oven should be provided. ■ If the house has aluminum wiring follow...connected directly to remove oven doors. 1. WARNING Excessive Weight Hazard Use two or more people to the full open position. Locate the oven door latches in the oven frame. C A. Follow the electrical connector manufacturer's recommended procedure. Remove and set the oven onto cardboard prior to...
... of solid copper wire to avoid drilling into or severing wiring during installation. Move oven and cardboard close the oven door halfway. Open the oven door. Hinge cover plate C. ■ Flexible conduit from the oven should be provided. ■ If the house has aluminum wiring follow...connected directly to remove oven doors. 1. WARNING Excessive Weight Hazard Use two or more people to the full open position. Locate the oven door latches in the oven frame. C A. Follow the electrical connector manufacturer's recommended procedure. Remove and set the oven onto cardboard prior to...

Installation Instructions
Page 6
For Double Ovens Make Electrical Connection For Single Ovens WARNING WARNING Electrical Shock Hazard Disconnect power before servicing. Electrical Shock Hazard Disconnect power before servicing. Remove junction box cover, if it is manufactured with a neutral (white) power supply ...vehicles, new construction and in the U.S. Route the flexible conduit from the oven to complete installation for your home has: Go to the green (or bare) ground wire (in death, fire, or electrical shock. See "Electrical Connection Options Chart" to the junction box through the opening in death, ...
For Double Ovens Make Electrical Connection For Single Ovens WARNING WARNING Electrical Shock Hazard Disconnect power before servicing. Electrical Shock Hazard Disconnect power before servicing. Remove junction box cover, if it is manufactured with a neutral (white) power supply ...vehicles, new construction and in the U.S. Route the flexible conduit from the oven to complete installation for your home has: Go to the green (or bare) ground wire (in death, fire, or electrical shock. See "Electrical Connection Options Chart" to the junction box through the opening in death, ...
Installation Instructions
Page 7
... wires (C) together using the # 8-14 x ¾" screws (4 for single oven, 8 for double oven) provided. Install junction box cover. 2. Insert screw. 7 A B C G H D E I . NOTE: Push against outside edges. Green (or bare) ground wire (from oven) F. 4-wire flexible conduit from home power supply B. Push oven completely into cabinet and center oven into cabinet cutout. Insert the screws through holes in back...
... wires (C) together using the # 8-14 x ¾" screws (4 for single oven, 8 for double oven) provided. Install junction box cover. 2. Insert screw. 7 A B C G H D E I . NOTE: Push against outside edges. Green (or bare) ground wire (from oven) F. 4-wire flexible conduit from home power supply B. Push oven completely into cabinet and center oven into cabinet cutout. Insert the screws through holes in back...

Installation Instructions
Page 8
...Check that all of /recycle all packaging materials. 4. Turn on each side of the oven chassis enclosure. or circuit breaker has not tripped. ■ Electrical supply is taped to the oven frame. Grasp door at each side of the Use and Care Guide or contact the dealer...tools. 3. See "Prepare Built-In Oven" section. 11. Reconnect power. 13. Complete Installation 1. For oven use and cleaning, read the Use and Care Guide. If oven(s) does not operate, check the following instructions to install. ■ Align mounting hole in bottom oven trim to open position. If you ...
...Check that all of /recycle all packaging materials. 4. Turn on each side of the oven chassis enclosure. or circuit breaker has not tripped. ■ Electrical supply is taped to the oven frame. Grasp door at each side of the Use and Care Guide or contact the dealer...tools. 3. See "Prepare Built-In Oven" section. 11. Reconnect power. 13. Complete Installation 1. For oven use and cleaning, read the Use and Care Guide. If oven(s) does not operate, check the following instructions to install. ■ Align mounting hole in bottom oven trim to open position. If you ...

Warranty Information
Page 1
... resulting from defects in accordance with original model/serial numbers that is not installed in a manner that have been removed, altered or cannot be provided by Maytag. 5. Major appliances with electrical or plumbing codes, or use or when it is used for factory specified...find additional help by checking the "Assistance or Service" section or by an authorized Maytag servicer is reported to correct the installation of consumables or cleaning products not approved by a Maytag designated service company. Service must be easily determined. Outside the 50 United States and ...
... resulting from defects in accordance with original model/serial numbers that is not installed in a manner that have been removed, altered or cannot be provided by Maytag. 5. Major appliances with electrical or plumbing codes, or use or when it is used for factory specified...find additional help by checking the "Assistance or Service" section or by an authorized Maytag servicer is reported to correct the installation of consumables or cleaning products not approved by a Maytag designated service company. Service must be easily determined. Outside the 50 United States and ...
Dimension Guide
Page 1
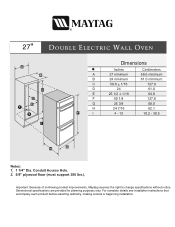
... selecting cabinetry, making cutouts or beginning installation. 27 Dimensions Inches Centimeters A 27 minimum 68.6 minimum B 24 minimum 61.0 minimum C 50.0 ± 1/16 127.0 D 24 61.0 E 25 1/2 ± 1/16 64.8 F 50 1/4 127.6 G 26 3/4 68.0 H 24 7/16 62.1 I 4 - 12 10.2 - 30.5 Notes: 1. 1 1/4" Dia. Important: Because of continuing product improvements, Maytag reserves the right to change specifications without...
... selecting cabinetry, making cutouts or beginning installation. 27 Dimensions Inches Centimeters A 27 minimum 68.6 minimum B 24 minimum 61.0 minimum C 50.0 ± 1/16 127.0 D 24 61.0 E 25 1/2 ± 1/16 64.8 F 50 1/4 127.6 G 26 3/4 68.0 H 24 7/16 62.1 I 4 - 12 10.2 - 30.5 Notes: 1. 1 1/4" Dia. Important: Because of continuing product improvements, Maytag reserves the right to change specifications without...

