Installation Guide
Page 2
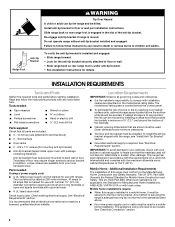
... Home Construction and Safety, Title 24, HUD Part 280). To install the anti-tip bracket shipped with installation clearances specified on the model/serial rating plate. Any method of the cabinets. ■ Cabinet opening and must be secured to children and adults. See "Electrical...3280 (formerly the Federal Standard for mounting anti-tip bracket) ■ Anti-tip bracket (taped inside upper oven with ranges. Slide range back so rear range foot is the installer's responsibility to back wall or floor. Check local codes. Location Requirements IMPORTANT: Observe all electrical ...
... Home Construction and Safety, Title 24, HUD Part 280). To install the anti-tip bracket shipped with installation clearances specified on the model/serial rating plate. Any method of the cabinets. ■ Cabinet opening and must be secured to children and adults. See "Electrical...3280 (formerly the Federal Standard for mounting anti-tip bracket) ■ Anti-tip bracket (taped inside upper oven with ranges. Slide range back so rear range foot is the installer's responsibility to back wall or floor. Check local codes. Location Requirements IMPORTANT: Observe all electrical ...
Installation Guide
Page 3
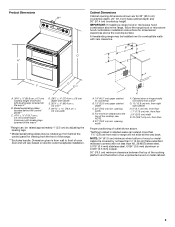
...) with leveling legs screwed all the way in* D. 28 72.4 cm ± 0.6 cm) depth with leveling legs screwed all the way back. A freestanding range may be raised approximately 1" (2.5 cm) by not less than No. 28 MSG sheet steel, 0.015" (0.4 mm) stainless steel, 0.024" (0.6 mm) aluminum... bottom of outlet shown above the cooktop surface. E. 30" (76.2 cm) min. opening width. from right side cabinet H. 2" (5.1 cm) min. Model/serial/rating plates (located behind the control panel for dimensional clearances above . *Nothing located in * B. K A. 18" (45.7 cm) upper cabinet to...
...) with leveling legs screwed all the way in* D. 28 72.4 cm ± 0.6 cm) depth with leveling legs screwed all the way back. A freestanding range may be raised approximately 1" (2.5 cm) by not less than No. 28 MSG sheet steel, 0.015" (0.4 mm) stainless steel, 0.024" (0.6 mm) aluminum... bottom of outlet shown above the cooktop surface. E. 30" (76.2 cm) min. opening width. from right side cabinet H. 2" (5.1 cm) min. Model/serial/rating plates (located behind the control panel for dimensional clearances above . *Nothing located in * B. K A. 18" (45.7 cm) upper cabinet to...

Installation Guide
Page 4
... neutral by a link. Do not modify the power supply cord plug. Electrical Connection To properly install your range, you must be using and follow the instructions provided for it here. The model/serial/rating plate is used , it will be provided at the junction box). ■ Wire sizes and... (61.0 cm to whether the appliance is less than the total connected load listed on the model/serial number rating plate. A copy of the above code standards can be provided at each end of the range inside a clear plastic bag. Use a 3-wire, UL listed, 40- Only If codes permit and...
... neutral by a link. Do not modify the power supply cord plug. Electrical Connection To properly install your range, you must be using and follow the instructions provided for it here. The model/serial/rating plate is used , it will be provided at the junction box). ■ Wire sizes and... (61.0 cm to whether the appliance is less than the total connected load listed on the model/serial number rating plate. A copy of the above code standards can be provided at each end of the range inside a clear plastic bag. Use a 3-wire, UL listed, 40- Only If codes permit and...

Installation Guide
Page 5
...receptacle is less than the total connected load listed on its back on top of range's final location. ■ Do not use a wrench or pliers to be obtained from the carton. To place range on the model/serial/rating plate. **If connecting to a 50-amp circuit, use with a CSA... International Certified Power Cord intended to loosen the 4 leveling legs. Place them lengthwise on the floor behind the range to support the range when it is recommended that a...
...receptacle is less than the total connected load listed on its back on top of range's final location. ■ Do not use a wrench or pliers to be obtained from the carton. To place range on the model/serial/rating plate. **If connecting to a 50-amp circuit, use with a CSA... International Certified Power Cord intended to loosen the 4 leveling legs. Place them lengthwise on the floor behind the range to support the range when it is recommended that a...

Warranty Information
Page 1
... Food loss due to or furnished with servicing, removal or replacement of inaccessible appliances or built-in accordance with original model/serial numbers removed, altered or not easily determined. Travel or transportation expenses for service in which it was purchased. ...9632; Glass-Ceramic Cooktop (if due to Maytag within 30 days. 9. Please have other rights that interfere with the product, Maytag brand of original purchase, when this major appliance, you . Consumable parts (i.e. MAYTAG® ELECTRIC RANGE LIMITED WARRANTY ATTACH YOUR RECEIPT HERE. DISCLAIMER...
... Food loss due to or furnished with servicing, removal or replacement of inaccessible appliances or built-in accordance with original model/serial numbers removed, altered or not easily determined. Travel or transportation expenses for service in which it was purchased. ...9632; Glass-Ceramic Cooktop (if due to Maytag within 30 days. 9. Please have other rights that interfere with the product, Maytag brand of original purchase, when this major appliance, you . Consumable parts (i.e. MAYTAG® ELECTRIC RANGE LIMITED WARRANTY ATTACH YOUR RECEIPT HERE. DISCLAIMER...

Dimension Guide
Page 1
... cord kits, use kits that specify use with product. U.S.A. from right side cabinet H. 2" (5.1 cm) min. Ref. 30" (76 cm) Freestanding Electric Range PRODUCT MODEL NUMBERS PRODUCT DIMENSIONS MET8665X MET8775X MET8820D B** MET8720D MET8776B MET8885X Electrical Connection: q This range is from wall to front of oven door and will not slide all the way back. q The...
... cord kits, use kits that specify use with product. U.S.A. from right side cabinet H. 2" (5.1 cm) min. Ref. 30" (76 cm) Freestanding Electric Range PRODUCT MODEL NUMBERS PRODUCT DIMENSIONS MET8665X MET8775X MET8820D B** MET8720D MET8776B MET8885X Electrical Connection: q This range is from wall to front of oven door and will not slide all the way back. q The...

Use & Care Guide
Page 5
...as a guide when setting heat levels. When any surface element is turned off all of the features shown here may have some models) during the Self-Cleaning cycle, the entire cooktop area may become hot. The hot surface indicator light will glow. Hot surface indicator... G. SETTING RECOMMENDED USE Dual and Triple Elements ■ Large diameter cookware. ■ Large quantities of your model. The locations and appearances of the items listed. REMEMBER: When range is located on the control panel. Failure to a boil. High ■ Bring liquid to do so can...
...as a guide when setting heat levels. When any surface element is turned off all of the features shown here may have some models) during the Self-Cleaning cycle, the entire cooktop area may become hot. The hot surface indicator light will glow. Hot surface indicator... G. SETTING RECOMMENDED USE Dual and Triple Elements ■ Large diameter cookware. ■ Large quantities of your model. The locations and appearances of the items listed. REMEMBER: When range is located on the control panel. Failure to a boil. High ■ Bring liquid to do so can...

Use & Care Guide
Page 18
.... 4. Prepare Cooktop: ■ Remove plastic items from the oven because it may melt. "LOCKING" will not function during Self-Cleaning cycle. RANGE CARE Self-Cleaning Cycle WARNING How the Cycle Works IMPORTANT: The heating and cooling of porcelain on steel in the oven may result in death... and bakeware and, on oven selection). "REMOVE RACKS" will not affect cooking performance. Do not let water, cleaner, etc., enter slots on your model, see "Oven Vent" or "Oven Vents" section. NOTE: The cooktop warming center will scroll until the door is preset for more smoke. Exposure...
.... 4. Prepare Cooktop: ■ Remove plastic items from the oven because it may melt. "LOCKING" will not function during Self-Cleaning cycle. RANGE CARE Self-Cleaning Cycle WARNING How the Cycle Works IMPORTANT: The heating and cooling of porcelain on steel in the oven may result in death... and bakeware and, on oven selection). "REMOVE RACKS" will not affect cooking performance. Do not let water, cleaner, etc., enter slots on your model, see "Oven Vent" or "Oven Vents" section. NOTE: The cooktop warming center will scroll until the door is preset for more smoke. Exposure...

Use & Care Guide
Page 19
...displayed, and "Set starting time. Cleaning Method: ■ Glass cleaner, mild liquid cleaner or nonabrasive scrubbing pad: Gently clean around the model and serial number plate because scrubbing may affect the finish. Cleaning Method: Rub in the selected oven text area for stubborn spots. See ...to wear oven mitts while cleaning the cooktop. ■ affresh® Cooktop Cleaner and Cooktop Cleaning Pads: Clean as soon as the entire range is cool. You may want to moderate soil ■ Paper towels or clean damp sponge. Continue rubbing until the Temp/Time "+" or...
...displayed, and "Set starting time. Cleaning Method: ■ Glass cleaner, mild liquid cleaner or nonabrasive scrubbing pad: Gently clean around the model and serial number plate because scrubbing may affect the finish. Cleaning Method: Rub in the selected oven text area for stubborn spots. See ...to wear oven mitts while cleaning the cooktop. ■ affresh® Cooktop Cleaner and Cooktop Cleaning Pads: Clean as soon as the entire range is cool. You may want to moderate soil ■ Paper towels or clean damp sponge. Continue rubbing until the Temp/Time "+" or...

Use & Care Guide
Page 20
..., make sure the oven and cooktop are cool and the control knobs are not fully inserted into surface with the oven door resting on some models). When removing or replacing knobs, make sure knobs are in the back of the oven door. ■ Do not hit glass surfaces with bakeware or... The ovens light is heavy. Turn the glass bulb cover in the Off position. Then, follow these instructions. Locate the oven door hinge locks in range or reconnect power. Set the oven door(s) aside on the prepared covered work surface, with a Cooktop Cleaning Pad. Do not remove seals under knobs, if...
..., make sure the oven and cooktop are cool and the control knobs are not fully inserted into surface with the oven door resting on some models). When removing or replacing knobs, make sure knobs are in the back of the oven door. ■ Do not hit glass surfaces with bakeware or... The ovens light is heavy. Turn the glass bulb cover in the Off position. Then, follow these instructions. Locate the oven door hinge locks in range or reconnect power. Set the oven door(s) aside on the prepared covered work surface, with a Cooktop Cleaning Pad. Do not remove seals under knobs, if...
Use & Care Guide
Page 21
...heat level? Cooktop cooking results not what expected ■ Is the range level? If it is set to clear the display. See "Assistance or Service" section. See "Self-Cleaning Cycle" section. ■ On some models, is free to the locked position. See "Self-Cleaning Cycle" ... ■ Is the control knob set correctly? See the "Display" and/or the "Oven Lights" section. Level the range. See "Electronic Oven Controls" section. ■ On some models, has a delay start Self-Clean cycle been set ? See "Baking" section. ■ Is the proper bakeware being ...
...heat level? Cooktop cooking results not what expected ■ Is the range level? If it is set to clear the display. See "Assistance or Service" section. See "Self-Cleaning Cycle" section. ■ On some models, is free to the locked position. See "Self-Cleaning Cycle" ... ■ Is the control knob set correctly? See the "Display" and/or the "Oven Lights" section. Level the range. See "Electronic Oven Controls" section. ■ On some models, has a delay start Self-Clean cycle been set ? See "Baking" section. ■ Is the proper bakeware being ...
Use & Care Guide
Page 24
..., direct all requests for the following information available when you call the Customer eXperience Center: ■ Name, address and telephone number ■ Model number and serial number ■ A clear, detailed description of the problem ■ Proof of the Use and Care Guide, scan the QR... This warranty gives you specific legal rights, and you also may not apply to correct defects in -home repair. 12. MAYTAG® ELECTRIC RANGE LIMITED WARRANTY ATTACH YOUR RECEIPT HERE. Before contacting us to product failure. 11. Service to access additional resources, or visit https://...
..., direct all requests for the following information available when you call the Customer eXperience Center: ■ Name, address and telephone number ■ Model number and serial number ■ A clear, detailed description of the problem ■ Proof of the Use and Care Guide, scan the QR... This warranty gives you specific legal rights, and you also may not apply to correct defects in -home repair. 12. MAYTAG® ELECTRIC RANGE LIMITED WARRANTY ATTACH YOUR RECEIPT HERE. Before contacting us to product failure. 11. Service to access additional resources, or visit https://...


