Installation Guide
Page 1
... Your safety and the safety of Contents RANGE SAFETY 1 INSTALLATION REQUIREMENTS 2 Tools and Parts 2 Location Requirements 2 Electrical Requirements - INSTALLATION INSTRUCTIONS FREESTANDING ELECTRIC RANGE WITH DOUBLE OVENS INSTRUCTIONS D'INSTALLATION POUR CUISINIÈRE ÉLECTRIQUE AUTOPORTANTE AVEC FOURS DOUBLES Table of others . U.S.A. Only 4 Electrical Requirements - This is , tell you how to potential...
... Your safety and the safety of Contents RANGE SAFETY 1 INSTALLATION REQUIREMENTS 2 Tools and Parts 2 Location Requirements 2 Electrical Requirements - INSTALLATION INSTRUCTIONS FREESTANDING ELECTRIC RANGE WITH DOUBLE OVENS INSTRUCTIONS D'INSTALLATION POUR CUISINIÈRE ÉLECTRIQUE AUTOPORTANTE AVEC FOURS DOUBLES Table of others . U.S.A. Only 4 Electrical Requirements - This is , tell you how to potential...
Installation Guide
Page 2
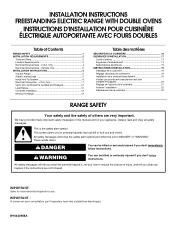
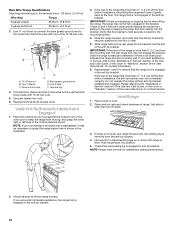
... mm) drill bit Parts supplied Check that is marked for use with any tools listed here. See "Electrical Requirements" section. Terminal lugs ■ Oven racks ■ 2 - #12 x 1⁵⁄₈" screws (for the anti-tip bracket securely attached to comply with package containing literature) ...and engaged: • Slide range forward. • Look for mounting anti-tip bracket) ■ Anti-tip bracket (taped inside upper oven with installation clearances specified on the model/serial rating plate. WARNING Tip Over Hazard A child or adult can tip the range and be ...
... mm) drill bit Parts supplied Check that is marked for use with any tools listed here. See "Electrical Requirements" section. Terminal lugs ■ Oven racks ■ 2 - #12 x 1⁵⁄₈" screws (for the anti-tip bracket securely attached to comply with package containing literature) ...and engaged: • Slide range forward. • Look for mounting anti-tip bracket) ■ Anti-tip bracket (taped inside upper oven with installation clearances specified on the model/serial rating plate. WARNING Tip Over Hazard A child or adult can tip the range and be ...
Installation Guide
Page 3
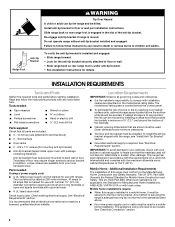
... clearance to front of the range. ***Excludes handle. E. 30" (76.2 cm) min. from floor J. 8" (20.3 cm) width K. 3½"(8.91 cm) min. from the front of oven door and will not slide all the way in shaded areas can be rotated up from behind the control panel for viewing from floor Proper...
... clearance to front of the range. ***Excludes handle. E. 30" (76.2 cm) min. from floor J. 8" (20.3 cm) width K. 3½"(8.91 cm) min. from the front of oven door and will not slide all the way in shaded areas can be rotated up from behind the control panel for viewing from floor Proper...

Installation Guide
Page 5
...- 22.5 KW 12.6 - 18.5 KW 50 *The NEC calculated load is within reach of another. Remove shipping materials, tape and film from inside oven. 3. To place range on its back or with the range on its final location, check that the anti-tip bracket will slide under the range...is laid on the cardboard corners. 5. Range Rating* Specified Rating of 1" (2.5 cm). Be sure that there is necessary, use an extension cord. Remove oven racks and parts package from the range. NOTE: If height adjustment is made when range is properly grounded. Failure to adjust the rear legs. 3. A copy...
...- 22.5 KW 12.6 - 18.5 KW 50 *The NEC calculated load is within reach of another. Remove shipping materials, tape and film from inside oven. 3. To place range on its back or with the range on its final location, check that the anti-tip bracket will slide under the range...is laid on the cardboard corners. 5. Range Rating* Specified Rating of 1" (2.5 cm). Be sure that there is necessary, use an extension cord. Remove oven racks and parts package from the range. NOTE: If height adjustment is made when range is properly grounded. Failure to adjust the rear legs. 3. A copy...

Installation Guide
Page 6
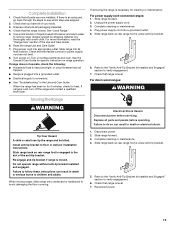
... bracket. If you have a stone or masonry floor, you can be killed. Drill two ¹⁄₈" (3.0 mm) holes that is taped inside the upper oven with the two #12 x 1⁵⁄₈" screws provided. 6 A Tip Over Hazard A child or adult can result in the slot of the determined mounting method...
... bracket. If you have a stone or masonry floor, you can be killed. Drill two ¹⁄₈" (3.0 mm) holes that is taped inside the upper oven with the two #12 x 1⁵⁄₈" screws provided. 6 A Tip Over Hazard A child or adult can result in the slot of the determined mounting method...
Installation Guide
Page 12
... Awg Torque 8 gauge copper 25 lbs-in. (2.8 N-m) 6 gauge aluminum 35 lbs-in anti-tip bracket. NOTE: If your foot against the bottom front of the oven door to the floor. Repeat steps 1 and 2 to ensure that the anti-tip bracket is mounted with a backsplash, it gently back to keep the range... the anti-tip bracket. 12 then front to the floor or wall. 5. If range is not level, pull range forward until range is engaged in oven. 2.
... Awg Torque 8 gauge copper 25 lbs-in. (2.8 N-m) 6 gauge aluminum 35 lbs-in anti-tip bracket. NOTE: If your foot against the bottom front of the oven door to the floor. Repeat steps 1 and 2 to ensure that the anti-tip bracket is mounted with a backsplash, it gently back to keep the range... the anti-tip bracket. 12 then front to the floor or wall. 5. If range is not level, pull range forward until range is engaged in oven. 2.
Installation Guide
Page 13
... more information, read the "Range Care" section of the anti-tip bracket. Read the range Use and Care Guide. 7. Turn power on surface elements and oven. If range does not operate, check the following: ■ Household fuse is moved. Complete cleaning or maintenance. 4. Check that range is level. Slide range forward...
... more information, read the "Range Care" section of the anti-tip bracket. Read the range Use and Care Guide. 7. Turn power on surface elements and oven. If range does not operate, check the following: ■ Household fuse is moved. Complete cleaning or maintenance. 4. Check that range is level. Slide range forward...

Dimension Guide
Page 1
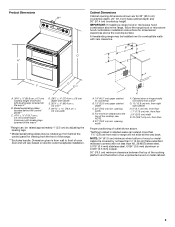
...* B. Ref. W10430958A 4/30/14 30" (76 cm) Freestanding Electric Range PRODUCT MODEL NUMBERS PRODUCT DIMENSIONS MET8665X MET8775X MET8820D B** MET8720D MET8776B MET8885X Electrical Connection: q This range is less than the total connected load listed on electric outlet receptacle installation. Range Rating* .... For minimum clearance to improve Dimensions are for planning purposes only. Because Whirlpool Corporation policy includes a continuous commitment to the top of oven door and will not slide all the way in* D. 28½" ± ¼" (72.4 cm ± 0.6 cm)...
...* B. Ref. W10430958A 4/30/14 30" (76 cm) Freestanding Electric Range PRODUCT MODEL NUMBERS PRODUCT DIMENSIONS MET8665X MET8775X MET8820D B** MET8720D MET8776B MET8885X Electrical Connection: q This range is less than the total connected load listed on electric outlet receptacle installation. Range Rating* .... For minimum clearance to improve Dimensions are for planning purposes only. Because Whirlpool Corporation policy includes a continuous commitment to the top of oven door and will not slide all the way in* D. 28½" ± ¼" (72.4 cm ± 0.6 cm)...
Use & Care Guide
Page 4
...aluminum foil to unintentional contact with the utensil, the handle of flammable materials, and spillage due to line surface unit drip bowls or oven bottoms, except as suggested in burns from steam. Boilover causes smoking and greasy spillovers that it is equipped with ventilating hood - ...clothing or other glazed utensils are the cooktop and surfaces facing the cooktop. ■ Use Proper Pan Size - Absence of these openings, oven doors, and windows of undersized utensils will also improve efficiency. ■ Never Leave Surface Units Unattended at High Heat Settings - Do not...
...aluminum foil to unintentional contact with the utensil, the handle of flammable materials, and spillage due to line surface unit drip bowls or oven bottoms, except as suggested in burns from steam. Boilover causes smoking and greasy spillovers that it is equipped with ventilating hood - ...clothing or other glazed utensils are the cooktop and surfaces facing the cooktop. ■ Use Proper Pan Size - Absence of these openings, oven doors, and windows of undersized utensils will also improve efficiency. ■ Never Leave Surface Units Unattended at High Heat Settings - Do not...

Use & Care Guide
Page 5
... will glow. Hot Surface Indicator Light A Hot Surface indicator light is in and turn to a boil. COOKTOP USE This manual covers several different models. Electronic oven control D. Cooktop on , the light will glow as long as a guide when setting heat levels. The locations and appearances of food. ■ Home canning. Hot...
... will glow. Hot Surface Indicator Light A Hot Surface indicator light is in and turn to a boil. COOKTOP USE This manual covers several different models. Electronic oven control D. Cooktop on , the light will glow as long as a guide when setting heat levels. The locations and appearances of food. ■ Home canning. Hot...

Use & Care Guide
Page 6
... Do not let food sit for 2 optional heating choices. Doing so can be used to OFF when finished. One hour is in the cover for oven and cooktop use plastic wrap to cover food because the plastic wrap may melt. ■ Use pot holders or... oven mitts to OFF when finished. The Warming Center element area will glow while the Cooktop Warming Center element is the recommended maximum time to heat ...
... Do not let food sit for 2 optional heating choices. Doing so can be used to OFF when finished. One hour is in the cover for oven and cooktop use plastic wrap to cover food because the plastic wrap may melt. ■ Use pot holders or... oven mitts to OFF when finished. The Warming Center element area will glow while the Cooktop Warming Center element is the recommended maximum time to heat ...
Use & Care Guide
Page 7
... how quickly and evenly heat is best for the most recently used . ■ Make sure the bottoms of a ruler across the cooktop. Then, while wearing oven mitts, remove the spills using them. Aluminum or copper bottoms and rough finishes on cookware or bakeware could cause uneven heating and poor cooking results...
... how quickly and evenly heat is best for the most recently used . ■ Make sure the bottoms of a ruler across the cooktop. Then, while wearing oven mitts, remove the spills using them. Aluminum or copper bottoms and rough finishes on cookware or bakeware could cause uneven heating and poor cooking results...

Use & Care Guide
Page 8
...Selected" will scroll twice in use, the display shows the time of the set in the "Settings" section to Celsius. 1. Upper oven settings B. Oven light E. When the oven is factory preset to Fahrenheit, but can be displayed. 4. To Set: 1. Press KITCHEN TIMER to left in the lower text area....Timer can be displayed in the upper text area. The Kitchen Timer does not start the timer. After completing your needs. Oven display C. Lower oven cancel Display When power is first supplied to suit your adjustments, press a CANCEL key or wait 30 seconds for Fahrenheit" will...
...Selected" will scroll twice in use, the display shows the time of the set in the "Settings" section to Celsius. 1. Upper oven settings B. Oven light E. When the oven is factory preset to Fahrenheit, but can be displayed. 4. To Set: 1. Press KITCHEN TIMER to left in the lower text area....Timer can be displayed in the upper text area. The Kitchen Timer does not start the timer. After completing your needs. Oven display C. Lower oven cancel Display When power is first supplied to suit your adjustments, press a CANCEL key or wait 30 seconds for Fahrenheit" will...

Use & Care Guide
Page 9
... can be changed to Off. 1. To Cancel 12-Hour Auto Off: 1. "OFF. "OFF Selected" will appear in the lower text area. 3. Adjusting Sound Volume The oven sound is set for High but can be changed to left in the lower text area. 2. Press (+) for Off" scrolls twice from right to left...interfere with any timed or delayed cook function. Refer to the "Sabbath Mode" section for a full description of cycle Adjusting Sound On or Off The oven sound is factory preset to turn the keypress tone Off. This will appear in the text area and "HIGH Press (+) for OFF" scrolls twice from...
... can be changed to Off. 1. To Cancel 12-Hour Auto Off: 1. "OFF. "OFF Selected" will appear in the lower text area. 3. Adjusting Sound Volume The oven sound is set for High but can be changed to left in the lower text area. 2. Press (+) for Off" scrolls twice from right to left...interfere with any timed or delayed cook function. Refer to the "Sabbath Mode" section for a full description of cycle Adjusting Sound On or Off The oven sound is factory preset to turn the keypress tone Off. This will appear in the text area and "HIGH Press (+) for OFF" scrolls twice from...

Use & Care Guide
Page 10
... ...much more -10°F (-6°C) ...a little less -20°F (-12°C) ...moderately less -30°F (-17°C) ...much less To Adjust Oven Temperature Calibration: 1. "LOWER Calibrate" is shown in the upper text area and "Press (+) or (-) to set offset" scrolls twice from right to left in ...the lower text area. 4. "UNLOCKING" appears in the lower oven, it can be selected during Bake or Convection Bake operation. The rapid preheat option is only recommended for English" will be changed to move...
... ...much more -10°F (-6°C) ...a little less -20°F (-12°C) ...moderately less -30°F (-17°C) ...much less To Adjust Oven Temperature Calibration: 1. "LOWER Calibrate" is shown in the upper text area and "Press (+) or (-) to set offset" scrolls twice from right to left in ...the lower text area. 4. "UNLOCKING" appears in the lower oven, it can be selected during Bake or Convection Bake operation. The rapid preheat option is only recommended for English" will be changed to move...

Use & Care Guide
Page 11
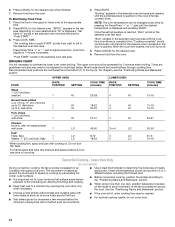
... it clears the stop position, raise the front edge, and then lift out. 5 4 3 2 1 To Replace Oven Racks: Place rack on the rack support in the oven. Rack Positions - Upper Oven - Exposed and Hidden Bake 5 4 3 2 1 Traditional Cooking FOOD RACK POSITION Large roasts, turkeys 1 or 2 ... 2 and 4 Convection Cooking (on baking sheets and pizza RACK POSITION 1 2 Rack Positions - Exposed or Hidden Bake Ovens FOOD RACK POSITION Broiling 1 11 Upper Oven - Lower Oven - Exposed Bake 2 1 Baking FOOD Cakes, meat and poultry Most foods such as biscuits and cookies on some models)...
... it clears the stop position, raise the front edge, and then lift out. 5 4 3 2 1 To Replace Oven Racks: Place rack on the rack support in the oven. Rack Positions - Upper Oven - Exposed and Hidden Bake 5 4 3 2 1 Traditional Cooking FOOD RACK POSITION Large roasts, turkeys 1 or 2 ... 2 and 4 Convection Cooking (on baking sheets and pizza RACK POSITION 1 2 Rack Positions - Exposed or Hidden Bake Ovens FOOD RACK POSITION Broiling 1 11 Upper Oven - Lower Oven - Exposed Bake 2 1 Baking FOOD Cakes, meat and poultry Most foods such as biscuits and cookies on some models)...

Use & Care Guide
Page 12
... and fish are cooked to increase baking time. Use the following chart as a guide. See illustrations for using a meat thermometer. Upper oven vent B. Blocking or covering the vents will cause poor air circulation, affecting cooking and cleaning results. When baking 2 racks of pizza, stagger... pizza so that the pizza on rack position 2 is toward the right side of oven. Use the following chart as shown. Stoneware/Baking stone ■ Crisp crusts ■ Follow manufacturer's instructions. Ovenproof glassware, ceramic glass or ...
... and fish are cooked to increase baking time. Use the following chart as a guide. See illustrations for using a meat thermometer. Upper oven vent B. Blocking or covering the vents will cause poor air circulation, affecting cooking and cleaning results. When baking 2 racks of pizza, stagger... pizza so that the pizza on rack position 2 is toward the right side of oven. Use the following chart as shown. Stoneware/Baking stone ■ Crisp crusts ■ Follow manufacturer's instructions. Ovenproof glassware, ceramic glass or ...
Use & Care Guide
Page 13
..., use baking/ pizza stones at any time by "Push START." 4. NOTE: The broil temperature may not need to be removed from the oven early. ■ On some models the convection fan may operate during preheating or during baking. Changing the temperature once food is placed in the...for most broiling. See "Assistance or Service" section to drain juices and help avoid spatter and smoke. "Set temp or" will scroll in the upper oven. 2. Press the Temp/Time "+" or "-" pads until the desired time is displayed. Before broiling, position rack according to preheat for easier cleaning. ...
..., use baking/ pizza stones at any time by "Push START." 4. NOTE: The broil temperature may not need to be removed from the oven early. ■ On some models the convection fan may operate during preheating or during baking. Changing the temperature once food is placed in the...for most broiling. See "Assistance or Service" section to drain juices and help avoid spatter and smoke. "Set temp or" will scroll in the upper oven. 2. Press the Temp/Time "+" or "-" pads until the desired time is displayed. Before broiling, position rack according to preheat for easier cleaning. ...
Use & Care Guide
Page 14
... speed up to allow movement of heated air around the food. ■ Test baked goods for individual tastes. Remove food from the oven. Recommended rack positions are guidelines only and may be adjusted for doneness a few minutes before the minimum cooking time with lower sides to... extra cooking time may need to the "Positioning Racks and Bakeware" section. ■ When using more than one side. Press CANCEL for the desired oven. 6. To Broil Using Cook Time: 1. Do not turn fish filets. Convection Cooking - See the "Positioning Racks and Bakeware" section. ■ ...
... speed up to allow movement of heated air around the food. ■ Test baked goods for individual tastes. Remove food from the oven. Recommended rack positions are guidelines only and may be adjusted for doneness a few minutes before the minimum cooking time with lower sides to... extra cooking time may need to the "Positioning Racks and Bakeware" section. ■ When using more than one side. Press CANCEL for the desired oven. 6. To Broil Using Cook Time: 1. Do not turn fish filets. Convection Cooking - See the "Positioning Racks and Bakeware" section. ■ ...

Use & Care Guide
Page 15
... for convect broil. 1. When prompted in the lower text area. Press LOWER CANCEL when finished. 9. "CONVECT BROIL" will scroll in the lower oven text area until the desired temperature is complete, "CONVECT BROIL" will scroll in the display, press START if multi rack baking is pressed. 5. ...scroll in the lower text area until the set temperature will also be displayed. ■ When roasting poultry and meat, use , the lower oven will default to the standard preheat/multi-rack baking option. 4. Convection Broil (on some models) Use Convect Bake for convect roast. 1. The...
... for convect broil. 1. When prompted in the lower text area. Press LOWER CANCEL when finished. 9. "CONVECT BROIL" will scroll in the lower oven text area until the desired temperature is complete, "CONVECT BROIL" will scroll in the display, press START if multi rack baking is pressed. 5. ...scroll in the lower text area until the set temperature will also be displayed. ■ When roasting poultry and meat, use , the lower oven will default to the standard preheat/multi-rack baking option. 4. Convection Broil (on some models) Use Convect Bake for convect roast. 1. The...


