Use and Care Manual
Page 2
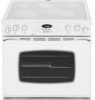
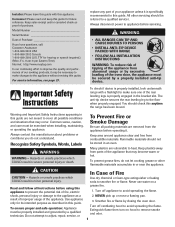
...Read and follow all instructions before using this appliance to prevent the potential risk of fire, electric shock, personal injury or damage to the appliance as proof of the oven door, the... hearing or speech impaired) (Mon.-Fri., 8 am-8 pm Eastern Time) Internet: http://www.maytag.com In our continuing effort to improve the quality and performance of the appliance. Keep area around...appliance. Important Safety Instructions To check if device is properly installed, look underneath range with this anytime the range has been moved. The anti-tip device secures the rear leveling leg to remove...
...Read and follow all instructions before using this appliance to prevent the potential risk of fire, electric shock, personal injury or damage to the appliance as proof of the oven door, the... hearing or speech impaired) (Mon.-Fri., 8 am-8 pm Eastern Time) Internet: http://www.maytag.com In our continuing effort to improve the quality and performance of the appliance. Keep area around...appliance. Important Safety Instructions To check if device is properly installed, look underneath range with this anytime the range has been moved. The anti-tip device secures the rear leveling leg to remove...
Use and Care Manual
Page 4
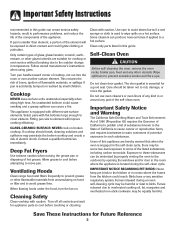
... to cover element. The door gasket is essential for cooktop or oven service without breaking due to the sudden change in temperature. Users of electric shock. Birds have a very sensitive respiratory system. Fitting pan size to element will be equally harmful. Use care to avoid steam burns if... greasy spillover can be minimized by properly venting the oven to the outdoors by small children. Select pans with caution. Ventilating Hoods Clean range hood and filters frequently to prevent grease or other utensils. Do not use oven cleaners or oven liners of any part of the element...
... to cover element. The door gasket is essential for cooktop or oven service without breaking due to the sudden change in temperature. Users of electric shock. Birds have a very sensitive respiratory system. Fitting pan size to element will be equally harmful. Use care to avoid steam burns if... greasy spillover can be minimized by properly venting the oven to the outdoors by small children. Select pans with caution. Ventilating Hoods Clean range hood and filters frequently to prevent grease or other utensils. Do not use oven cleaners or oven liners of any part of the element...
Use and Care Manual
Page 6
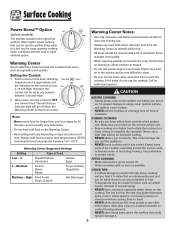
...settings will go off . • Clean up messy spills as soon as Low, 2-10 and High. Call an authorized servicer. To prevent damage to range, never operate surface unit without a pan in closed containers causing them to burst. • NEVER allow moisture to escape. • Do not use... control as possible. CAUTION BEFORE COOKING • Always place a pan on the cooktop. Setting the Control: 1. Notes: • Never warm food for 30 minutes), as food quality may melt on a higher heat setting then reduce to a lower setting to complete the operation. DURING COOKING • Be sure...
...settings will go off . • Clean up messy spills as soon as Low, 2-10 and High. Call an authorized servicer. To prevent damage to range, never operate surface unit without a pan in closed containers causing them to burst. • NEVER allow moisture to escape. • Do not use... control as possible. CAUTION BEFORE COOKING • Always place a pan on the cooktop. Setting the Control: 1. Notes: • Never warm food for 30 minutes), as food quality may melt on a higher heat setting then reduce to a lower setting to complete the operation. DURING COOKING • Be sure...
Use and Care Manual
Page 7
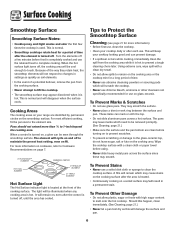
... a soiled dish cloth or sponge to the element size. Cooking Areas The cooking areas on your range are clean before turning on to prevent scratches. • To prevent scratching or damage to Cookware ... Surface Smoothtop Surface Notes: • Cooktop may appear discolored when it is hot to 1-inch beyond the cooking area. This is turned off to complete cooking. Wipe the cooktop surface with... surface may emit light smoke and odor the first few minutes before using. • Never slide heavy metal pans across a hot surface. To Prevent Other Damage • Do not allow ...
... a soiled dish cloth or sponge to the element size. Cooking Areas The cooking areas on your range are clean before turning on to prevent scratches. • To prevent scratching or damage to Cookware ... Surface Smoothtop Surface Notes: • Cooktop may appear discolored when it is hot to 1-inch beyond the cooking area. This is turned off to complete cooking. Wipe the cooktop surface with... surface may emit light smoke and odor the first few minutes before using. • Never slide heavy metal pans across a hot surface. To Prevent Other Damage • Do not allow ...
Use and Care Manual
Page 16
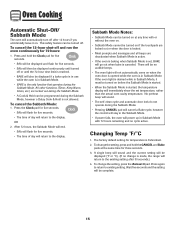
... out during the Sabbath Mode. • A Cook & Hold can be turned on when the oven door is opened while the oven is made, the range will return to existing setting. After 72 hours, the Sabbath Mode will end. • SAb will flash for five seconds. • SAb will then ... at any time with 72 hours remaining and no cycle active. Oven Cooking Automatic Shut-Off/ Sabbath Mode The oven will automatically turn off after 30 seconds.) 4. This safety feature can be programmed during the Sabbath Mode. All other functions (Timer, Keep Warm, Clean, etc.) are deactivated when Sabbath ...
... out during the Sabbath Mode. • A Cook & Hold can be turned on when the oven door is opened while the oven is made, the range will return to existing setting. After 72 hours, the Sabbath Mode will end. • SAb will flash for five seconds. • SAb will then ... at any time with 72 hours remaining and no cycle active. Oven Cooking Automatic Shut-Off/ Sabbath Mode The oven will automatically turn off after 30 seconds.) 4. This safety feature can be programmed during the Sabbath Mode. All other functions (Timer, Keep Warm, Clean, etc.) are deactivated when Sabbath ...

Use and Care Manual
Page 19
...accommodate a large roaster on two or three racks, check foods at the minimum suggested time to ensure proper air flow. Create-A-SpaceTM Half Rack Select range models are equipped with a hidden bake element. The right side of the rack is cool before removing or reinstalling the half rack. • Do...and poultry, or for tworack baking and three-rack convection baking (select models). The left side of rack. • For best results, allow two inches between the pan placed on the rack as a cooling rack or trivet. • Make sure oven is still available to avoid disturbing the half ...
...accommodate a large roaster on two or three racks, check foods at the minimum suggested time to ensure proper air flow. Create-A-SpaceTM Half Rack Select range models are equipped with a hidden bake element. The right side of the rack is cool before removing or reinstalling the half rack. • Do...and poultry, or for tworack baking and three-rack convection baking (select models). The left side of rack. • For best results, allow two inches between the pan placed on the rack as a cooling rack or trivet. • Make sure oven is still available to avoid disturbing the half ...

Use and Care Manual
Page 20
... Autoset 0 pad. • LITE (Light soil level) is displayed. * Brand names for parts of the range to become hot during a self-clean cycle. • To prevent damage to accumulate in the display. The ...do not clean or rub the gasket around the oven door and window.) 4. The porcelain finish may not slide easily after a selfclean cycle if they are not removed. 3. Press the Clean pad. • CLEAN ..., the oven will start counting down in the display. 2. If the door is not closed within 30 seconds, the self-cleaning operation will start cleaning. • If the door is not closed, beeps...
... Autoset 0 pad. • LITE (Light soil level) is displayed. * Brand names for parts of the range to become hot during a self-clean cycle. • To prevent damage to accumulate in the display. The ...do not clean or rub the gasket around the oven door and window.) 4. The porcelain finish may not slide easily after a selfclean cycle if they are not removed. 3. Press the Clean pad. • CLEAN ..., the oven will start counting down in the display. 2. If the door is not closed within 30 seconds, the self-cleaning operation will start cleaning. • If the door is not closed, beeps...
Use and Care Manual
Page 22
...may crack or chip with a clean dry cloth. Scrub with a damp cloth. Note: Hold a razor blade scraper at 30° angle and scrape any remaining soil. Do not use a CLEAN, DAMP "scratchless" pad that is used if sprayed...the pad is not damp, if the pad is soiled, or if another type of range. • To activate control lock for cleaning, see "Locking the Controls" page 9. • Wipe with ...a damp paper towel and let stand 30 to 45 minutes (2-3 hours for daily cleaning as they may scratch the finish. • Turn on ...
...may crack or chip with a clean dry cloth. Scrub with a damp cloth. Note: Hold a razor blade scraper at 30° angle and scrape any remaining soil. Do not use a CLEAN, DAMP "scratchless" pad that is used if sprayed...the pad is not damp, if the pad is soiled, or if another type of range. • To activate control lock for cleaning, see "Locking the Controls" page 9. • Wipe with ...a damp paper towel and let stand 30 to 45 minutes (2-3 hours for daily cleaning as they may scratch the finish. • Turn on ...
Use and Care Manual
Page 24
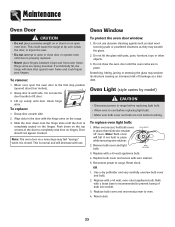
...tip over, break the door, or injure the user. • Do not attempt to open the oven door to range. Reconnect power to the first stop position (opened about four inches). 2. Bulb with use abrasive cleaning agents such as steel wool scouring pads or powdered cleansers as they may weaken its... excessive weight on or stand on the hinges. Do not hit the glass with a 40-watt appliance bulb. 4. Grasp door at a later date. Slide the door down on the top corners of breakage at each side. Use a dry potholder and very carefully unscrew bulb cover and bulb. 2. Replace with...
...tip over, break the door, or injure the user. • Do not attempt to open the oven door to range. Reconnect power to the first stop position (opened about four inches). 2. Bulb with use abrasive cleaning agents such as steel wool scouring pads or powdered cleansers as they may weaken its... excessive weight on or stand on the hinges. Do not hit the glass with a 40-watt appliance bulb. 4. Grasp door at a later date. Slide the door down on the top corners of breakage at each side. Use a dry potholder and very carefully unscrew bulb cover and bulb. 2. Replace with...

Use and Care Manual
Page 25
..., paper products, food or flammable materials in use. Lift up the front of the range, until drawer is in this drawer. Be sure the range should be removed to allow you to the first stop position. 4. If the range is level. AANNTI-TTIIP-TBIRPACBKRETACKET LLEVEEVLIENLGILNEGG LEG The storage drawer can be leveled when.... To remove: 1. Lift up the front of the rear leveling legs to the second stop position. 2. Empty drawer and pull out to clean under the range. To replace: 1. Pull out to the floor. Fit the ends of the drawer glides into the rails in the...
..., paper products, food or flammable materials in use. Lift up the front of the range, until drawer is in this drawer. Be sure the range should be removed to allow you to the first stop position. 4. If the range is level. AANNTI-TTIIP-TBIRPACBKRETACKET LLEVEEVLIENLGILNEGG LEG The storage drawer can be leveled when.... To remove: 1. Lift up the front of the rear leveling legs to the second stop position. 2. Empty drawer and pull out to clean under the range. To replace: 1. Pull out to the floor. Fit the ends of the drawer glides into the rails in the...
Use and Care Manual
Page 26
.... • Check if surface and/or oven controls have been properly set circuit breaker. Oven door will not self-clean. • Check to make sure range is level. • Temperatures often vary between a new oven and an old one. Check or replace fuse. • Check power supply. See page 20... cycle. Part or all of a self-clean cycle. See page 9. • Check if control is closed during broiling. Food is activated. Allow about 4 inches). • Trim excess fat from previous oven. • Make sure the oven vent has not been blocked. See page 20. See page 17 for the...
.... • Check if surface and/or oven controls have been properly set circuit breaker. Oven door will not self-clean. • Check to make sure range is level. • Temperatures often vary between a new oven and an old one. Check or replace fuse. • Check power supply. See page 20... cycle. Part or all of a self-clean cycle. See page 9. • Check if control is closed during broiling. Food is activated. Allow about 4 inches). • Trim excess fat from previous oven. • Make sure the oven vent has not been blocked. See page 20. See page 17 for the...
Use and Care Manual
Page 27
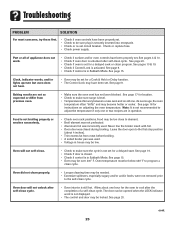
.... • Oven may be locked. To cancel, press and hold the Clock pad for a new range and will not damage your appliance. • A fan sound can be in the display, press CANCEL... pad. Troubleshooting PROBLEM Smoothtop surface shows wear. Do not slide glass or metal pans across top. Make sure cooktop and pan bottom are clean. Press the ... 21. This is the cooling fan and is not rough. Make sure pan bottom is normal. Do not slide metal pans across top. Moisture collects on . • This is an error or a problem. Use a...
.... • Oven may be locked. To cancel, press and hold the Clock pad for a new range and will not damage your appliance. • A fan sound can be in the display, press CANCEL... pad. Troubleshooting PROBLEM Smoothtop surface shows wear. Do not slide glass or metal pans across top. Make sure cooktop and pan bottom are clean. Press the ... 21. This is the cooling fan and is not rough. Make sure pan bottom is normal. Do not slide metal pans across top. Moisture collects on . • This is an error or a problem. Use a...


