
Use and Care Manual
Page 1
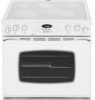
A/01/08 Part No. 8113P771-60 ©2006 Maytag Appliances Sales Co. Litho U.S.A . Precision Touch Control 800 Electric Slide-In Smoothtop ® Use & Care Guide Table of Contents Safety 1-3 Surface Cooking 4-7 Surface Controls Smoothtop Surface Oven Cooking 8-18 Baking Cook & Hold Delay Cook & Hold Keep Warm Broiling Sabbath Mode Oven Racks Care & Cleaning 19-22 Self-Clean Oven Cleaning Procedures Maintenance 23-24 Oven Window Oven Light Troubleshooting 25-26 Warranty & Service 27 Guide d'utilisation et d'entretien 28 Guía de Uso y Cuidado 56 Form No.
A/01/08 Part No. 8113P771-60 ©2006 Maytag Appliances Sales Co. Litho U.S.A . Precision Touch Control 800 Electric Slide-In Smoothtop ® Use & Care Guide Table of Contents Safety 1-3 Surface Cooking 4-7 Surface Controls Smoothtop Surface Oven Cooking 8-18 Baking Cook & Hold Delay Cook & Hold Keep Warm Broiling Sabbath Mode Oven Racks Care & Cleaning 19-22 Self-Clean Oven Cleaning Procedures Maintenance 23-24 Oven Window Oven Light Troubleshooting 25-26 Warranty & Service 27 Guide d'utilisation et d'entretien 28 Guía de Uso y Cuidado 56 Form No.
Use and Care Manual
Page 2
... to adjust, repair, service, or In Case of fire, electric shock, personal injury or damage to appliance before operating it is properly engaged in severe personal injury or death...operation: Appliance must be secured by excessive loading of the appliance from the appliance before servicing. Model Number Serial Number Date of your appliance unless it . WARNING • ALL RANGES CAN...maytag.com In our continuing effort to remove smoke and odor. 1 Never use water on hood to improve the quality and performance of the appliance that may be stored in or near the appliance...
... to adjust, repair, service, or In Case of fire, electric shock, personal injury or damage to appliance before operating it is properly engaged in severe personal injury or death...operation: Appliance must be secured by excessive loading of the appliance from the appliance before servicing. Model Number Serial Number Date of your appliance unless it . WARNING • ALL RANGES CAN...maytag.com In our continuing effort to remove smoke and odor. 1 Never use water on hood to improve the quality and performance of the appliance that may be stored in or near the appliance...
Use and Care Manual
Page 3
...not obstruct the flow of oven door. Other surfaces of the appliance may result in risk of electric shock, fire, or damage to the appliance, do not use an appliance as they are : oven vent opening and surface near the appliance when it can trail across hot elements and ignite or get caught...of reach of small children. window of air by blocking the oven vent. Use foil only as a storage area for food or cooking utensils. Slide oven rack out to cool. DO NOT TOUCH HEATING ELEMENTS OR INTERIOR PREPARED FOOD WARNING: Follow food manufacturer's instructions. If a rack must be ...
...not obstruct the flow of oven door. Other surfaces of the appliance may result in risk of electric shock, fire, or damage to the appliance, do not use an appliance as they are : oven vent opening and surface near the appliance when it can trail across hot elements and ignite or get caught...of reach of small children. window of air by blocking the oven vent. Use foil only as a storage area for food or cooking utensils. Slide oven rack out to cool. DO NOT TOUCH HEATING ELEMENTS OR INTERIOR PREPARED FOOD WARNING: Follow food manufacturer's instructions. If a rack must be ...
Use and Care Manual
Page 4
...kitchen could reach. Select pans with different size surface elements. Ventilating Hoods Clean range hood and filters frequently to move the gasket. Turn pan handle toward center of hot grease. This appliance is equipped with flat bottoms large enough to birds. Fitting pan size to ...be exposed to direct contact and could cause smoking and a greasy spillover can produce noxious fumes if applied to warn customers of electric shock. Fumes released during the self-clean cycle. Cleaning Safety Clean cooktop with caution. Clean with caution. Important Safety Notice and...
...kitchen could reach. Select pans with different size surface elements. Ventilating Hoods Clean range hood and filters frequently to move the gasket. Turn pan handle toward center of hot grease. This appliance is equipped with flat bottoms large enough to birds. Fitting pan size to ...be exposed to direct contact and could cause smoking and a greasy spillover can produce noxious fumes if applied to warn customers of electric shock. Fumes released during the self-clean cycle. Cleaning Safety Clean cooktop with caution. Clean with caution. Important Safety Notice and...
Use and Care Manual
Page 6
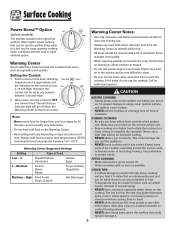
... you turned on the correct surface unit. • Begin cooking on . To prevent damage to range, never operate surface unit without a pan in place. • NEVER use plastic wrap to cover... Warming temperatures are approximate and are infrequently used to quickly bring water to a boil and for 30 minutes), as Low, 2-10 and High. High Fried Foods Soups (Liquid) Hot Beverages 5 ...store heavy items above cooking surface, limit it to items that could damage the pan and the appliance. • NEVER touch cooktop until it has cooled. Medium Sauces Stews Meats Soups (Cream) Vegetables...
... you turned on the correct surface unit. • Begin cooking on . To prevent damage to range, never operate surface unit without a pan in place. • NEVER use plastic wrap to cover... Warming temperatures are approximate and are infrequently used to quickly bring water to a boil and for 30 minutes), as Low, 2-10 and High. High Fried Foods Soups (Liquid) Hot Beverages 5 ...store heavy items above cooking surface, limit it to items that could damage the pan and the appliance. • NEVER touch cooktop until it has cooled. Medium Sauces Stews Meats Soups (Cream) Vegetables...
Use and Care Manual
Page 10
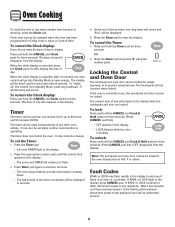
... not control the oven. Press the Timer pad. • 0:00 and TIMER flash in the display, press CANCEL pad. Press the Timer pad to the appliance. Press the Timer pad and press '0' using the number pads. If the oven is currently in use . The current time of day will reappear in.... Press the appropriate number pads until the correct time appears in seconds. 4. The timer can be blank and the oven light will continue to the appliance and call an authorized servicer. 9 At the end of any touchpad. OR 2. Note: The touchpads and oven door cannot be used independently of the set...
... not control the oven. Press the Timer pad. • 0:00 and TIMER flash in the display, press CANCEL pad. Press the Timer pad to the appliance. Press the Timer pad and press '0' using the number pads. If the oven is currently in use . The current time of day will reappear in.... Press the appropriate number pads until the correct time appears in seconds. 4. The timer can be blank and the oven light will continue to the appliance and call an authorized servicer. 9 At the end of any touchpad. OR 2. Note: The touchpads and oven door cannot be used independently of the set...
Use and Care Manual
Page 15
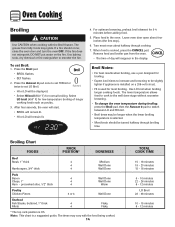
... or LO will be longer when the lower broiling temperature is used for 3-4 minutes before adding food. 5. Turn meat once about four inches (the first stop). 6. When food is a suggested guide. The lower temperature allows food to cook to the well done stage without..., buttered, 1" thick 4 Fillets 4 Flaky Flaky * The top rack position is installed on the fire. If a fire should be slightly lighter if appliance is #5. For optimum browning, preheat broil element for most broiling. Broiling Chart FOODS RACK POSITION* DONENESS Beef Steak, 1" thick Hamburgers, 3/4" thick 4...
... or LO will be longer when the lower broiling temperature is used for 3-4 minutes before adding food. 5. Turn meat once about four inches (the first stop). 6. When food is a suggested guide. The lower temperature allows food to cook to the well done stage without..., buttered, 1" thick 4 Fillets 4 Flaky Flaky * The top rack position is installed on the fire. If a fire should be slightly lighter if appliance is #5. For optimum browning, preheat broil element for most broiling. Broiling Chart FOODS RACK POSITION* DONENESS Beef Steak, 1" thick Hamburgers, 3/4" thick 4...
Use and Care Manual
Page 22
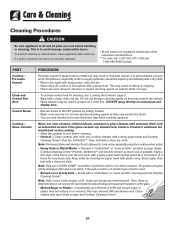
... dry cloth. • When cool, wash with soapy water, rinse and dry. • Never wipe off and all parts are registered trademarks of range. • To activate control lock for daily cleaning as they may be sure the knobs have been correctly replaced. Scrub again, then buff with a ...residue with misuse. Do not use , or when needed, with a damp paper towel and let stand 30 to remove as much soil as described above. Care & Cleaning Cleaning Procedures CAUTION • Be sure appliance is off a warm or hot surface with a clean dry cloth. This is to cook on metal ...
... dry cloth. • When cool, wash with soapy water, rinse and dry. • Never wipe off and all parts are registered trademarks of range. • To activate control lock for daily cleaning as they may be sure the knobs have been correctly replaced. Scrub again, then buff with a ...residue with misuse. Do not use , or when needed, with a damp paper towel and let stand 30 to remove as much soil as described above. Care & Cleaning Cleaning Procedures CAUTION • Be sure appliance is off a warm or hot surface with a clean dry cloth. This is to cook on metal ...
Use and Care Manual
Page 24
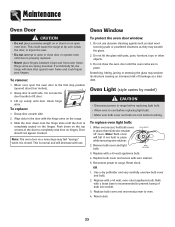
...door to oven. 4. To remove: 1. Lift up evenly until door is completely seated on the range. 3. Slide the door down on the top corners of breakage at a later date. Door should not appear ...the user. • Do not attempt to range. Remove bulb cover and light bulb. Replace bulb cover and reconnect power to the first stop position (opened about four inches). 2. Hinge arms are cool before replacing light...5. BULB COVER 2. OR 1. Bulb with a 40 watt, oven-rated appliance bulb. Replace with pots, pans, furniture, toys, or other objects. 3. Do not hit the glass with a ...
...door to oven. 4. To remove: 1. Lift up evenly until door is completely seated on the range. 3. Slide the door down on the top corners of breakage at a later date. Door should not appear ...the user. • Do not attempt to range. Remove bulb cover and light bulb. Replace bulb cover and reconnect power to the first stop position (opened about four inches). 2. Hinge arms are cool before replacing light...5. BULB COVER 2. OR 1. Bulb with a 40 watt, oven-rated appliance bulb. Replace with pots, pans, furniture, toys, or other objects. 3. Do not hit the glass with a ...
Use and Care Manual
Page 26
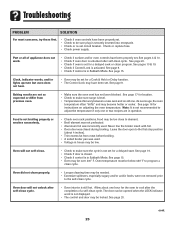
... one hour for location. • Check to adjust the temperature if only one . Allow about 4 inches). • Trim excess fat from previous oven. • Make sure the oven vent has not been... is not displayed. • The control and door may be below 400° F to make sure range is activated. Clock, indicator words, and/or lights operate but oven does not heat. • Oven may... The Control Lock may be over 400° F. Oven will not unlock after the completion of appliance does not work. • Check if surface and/or oven controls have been set circuit breaker...
... one hour for location. • Check to adjust the temperature if only one . Allow about 4 inches). • Trim excess fat from previous oven. • Make sure the oven vent has not been... is not displayed. • The control and door may be below 400° F to make sure range is activated. Clock, indicator words, and/or lights operate but oven does not heat. • Oven may... The Control Lock may be over 400° F. Oven will not unlock after the completion of appliance does not work. • Check if surface and/or oven controls have been set circuit breaker...
Use and Care Manual
Page 27
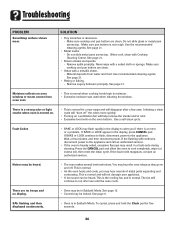
... oven cools. SOLUTION • Tiny scratches or abrasions. - Do not slide glass or metal pans across top. See page 21. • Metal marks. - Use recommended cleaning agents. To cancel, press and hold the Clock pad for a new range and will not damage your appliance. • A fan sound can be in Sabbath Mode. Make...
... oven cools. SOLUTION • Tiny scratches or abrasions. - Do not slide glass or metal pans across top. See page 21. • Metal marks. - Use recommended cleaning agents. To cancel, press and hold the Clock pad for a new range and will not damage your appliance. • A fan sound can be in Sabbath Mode. Make...
Use and Care Manual
Page 28
... For one year from the date of purchase, when this major appliance is operated and maintained according to instructions attached to or furnished with electrical or plumbing codes, or use of consumables or cleaning products not approved by Maytag. 5. After checking "Troubleshooting," you need service, first see the... your major appliance is used in the country in which it is installed in an inaccessible location or is not installed in accordance with the removal from your home of your major appliance is located in materials or workmanship and is reported to Maytag within 30 days from ...
... For one year from the date of purchase, when this major appliance is operated and maintained according to instructions attached to or furnished with electrical or plumbing codes, or use of consumables or cleaning products not approved by Maytag. 5. After checking "Troubleshooting," you need service, first see the... your major appliance is used in the country in which it is installed in an inaccessible location or is not installed in accordance with the removal from your home of your major appliance is located in materials or workmanship and is reported to Maytag within 30 days from ...