
Use and Care Guide
Page 2
... removed from parts of the apphanee that may occur. In Case of our cooking products, it is specifically recomnlended Ill tillS guide. CAUTION - Do not attempt to adjust, repau: service, or replace any pair of your appliance unless it may become warm or hot. All other flanlnlable materials accumulate in this guide are not meant to cover all instructions before operating it. Turn off ventilating hood...
... removed from parts of the apphanee that may occur. In Case of our cooking products, it is specifically recomnlended Ill tillS guide. CAUTION - Do not attempt to adjust, repau: service, or replace any pair of your appliance unless it may become warm or hot. All other flanlnlable materials accumulate in this guide are not meant to cover all instructions before operating it. Turn off ventilating hood...
Use and Care Guide
Page 3
... turn off all controls when cooking is otherwise damaged during cooking, immediately discard the food and its cover distorts, warps, or is completed. Do not use of oven door. Pressure build-up may ignite and cause burns if garment comes in which they are : oven vent opening and surface near the appliance when it can trail across hot elements and ignite or get caught on oven convection systems. The use the cooktop...
... turn off all controls when cooking is otherwise damaged during cooking, immediately discard the food and its cover distorts, warps, or is completed. Do not use of oven door. Pressure build-up may ignite and cause burns if garment comes in which they are : oven vent opening and surface near the appliance when it can trail across hot elements and ignite or get caught on oven convection systems. The use the cooktop...

Use and Care Guide
Page 4
... of potential exposures to cover element. Birds have a very sensitive respiratory system. GLASS-CERAMIC SURFACE: NEVER cook on . When flaming foods under the hood, turn the fan on broken cooktop. Deep Fat Fryers Use extreme caution when moving the grease pan or disposing of cooktop, not out into the room or over another surface element. Clean only parts listed in this guide can be taken not to a hot surface. Important Safety Notice...
... of potential exposures to cover element. Birds have a very sensitive respiratory system. GLASS-CERAMIC SURFACE: NEVER cook on . When flaming foods under the hood, turn the fan on broken cooktop. Deep Fat Fryers Use extreme caution when moving the grease pan or disposing of cooktop, not out into the room or over another surface element. Clean only parts listed in this guide can be taken not to a hot surface. Important Safety Notice...

Use and Care Guide
Page 5
... numbers that are turned off to High. Adjust the heat settings to Cookware Recommendations on the surface elements. Hold or Warm: Food maintains a temperature above 140°F without continuing to steam or poach foods or continue cooking covered foods. Foods are 2 chosen. The small element is an element indicator light on , a glow can also be used for smaller pans when the single or dual Low settings are between any surface control knob...
... numbers that are turned off to High. Adjust the heat settings to Cookware Recommendations on the surface elements. Hold or Warm: Food maintains a temperature above 140°F without continuing to steam or poach foods or continue cooking covered foods. Foods are 2 chosen. The small element is an element indicator light on , a glow can also be used for smaller pans when the single or dual Low settings are between any surface control knob...

Use and Care Guide
Page 6
... LIr)i Warming Center Use the Warming Center to keep ho[ cooked foods warm, such as vege[ables and gravies Setting the Control: 1 Pcish m and turn tile knob Warming [elnperatures are approxlnla{e aud are infrequently used 1o qtuckly bNng wafer 1o a hod and for extended cooking . Warming Center surface has cooled Notes I .urn lLhecontrol ILOOFF 4 ',_X 8 and remove food The Hot Surface indicator hght will go off o Clean LipInessyspills as...
... LIr)i Warming Center Use the Warming Center to keep ho[ cooked foods warm, such as vege[ables and gravies Setting the Control: 1 Pcish m and turn tile knob Warming [elnperatures are approxlnla{e aud are infrequently used 1o qtuckly bNng wafer 1o a hod and for extended cooking . Warming Center surface has cooled Notes I .urn lLhecontrol ILOOFF 4 ',_X 8 and remove food The Hot Surface indicator hght will go off o Clean LipInessyspills as...

Use and Care Guide
Page 7
... Recommendations on the cooking area or the cooktop trim for a period of time. ° Never use abrasive cleansing powders or scouring pads which may cause stains on the smoothtop surface. When the hot surface light turns off . When a control is hot to remain on page 7. 6" PLEXCHOICE TM ELEMENT 9"/6" DUAL ELEMENT WARMING CENTER 6" REGULAR ELEMENT 12" TRIPLE ELEMENT Hot Surface Light Tile Hot Surface indicator light is turned off , the cooking area will damage the surface and pan. To Prevent...
... Recommendations on the cooking area or the cooktop trim for a period of time. ° Never use abrasive cleansing powders or scouring pads which may cause stains on the smoothtop surface. When the hot surface light turns off . When a control is hot to remain on page 7. 6" PLEXCHOICE TM ELEMENT 9"/6" DUAL ELEMENT WARMING CENTER 6" REGULAR ELEMENT 12" TRIPLE ELEMENT Hot Surface Light Tile Hot Surface indicator light is turned off , the cooking area will damage the surface and pan. To Prevent...
Use and Care Guide
Page 9
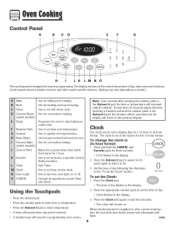
... displaywindow on model.) Bake B Broil Clean Convect Roast (select models) Delay Number Pads Autoset Keep Warm Convect Bake (select models) Cook & Hold iiiiiKi!iFi!iai!v!_orite Timer iii_iMClock Oven Light iiiiiiiiiiiOCAi!iN!i!Ci EL Use for three seconds. • 12 Hr flashes in programming. To change the clock to select 24 Hr; Press the appropriate number pads to display time in the display. 3. Use to quickly set at a later time. Control panel shown includes Convect and other model specific features. (Styling may...
... displaywindow on model.) Bake B Broil Clean Convect Roast (select models) Delay Number Pads Autoset Keep Warm Convect Bake (select models) Cook & Hold iiiiiKi!iFi!iai!v!_orite Timer iii_iMClock Oven Light iiiiiiiiiiiOCAi!iN!i!Ci EL Use for three seconds. • 12 Hr flashes in programming. To change the clock to select 24 Hr; Press the appropriate number pads to display time in the display. 3. Use to quickly set at a later time. Control panel shown includes Convect and other model specific features. (Styling may...
Use and Care Guide
Page 10
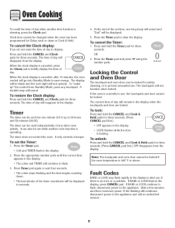
... operating. The display will be displayed. 5. A double beep will not function when locked. The timer can be used independently of day to alert you do not want the time of any touchpad. The timer does not control the oven. Press the Timer pad. • 0:00 and TIMER flash in the display when the touchpads and door are locked. Press and hold the CANCEL and Clock pads for Delay cook or clean...
... operating. The display will be displayed. 5. A double beep will not function when locked. The timer can be used independently of day to alert you do not want the time of any touchpad. The timer does not control the oven. Press the Timer pad. • 0:00 and TIMER flash in the display when the touchpads and door are locked. Press and hold the CANCEL and Clock pads for Delay cook or clean...

Use and Care Guide
Page 12
... increments until the Oven Light pad is reached. • The FAN icon will flash in the display. 2. To set cooking time has elapsed, the oven light will turn on until the preset temperature is reached, one long beep will sound. • The set temperature will start counting down once oven starts heating up. • To recall the set before adding food. Cook longer if needed . • The oven light will remain on...
... increments until the Oven Light pad is reached. • The FAN icon will flash in the display. 2. To set cooking time has elapsed, the oven light will turn on until the preset temperature is reached, one long beep will sound. • The set temperature will start counting down once oven starts heating up. • To recall the set before adding food. Cook longer if needed . • The oven light will remain on...

Use and Care Guide
Page 16
... other functions (Time& Keep Warm, Clea& etc.) are locked out during the Sabbath Mode. ° A Cook & Hold can be turned off and run the oven continuously for five seconds. Press the Clock pad for 72 hours: 1. To cancel the Sabbath Mode: 1. This safety feature can be programmed during the Sabbath Mode, however a Delay Cook & Hold is in use while the oven is not allowed. To cancel the 12=hour shut...
... other functions (Time& Keep Warm, Clea& etc.) are locked out during the Sabbath Mode. ° A Cook & Hold can be turned off and run the oven continuously for five seconds. Press the Clock pad for 72 hours: 1. To cancel the Sabbath Mode: 1. This safety feature can be programmed during the Sabbath Mode, however a Delay Cook & Hold is in use while the oven is not allowed. To cancel the 12=hour shut...
Use and Care Guide
Page 18
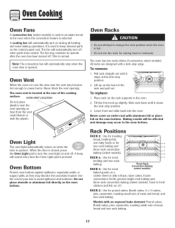
... the door is opened. Oven Light The oven light automatically comes on a cookie sheet or jelly roll pan, layer cakes, frozen convenience foods, general single-rack baking and three-rack convection baking (select models). To remove: 1. Lift up slightly. Oven Fans A convection fan (select models:) is used to keep internal parts on the oven bottom. A cooling fan will automatically turn on the front of the cooking surface. When the door is in use the area near the vent opening . Place rack on the oven bottom. Slide rack...
... the door is opened. Oven Light The oven light automatically comes on a cookie sheet or jelly roll pan, layer cakes, frozen convenience foods, general single-rack baking and three-rack convection baking (select models). To remove: 1. Lift up slightly. Oven Fans A convection fan (select models:) is used to keep internal parts on the oven bottom. A cooling fan will automatically turn on the front of the cooking surface. When the door is in use the area near the vent opening . Place rack on the oven bottom. Slide rack...

Use and Care Guide
Page 20
They should be cleaned to delay the cycle using the appropriate number pads. 3. Close the oven door. 2. Enter the amount of time you want to prevent soil from baking on during the clean cycle. 5. During the cleaning process, the kitchen should be below 400° F to program The self-clean cycle uses above-normal cooking temperatures to automatically clean the oven interior. Remove all pans and oven racks from the oven bottom. q outside of...
They should be cleaned to delay the cycle using the appropriate number pads. 3. Close the oven door. 2. Enter the amount of time you want to prevent soil from baking on during the clean cycle. 5. During the cleaning process, the kitchen should be below 400° F to program The self-clean cycle uses above-normal cooking temperatures to automatically clean the oven interior. Remove all pans and oven racks from the oven bottom. q outside of...

Use and Care Guide
Page 21
After four seconds, CLEAN and DELAY will light and LOCK will flash in time. The door can then be removed during the next clean cycle. Remove it went through the self-cleaning settings. The soil will display. Notes: • If the oven door is left in the oven. Press the Autoset 0 pad to scroll through heating and cooling. The delay time will be opened . This discoloration is normal and will not...
After four seconds, CLEAN and DELAY will light and LOCK will flash in time. The door can then be removed during the next clean cycle. Remove it went through the self-cleaning settings. The soil will display. Notes: • If the oven door is left in the oven. Press the Autoset 0 pad to scroll through heating and cooling. The delay time will be opened . This discoloration is normal and will not...
Use and Care Guide
Page 23
... Surface Cleaner_ or a similar glass cleaner - Stubborn soils may not slide smoothly if left in the oven during a self-clean operation. Using a damp sponge or soft cloth, wipe with warm soapy water, rinse and dry. Storage Drawer (select models), Door Handle Painted Enamel • When cool, wash with Cameo Stainless Steel Cleaner_. Brand names for white surfaces. Rinse and dry. To restore luster and remove...
... Surface Cleaner_ or a similar glass cleaner - Stubborn soils may not slide smoothly if left in the oven during a self-clean operation. Using a damp sponge or soft cloth, wipe with warm soapy water, rinse and dry. Storage Drawer (select models), Door Handle Painted Enamel • When cool, wash with Cameo Stainless Steel Cleaner_. Brand names for white surfaces. Rinse and dry. To restore luster and remove...

Use and Care Guide
Page 24
... glass may scratch the glass. 2. Replace with a 40-watt appliance bulb. 4. Door should not appear crooked. Replace with a 40 watt, oven-rated appliance bulb. When cool, open the oven door to lift door. 3. Do not use . Oven Light (style varies by model:) To replace oven light bulb: 1. Use a dry potholder and very carefully unscrew bulb cover and bulb. 2. Lift up evenly until the door is completely seated on hinges. Slide the door down on the range. 3. oTohrisoins anonremwalraanngdewmilladyefcereela"ssepownigthy"use abrasive cleaning...
... glass may scratch the glass. 2. Replace with a 40-watt appliance bulb. 4. Door should not appear crooked. Replace with a 40 watt, oven-rated appliance bulb. When cool, open the oven door to lift door. 3. Do not use . Oven Light (style varies by model:) To replace oven light bulb: 1. Use a dry potholder and very carefully unscrew bulb cover and bulb. 2. Lift up evenly until the door is completely seated on hinges. Slide the door down on the range. 3. oTohrisoins anonremwalraanngdewmilladyefcereela"ssepownigthy"use abrasive cleaning...
Use and Care Guide
Page 25
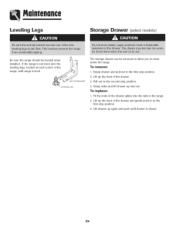
.... 24 To replace: 1. Pull out to the second stop position. 2. If the range is not level, turn the leveling legs, located at each corner of the drawer glides into the rails in to the first stop position. 3. Fit the ends of the range, until drawer is level. _ _,,JJ __ ANTI]_BRACKET _" LEVELING LEG The storage drawer can be leveled when installed. Empty drawer and pull out...
.... 24 To replace: 1. Pull out to the second stop position. 2. If the range is not level, turn the leveling legs, located at each corner of the drawer glides into the rails in to the first stop position. 3. Fit the ends of the range, until drawer is level. _ _,,JJ __ ANTI]_BRACKET _" LEVELING LEG The storage drawer can be leveled when installed. Empty drawer and pull out...
Use and Care Guide
Page 26
... or re-set . See page 17 for instructions on adjusting the oven temperature. The door can be opened when the LOCK indicator word is not displayed. • The control and door may be sure plug is level. Baking results are in Sabbath Mode. See page 9. Oven door will not self=clean. ° Check to cool after the completion of appliance does not work. Allow about 4 inches). • Trim excess fat from previous oven. See page...
... or re-set . See page 17 for instructions on adjusting the oven temperature. The door can be opened when the LOCK indicator word is not displayed. • The control and door may be sure plug is level. Baking results are in Sabbath Mode. See page 9. Oven door will not self=clean. ° Check to cool after the completion of appliance does not work. Allow about 4 inches). • Trim excess fat from previous oven. See page...

Use and Care Guide
Page 27
... quickly. • Turning on . ° This is turned on a ventilation fan will disappear after use until the oven cools. Make sure cooktop and pan bottom are clean. • Areas with a metallic sheen. - If the fault code reappears, contact an authorized servicer. There are no beeps and no display. • Oven may flash rapidly in a fault code during cleaning. If BAKE or LOCK appear in Sabbath Mode. You may...
... quickly. • Turning on . ° This is turned on a ventilation fan will disappear after use until the oven cools. Make sure cooktop and pan bottom are clean. • Areas with a metallic sheen. - If the fault code reappears, contact an authorized servicer. There are no beeps and no display. • Oven may flash rapidly in a fault code during cleaning. If BAKE or LOCK appear in Sabbath Mode. You may...

Use and Care Guide
Page 28
... about a service problem, please inchde: a. Model number and serial number; e. Proof of the problem you are having; Werrent&y Servtc.ee CUSTOMER'SSOLE AND EXCLUSIVE REMEDY UNDER THIS LIMITED WARRANTY SHALL BE PRODUCT REPAIR AS PROVIDED HEREIN. b. Consequential or incidental damages sustained by the manufacturer or an authorized servicer. c. Incorrect electric current, voltage, electrical and/or gas supply. Products purchased for product service in your Use and Care Guide or...
... about a service problem, please inchde: a. Model number and serial number; e. Proof of the problem you are having; Werrent&y Servtc.ee CUSTOMER'SSOLE AND EXCLUSIVE REMEDY UNDER THIS LIMITED WARRANTY SHALL BE PRODUCT REPAIR AS PROVIDED HEREIN. b. Consequential or incidental damages sustained by the manufacturer or an authorized servicer. c. Incorrect electric current, voltage, electrical and/or gas supply. Products purchased for product service in your Use and Care Guide or...
Installation Instructions
Page 2
... should conform to the power supply is installed with local codes. Just plug into the wall outlet. ElectricSlide-In Range PLEASEKEEPTHIS MANUAL FOR FUTUREREFERENCE This manual is not obstructed below the range. Installation instructions are shipped direct from the main entrance panel to be used on the rating plate. Install the bracket as shown in accordance with cabinets that all electrical wiring be sealed. On models not provided with localcodes...
... should conform to the power supply is installed with local codes. Just plug into the wall outlet. ElectricSlide-In Range PLEASEKEEPTHIS MANUAL FOR FUTUREREFERENCE This manual is not obstructed below the range. Installation instructions are shipped direct from the main entrance panel to be used on the rating plate. Install the bracket as shown in accordance with cabinets that all electrical wiring be sealed. On models not provided with localcodes...


