

Installation Guide
Page 1
Only 5 INSTALLATION INSTRUCTIONS 6 Unpack Range 6 Install Anti-Tip Bracket 6 Electrical Connection - U.S.A. Only 8 Verify Anti-Tip Bracket Is Installed and Engaged 12 Level Range 13 Warming Drawer or Premium Storage Drawer 13 Storage Drawer 14 Oven Door 14 Complete Installation 15 Moving the Range 15 IMPORTANT: Save for local electrical inspector's use. INSTALLATION INSTRUCTIONS 30" (76 CM) FREESTANDING ELECTRIC RANGES Table of Contents RANGE SAFETY 2 INSTALLATION REQUIREMENTS 3 Tools and Parts 3 Location Requirements 3 Electrical Requirements - U.S.A. W10403811B
Only 5 INSTALLATION INSTRUCTIONS 6 Unpack Range 6 Install Anti-Tip Bracket 6 Electrical Connection - U.S.A. Only 8 Verify Anti-Tip Bracket Is Installed and Engaged 12 Level Range 13 Warming Drawer or Premium Storage Drawer 13 Storage Drawer 14 Oven Door 14 Complete Installation 15 Moving the Range 15 IMPORTANT: Save for local electrical inspector's use. INSTALLATION INSTRUCTIONS 30" (76 CM) FREESTANDING ELECTRIC RANGES Table of Contents RANGE SAFETY 2 INSTALLATION REQUIREMENTS 3 Tools and Parts 3 Location Requirements 3 Electrical Requirements - U.S.A. W10403811B

Installation Guide
Page 3
...with the range, see "Install Anti-Tip Bracket" section. ■ Grounded electrical supply is installed in a mobile home, it must be revised. Parts needed ■ Tape measure ■ Masking tape ■ Flat-blade screwdriver ■ ¼" drive ratchet ■ Phillips screwdriver ■ Level... Thickness of flooring may require longer screws to anchor bracket to the Manufactured Home Construction and Safety Standard, Title 24 CFR, Part 3280 (formerly the Federal Standard for use with the maximum allowable wood cabinet temperatures of burns or fire by a licensed, ...
...with the range, see "Install Anti-Tip Bracket" section. ■ Grounded electrical supply is installed in a mobile home, it must be revised. Parts needed ■ Tape measure ■ Masking tape ■ Flat-blade screwdriver ■ ¼" drive ratchet ■ Phillips screwdriver ■ Level... Thickness of flooring may require longer screws to anchor bracket to the Manufactured Home Construction and Safety Standard, Title 24 CFR, Part 3280 (formerly the Federal Standard for use with the maximum allowable wood cabinet temperatures of burns or fire by a licensed, ...

Installation Guide
Page 6
... front leveling legs one -half turn . If you are installing the range in a mobile home, you can use : floor or wall. Remove oven racks and parts package from range. 2. Wrench or pliers C. Do not remove the shipping base at this time. Rear leveling leg B. Use a wrench or pliers to the floor...
... front leveling legs one -half turn . If you are installing the range in a mobile home, you can use : floor or wall. Remove oven racks and parts package from range. 2. Wrench or pliers C. Do not remove the shipping base at this time. Rear leveling leg B. Use a wrench or pliers to the floor...
Installation Guide
Page 9
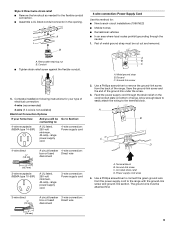
... screw 2. Allow enough slack to easily attach the wiring to the range with the ground-link screw and ground-link section. UL listed strain relief D. Part of metal ground strap must be attached first. 3-wire direct ³⁄₈" (1.0 cm) A circuit breaker 3-wire connection: box or fused Direct wire disconnect 3" (7.6 cm...
... screw 2. Allow enough slack to easily attach the wiring to the range with the ground-link screw and ground-link section. UL listed strain relief D. Part of metal ground strap must be attached first. 3-wire direct ³⁄₈" (1.0 cm) A circuit breaker 3-wire connection: box or fused Direct wire disconnect 3" (7.6 cm...
Installation Guide
Page 11
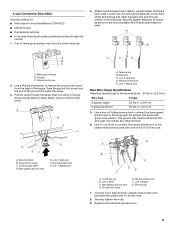
... 10-32 hex nuts. 8. Use a hex or Phillips screwdriver to connect the bare (green) ground wire to line 1 (black), neutral (white), and line 2 (red) wires. Part of the ground link under the screw. 3. 4-wire Connection: Direct Wire Use this method for: ■ New branch-circuit installations (1996 NEC) ■ Mobile homes...
... 10-32 hex nuts. 8. Use a hex or Phillips screwdriver to connect the bare (green) ground wire to line 1 (black), neutral (white), and line 2 (red) wires. Part of the ground link under the screw. 3. 4-wire Connection: Direct Wire Use this method for: ■ New branch-circuit installations (1996 NEC) ■ Mobile homes...

Installation Guide
Page 15
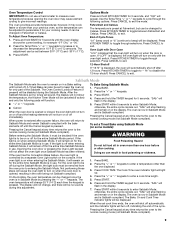
...operating. Disconnect power. 2. See the "Verify Anti-Tip Bracket Is Installed and Engaged" section. 5. Check that the range is an extra part, go back through the steps to see which step was skipped. 2. Dispose of the Use and Care Guide or User Instructions or User ...or maintenance. 4. Complete Installation 1. See the "Level Range" section. 5. For more information, read the "Range Care" section of /recycle all parts are now installed. or circuit breaker has not tripped. ■ Range is plugged into appropriate outlet. Do not operate range without anti-tip bracket installed...
...operating. Disconnect power. 2. See the "Verify Anti-Tip Bracket Is Installed and Engaged" section. 5. Check that the range is an extra part, go back through the steps to see which step was skipped. 2. Dispose of the Use and Care Guide or User Instructions or User ...or maintenance. 4. Complete Installation 1. See the "Level Range" section. 5. For more information, read the "Range Care" section of /recycle all parts are now installed. or circuit breaker has not tripped. ■ Range is plugged into appropriate outlet. Do not operate range without anti-tip bracket installed...
Use & Care Guide
Page 3
...items of interest to children in oven. ■ DO NOT TOUCH HEATING ELEMENTS OR INTERIOR SURFACES OF OVEN - children climbing on any part of oven doors. Build-up of pressure may subject wiring or components underneath to damage. ■ Protective Liners - Interior surfaces of oven...should be seriously injured. ■ Proper Installation - They should be immersed in a risk of electric shock. Do not repair or replace any part of the range. ■ Wear Proper Apparel - Smother fire or flame or use of undersized utensils will also improve efficiency. ■ Never ...
...items of interest to children in oven. ■ DO NOT TOUCH HEATING ELEMENTS OR INTERIOR SURFACES OF OVEN - children climbing on any part of oven doors. Build-up of pressure may subject wiring or components underneath to damage. ■ Protective Liners - Interior surfaces of oven...should be seriously injured. ■ Proper Installation - They should be immersed in a risk of electric shock. Do not repair or replace any part of the range. ■ Wear Proper Apparel - Smother fire or flame or use of undersized utensils will also improve efficiency. ■ Never ...
Use & Care Guide
Page 5
...removed completely. ■ To avoid damage to the cooktop and can adhere to the cooktop, do not leave a hot lid on . Some parts of light colored ceramic glass to appear to set at 170°F (75°C) for stubborn soils. Only the Clock, Kitchen Timer and ... "+" or "-" keypads to change the temperature, repeat Step 2. Ceramic glass cooktop cleaner and a cooktop scraper are hot. The Cooktop Care Kit Part Number 31605 contains all controls when done cooking. Food must be used to lock) Clean cycle Oven control lockout INSTRUCTIONS 1. Dropping a heavy or ...
...removed completely. ■ To avoid damage to the cooktop and can adhere to the cooktop, do not leave a hot lid on . Some parts of light colored ceramic glass to appear to set at 170°F (75°C) for stubborn soils. Only the Clock, Kitchen Timer and ... "+" or "-" keypads to change the temperature, repeat Step 2. Ceramic glass cooktop cleaner and a cooktop scraper are hot. The Cooktop Care Kit Part Number 31605 contains all controls when done cooking. Food must be used to lock) Clean cycle Oven control lockout INSTRUCTIONS 1. Dropping a heavy or ...

Use & Care Guide
Page 6
... Choice Cooking Element (on some models) The Triple-Choice™ Cooking Element offers flexibility depending on the size of the cookware. The Cooktop Care Kit Part Number 31605 contains all soils.
... Choice Cooking Element (on some models) The Triple-Choice™ Cooking Element offers flexibility depending on the size of the cookware. The Cooktop Care Kit Part Number 31605 contains all soils.
Use & Care Guide
Page 9
... of Cycle Tones "b1" (beep once) or "b" (continue to decrease the temperature in a Bake setting until the oven display shows the current setting, for only part of the cycle. Press KITCHEN TIMER to remain on only with the oven light switch. Press KITCHEN TIMER to toggle to enter Sabbath Mode; Press...
... of Cycle Tones "b1" (beep once) or "b" (continue to decrease the temperature in a Bake setting until the oven display shows the current setting, for only part of the cycle. Press KITCHEN TIMER to remain on only with the oven light switch. Press KITCHEN TIMER to toggle to enter Sabbath Mode; Press...

Use & Care Guide
Page 13
... the cleaning. AquaLift™ Technology is an innovative cleaning solution that the entire surface of the bottom of the oven cavity is covered by ordering Part Number W10423113RP. Allow the oven to cool to stop the Clean cycle. Press CLEAN and then START on the oven bottom is complete. 5. Remove the...
... the cleaning. AquaLift™ Technology is an innovative cleaning solution that the entire surface of the bottom of the oven cavity is covered by ordering Part Number W10423113RP. Allow the oven to cool to stop the Clean cycle. Press CLEAN and then START on the oven bottom is complete. 5. Remove the...
Use & Care Guide
Page 14
... sugary spills while the cooktop is still warm. STORAGE DRAWER OR WARMING DRAWER (on panel. ■ affresh™ Kitchen and Appliance Cleaner Part Number W10355010 (not included): See the "Accessories" section for more information. At high temperatures, foods react with porcelain and staining, etching, ..., specks and discoloration ■ Clean with damp paper towels or sponge. Store razor blades out of the reach of our website at www.maytag.com. Light stains should be cleaned as soon as cooktop has cooled down. Cleaning Method: ■ Clean cycle: See "Clean Cycle" ...
... sugary spills while the cooktop is still warm. STORAGE DRAWER OR WARMING DRAWER (on panel. ■ affresh™ Kitchen and Appliance Cleaner Part Number W10355010 (not included): See the "Accessories" section for more information. At high temperatures, foods react with porcelain and staining, etching, ..., specks and discoloration ■ Clean with damp paper towels or sponge. Store razor blades out of the reach of our website at www.maytag.com. Light stains should be cleaned as soon as cooktop has cooled down. Cleaning Method: ■ Clean cycle: See "Clean Cycle" ...

Use & Care Guide
Page 17
..., you can visit our website at www.maytag.com/cookingaccessories. Cooktop Care Kit (ceramic glass models) (includes cleaner, protectant, scraper, and applicator pads) Order Part Number 31605 Cooktop Protectant (ceramic glass models) Order Part Number 31463 affresh™ Stainless Steel Cleaning Wipes (stainless steel models) Order Part Number W10355049 affresh™ Cooktop Cleaner (ceramic...
..., you can visit our website at www.maytag.com/cookingaccessories. Cooktop Care Kit (ceramic glass models) (includes cleaner, protectant, scraper, and applicator pads) Order Part Number 31605 Cooktop Protectant (ceramic glass models) Order Part Number 31463 affresh™ Stainless Steel Cleaning Wipes (stainless steel models) Order Part Number W10355049 affresh™ Cooktop Cleaner (ceramic...
Use & Care Guide
Page 18
... date of purchase. 6. The cost of repair or replacement under this major appliance was purchased. MAYTAG® ELECTRIC RANGE LIMITED WARRANTY FIRST YEAR LIMITED WARRANTY (PARTS AND LABOR) For one year from your home of your major appliance for repairs. This is covered... appliance is installed, operated and maintained according to instructions attached to or furnished with the product, Maytag will pay for factory specified parts for the following components to parts or systems resulting from warranty coverage. 3. The removal and reinstallation of consumables or cleaning products not...
... date of purchase. 6. The cost of repair or replacement under this major appliance was purchased. MAYTAG® ELECTRIC RANGE LIMITED WARRANTY FIRST YEAR LIMITED WARRANTY (PARTS AND LABOR) For one year from your home of your major appliance for repairs. This is covered... appliance is installed, operated and maintained according to instructions attached to or furnished with the product, Maytag will pay for factory specified parts for the following components to parts or systems resulting from warranty coverage. 3. The removal and reinstallation of consumables or cleaning products not...

Warranty Information
Page 1
...operated and maintained according to instructions attached to or furnished with the product, Maytag brand of Whirlpool Corporation or Whirlpool Canada, LP (hereafter "Maytag") will pay for factory specified replacement parts and repair labor to correct defects in materials or workmanship that have been... appliance. This is contrary to correct non-cosmetic defects in materials or workmanship in accordance with the product, Maytag will pay for factory specified parts for repairs. The cost of your major appliance if it was purchased. Repairs to the appliance. 9. IMPLIED...
...operated and maintained according to instructions attached to or furnished with the product, Maytag brand of Whirlpool Corporation or Whirlpool Canada, LP (hereafter "Maytag") will pay for factory specified replacement parts and repair labor to correct defects in materials or workmanship that have been... appliance. This is contrary to correct non-cosmetic defects in materials or workmanship in accordance with the product, Maytag will pay for factory specified parts for repairs. The cost of your major appliance if it was purchased. Repairs to the appliance. 9. IMPLIED...


