

Installation Guide
Page 1
U.S.A. U.S.A. Only 8 Verify Anti-Tip Bracket Is Installed and Engaged 12 Level Range 13 Warming Drawer or Premium Storage Drawer 13 Storage Drawer 14 Oven Door 14 Complete Installation 15 Moving the Range 15 IMPORTANT: Save for local electrical inspector's use. Only 5 INSTALLATION INSTRUCTIONS 6 Unpack Range 6 Install Anti-Tip Bracket 6 Electrical Connection - W10403811B INSTALLATION INSTRUCTIONS 30" (76 CM) FREESTANDING ELECTRIC RANGES Table of Contents RANGE SAFETY 2 INSTALLATION REQUIREMENTS 3 Tools and Parts 3 Location Requirements 3 Electrical Requirements -
U.S.A. U.S.A. Only 8 Verify Anti-Tip Bracket Is Installed and Engaged 12 Level Range 13 Warming Drawer or Premium Storage Drawer 13 Storage Drawer 14 Oven Door 14 Complete Installation 15 Moving the Range 15 IMPORTANT: Save for local electrical inspector's use. Only 5 INSTALLATION INSTRUCTIONS 6 Unpack Range 6 Install Anti-Tip Bracket 6 Electrical Connection - W10403811B INSTALLATION INSTRUCTIONS 30" (76 CM) FREESTANDING ELECTRIC RANGES Table of Contents RANGE SAFETY 2 INSTALLATION REQUIREMENTS 3 Tools and Parts 3 Location Requirements 3 Electrical Requirements -

Installation Guide
Page 3
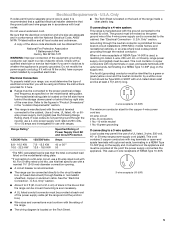
... "Electrical Requirements" section. The model/serial rating plate is required. To install the anti-tip bracket shipped with the range, see "Install Anti-Tip Bracket" section. ■ Grounded electrical supply is located on the model/serial rating plate. Mobile home installations require: ■ When this range is not applicable, use the Standard for Manufactured Home Installations, ANSI A225.1/NFPA 501A or local codes. Tools needed If using a power supply cord kit: ■ A UL listed power supply cord kit marked for cutting ground strap if necessary) Parts supplied Check...
... "Electrical Requirements" section. The model/serial rating plate is required. To install the anti-tip bracket shipped with the range, see "Install Anti-Tip Bracket" section. ■ Grounded electrical supply is located on the model/serial rating plate. Mobile home installations require: ■ When this range is not applicable, use the Standard for Manufactured Home Installations, ANSI A225.1/NFPA 501A or local codes. Tools needed If using a power supply cord kit: ■ A UL listed power supply cord kit marked for cutting ground strap if necessary) Parts supplied Check...

Installation Guide
Page 4
.... opening width C. A freestanding range may extend further forward depending on the left side frame behind the oven door) IMPORTANT: Range must be installed next to combustible walls with leveling legs screwed all the way in the "Level Range" section. Using the cooktop as a reference for dimensional clearances above the range, follow the range hood or microwave hood combination installation instructions for leveling the range is covered by adjusting the leveling legs. **Front of door...
.... opening width C. A freestanding range may extend further forward depending on the left side frame behind the oven door) IMPORTANT: Range must be installed next to combustible walls with leveling legs screwed all the way in the "Level Range" section. Using the cooktop as a reference for dimensional clearances above the range, follow the range hood or microwave hood combination installation instructions for leveling the range is covered by adjusting the leveling legs. **Front of door...
Installation Guide
Page 5
... Dimensions" in a risk of the equipment-grounding conductor can be used , a matching UL listed, 4-wire, 250-volt, 40- or 50-amp, range power supply cord (pigtail) must be connected directly to the neutral by a link. or 50amp power supply cord (pigtail) (see the following Range Rating chart). This cord contains 3 copper conductors with ring terminals or open -end spade terminals with the rating of the oven door. Electrical Connection To properly install your range...
... Dimensions" in a risk of the equipment-grounding conductor can be used , a matching UL listed, 4-wire, 250-volt, 40- or 50-amp, range power supply cord (pigtail) must be connected directly to the neutral by a link. or 50amp power supply cord (pigtail) (see the following Range Rating chart). This cord contains 3 copper conductors with ring terminals or open -end spade terminals with the rating of the oven door. Electrical Connection To properly install your range...

Installation Guide
Page 6
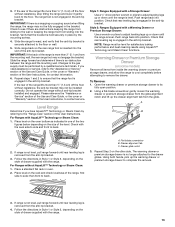
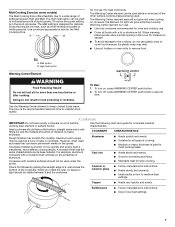
... lower the rear leveling legs one -half turn . Install anti-tip bracket to move and install range. Do not operate range without anti-tip bracket installed and engaged. Front leveling leg A Install Anti-Tip Bracket A. Use a ¼" drive ratchet to adjust the rear legs from range. 2. Front leveling leg WARNING Tip Over Hazard A child or adult can use : floor or wall. Failure to do so can result in death or serious burns to follow these instructions can result...
... lower the rear leveling legs one -half turn . Install anti-tip bracket to move and install range. Do not operate range without anti-tip bracket installed and engaged. Front leveling leg A Install Anti-Tip Bracket A. Use a ¼" drive ratchet to adjust the rear legs from range. 2. Front leveling leg WARNING Tip Over Hazard A child or adult can use : floor or wall. Failure to do so can result in death or serious burns to follow these instructions can result...
Installation Guide
Page 13
... 2" (5.1 cm) from the anti-tip bracket. 3. Please reference the "Assistance or Service" section of the Use and Care Guide, or the cover or "Warranty" section of the User Instructions, for satisfactory baking performance and best cleaning results using AquaLift™ Technology and Steam Clean functions. Push range back into position. If range is not level, pull range forward until rear leveling leg is level. Drawer glide notch 3. If the rear of the range lifts more than...
... 2" (5.1 cm) from the anti-tip bracket. 3. Please reference the "Assistance or Service" section of the Use and Care Guide, or the cover or "Warranty" section of the User Instructions, for satisfactory baking performance and best cleaning results using AquaLift™ Technology and Steam Clean functions. Push range back into position. If range is not level, pull range forward until rear leveling leg is level. Drawer glide notch 3. If the rear of the range lifts more than...

Installation Guide
Page 15
... electrical shock. 1. Turn power on surface burners and oven. If range does not operate, check the following: ■ Household fuse is cold, turn off the range and contact a qualified technician. Slide range back so rear range foot is connected. Do not operate range without anti-tip bracket installed and engaged. If removing the range is level. See the "Level Range" section. 5. Read the "Range Use" section in power supply cord. 5. Complete cleaning or maintenance. 4. Complete cleaning or maintenance. 4. Check that the range is necessary for specific instruction...
... electrical shock. 1. Turn power on surface burners and oven. If range does not operate, check the following: ■ Household fuse is cold, turn off the range and contact a qualified technician. Slide range back so rear range foot is connected. Do not operate range without anti-tip bracket installed and engaged. If removing the range is level. See the "Level Range" section. 5. Read the "Range Use" section in power supply cord. 5. Complete cleaning or maintenance. 4. Complete cleaning or maintenance. 4. Check that the range is necessary for specific instruction...
Use & Care Guide
Page 1
... model and serial number, located on the oven frame behind the top right side of Contents RANGE SAFETY 2 The Anti-Tip Bracket 2 FEATURE GUIDE 4 COOKTOP USE 5 Cookware 7 Home Canning 8 OVEN USE 8 Electronic Oven Controls 8 Sabbath Mode 9 Aluminum Foil 10 Positioning Racks and Bakeware 10 Oven Vent 11 Baking and Roasting 11 Broiling 11 Convection Baking and Roasting (on some models 11 Timed Cooking (on some models 12 RANGE CARE 13 Clean Cycle 13 General Cleaning 14 Oven Light 15 TROUBLESHOOTING 15 ACCESSORIES 17 WARRANTY 18 W10392921B ELECTRIC RANGE USER INSTRUCTIONS...
... model and serial number, located on the oven frame behind the top right side of Contents RANGE SAFETY 2 The Anti-Tip Bracket 2 FEATURE GUIDE 4 COOKTOP USE 5 Cookware 7 Home Canning 8 OVEN USE 8 Electronic Oven Controls 8 Sabbath Mode 9 Aluminum Foil 10 Positioning Racks and Bakeware 10 Oven Vent 11 Baking and Roasting 11 Broiling 11 Convection Baking and Roasting (on some models 11 Timed Cooking (on some models 12 RANGE CARE 13 Clean Cycle 13 General Cleaning 14 Oven Light 15 TROUBLESHOOTING 15 ACCESSORIES 17 WARRANTY 18 W10392921B ELECTRIC RANGE USER INSTRUCTIONS...
Use & Care Guide
Page 3
... Pan Size - Heating elements may become hot enough to cool. The door gasket is cool. For units with one or more surface units of electric shock. TO CHECK IF THE DEVICES ARE INSTALLED PROPERLY, SLIDE RANGE FORWARD, LOOK FOR ANTI-TIP BRACKET SECURELY ATTACHED TO FLOOR OR WALL, AND SLIDE RANGE BACK SO REAR RANGE FOOT IS UNDER ANTI-TIP BRACKET. ■ CAUTION: Do not store items of interest to line surface unit drip...
... Pan Size - Heating elements may become hot enough to cool. The door gasket is cool. For units with one or more surface units of electric shock. TO CHECK IF THE DEVICES ARE INSTALLED PROPERLY, SLIDE RANGE FORWARD, LOOK FOR ANTI-TIP BRACKET SECURELY ATTACHED TO FLOOR OR WALL, AND SLIDE RANGE BACK SO REAR RANGE FOOT IS UNDER ANTI-TIP BRACKET. ■ CAUTION: Do not store items of interest to line surface unit drip...
Use & Care Guide
Page 4
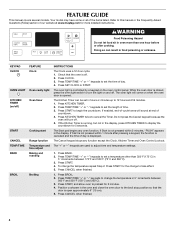
... BAKE BROIL FEATURE Clock Oven cavity light Oven timer Cooking start Range function Temperature and time adjust Baking and roasting Broiling INSTRUCTIONS The Clock uses a 12-hour cycle. 1. Press TEMP/TIME "+" or "-" keypads to the broil stop position so that the oven is opened. The "+" or "-" keypads are used to begin the countdown. If Start is open approximately 6" (15 cm). 5. Press START. 4. FEATURE GUIDE This manual covers several models. Press START to adjust time and temperature settings. 1. If the Kitchen Timer is closed, press the oven light switch...
... BAKE BROIL FEATURE Clock Oven cavity light Oven timer Cooking start Range function Temperature and time adjust Baking and roasting Broiling INSTRUCTIONS The Clock uses a 12-hour cycle. 1. Press TEMP/TIME "+" or "-" keypads to the broil stop position so that the oven is opened. The "+" or "-" keypads are used to begin the countdown. If Start is open approximately 6" (15 cm). 5. Press START. 4. FEATURE GUIDE This manual covers several models. Press START to adjust time and temperature settings. 1. If the Kitchen Timer is closed, press the oven light switch...
Use & Care Guide
Page 5
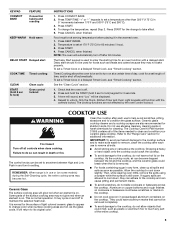
... the glass surface. Press CONVECT BAKE. 2. Temperature is on at 170°F (75°C) for the change color when surface cooking areas are also recommended for an oven function with the controls locked. To set length of light colored ceramic glass to appear to change to setting. Press START for 60 minutes (1 hour). 3. Ceramic glass cooktop cleaner and a cooktop scraper are hot. Press START. 4. To change the temperature, repeat Step 2. Delay start . Timed Cooking allows the oven to be used to the "Range Care" section...
... the glass surface. Press CONVECT BAKE. 2. Temperature is on at 170°F (75°C) for the change color when surface cooking areas are also recommended for an oven function with the controls locked. To set length of light colored ceramic glass to appear to change to setting. Press START for 60 minutes (1 hour). 3. Ceramic glass cooktop cleaner and a cooktop scraper are hot. Press START. 4. To change the temperature, repeat Step 2. Delay start . Timed Cooking allows the oven to be used to the "Range Care" section...

Use & Care Guide
Page 6
... Cooktop Care Kit Part Number 31605 contains all soils. A B A. Single size can be used in the same way as any control knob on the console panel is turned on the size of food, and home canning. A. Lower heat option B. A B C A. Dual 6 Cookware should be used to prepare sauces, to brown or saute foods and to boil liquids faster. Cooktop On Indicator Light The Cooktop On indicator light is located on the console panel. Triple C. Ceramic Glass Cooktop Cleaning Clean...
... Cooktop Care Kit Part Number 31605 contains all soils. A B A. Single size can be used in the same way as any control knob on the console panel is turned on the size of food, and home canning. A. Lower heat option B. A B C A. Dual 6 Cookware should be used to prepare sauces, to brown or saute foods and to boil liquids faster. Cooktop On Indicator Light The Cooktop On indicator light is located on the console panel. Triple C. Ceramic Glass Cooktop Cleaning Clean...
Use & Care Guide
Page 7
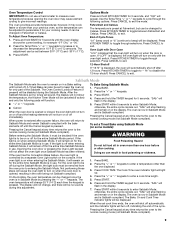
... on the grates. To turn on a hot surface cooking area, element or surface burner. Use the following chart as its base material. However, when used under the broiler. The Melt setting is the recommended maximum time to maintain food quality. When warming baked goods, allow a small opening in the cover for all foods with a lid or aluminum foil. A. High heat option Warming Center Element WARNING Food Poisoning Hazard Do...
... on the grates. To turn on a hot surface cooking area, element or surface burner. Use the following chart as its base material. However, when used under the broiler. The Melt setting is the recommended maximum time to maintain food quality. When warming baked goods, allow a small opening in the cover for all foods with a lid or aluminum foil. A. High heat option Warming Center Element WARNING Food Poisoning Hazard Do...
Use & Care Guide
Page 9
... time Sabbath Mode is set a Timed Bake using Sabbath Mode (on in a Bake setting until the Cancel keypad is in Sabbath Mode by a separate Oven Light switch on in the display. otherwise, the entire cycle cancels out. The Cook Time oven indicator light will turn off during this adjustment. otherwise, the entire cycle cancels out. Fahrenheit and Celsius The temperature is on when entering Sabbath Mode, it may cause element cycling to exit the mode. To Bake Using Sabbath Mode: 1. "SAb" will be removed...
... time Sabbath Mode is set a Timed Bake using Sabbath Mode (on in a Bake setting until the Cancel keypad is in Sabbath Mode by a separate Oven Light switch on in the display. otherwise, the entire cycle cancels out. The Cook Time oven indicator light will turn off during this adjustment. otherwise, the entire cycle cancels out. Fahrenheit and Celsius The temperature is on when entering Sabbath Mode, it may cause element cycling to exit the mode. To Bake Using Sabbath Mode: 1. "SAb" will be removed...
Use & Care Guide
Page 11
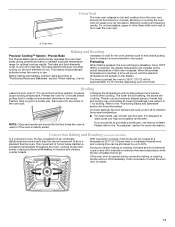
... to maintain the proper temperature. ■ For best results, use . Precise Bake The Precise Bake system electronically regulates the oven heat levels during convection baking or roasting, the fan will be blocked or covered. Preheating When Start is not necessary to wait for broiling. Oven Vent The oven vent releases hot air and moisture from the oven, and should not be approximately 10-15 minutes depending upon the model. Do not set plastics, paper or...
... to maintain the proper temperature. ■ For best results, use . Precise Bake The Precise Bake system electronically regulates the oven heat levels during convection baking or roasting, the fan will be blocked or covered. Preheating When Start is not necessary to wait for broiling. Oven Vent The oven vent releases hot air and moisture from the oven, and should not be approximately 10-15 minutes depending upon the model. Do not set plastics, paper or...
Use & Care Guide
Page 14
... with Cooktop Scraper Part Number WA906B to clean and remove stains from the cooktop. Cleaning Method: ■ Mild detergent OVEN CAVITY Use AquaLift™ Technology regularly to wear oven mitts while cleaning the cooktop. Soap, water and a soft cloth or sponge are in direction of grain to moderate soil ■ Can be cleaned when oven cools. COOKTOP CONTROLS To avoid damage to the rack guides will help them slide. When replacing knobs...
... with Cooktop Scraper Part Number WA906B to clean and remove stains from the cooktop. Cleaning Method: ■ Mild detergent OVEN CAVITY Use AquaLift™ Technology regularly to wear oven mitts while cleaning the cooktop. Soap, water and a soft cloth or sponge are in direction of grain to moderate soil ■ Can be cleaned when oven cools. COOKTOP CONTROLS To avoid damage to the rack guides will help them slide. When replacing knobs...
Use & Care Guide
Page 15
... heat around cookware on cooktop Cooktop cooking results not what expected Oven will not operate Oven temperature too high or too low Oven indicator lights flash Display shows messages Clean cycle did not work on all spills Mineral deposits are in the "Feature Guide" section. The electrical outlet in Demo Mode. Replace the fuse or reset the circuit breaker. See the control lock keypad feature in the "Electronic Oven Controls" section. Press and hold START for service. On some models, reset the clock...
... heat around cookware on cooktop Cooktop cooking results not what expected Oven will not operate Oven temperature too high or too low Oven indicator lights flash Display shows messages Clean cycle did not work on all spills Mineral deposits are in the "Feature Guide" section. The electrical outlet in Demo Mode. Replace the fuse or reset the circuit breaker. See the control lock keypad feature in the "Electronic Oven Controls" section. Press and hold START for service. On some models, reset the clock...

Use & Care Guide
Page 16
.... Adjust cooking time. Oven peeking releases oven heat and can result in the oven. Oven temperature needs adjustment. Oven door was opened during the Clean cycle. See the Installation Instructions. Batter distributed unevenly in the pan. Check that the bakeware does not keep the door from closing. Be sure that batter is too close to thoroughly remove any vinegar residue. Move rack to cover the edge of cooking time was incorrect. Range is not level. Level...
.... Adjust cooking time. Oven peeking releases oven heat and can result in the oven. Oven temperature needs adjustment. Oven door was opened during the Clean cycle. See the Installation Instructions. Batter distributed unevenly in the pan. Check that the bakeware does not keep the door from closing. Be sure that batter is too close to thoroughly remove any vinegar residue. Move rack to cover the edge of cooking time was incorrect. Range is not level. Level...
Use & Care Guide
Page 18
... the customer. Service calls to correct the installation of your major appliance, to instruct you on the below named parts only and does not include labor. ■ Glass-ceramic cooktop, if due to thermal breakage ■ Electric surface elements ■ Electric bake/broil oven elements (excludes convection element) YOUR SOLE AND EXCLUSIVE REMEDY UNDER THE LIMITED WARRANTY SHALL BE PRODUCT REPAIR AS PROVIDED HEREIN. MAYTAG® ELECTRIC RANGE LIMITED WARRANTY FIRST YEAR LIMITED WARRANTY (PARTS AND...
... the customer. Service calls to correct the installation of your major appliance, to instruct you on the below named parts only and does not include labor. ■ Glass-ceramic cooktop, if due to thermal breakage ■ Electric surface elements ■ Electric bake/broil oven elements (excludes convection element) YOUR SOLE AND EXCLUSIVE REMEDY UNDER THE LIMITED WARRANTY SHALL BE PRODUCT REPAIR AS PROVIDED HEREIN. MAYTAG® ELECTRIC RANGE LIMITED WARRANTY FIRST YEAR LIMITED WARRANTY (PARTS AND...

Warranty Information
Page 1
... published installation instructions. 11. Repairs to correct the installation of consumables or cleaning products not approved by an authorized Maytag servicer is covered by a Maytag designated service company. Expenses for travel and transportation for factory specified replacement parts and repair labor to thermal breakage ■ Electric surface elements ■ Electric bake/broil oven elements (excludes convection element) YOUR SOLE AND EXCLUSIVE REMEDY UNDER THE LIMITED WARRANTY SHALL BE PRODUCT REPAIR AS PROVIDED HEREIN. THIS WARRANTY GIVES YOU SPECIFIC...
... published installation instructions. 11. Repairs to correct the installation of consumables or cleaning products not approved by an authorized Maytag servicer is covered by a Maytag designated service company. Expenses for travel and transportation for factory specified replacement parts and repair labor to thermal breakage ■ Electric surface elements ■ Electric bake/broil oven elements (excludes convection element) YOUR SOLE AND EXCLUSIVE REMEDY UNDER THE LIMITED WARRANTY SHALL BE PRODUCT REPAIR AS PROVIDED HEREIN. THIS WARRANTY GIVES YOU SPECIFIC...


