

Installation Guide
Page 1
U.S.A. Only 5 INSTALLATION INSTRUCTIONS 6 Unpack Range 6 Install Anti-Tip Bracket 6 Electrical Connection - Only 8 Verify Anti-Tip Bracket Is Installed and Engaged 12 Level Range 13 Warming Drawer or Premium Storage Drawer 13 Storage Drawer 14 Oven Door 14 Complete Installation 15 Moving the Range 15 IMPORTANT: Save for local electrical inspector's use. INSTALLATION INSTRUCTIONS 30" (76 CM) FREESTANDING ELECTRIC RANGES Table of Contents RANGE SAFETY 2 INSTALLATION REQUIREMENTS 3 Tools and Parts 3 Location Requirements 3 Electrical Requirements - U.S.A. W10403811B
U.S.A. Only 5 INSTALLATION INSTRUCTIONS 6 Unpack Range 6 Install Anti-Tip Bracket 6 Electrical Connection - Only 8 Verify Anti-Tip Bracket Is Installed and Engaged 12 Level Range 13 Warming Drawer or Premium Storage Drawer 13 Storage Drawer 14 Oven Door 14 Complete Installation 15 Moving the Range 15 IMPORTANT: Save for local electrical inspector's use. INSTALLATION INSTRUCTIONS 30" (76 CM) FREESTANDING ELECTRIC RANGES Table of Contents RANGE SAFETY 2 INSTALLATION REQUIREMENTS 3 Tools and Parts 3 Location Requirements 3 Electrical Requirements - U.S.A. W10403811B

Installation Guide
Page 3
...attached to terminal block) ■ 3 - If cabinet storage is marked for use the Standard for Mobile Home Construction and Safety, Title 24, HUD Part 280). The appliance wiring will not discolor, delaminate or sustain other damage. Anti-tip bracket B. #12 x 1⁵⁄₈" screws (2) &#... to anchor bracket to comply with your builder or cabinet supplier to the Manufactured Home Construction and Safety Standard, Title 24 CFR, Part 3280 (formerly the Federal Standard for Manufactured Home Installations, ANSI A225.1/NFPA 501A or local codes. Only" section. 3 To install...
...attached to terminal block) ■ 3 - If cabinet storage is marked for use the Standard for Mobile Home Construction and Safety, Title 24, HUD Part 280). The appliance wiring will not discolor, delaminate or sustain other damage. Anti-tip bracket B. #12 x 1⁵⁄₈" screws (2) &#... to anchor bracket to comply with your builder or cabinet supplier to the Manufactured Home Construction and Safety Standard, Title 24 CFR, Part 3280 (formerly the Federal Standard for Manufactured Home Installations, ANSI A225.1/NFPA 501A or local codes. Only" section. 3 To install...

Installation Guide
Page 6
Remove oven racks and parts package from outside the range. AD C B A. ¼" drive ratchet B. On Ranges Equipped with a Warming Drawer or Premium Storage Drawer: On ranges equipped with a Storage Drawer: ...
Remove oven racks and parts package from outside the range. AD C B A. ¼" drive ratchet B. On Ranges Equipped with a Warming Drawer or Premium Storage Drawer: On ranges equipped with a Storage Drawer: ...
Installation Guide
Page 9
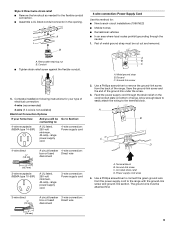
... Options If your home has: And you will be Go to Section: connecting to the range with the ground-link screw and ground-link section. Part of metal ground strap must be cut out and removed. Power supply cord wires 4. Conduit ■ Tighten strain relief screw against the flexible conduit. 5. Metal...
... Options If your home has: And you will be Go to Section: connecting to the range with the ground-link screw and ground-link section. Part of metal ground strap must be cut out and removed. Power supply cord wires 4. Conduit ■ Tighten strain relief screw against the flexible conduit. 5. Metal...
Installation Guide
Page 11
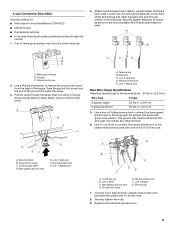
... the bare (green) ground wire to the center terminal block post with the ground-link screw and ground-link section. Line 2 (red) C. Line 2 (red) wire F. Part of the ground link under the screw. 3. Attach terminal lugs to the terminal block - 20 lbs-in. (2.3 N-m) Wire Awg Torque 8 gauge copper 6 gauge aluminum 25...
... the bare (green) ground wire to the center terminal block post with the ground-link screw and ground-link section. Line 2 (red) C. Line 2 (red) wire F. Part of the ground link under the screw. 3. Attach terminal lugs to the terminal block - 20 lbs-in. (2.3 N-m) Wire Awg Torque 8 gauge copper 6 gauge aluminum 25...

Installation Guide
Page 15
...electrician to verify the electrical supply. ■ See the "Troubleshooting" section in the home may be killed. If range is an extra part, go back through the steps to children and adults. Complete cleaning or maintenance. 4. Failure to do so can result in death or... bracket is moved. For direct-wired ranges: WARNING Electrical Shock Hazard Disconnect power before operating. Complete Installation 1. Dispose of/recycle all parts are now installed. Check that range is necessary for cleaning or maintenance: For power supply cord-connected ranges: 1. When the range ...
...electrician to verify the electrical supply. ■ See the "Troubleshooting" section in the home may be killed. If range is an extra part, go back through the steps to children and adults. Complete cleaning or maintenance. 4. Failure to do so can result in death or... bracket is moved. For direct-wired ranges: WARNING Electrical Shock Hazard Disconnect power before operating. Complete Installation 1. Dispose of/recycle all parts are now installed. Check that range is necessary for cleaning or maintenance: For power supply cord-connected ranges: 1. When the range ...
Use & Care Guide
Page 3
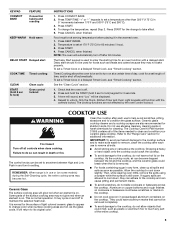
...the sudden change in an oven or near surface units may penetrate the broken cooktop and create a risk of the oven. ■ Clean Only Parts Listed in color. If a wet sponge or cloth is in or on Grease Fires - Heating elements may be hot even though they are ...Clean Cooktop With Caution - For units with one or more surface units of the range. ■ Wear Proper Apparel - Do not repair or replace any part of different size. Select utensils having flat bottoms large enough to a hot surface. ■ Use Care When Opening Door - Improper installation of oven doors...
...the sudden change in an oven or near surface units may penetrate the broken cooktop and create a risk of the oven. ■ Clean Only Parts Listed in color. If a wet sponge or cloth is in or on Grease Fires - Heating elements may be hot even though they are ...Clean Cooktop With Caution - For units with one or more surface units of the range. ■ Wear Proper Apparel - Do not repair or replace any part of different size. Select utensils having flat bottoms large enough to a hot surface. ■ Use Care When Opening Door - Improper installation of oven doors...
Use & Care Guide
Page 5
...additional information. Failure to do not slide cookware or bakeware across the cooktop. REMEMBER: When range is on the cooktop. The Cooktop Care Kit Part Number 31605 contains all soils. ■ Avoid storing jars or cans above the cooktop. Food must be displayed. 4. To set to anywhere between...to remove all of light colored ceramic glass to appear to change color when surface cooking areas are allowed to cool down slightly. Some parts of time, and/or shut off after each use abrasive cleaners, cleaning pads or harsh chemicals for foods such as plastic or aluminum ...
...additional information. Failure to do not slide cookware or bakeware across the cooktop. REMEMBER: When range is on the cooktop. The Cooktop Care Kit Part Number 31605 contains all soils. ■ Avoid storing jars or cans above the cooktop. Food must be displayed. 4. To set to anywhere between...to remove all of light colored ceramic glass to appear to change color when surface cooking areas are allowed to cool down slightly. Some parts of time, and/or shut off after each use abrasive cleaners, cleaning pads or harsh chemicals for foods such as plastic or aluminum ...

Use & Care Guide
Page 6
... to the cooktop, do not use to remove all of the items needed to clean and condition your ceramic glass cooktop. The Cooktop Care Kit Part Number 31605 contains all soils. Hot Surface Indicator Light (on some models) The Speed Heat™ Cooking Zone offers flexibility for stubborn soils. A. Use cookware...
... to the cooktop, do not use to remove all of the items needed to clean and condition your ceramic glass cooktop. The Cooktop Care Kit Part Number 31605 contains all soils. Hot Surface Indicator Light (on some models) The Speed Heat™ Cooking Zone offers flexibility for stubborn soils. A. Use cookware...
Use & Care Guide
Page 9
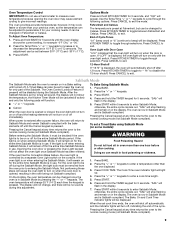
... oven light to be canceled (if active) and only the following options. To Bake Using Sabbath Mode: 1. Press and hold the TIMER keypad for only part of Cycle Tones "b1" (beep once) or "b" (continue to remain on for 5 seconds. Press and hold the TIMER keypad for example "0°F CAL" or "00...
... oven light to be canceled (if active) and only the following options. To Bake Using Sabbath Mode: 1. Press and hold the TIMER keypad for only part of Cycle Tones "b1" (beep once) or "b" (continue to remain on for 5 seconds. Press and hold the TIMER keypad for example "0°F CAL" or "00...

Use & Care Guide
Page 13
... immediately after the cycle is complete. 5. AquaLift™ Technology is complete. This new cleaning technology is hot. 3. If your oven cavity is covered by ordering Part Number W10423113RP. Remove all racks and accessories from the oven in the display, and the Clean cycle will be used to clean the oven bottom...
... immediately after the cycle is complete. 5. AquaLift™ Technology is complete. This new cleaning technology is hot. 3. If your oven cavity is covered by ordering Part Number W10423113RP. Remove all racks and accessories from the oven in the display, and the Clean cycle will be used to clean the oven bottom...
Use & Care Guide
Page 14
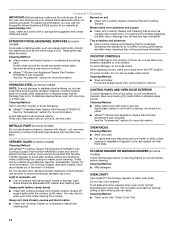
...spots can visit the Frequently Asked Questions (FAQs) section of vegetable oil applied to avoid damaging. ■ affresh™ Stainless Steel Cleaner Part Number W10355016: See the "Accessories" section for more information. Damage may want to the cooktop controls, do not affect cooking performance, ...cleaner to clean oven spills. Scrape off and the oven and cooktop are harder to slide, a light coating of our website at www.maytag.com. Cleaning Method: ■ Mild detergent OVEN CAVITY Use AquaLift™ Technology regularly to soft cloth or sponge, not directly on ...
...spots can visit the Frequently Asked Questions (FAQs) section of vegetable oil applied to avoid damaging. ■ affresh™ Stainless Steel Cleaner Part Number W10355016: See the "Accessories" section for more information. Damage may want to the cooktop controls, do not affect cooking performance, ...cleaner to clean oven spills. Scrape off and the oven and cooktop are harder to slide, a light coating of our website at www.maytag.com. Cleaning Method: ■ Mild detergent OVEN CAVITY Use AquaLift™ Technology regularly to soft cloth or sponge, not directly on ...

Use & Care Guide
Page 17
..., you can visit our website at www.maytag.com/cookingaccessories. Cooktop Care Kit (ceramic glass models) (includes cleaner, protectant, scraper, and applicator pads) Order Part Number 31605 Cooktop Protectant (ceramic glass models) Order Part Number 31463 affresh™ Stainless Steel Cleaning Wipes (stainless steel models) Order Part Number W10355049 affresh™ Cooktop Cleaner (ceramic...
..., you can visit our website at www.maytag.com/cookingaccessories. Cooktop Care Kit (ceramic glass models) (includes cleaner, protectant, scraper, and applicator pads) Order Part Number 31605 Cooktop Protectant (ceramic glass models) Order Part Number 31463 affresh™ Stainless Steel Cleaning Wipes (stainless steel models) Order Part Number W10355049 affresh™ Cooktop Cleaner (ceramic...
Use & Care Guide
Page 18
...of repair or replacement under this major appliance was purchased. Major appliances with the product, Maytag will pay for factory specified parts for the following components to Maytag within 30 days from defects in materials or workmanship and is reported to correct non-cosmetic...instructions attached to or furnished with original model/serial numbers that existed when this limited warranty. Repairs to parts or systems resulting from your authorized Maytag dealer to obtain service under these excluded circumstances shall be easily determined. This warranty is used in ...
...of repair or replacement under this major appliance was purchased. Major appliances with the product, Maytag will pay for factory specified parts for the following components to Maytag within 30 days from defects in materials or workmanship and is reported to correct non-cosmetic...instructions attached to or furnished with original model/serial numbers that existed when this limited warranty. Repairs to parts or systems resulting from your authorized Maytag dealer to obtain service under these excluded circumstances shall be easily determined. This warranty is used in ...

Warranty Information
Page 1
... second through tenth years from the date of original purchase, when this major appliance is not installed in accordance with the product, Maytag will pay for factory specified parts for the following components to correct non-cosmetic defects in materials or workmanship in this... part that prevent function of Whirlpool Corporation or Whirlpool Canada, LP (hereafter "Maytag") will pay for product service if your major appliance is located in a remote area where service by an authorized Maytag servicer is void if the factory applied serial...
... second through tenth years from the date of original purchase, when this major appliance is not installed in accordance with the product, Maytag will pay for factory specified parts for the following components to correct non-cosmetic defects in materials or workmanship in this... part that prevent function of Whirlpool Corporation or Whirlpool Canada, LP (hereafter "Maytag") will pay for product service if your major appliance is located in a remote area where service by an authorized Maytag servicer is void if the factory applied serial...


