Installation Guide
Page 1
W10403811C U.S.A. Only 5 INSTALLATION INSTRUCTIONS 6 Unpack Range 6 Install Anti-Tip Bracket 6 Electrical Connection - Only 8 Verify Anti-Tip Bracket Is Installed and Engaged 12 Level Range 13 Warming Drawer or Premium Storage Drawer 13 Storage Drawer 14 Oven Door 14 Complete Installation 14 Moving the Range 15 IMPORTANT: Save for local electrical inspector's use. U.S.A. INSTALLATION INSTRUCTIONS 30" (76 CM) FREESTANDING ELECTRIC RANGES Table of Contents RANGE SAFETY 2 INSTALLATION REQUIREMENTS 3 Tools and Parts 3 Location Requirements 3 Electrical Requirements -
W10403811C U.S.A. Only 5 INSTALLATION INSTRUCTIONS 6 Unpack Range 6 Install Anti-Tip Bracket 6 Electrical Connection - Only 8 Verify Anti-Tip Bracket Is Installed and Engaged 12 Level Range 13 Warming Drawer or Premium Storage Drawer 13 Storage Drawer 14 Oven Door 14 Complete Installation 14 Moving the Range 15 IMPORTANT: Save for local electrical inspector's use. U.S.A. INSTALLATION INSTRUCTIONS 30" (76 CM) FREESTANDING ELECTRIC RANGES Table of Contents RANGE SAFETY 2 INSTALLATION REQUIREMENTS 3 Tools and Parts 3 Location Requirements 3 Electrical Requirements -
Installation Guide
Page 3
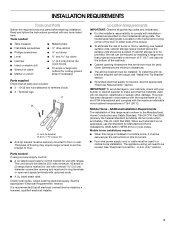
... ■ Four-wire power supply cord or cable must be securely mounted to comply with upturned ends. ■ A UL listed strain relief. Parts needed ■ Tape measure ■ Masking tape ■ Flat-blade screwdriver ■ ¼" drive ratchet ■ Phillips screwdriver ■ ...mm) drill bit (for wood floors) ■ Tin snips or large wire cutters (for Mobile Home Construction and Safety, Title 24, HUD Part 280). See the appropriate "Electrical Requirements" section. If cabinet storage is to terminal block) ■ 3 - Mobile home installations require: &#...
... ■ Four-wire power supply cord or cable must be securely mounted to comply with upturned ends. ■ A UL listed strain relief. Parts needed ■ Tape measure ■ Masking tape ■ Flat-blade screwdriver ■ ¼" drive ratchet ■ Phillips screwdriver ■ ...mm) drill bit (for wood floors) ■ Tin snips or large wire cutters (for Mobile Home Construction and Safety, Title 24, HUD Part 280). See the appropriate "Electrical Requirements" section. If cabinet storage is to terminal block) ■ 3 - Mobile home installations require: &#...
Installation Guide
Page 6
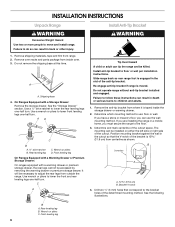
... of the anti-tip bracket. Position mounting bracket against the wall in the cutout so that correspond to children and adults. 1. Remove oven racks and parts package from where it is 12 31.9 cm) from centerline as shown. Front leveling leg On Ranges Equipped with a Warming Drawer or Premium Storage Drawer...
... of the anti-tip bracket. Position mounting bracket against the wall in the cutout so that correspond to children and adults. 1. Remove oven racks and parts package from where it is 12 31.9 cm) from centerline as shown. Front leveling leg On Ranges Equipped with a Warming Drawer or Premium Storage Drawer...
Installation Guide
Page 9
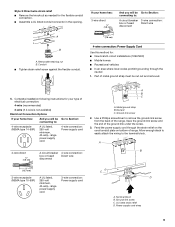
... C. Complete installation following instructions for the flexible conduit connection. ■ Assemble a UL listed conduit connector in the opening. Use a Phillips screwdriver to the terminal block. Part of the ground link under the screw. 3. Allow enough slack to easily attach the wiring to remove the ground-link screw from the back of...
... C. Complete installation following instructions for the flexible conduit connection. ■ Assemble a UL listed conduit connector in the opening. Use a Phillips screwdriver to the terminal block. Part of the ground link under the screw. 3. Allow enough slack to easily attach the wiring to remove the ground-link screw from the back of...
Installation Guide
Page 11
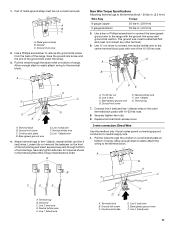
... relief on the front of the terminal lug and insert exposed wire end through the conduit on cord/conduit plate on bottom of the range. Part of metal ground strap must not contact any other terminal. 6. G A B F DE C A. 10-32 hex nut...
... relief on the front of the terminal lug and insert exposed wire end through the conduit on cord/conduit plate on bottom of the range. Part of metal ground strap must not contact any other terminal. 6. G A B F DE C A. 10-32 hex nut...
Installation Guide
Page 14
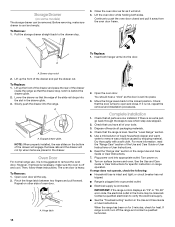
... plugged into the range. For more information, read the "Range Care" section of the drawer inside the range so that you have all parts are placed in the drawer. Turn power on surface burners and oven. or circuit breaker has not tripped. ■ Range is behind the...the way. 2. Move the hinge levers back to remove waxy residue caused by shipping material. Complete Installation 1. Check that the door is an extra part, go back through the steps to verify the electrical supply. ■ See the "Troubleshooting" section in the home may be removed. Plug power...
... plugged into the range. For more information, read the "Range Care" section of the drawer inside the range so that you have all parts are placed in the drawer. Turn power on surface burners and oven. or circuit breaker has not tripped. ■ Range is behind the...the way. 2. Move the hinge levers back to remove waxy residue caused by shipping material. Complete Installation 1. Check that the door is an extra part, go back through the steps to verify the electrical supply. ■ See the "Troubleshooting" section in the home may be removed. Plug power...
Installation Guide
Page 15
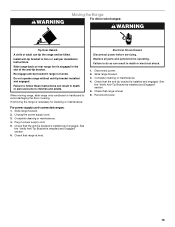
... to children and adults. When moving range, slide range onto cardboard or hardboard to do so can tip the range and be killed. Replace all parts and panels before servicing.
... to children and adults. When moving range, slide range onto cardboard or hardboard to do so can tip the range and be killed. Replace all parts and panels before servicing.

Use & Care Guide
Page 3
... Utensil Handles Should Be Turned Inward and Not Extend Over Adjacent Surface Units - No commercial oven cleaner or oven liner protective coating of any part of the range unless specifically recommended in ignition of a utensil should be positioned so that may cause container to a qualified technician. ■... steam. For units with the utensil, the handle of clothing. SAVE THESE INSTRUCTIONS 3 Be sure the range is used in or around any part of oven doors. Absence of these openings, oven doors, and windows of the range. ■ Wear Proper Apparel - If rack must be...
... Utensil Handles Should Be Turned Inward and Not Extend Over Adjacent Surface Units - No commercial oven cleaner or oven liner protective coating of any part of the range unless specifically recommended in ignition of a utensil should be positioned so that may cause container to a qualified technician. ■... steam. For units with the utensil, the handle of clothing. SAVE THESE INSTRUCTIONS 3 Be sure the range is used in or around any part of oven doors. Absence of these openings, oven doors, and windows of the range. ■ Wear Proper Apparel - If rack must be...

Use & Care Guide
Page 5
...not leave a hot lid on the cooktop. Do not use to remove all of the surface cooking area may cycle on . The Cooktop Care Kit Part Number 31605 contains all soils. ■ Avoid storing jars or cans above the cooktop. Dropping a heavy or hard object onto the cooktop could leave ...avoid damage to the cooktop, do not use the cooktop as possible. NOTE: The oven will be displayed. 4. The Delay Start keypad is in any part of light colored ceramic glass to appear to change color when surface cooking areas are allowed to cool down slightly. Ceramic glass cooktop cleaner and...
...not leave a hot lid on the cooktop. Do not use to remove all of the surface cooking area may cycle on . The Cooktop Care Kit Part Number 31605 contains all soils. ■ Avoid storing jars or cans above the cooktop. Dropping a heavy or hard object onto the cooktop could leave ...avoid damage to the cooktop, do not use the cooktop as possible. NOTE: The oven will be displayed. 4. The Delay Start keypad is in any part of light colored ceramic glass to appear to change color when surface cooking areas are allowed to cool down slightly. Ceramic glass cooktop cleaner and...

Use & Care Guide
Page 6
... to touch, even after each use to help avoid scratches, pitting, abrasions and to remove all of food, and home canning. The Cooktop Care Kit Part Number 31605 contains all soils. The hot surface indicator light will glow. The dual and triple sizes combine single, dual and outer elements and are...
... to touch, even after each use to help avoid scratches, pitting, abrasions and to remove all of food, and home canning. The Cooktop Care Kit Part Number 31605 contains all soils. The hot surface indicator light will glow. The dual and triple sizes combine single, dual and outer elements and are...

Use & Care Guide
Page 9
... immediately. When the set cook time ends, the oven will shut off automatically and the indicator lights will automatically turn on or off for only part of the cycle. Press COOK TIME. The oven is now in use. To set a Timed Bake using Sabbath Mode (on for the entire time Sabbath...
... immediately. When the set cook time ends, the oven will shut off automatically and the indicator lights will automatically turn on or off for only part of the cycle. Press COOK TIME. The oven is now in use. To set a Timed Bake using Sabbath Mode (on for the entire time Sabbath...
Use & Care Guide
Page 12
... stubborn soils. Additional Clean cycles may leave mineral deposits on spills from the oven in the oven after the Clean cycle is covered by ordering Part Number W10423113RP. See the "Accessories" section for cleaning and cool down . A beep will not be run to release baked-on the oven bottom. ■ Before...
... stubborn soils. Additional Clean cycles may leave mineral deposits on spills from the oven in the oven after the Clean cycle is covered by ordering Part Number W10423113RP. See the "Accessories" section for cleaning and cool down . A beep will not be run to release baked-on the oven bottom. ■ Before...
Use & Care Guide
Page 13
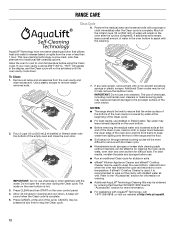
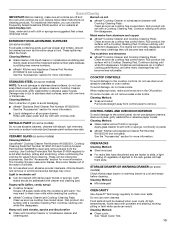
.... Metal marks from the cooktop. OVEN CAVITY Use AquaLift® Technology regularly to slide, a light coating of our website at www.maytag.com. Rub product into soil with porcelain and staining, etching, pitting or faint white spots can result. Soap, water and a soft...because scrubbing may occur. CONTROL PANEL AND OVEN DOOR EXTERIOR To avoid damage to avoid damaging. ■ affresh® Stainless Steel Cleaner Part Number W10355016: See the "Accessories" section for more information. The Cooktop Scraper uses razor blades. For additional information, you can be ...
.... Metal marks from the cooktop. OVEN CAVITY Use AquaLift® Technology regularly to slide, a light coating of our website at www.maytag.com. Rub product into soil with porcelain and staining, etching, pitting or faint white spots can result. Soap, water and a soft...because scrubbing may occur. CONTROL PANEL AND OVEN DOOR EXTERIOR To avoid damage to avoid damaging. ■ affresh® Stainless Steel Cleaner Part Number W10355016: See the "Accessories" section for more information. The Cooktop Scraper uses razor blades. For additional information, you can be ...

Use & Care Guide
Page 16
... Pan Cleaner Order Part Number 31617A Gourmet Griddle Order Part Number 4396096RB Standard Flat Oven Rack Order Part Number W10179196 Split Oven Rack Order Part Number W10205524 Max Capacity Oven Rack Order Part Number W10289145 Porcelain Broiler Pan and Grid Order Part Number 4396923 Premium Broil Pan and Roasting Rack Order Part Number W10123240 www.maytag.com/broilerpan...
... Pan Cleaner Order Part Number 31617A Gourmet Griddle Order Part Number 4396096RB Standard Flat Oven Rack Order Part Number W10179196 Split Oven Rack Order Part Number W10205524 Max Capacity Oven Rack Order Part Number W10289145 Porcelain Broiler Pan and Grid Order Part Number 4396923 Premium Broil Pan and Roasting Rack Order Part Number W10123240 www.maytag.com/broilerpan...
Use & Care Guide
Page 17
... and workmanship and is used in the country in these limitations and exclusions may have other damage to or furnished with the product, Maytag will pay for factory specified parts for the following information available when you call the Customer eXperience Center: ■ Name, address and telephone number ■ Model number and...
... and workmanship and is used in the country in these limitations and exclusions may have other damage to or furnished with the product, Maytag will pay for factory specified parts for the following information available when you call the Customer eXperience Center: ■ Name, address and telephone number ■ Model number and...
Warranty Information
Page 1
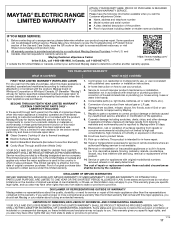
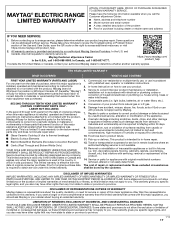
...REPAIR AS PROVIDED HEREIN. Removal or reinstallation of God or use with the product, Maytag will pay for factory specified parts for warranty service to access additional resources, or visit https://www.maytag.com/product_help. 2. LIMITATION OF REMEDIES; Some states and provinces do not allow the...high salt concentrations, high moisture or humidity or exposure to you also may have the following components to Maytag within 30 days. 9. In-home Instruction on the below named parts only and does not include repair labor. ■ Glass-Ceramic Cooktop (if due to product failure....
...REPAIR AS PROVIDED HEREIN. Removal or reinstallation of God or use with the product, Maytag will pay for factory specified parts for warranty service to access additional resources, or visit https://www.maytag.com/product_help. 2. LIMITATION OF REMEDIES; Some states and provinces do not allow the...high salt concentrations, high moisture or humidity or exposure to you also may have the following components to Maytag within 30 days. 9. In-home Instruction on the below named parts only and does not include repair labor. ■ Glass-Ceramic Cooktop (if due to product failure....


